Does the 30w Jean Hiraga Power Supply need an input choke coil

Since I don't see myself hauling batteries to get an A class amplifier playing I was wondering about a PSU for the Hiraga monster.
I've seen them without input chokes and with. I believe the Lundahl 2733 was mentioned, also the 159ZG Hammond. This came about in an older thread but since I'm a beginner the discussion was a bit all over making it very hard to follow. From what I read the input choke is the better option for this amplifier since it can deliver large amount of current very fast. So maybe someone could shed some light on this and maybe a schematic. I think the discussion was also in l'audiophile magzine about the PSU for the 20W and they somehow changed it to have a choke in it but I couldn't find it for the life of me.

HYS3C210-CS Switch Mode Power supply

Good day ! I have been working on a Monster Clarity HD1 multimedia speaker which has this HYS3C210-CS smps. Its is a very good monitor speaker but suddenly stopped. I found 2 diodes Sb260 and Sb160 shorted. I replaced them but still it is not working. At the back of the board as I believed is a driver chip and a ceramic capacitor encircled with red which are defective as shown on the photos. Can anyone share me the number and value of this SMD parts? I would appreciate much if somebody can also share me the schematic diagram of this SMPS. Thank you in advance bro. More power!
HYS3C210-CS Power supply.jpgHYS3C210-Cs power supply2.jpg

Fender 83 P bass special active preamp

Hi there, I recently got an old preamp that came out of a P bass special from 1983. I placed it into a 5 string bass that I built and it sounds good and very quiet. I used Seymour Duncan quarter pounder Jazz bass pickups which are much hotter than the original P bass pickups from Fender. The only problem that I have is that it has got a boomy bass sound. Obviously the preamp was designed for a four string bass and not for a five string bass. Now, I can help myself with a soldering iron. but I am not an electronic expert by any means. I have got a copy of the schematic of the preamp and would like some help from you guys. I'm sure there's a way to change one or two components to reduce the gain of the bass frequency, maybe smaller caps or resistors but you guys must tell me which. Any help would be appreciated. Thanx.
Screenshot 2024-08-06 111109.png

Help with a rear-firing tweeter

Hello everyone,

I want to add an ambient rear-firing dome tweeter to a pair of 3-way speakers to observe the effects.
The system is powered by a Hypex FA253. I will use the 100W inbuilt tweeter amplifier to power both the front-firing LT3.2 Planar ribbon plus the new rear-firing ND16FA6 dome.

I am aware that the filters and slopes (DSP) for the front tweeter will inherently be applied to this ambient tweeter (being connected to the same processing). However, I intend only to use the rear-firing dome from ~8Khz and up (I am after ambience / highest octaves only). I might add a 3.3 µF cap for a 1st order roll-off at 8000hz to the ND16FA6?

What are your thoughts on this? I would appreciate any help on how to wire this up; I want to ensure the load to the amp is stable, the impendence stays happy etc.

Thank you kindly.

Vance

Hello, here to learn and have some amps to build

Hi all, I am here as I had a work friend who was a very keen DIY audio guy and was building some of the Nelson Pass Burning Amps when he got sick and was unable to continue due to physical ill health. I helped with the builds while he provided direction and brain power. Unfortunately he died before we could finish, I got the two chassis assembled and PSUs built and tested and we were waiting on a few parts, but his illness progressed very fast.

Anyway in his memory I want to finish what we started albeit in slightly altered and reduced form (was originally planned on balanced mono-blocks with a lot of FETs). I have a background in electronics as used to be a tech decades ago, but not anything to do amplifiers, however have been reading lots on this forum and learning a lot - didn't know what a Class A amp was, or terms such as mono-block or gain stage or anything much else a few months ago, this site is a terrific resource!

Thanks

  • Locked
For Sale 3e Audio TPA3251/55 & PSU in the bin 2024-08-28 AU time

Price drop
AMP Balanced/unbalanced TPA3251 & TPA3255 AUD45.00
PSU AUD30.00. Family and friend PayPal

Yes I will post anywhere AuPost delivers and yes I will charge insurance and the cost of the box and there are no returns.

Photos for illustrative purposes.

I have sold some, so check out what I have left.

If I get no response by 12:00 Central Australian time on 2024-08-28 they go in the bin. I have had enough and I really do not care.

Attachments

  • 333-125-279-929-01.jpg
    333-125-279-929-01.jpg
    192.1 KB · Views: 56
  • 200W 36V-6A Quasi-Resonant PSU For TPA3251-002.jpg
    200W 36V-6A Quasi-Resonant PSU For TPA3251-002.jpg
    258.2 KB · Views: 57
  • Like
Reactions: elb

Bottle of water incident - dead amplifier - Transistors replacement!

Hi , sadly I accidentally spilled a bottle of water ( was on the desk , right next to the amplifier , yes , very good place to keep it ..... ) went into my Amplifier ( music was playing. suddenly died ). It went on the amplifier section. ( output transistors, heatsink. )
I cleaned it , let it dry.
amp does not turn on , power transformer seems ok ( 4 ohm 14 Henry ). Fuse is ok, maybe something else , not even stand by led works.
Measured power transistors show a few ohms, so most likely they might be blown. Until I take it apart and measure.

Output transistors are 2sc3182n / 2sa1265n . Only place I found them , and I have my doubts they are original and not fake.
https://www.adelaida.ro/2sc3182n.html
https://www.adelaida.ro/2sa1265-si-p-140v-10a.html
Bought components from this website before, they were genuine.

*Question is , for testing I think I can use 2sc4468 / 2sa1695.
What better alternatives are ( to use permanently ) instead of the original 2sc3182n / 2sa1265n .
Would 2sc4468 / 2sa1695 work ? they are 20mhz instead of 30, same Ic , power.
250p instead of 220p .
Slightly different Collector-emitter saturation voltage , Collector cut-off current , Emitter cut-off current . Specs I don't really understand.
Datasheets:
2sc3182n
2sc4468

I hope the pre drivers and drivers 2sc3298 / 2sa1306 are alive. Tho I found them too
https://www.adelaida.ro/2sc3298y.html
https://www.adelaida.ro/2sa1306-si-n-160v-1.5a-pioneer.html


* Amplifier is my beloved Pioneer A702r
Service manual down here in attachements.

Weird that no water went on the power supply side. amp just turned off ( died ) won't turn on , not even in stand by at all.
I know water and electronics aren't friends, but tap water , no salt, could cause that much damage !?.
Amp was running pretty high volume, hot ( 27 degrees celsius ambiet temp , yea it's pretty hot here in the summer ) . Temps were around 50c.

So I think I need to take it apart, test the stand by, main transformers separately. Check the output transistors, drivers, pre drivers... etc.
**** I just checked quickly the cable that goes from the main transformer to the amplifier power section +- 55v dc , unplugged, on the amp side it shows 0.5ohm so yea, something is fried.

- " same amp " slightly less power ( a602r ) uses 2sc3281 / 2sa1302 only 4 transistors , two per channel. here on a702r are 8 transistors, 4 per channel but 2sc3182/2sa1265.
are MJL3281A / MJL1302A some kind of replacements for 2sc3281 / 2sa1302 ?. What if I use MJL3281A / MJL1302A instead of the 2sc3182/2sa1265.

- Bruno.

Attachments

Hiya…Here for some help with one quiet output on a Sharp DX200 CD player

Hi everybody. I’m here cuz I just bought a cd player, Sharp DX 200, for 5 bucks and one output is really quiet. Everything else seems to work. I’ve tested and ruled out the other components of my system and am certain that the fault is with the player itself. I have another cd player that works fine when hooked up. I resoldered the output Jack, then I replaced it. No change. The left output is good. The right is barely audible. I can’t find the schematics, and even if I had them, I’m not that great at reading them. I suspect it might be a simple repair. I already have a working cd player but want to do this as a fun/learning project. Looking for some help. Thanks in advance!

Fake STK3152/STK3102

As an owner of a Marantz PM80SE, it has given me the usual grief of a failing STK3102, twice.

Thanks to this forum, I quickly found it to be the culprit when it first statrted acting up in 2004. And then it started all over again in 2011.
Not wanting to replace the module I again, I thought about making a discrete replacement based on the VAS of PM8000, which looked like it should work without too much headaches. But I stashed the amp in the attick instead and never made an attempt.

After some work on my brothers PM7200KI, I thought to have another go again.

Powered it up and sure enough, the output relays refused to engage.
A quick measurement on the headphone voltage divider near the red reed relay at the back of the power amp board confirmed the left output going close to a voltage rail.
Took out the STK3102 (or so I thought) and powered it up again, no more DC.

Since the replacement STK-module that I bought in 2004 was no longer functioning properly, I popped the plastic cover and found that it was a fake. Finding only SOT23 transistors and some 0805 resistors, I was a bit surprised. Okay, in a VAS it worked for about 6 years, but aren't these things supposed to be able to drive 8 Ohm loads?

This is apparently the inside of an oriniginal:
stk3102_interieur.jpg


Whereas in my (supposedly) STK3152 replacement it looked like this:
An externally hosted image should be here but it was not working when we last tested it.


Front of the fake:
An externally hosted image should be here but it was not working when we last tested it.


Rear of the fake:
An externally hosted image should be here but it was not working when we last tested it.


No doubt many of you know about these replacements being fake, but I thought I'd share it anyway.

I do wonder, though, if I can repair this thing and stick it back in...
Hopefully these transistors aren't some Chinese knock-offs but generic transistors that I can find in a smd-codebook..

Help troubleshooting M2 clone

I have 2 M2 clones built with Tea Bags boards. I connected the first M2 I built which had been sitting unpowered for about one year and noticed a greatly diminished output from the left channel. Both Q1 and Q2 are heating up but I did notice that Q1 is running about 10F lower in temperature than the right channel which produces the correct output. I poked around on the board looking for a bad solder joint with no luck. I replaced the problem M2 with a second M2 and confirmed the issue is isolated to the left channel board. Power supply voltages are fine. The only thing that changed was I did remove the fender washers compressing Q1 and Q2 to verify the FETs make and model. Is it possible I damaged one of the FETs doing this? Any help isolating the problem is appreciated. Both of my amps have operated flawlessly since I built a few years ago.

Jim

suggestions for sub using 3015LF

Hi, I've tried to read through the posts on options for building a sub with the 3015LF driver, but I'm curious if I'm missing anything (I assume I am).
Designs that I'm considering are Cubo 15, Cubo Sub, SS15, and (maybe) THAM15 (not sure if the 315LF works in THAM15).
I have 4 of the drivers already in 4 40-year old TOA bass reflex cabs. I'm assuming there's some better cabs around now. The TOA cabs only go to 50 Hz. It'd be nice to get to 40. I use these primarily for small, free outdoor parties, playing everything from acoustic music to tekno.

WinPCD - Passive Crossover Designer for Windows

WinPCD - Passive Crossover Designer for Windows with Polar plots

An update is available for WinPCD, the Windows Passive Crossover Designer, a crossover program that originally emulated the PCD that was written for Excel. It still doesn't do all that the PCD does, but it has other enhancements and does not require Excel.

Prior to this release (v1.513) the user interface locked up when the polar calculations were being made. No windows could be opened or moved, even the polar window would accept no user input. There was a single thread.

With this release the user can now open, move or close windows to include the polar plot window. Controls that affect the calculations cannot be changed, however, because this would interfere with the polar plot calculations. The polar plot window can be closed prematurely and the settings will all reset to what they were before calling the polar plot.

While coding these changes I noticed that there was some error in the off-axis response. The farther off-axis the mic angle, the more error occurred in the calculations. That has been corrected and I think that the off-axis calculations are now accurate. Keep in mind, however, that the off-axis has two components, the change in delay from each driver due to different distance and the change in each driver due to the off-axis response change. The latter is a calculated change based on the basic assumption of a flat radiator. It's not accurate (and possibly worse than reality), but it provides a basic idea of the change with angle.

Dave


polar.gif

Full front hemisphere model in 5 degree rings with 5 degree intervals on each

horizonatal_off_axis.gif

Horizontal model from -90 to +90 degrees in 5 degree intervals

vertical_off_axis.gif

Vertical l model from -90 to +90 degrees in 5 degree intervals

Restoring a pair of Klipshorn speakers

Hello all,

I'm living in Richmond Hill, and hoping to dive deeper into my home audio set up.

The biggest part of my journey, a pair of Klipsh Klipshorns KC-BR (from the late 80s or early 90s) that I inherited from my father. Ever since I was a little child I was absolutely obsessed with them and in beyond happy that I now have them in my possession.

What I'm hoping to gain here is some info on how I can bring them back to glory (everything is original so I feel like many parts/wires maybe due for some upgrading), and also how I can integrate them with an appropriate set up. I have read on some other forums that there may be some kits that can be purchased to help do this, however I never got a working link to any. They are in pretty good shape physically, however I would want to update the mesh around them, as they have taken some hits after being moved from a few different houses over the years (some rips and degrading of material). The speakers are currently set up in my basement (in the corners of the room), but not connected to anything. So that's one of the big things for me is to make sure I get, or build, the correct things to paid with the system. Such as amps, equalizers, ect. If there's anyone local to the area that can help or give advice, I would be SO THANKFUL for that.

I used to think of myself as a little bit of an audiophile, but a quick read at the posts on here and I realize that there's a lot that I know nothing about.

The last thing I want to mention is that I would like to get the system integrated with some newer tools. I have a simple pioneer sb3 dj set paired with 5" JBL 305P Bookshelf Speakers. Unfortunately neither of them are being used at the moment, but the hope for me is that I'd be able to sometimes use the khorns to play some music when people come over using the sb3, and at other times to just use the bookshelf speakers with the sp3 when just messing around myself. I do have a small collection of older vinyls as well (maybe 300 or so albums/singles) and I would like to be able to play those on the khorns as well.

Thanks in advance

TH 15" flat response to 35Hz (-3dB) - By LORDSANSUI

SS15MOD - TH 15" flat response

Hello all,

Time to post some results, but before, I'd like to say thanks to all guys who have been supporting / teaching / encouraging me to learn more about TH design.

After some benchmark between lots of different cab I decided to choose TH one due to the large documentation available for design but also due to good results between simulation and real worlds.

The base design is the SS15 published by Jbell (He has one sheet build constrain, I'm not 😀 )

Single sheet TH challenge

or TH18 published by Xoc1 (designed for 18" drivers based on Danley's design TH118 that is also based on previous 15" design TH115)

TH-18 Flat to 35hz! (Xoc1's design)

They have the same base design in terms of fold.

Project targets:

Low frequency <40Hz for a single cab
High frequency > 100Hz
Volume < 300 L (reduced from 450L once my current T18 clone cab has 300L with 18” driver and I swapped from 18" to 15")
Single driver
SPL@1m > 98dB

I chose Brazilian driver Snake HPX2150 15” and I also forgot about 18” once I confirmed I could reach my target with 15” one with more compacted size.

Bellow you can find Thielle/Small parameters in comparison with SS15’s driver (Eminence) and also THAM15’s driver (B&C):

An externally hosted image should be here but it was not working when we last tested it.


The design was started using the image below to find the best targets for the cab.

An externally hosted image should be here but it was not working when we last tested it.


The S1 is a results of driver compression ratio (cone area dived by throat area).
Detail about the others parameters see here (credits to soho54):

Hornresp for Dum... hmm... Everyone 😉 - Page 2 - Home Theater Forum and Systems - HomeTheaterShack.com

Like a DOE (design of experiments) I covered the ranged bellow:

Compression ratio: 1:1 till 2,5:1
Note: I didn’t went higher once the driver isn’t stiff enough and the motor strength (BL^2/Re) isn’t that high too.
Horn Length: 250cm till 350cm
Horn expansion angle: 0 degree till 5 degree

The best option I found was:

Compression ratio 2:1
Horn Length: 260cm
Horn expansion angle: 3 degree

Hornresp parameter for base design.
S1: 440 L12: 20 S2: 493,68 L23: 100 S3: 760,92 L34: 120 S4: 1081,71 L45: 20 S5: 1134,75

The next step was to install Solidworks to build the cab thru automatic folding process using parametric sketch.

An externally hosted image should be here but it was not working when we last tested it.


In sequence I also implement an automatic unfolding process. This is very important to guarantee reliability on the hornresp simulation. I used soho54 method that is called “advanced centerline method”.

An externally hosted image should be here but it was not working when we last tested it.


Using parametric CAD software makes things easier when they are well implemented.

Next, I tryed to add the second horn expansion:

Horn expansion angle: from 3 degree till 24 degree.

An externally hosted image should be here but it was not working when we last tested it.

An externally hosted image should be here but it was not working when we last tested it.


The best results condifering 2nd expansion was: 6 degree and 12 degree

Here are my proposals:

Proposal A (HxDxW 762 x 630 x 550 = 264,5L)

An externally hosted image should be here but it was not working when we last tested it.


Proposal B (HxDxW 776 x 625 x 550 = 267,1L)

An externally hosted image should be here but it was not working when we last tested it.


Proposals A and B over righted @ 600W

An externally hosted image should be here but it was not working when we last tested it.


Which one would you guys pick up to build?

:cheers:

Measuring TS/impedance

Hello, greetings to all members here! I'm an electrical and sound engineer from Hungary.
My hobby is designing and building all kinds of analog audio electronics.

As a first topic, I'd like to learn more about the sensitivity measurements of the speakers.
Especially, the measurement method(s) for tweeters.
I've got a Dayton DATS V3 system, and I've tried to use it for woofers or for midrange speakers, with the added mass method. It's easy and working fine for me.
But unfortunately, this isn't suitable for the majority of the tweeters (especially for the more delicate silk or other soft-dome ones).
I've also tried to measure that via a test-box method with a known internal volume.
Unfortunately again, DATS always gives me an error-message, regarding to the volume of the test box (it's either too large, or too small at the other attempt, it's annoying and strange...).
I've also read somwhere here in the forum, that if the TS-parameters of the driver has been measured, then the WINISD for example can calculate the sensitivity somehow... Sadly, I don't know the exact formula, how to get that.
I've also read about the miking method, when you put a mesurement mic in front of the speaker (in axis, 1m away) and put 1W of output power (or 2,83V when the impedance is 8 ohms) to it, and measure the SPL with a calibrated chain... something like that...

So, my question is... what's the best way to do it, with adequate accuracy but in the simplest way...?

Hello! New Student and Sound Engineer

Hello all!

I'm a student currently at the end of their bachelors program in Music Technology and Audio Production. I also work professionally as a sound engineer.

I know a fair bit about electronics, acoustics and math already, but am by no means an expert. Live sound systems and their applications/variations are my current area of expertise (as far as that goes).

I've joined this forum as a way to learn more about speakers and their designs to serve as a reference for my journey to building my own set of speakers. I know there are kits available and while those seem like a lot of fun, and I will still probably build some along the way, my primary goal is to research and develop my own (maybe not very unique) speakers for my personal use.

I look forward to participating in and hopefully contributing to discussions on here! 🙂
  • Like
Reactions: krivium

  • Poll Poll
JL E6450

JL e6450

  • 2

    Votes: 1 100.0%
  • 1

    Votes: 1 100.0%

Hi every one
I have JL e6450 the number Q50(irfz44r) and Q49 (irfz44r) was barn i order some from AliExpress and change it but still same problem its going hot, with out connect the speaker.
as will the voltage when i reed it from the amp its give me 6.40V in the meter
any idea what is the issue
thank you for your help

E130L PP Power Amplifier

Hi All,

I'm just about to start a Push Pull Amp build using E130L Tubes, it will be a dual mono in one enclosure, output transformers are being custom built in Poland, input impedance 1.6k, phase splitters will be 6n6p's, grid v regs will be 0A2 gas tubes, the plan is for 50/60 watts into 4/8 ohms. This is my first Power Amp build, so any advice help on this would be appreciated. Everything I need is ordered, I've probably forgotten something.

Tube amps cost priorities

Hi everyone!

I've had several vitage tube amps and modified them but I'm not at the range of expertise to evaluate every aspect of them. Since SMPS are available (please disregard tha tin the discussion, I've got several analog and digital PS available), the major factor in cost is the output transformer. They are (compared to other transformers) very expensive, and I'm aware the saturation is a big issue, my question is, why not use regularily available ones? I have to admit, I am not aware what transformation values are exactly needed nor do I know about the typical inductance of sait OT.

Capable and reputable OT (~40-100W) come at 150-400€, but here's my question, if you can get 100V audio transformers for as low as 2,50€ (in bulk even cheaper), isn't it possible to buy a bunch of these and compensate for the current by parallel/serial connect them? Probably counter inductance by R-C or other circuits? I mean, for 400€ you could get ~160+ of them.
Please don't laugh about that, I'm often able to tell what's a problem in an amplifier circuit but regarding tubes I've got little practical experience in output transformers and what's really required or the 'usual range' of output transformers.

So my question is, (besides saturation), what's the problem of mass parallel/serial 70/100V transformers and why it isn't there any example on the net for it (or rebunking it) since it could shave the cost down to about 1/10s? I know, that it's probably looking at it very naively but I haven't found any reputable stance on it.

For Sale SEAS E0047-04 T29MF001 “MAGNUM” magnesium dome tweeter

I am selling Seas E0047-04 T29MF001 tweeters in perfect working order as they are still running.
After trying everything for me it is the best tweeter I have ever had, everything sounds good so it is easy to filter passively or active,
It took me a long time to get them since seas has not manufactured them for a few years.

Price €450+shipping

http://www.seas.no/index.php?option...&id=372:e0047-04-t29mf001&catid=25&Itemid=254


The T29MF001, “MAGNUM” is a 25mm magnesium dome tweeter with a patented Neodymium based magnet system. It is the tweeter of choice for those who seek extremely precise and realistic sound reproduction combined with a relatively low crossover frequency.

A unique HEXADYM patented magnet system based on 6 radially magnetized NdFeB magnet blocks. Efficient ventilation and damping of every potentially resonant cavity behind the dome, surround and voice coil. Moderate magnetic stray fields present no problems in AV installations.

A generously underhung voice coil ( + and - 0.5mm ) ensures low distortion even with low crossover frequencies.

An optimally shaped magnesium dome membrane which behaves like a piston throughout the audible frequency range and shows a controlled break up above it.

A homogenous, linear surround manufactured by SEAS from SONOMAX, a soft polymer material of high climatic stability.

Flexible lead-out wires which ensure a good connection between voice coil and terminals. This arrangement also helps to prevent lead breakage due to the large excursions encountered when low crossover frequencies are used.

Low viscosity magnetic fluid which provides excellent cooling while maintaining a low resonance frequency.

6,0 mm machined aluminium front plate with a moderate horn loading characteristic which ensures linear frequency response, and a stiff and stable connection to the cabinet.

A substantial injection-moulded rear chamber made from zink eliminates unwanted chamber wall resonances and conducts heat away from the magnet system.

Captura-de-pantalla-2023-07-30-123102.jpg

s-seas-excel-loudspeaker-tweeter-e0047-t29mf001.jpg


IMG-20230730-WA0011.jpg

IMG-20230730-WA0012.jpg

iiu-Ih7-PSmb-T9-Daw-WMIQibz-OS8ffljb81-SWp7-R3-Kovw0-plaintext-638263078522443266.jpg

p-Mv-Xp-Irv-FKVFXm72-B1m-EQd-OFqmp-Th-t-KIT2un42f-HEE-plaintext-638263078524327795.jpg

IK0-Hvmvx-D-65x-Uf-QN0-N0h1-g-BRd-Aq-VQQq-EFHj-J3-VUz-Q-plaintext-638263078508463225.jpg

Gv-Txz-BLCd-HL98t-Xsgy-OGW7m-OXV6u-UEa-Jwdvq-Un-LDd-Os-plaintext-638263078502032909.jpg

Hello!

Now that kids are nearly out of the house, I’ve had the opportunity to focus back on to my lowly home studio. In my college years, I always enjoyed the Parasound power amps designed by John Curl and a recent find at a used record store got me into rebuilding an old HCA1500a with some swollen caps. That amp is working great now and I’m back for more looking at rebuilding other malfunctioning gear I come across.

I’ve already read so much on diyaudio and know there’s so much more information out there for me to read. With an account now, the conversations can be two-way. 🙂

Ben

I'm looking to mod my NHT Power 2

Hello everyone. Years ago, I bought an NHT Power2 with two 500A modules powered by a third 500ASP module. I always wanted to add a 1000w power supply but never did. I just noticed that Icepower released a stand-alone 1000s module that I could use. Does anyone have any experience with them? I have opened the case before, and it seems like there is enough room to add the 1000S, use it to power both of the 500A modules and then create a 3rd channel using the 500ASP. Thoughts?

Krell KRC preamplifier info

Hi All,

I have Krell KRC preamplifier and try to find more technical information about it. I tried to find a service manual or some circuit but unsuccessfully. Does someone have more info about it. All capacitors has been replaced and it sounds great. The bad thing here is that the preamp cannot be switch off from the device, The only way is the turn off is from the power socket. I digged a little bit looking the board and found out there are two relayes which should be used for switch off/on the preamp but they are not used at the moment. That why I am looking for some circuit because I want to make it workable. They may be used when there is some issue with the device but who knows.

Any help will be usefull,
Thank you in advance.

Attachments

  • Screenshot_20240826_142445_Gallery.jpg
    Screenshot_20240826_142445_Gallery.jpg
    226.3 KB · Views: 151

Balanced microphone preamplifier with effect loop

Hello,

A few days ago a good friend of mine asked me for help. He wanted to utilize his guitar effect pedals with vocal microphone at stage.
After short research I found that off the shelf solutions (like Radial Voco-Loco for example) aren't so affordable, so I came with idea doing it DIY way.

Basically I wanted balanced XLR microphone input, single ended 6.3mm send/return and balanced XLR line level output.
Design assumptions:
- Lowest noise and distortion possible
- Gain range suitable for both dynamic and condenser microphones
- Switchable +48V Phantom power supply
- Universal and easy to use
- Reliable
- Compact, fitting inside Hammond 1590BB enclosure
- Rather simple and elegant circuit as I don't like to make things over-complicated
- Not too expensive

Later, after hearing friend's suggestions:
- Possibility to bypass effects with foot-switch
- Dry/Wet (blend) mix

Considering the following I decided to use ICs from THAT Corp. - 1510 as mic pre and 1646 as balanced line driver. Both could be substituted with slightly worse INA217 & DRV135 from Texas Instruments.

Dry/Wet mixing circuit is rather simple, virtual ground type.
I could have used one dual pot instead of two singles but that way gives more flexibility.
If I'm not mistaken now it is possible to use it as two channel mixer - using mic input and return jack as second channel.
Two inverting op amp stages are used so absolute polarity is preserved.
Only thing I'm not completely sure is if should I leave it as is with buffered pot or place pot in place of feedback resistor, getting more gain possibilities.
OPA1678 input bias current is extremely low so coupling cap isn't probably required.

Power supply design was definitely the hardest part of design process. More on this can be found at my another thread - https://www.diyaudio.com/forums/pow...-getting-15v-15v-48v-single-power-supply.html
Phantom power and grounding are really tricky matters. I had to did a lot of research in terms of proper grounding and "Pin 1 problem".
Some really helpful papers:
Ian Thompson-Bell - Mixer Grounding 101
Rane note 151 - Grounding and Shielding Audio Devices
Rane note 165 - Pin 1 Revisited

After a lot of thinking and with help of fellow forum users I finally decided that I gonna use external +48V SMPS and integrated DC/DC converter to +/- 15V.
My last concern if its ok to "tie" enclosure and signal grounds with LED and resistor when SW1 turns phantom off. Or maybe DPDT switch should be used?

There is a jumper, so I have a bit of flexibility with grounding. Depending on the results of measurements, I can tie grounds or leave them unconnected.
Most sources recommends tieing them in one point. But isolated DC/DC converters are pretty new thing, maybe they didn't been considered? Having completely floating supply sounds indeed interesting.

Schematics are attached to post. Now fun part begins - PCB layout 😀

Regards,
Miłosz

Attachments

  • MicPreFXLoop sch.PNG
    MicPreFXLoop sch.PNG
    217.2 KB · Views: 892

Allow me to introduce myself :)

I'm Tony Ferraro, and I'm excited to join the diyAudio community! I know a lot about recording and I know how to setup and use complicated professional audio equipment, but I know very little about circuit design as a whole. I can troubleshoot and fix most audio related gear, but would like to learn so much more. I want to understand how circuits are designed, how components work, why components are chosen for certain designs and how they affect the signal in a circuit. I want to be able to backwards engineer any circuit and be able to make a schematic on my own. Eventually, I want to design and fabricate circuits for custom audio projects.

22 years professional experience working as a recording/live sound engineer, record producer, drummer/musician, vinyl scratch DJ, etc. I've always had a passion for music and am always curious about how things work. I got much more interested in diy audio when I had $4000 microphone pre-amps and other gear in my studio would malfunction and needed service. I couldn't afford to pay or wait to get these things fixed. I slowly started to figure out how to do it myself. After a while, people started asking if I could fix their gear and made some decent cash doing it. To make a long story short, a large portion of my income comes from repairing, servicing and selling audio equipment. It's hard to say I actually know how electronics work, but I end up figuring out whats wrong and doing the repairs myself.

I think I have the unique ability to answer a lot of questions from a different, but very useful perspective. I am more than happy to share my knowledge and am glad I have somewhere to post questions and get help troubleshooting projects I'm working on.

About me about my background-

I started my career obtaining a degree in Recording and Engineering at Music Tech College of Music in St. Paul, MN. My professors noticed I had a good ear as I quickly earned a solid reputation for many established musicians in the Twin Cities music scene. I ended up spending 12 hrs a day at school, taking advantage of free studio time recording local musicians using world class recording gear.

I was fortunate to learn how to record music using the best equipment while I went to school, but soon after found myself struggling to make anything sound half-way decent, recording death metal bands in a drywall dungeon practice space where I had to battle sound bleed from multiple other bands and mixing on headphones using extremely primitive physical (large and heavy) DAWs and shitty microphones. 2003 was a terrible time for digital recordings. Everything sounded bad, everything took forever, nothing worked right and computers would crash a lot. I somehow had a reputation with respected national recording artists that had a high standard for quality.

I don't know if any of this info is useful to anyone else. I might add to this later...

High Efficiency Line Array

This is a speaker system that I completed earlier this year.

Goal: A line array with efficiency of about 100dB 1W/1M not weighing more than about 50 pounds and is not too large so that it can be easily set-up and stored. The speaker system is intended to be driven by a class D amp powered by a 12V rechargeable battery rated 12AH.

A. One horn tweeter and six 5.25 inch woofers. This is a two-way closed-box system with a crossover frequency of 2 kHz.

1. The width of the enclosure equals 7.75 inches. For this width and where Fstep equals the baffle step frequency,
Fstep = (4560 in./ 7.75 in.) = 588 Hz
Thus the tweeter functioning at freq. > 2 kHz has efficiency in its operating frequency range equal to its rated efficiency of 100 dB 1W/1M.

2. Efficiency of each of the six woofers is specified as 89 dB 1W/1M. As a result of driving the six woofers together,
efficiency gain = 10*Log(6) = 7.8 dB
(Thanks to James R. Griffin, PH.D for this equation)
Thus efficiency of the six woofers driven together equals 97 dB 1W/1M. -only 3 dB away from efficiency of the tweeter!

B. Line Array
1. Center-to-center spacing of the woofers mostly equals 6.5 inches. This means that the woofers can function as a line array for freq. < 2 kHz. This is given that wavelength at 2 kHz equals 6.5 inches. Two of the woofers and the tweeter are positioned on the baffle in the D'Appolito MTM arrangement.

2. For the line array, intensity decreases at 3 dB and 6 dB per doubling of distance for respectively near and far field reproduction. Where d equals the distance at which the transition from near to far field reproduction occurs or the critical distance,
d = 1.5*f*H^2 (Griffin)
where f= frequency in kHz and H is the height of the array in meters.

3. Listener distance from the array is made equal to 2 meters to facilitate the listener being in the near field reproduction by the array as much as possible. Because I wanted the speaker to be easily moved, I limited the number of woofers to six, and the resultant height of the array between the radiation axes of the top and bottom woofers equals 1 meter. Given critical distance d equals 2 meters, height of the array equals 1 meter, and solving for frequency in the previous equation,
f = d/(1.5*H^2)
= 2/(1.5*1)
=1.3 kHz
This means that the listener is in the near field reproduction of the line array where freq. > 1.3 kHz. This is less than an octave below the crossover frequency of 2 kHz.

C. Equalization. I need to do some more thinking about how I came up with the equalization that was implemented.

Attachments

  • LINE-ARRAY-LEH-FRT.jpg
    LINE-ARRAY-LEH-FRT.jpg
    258.4 KB · Views: 227
  • LINE-ARRAY-LEH-SIDE.jpg
    LINE-ARRAY-LEH-SIDE.jpg
    228.1 KB · Views: 195
  • LINE-ARRAY-LEH-EQ-BLD.jpg
    LINE-ARRAY-LEH-EQ-BLD.jpg
    356.9 KB · Views: 177
  • LINE-ARRAY-LEH-EQ.jpg
    LINE-ARRAY-LEH-EQ.jpg
    56.3 KB · Views: 174
  • LINE-ARRAY-LEH-XOVR.jpg
    LINE-ARRAY-LEH-XOVR.jpg
    40.6 KB · Views: 208
  • Like
Reactions: GM

Need Help Diagram

Hi everyone. My name is James. I'm new on this zone. I would like to ask if you have the diagram of this board and possibly have the value of each resistor and zener diode. Any help will be appreciated. Thank you!

This board came from a power amplifier (a local brand) probably a chinese brand. They called this a stepper and obviously has an issue.

Attachments

  • PXL_20240825_170350411.jpg
    PXL_20240825_170350411.jpg
    296 KB · Views: 44

Amplifier design based on HITACHI topology balanced VAS super hi OLG of 75dB

Hi everyone,

Here I present an amp design that was inspired by HITACHI balanced VAS topology.
Open loop response is nice and flat in the audio range at 85dB, dipping to 75dB at 20KHz
THD shows to be around 0.0007% into 1khz.
This is not fully finished design.
I am hoping that with the help of the community this can be polished and I am excited to make actual boards.
I am attaching LTSpice file so feel free to download and tweak as you like.

Input stage consists of
LTP with low degeneration resistors,
constant current source supplying 1mA (not sure if that's enough),
and current mirror utilizing helper transistor.

VAS is balanced and cascoded.

Simple Vbe multiplier.

Simple 2EF output stage.

Idea is to use this amp with 36V power supply.

Things that probably will need further testing are the phase margin, distortions at 20khz, step response.

Thank you for looking everyone.

Attachments

  • sch.PNG
    sch.PNG
    26 KB · Views: 785
  • OLG2.PNG
    OLG2.PNG
    14.8 KB · Views: 697
  • thd-1k.PNG
    thd-1k.PNG
    23.4 KB · Views: 698
  • hitachi-amp-75db.asc
    hitachi-amp-75db.asc
    10.6 KB · Views: 110

Vertical reflections, symmetric crossover and tilt -experiment

Hello,

Long story short I suspect tilting back speakers about measly 10 degrees give or take would positively affect imaging.

This is a thread where it would be nice to collect some observations and experiences on tilting back loudspeakers, is it worth it.

Without further ado I'll explain an observation I had recently from VituixCAD simulation and I'd like to know better what you have experienced in terms of sound stage height and / or stability with and without tilt. If you have any comments regarding vertical early reflections and speaker tilt and height, crossovers, how we perceive the vertical reflections, what ever related.

There are attachments after the longish text explanation, scroll back and worth, it was bit hard to condense.

Observation from simulations:
Multiway speaker will have narrowing vertical response around crossover frequency on most typical two(+) way speakers between a tweeter and a woofer due to the drivers being not coincident but stacked one above the other, lobing. With symmetric crossover this narrowing is symmetric to vertical angles relative to listening axis meaning that above and below listening axis the frequency response is roughly similar 10 and -10, 20 and -20 etc.

On a typical listening situation a loudspeaker is positioned so that listening axis is about at ear height which is 90cm from floor in this example. Usually rooms (here in Finland at least) are about 2.5m tall and listening distance is 3m. Due to speaker and listeners ears being closer to floor than to ceiling angles towards first vertical specular reflections differ between floor and ceiling. On this example scenario the angles are roughly 30 degrees towards floor specular reflection and about 50 degrees towards ceiling. This means that with symmetric crossover frequency response towards these reflections are different. Also, floor being closer the path length through the floor is shorter than through the ceiling and this means less attenuation through floor reflection, which is louder of the two and arrives first to ear, right after direct sound making it probably dominant of the two.

Now the hypothesis from this observation regards to "vertical imaging" is that due to differing frequency responses that arrive to ear from high up and down below, and particularly nasty zigzag move right around crossover point which usually is right at the important vocal range and where ear is sensitive, affects perceived vertical image height/soundstage clarity/how would you call it. This is something I think I heard with quick listening test and would like to know what you think and hear.

Tilting speaker back some 10-15 degrees on this example scenario will make the response towards the first reflection points similar, no zig zag move and highs towards ceiling get boost and respectively attenuation towards floor. Same thing happens with my prototype speaker. I assume but don't know if its true, that if there is more sound through floor than through ceiling, and especially since the floor reflection arrives earlier, the perceived sound image height stays low. The zig zag move perhaps makes important vocal range image little bit hazy because there is more sound towards floor in general except around the crossover there is suddenly more sound to ceiling which perhaps pulls up this frequency zone a bit in perceived image, a confusing thing. When the two reflections are roughly balanced I assume sound image is stable at the speaker height, less confusing perceived vertical image. In addition if there was more highs through ceiling and more lows through floor would possibly elongate perceived vertical image some. If you know better or have links to studies, please comment!

This makes a lot of sense to me logically and I think I heard it but not so sure if its just bias 😀 Keep in mind direct sound frequency response also changes as speaker is tilted, but this could be adjusted if the scenario is planned in design phase. I'd be glad if you can share thoughts on it and especially if you have tried it. did vertical image or image in general get somehow sharper and perhaps even taller?

Here are some attachments for the text above.
This is made up sim with ideal drivers, its a two way box with 5" woofer and 1" tweeter, 20cm wide and 31cm tall, rather typical bookshelf speaker. The situation would be about the same for any loudspeaker that has a small tweeter and a woofer who are not coincident but stacked one above the other, perhaps 90% of all speakers out there, could be two or more ways, bookshelf or tower. Speaker with coincident tweeter and woofer (or a fullrange driver, or an array etc.) would have pretty much similar frequency response towards these reflections and perhaps there is not much difference. Perhaps this is partly the reason people like such speakers?

Drivers and baffle, responses made with mic at center for simplicity.
diffraction-tool-woofer.pngdiffraction-tool-tweeter.png

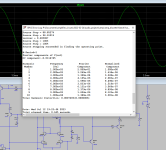
Here is the basic simple simulation setup. Arbitrary crossover point at 2500Hz, could be more or less doesn't matter, this is just some plausible crossover for such system.
system-wo-tilt.png

Angle calculations, the room setup and simple right angle triangle calculator to get how much I need to increase tweeter Z coordinate with the Tilt angle in simulator. On the calculator B was set to driver c-c distance of 10cm and desired angle to alpha. This is not too accurate do it like so but accurate enough to zone in the tilt for listening experiment.
angles.pngtriangle-calc.png

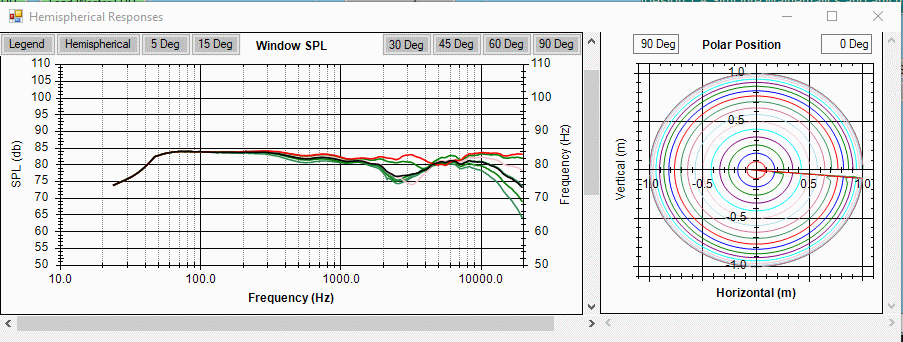
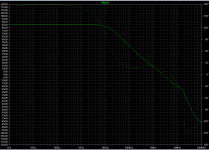
Here is the angles visible illustrating zig zag. Bottom graph shows -30 angle towards floor, direct sound and +50 angle towards ceiling. The zig zag happens roughly between 2-5kHz in this example, when ceiling reflection is relatively louder than floor reflection ( I think these graphs don't include attenuation due to path length ). Same graphs are also in power and DI window as light blue and light brown, these are default in VituixCAD so one doesn't have to setup the user defined angle if you are checking the stuff out in your project.
without-tilt.png

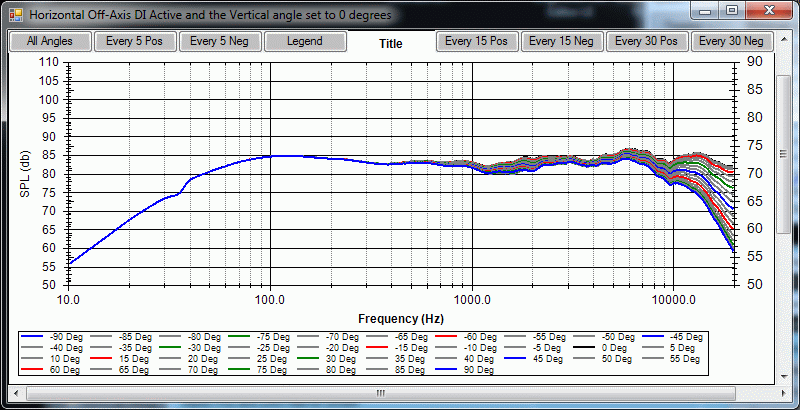
Now with small 10 degree tilt we can align the floor and ceiling reflection responses better so that dip due to lobing on both reflections happens roughly at same frequency. The hypothesis was that now both floor and ceiling reflections are about as loud through the whole frequency spectrum keeping the vertical image more stationary, stable. Alignment is not perfect but there is about no zig zag. 15 degrees would work fine as well but in the example listening axis response suffers already quite much. I don't know how bad this would be with your speaker, perhaps affects perceived sound or not.
with-10deg-tilt.png

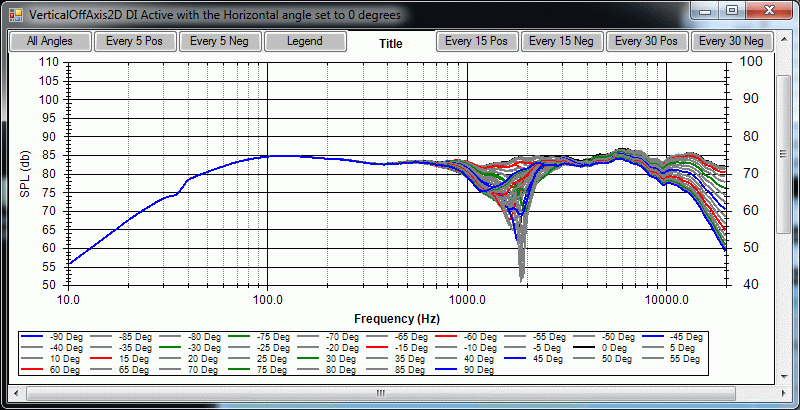
Here is also 15 and 20 degree tilts. 20 degrees is too much in this case, zig zag is worse.
with-15deg-tilt.pngwith-20deg-tilt.png

And here is completely another kind of system a three way with waveguide based on real measurements, not sure what kind of crossover slopes are, symmetric enough at least to make the zig zag. See the ER lines, light blue and brown. The first image is system adjusted before checking out this stuff, for basically power and DI and that kind of stuff. The second image shows that if I was to sacrifice some of the other lines and just adjust delay of the system to get tweeter back some and steer the nulls toward reflection angles the zig zag is gone. Not much of a sacrifice because the response can be adjusted for this new delay. Third image also tilts the waveguide little, now there is relatively more sound through ceiling on high frequencies than through floor, similar thing than perhaps a thick rug does as well. As frequency goes up more from above and less sound below listening axis. Here the 10 degree tilt works just fine.
real-system-measurements-optimized-for-other-stuff.pngreal-system-measurements-optimized-for-other-stuff-adjusted-for-ER.pngreal-system-measurements-optimized-for-other-stuff-adjusted-for-ER-and-tilt.png


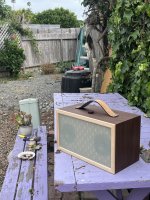
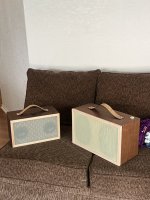
I suspect your speakers and listening setup are suitable for the test. If you try tilting your speakers I suggest you to concentrate on vocals when listening for the effects of tilting but anything goes. What do you hear or is there any difference at all on sound image?

Here are some quick rough numbers to tilt your speaker roughly 10 degrees, put some Lego (a standard block is ~1cm high) or something else under front edge of your speaker. You could try more or less tilt if you wish. Careful not to tip over your speakers, I don't want to be held responsible for broken stuff! 🙂 If you have DSP you could just delay the tweeter (driver closest to ceiling) some extra to tilt the nulls instead of physically tilting the speaker.

Box depth affects how high the front edge needs to be lifted to achieve 10 degree tilt. Here is few for starters:
20cm deep speaker box use ~5cm riser on the front, 5 lego blocks.
30cm deep speaker box use ~7cm riser.
40cm deep speaker box use ~10cm riser.
50cm deep speaker box use ~13cm riser.

ps. I'm sorry we have people coming in for visit so I might not be able to comment extensively too much until weekend. I hope the text is extensive enough to get an idea and comments flowing 🙂
  • Like
Reactions: vineethkumar01

For Sale AE TD10m X2

New TD10m Pair In UK. As per title.
Unused as project never built.
Silver pole piece.
£800 ONO for the pair.

1 pair of old speakers out of pinewood studios about 15 years ago.
Volt B250.2 12 inch bass drivers
Audax TW034. (Troels gravesens favourite tweeter until they became unobtainium.)

Cabinet is solid, but needs painting.
£offers.

Thanks.

Question about speaker SPL

I am unclear on speaker sensitivity. My desire is to build a new set of speakers for my 6LU8 amp. My current speakers are rated at 89db, I presumethis is the 1w 1m spl.

Now here is my question. If a driver has a rated SPL of say 90db, that means that my speaker build with that driver will not have appreciably more spl that my current speakers regardless of the box I put it in?

Or, another way, if I want double the "loudness" of my current speakers, I think I need an additional 3db of sensitivity (?), and I need a driver rated at at least 92db spl?

Roger

For Sale Najda DSP, XOVER, DAC, Preamp

I'm selling my well served WAF audio Najda.

Here are some details of the build:
-Full aluminum cnc machined and polished (polishing is not perfect though) enclosure
-Latest Nadja board, including control board and display
-JLSounds USB to I2S board v2
-LT3045 based voltage regulators
-Toroidy Audio grade toroidal power transformer (230v primary)
-Burson audio discrete Opamps on every output channel (2x V6 Vivid Dual and 2x V6 Classic dual)
-Some of the electrolytics have been relocated because the Burson's would not have fitted otherwise

For those who do not know what Najda is, it originates from here with several revisions:
https://www.diyaudio.com/community/threads/dsp-xover-project-part-2.215379/
There was also a WAF audio website (waf-audio.com), but it does not exist anymore for some very unfortunate reasons, RIP. But luckily Wayback machine helps: https://web.archive.org/web/20190630120625/http://www.waf-audio.com/products.php?pos=1&lang=en

Highlights shortly:
-DSP with super easy to use user interface in Windows software
-Crossover, DSP, IIR/FIR, DAC, Preamp
-up to 192kHz/24bit out each channel
-Inputs: 2ch in analog, Coax, Toslink, USB (through JLSound board)
-Outputs: 8ch analog, 6ch I2S

I have used this as a main DAC and crossover for many sets, including Linkwitz LX521.4. Also I have used this as a crossover simulator for diy speaker projects. It really does it's job well.

Latest Windows configuration software (Najda Under Control) and manuals will be provided for the buyer.

The unit will be resetted to factory settings prior to selling.

The price is 500€. Can be shipped to almost anywhere. Shipping to be added.

IMG_20240825_161450.jpg

IMG_20240825_161459.jpg
IMG_20240825_155318.jpg
IMG_20240825_155335.jpg
IMG_20240825_161527.jpg
IMG_20240825_161514.jpg

Hello internet I’m Leo and recently I have been enjoying building both headphones and speakers :)

I guess I’ll include some photos of finished projects and what I used. Feel free to ask any questions or make fun of me.

First larger speaker was built using an old speaker box I gutted out. Used a 12v battery and 24v step up converter to a bluetooth amp that supposedly puts out 100w per channel, all from aliexpress. I had a pair of 2 way alpine 6x9’s I removed from my car when I upgraded my sound system, I inserted them on a new baffle I cut out of plywood to fit the old speaker box. As you can probably guess it doesn’t sound great for a multitude of reasons but at the end of the day I’m happy it worked and is listenable to.

Next is a smaller speaker, again using a 12v battery and bluetooth amp putting out an advertised 50w per channel. This time I purchased a pair of dayton audio rs100-4’s and implemented the plans of a build I found here on diyaudio utilizing the 8ohm version of the rs100’s for a slotted vent box. The build went as smooth as the sound it produces, although it is missing some high end for my taste, maybe I go back and attempt to install tweeters?

The next one was sort of a joke, harbor freight ear muffs with cheap aliexpress drivers. Obviously sound really really good!

Last but not least headphones built with a pair of tymphany HPD-50N25PR00-32. Wood cups tuned to the best of my ability and again headband from aliexpress (surprisingly nice)

Attachments

  • IMG_8818.jpeg
    IMG_8818.jpeg
    522.4 KB · Views: 45
  • IMG_8859.jpeg
    IMG_8859.jpeg
    461.6 KB · Views: 40
  • IMG_9632.jpeg
    IMG_9632.jpeg
    649.2 KB · Views: 40
  • IMG_9633.jpeg
    IMG_9633.jpeg
    558.3 KB · Views: 40
  • IMG_9613.jpeg
    IMG_9613.jpeg
    562.7 KB · Views: 43
  • IMG_6595.jpeg
    IMG_6595.jpeg
    401.5 KB · Views: 47
  • IMG_7574.jpeg
    IMG_7574.jpeg
    457.8 KB · Views: 48

Behringer B2092A Sub Amplifier issue

Hey guys, can anyone, just based on their experience, tell me where should I start in trying to identify the following issue. Sub worked normally prior to this and nothing specific happened in between (like loss of power or something). It worked in the evening, turned off on a switch, then when turned on the next morning it started doing this.
I believe that the video is the best way to describe what's happening: https://www.dropbox.com/scl/fi/7vkc...nger.MOV?rlkey=yi8w2lbpc242or2b4rb7h1etn&dl=0

I obviously don't have a schematics and I would simply like to try to fix, won't die without it. I have some experience with electronics so I believe I will be able to test/remove/replace any component that can be tested with a UNI-T UT70B.
What I figured out so far:
- 1 component was missing, 47nF Capacitor next to the 4 'big' diodes, diode bridge? I've marked it in one of the photos. Capacitor was broken from it's pins, probably fell off from the sub at some point. I have replaced it (new one is on the image), but nothing has changed, same buzz before and after.
IMG_0464.jpeg

  • All other components LOOK normal, no blown capacitors or burned resistors, visual inspection is good.
  • I believe buzzing is not related to the input module because it behaves the same with or without it (I've disconnected it in the video)
  • I can see a red LED next to transistors light up, it's on the board itself, could that mean something? Maybe that diode is a 'debug' info on some amplifiers?

I would like to know where would a repair expert start? Could have that 1 Capacitor, while missing, caused damage to some other component? Should I replace all 4 'large' diodes or test them while removed from the board? Replace big capacitors? Should I somehow test the transformer?
Without any extensive experience, I would start by replacing all 4 big diodes and their capacitors, and while ordering components, I would also order these 4 largest capacitors and replace them as well, but I would get stuck if that doesn't do the job.
IMG_0462.jpeg

IMG_0463.jpeg


Any idea is highly appreciated! Thanks!

Workbench Audio Processor

Hey guys, I have a desire for an audio processor for the work bench, but I have been unable to find a suitable device. The closest are some old school type car audio processors, but again there is always a feature or two missing from unit to unit

I'm interested in something that gets me as close to knob per function as practical. Maybe I can DIY this. Have come up with a some plans that may achieve an analog or digital device

As best I can understand, for a 2.1 system, the output needs to be a set of three responses that can be shaped for lower and upper cut, boost at any point and over any width and be able to change the phase of the .1 channel

This is the outline of the plan

DIY machined and lasered chassis
Internal battery system linked to a USB port
Knob per function with easy visual reference
Balanced and unbalanced I/O
Tuby colouration with defeat
Clear protective cover

What I want to try to experiment with are
Main channels, taken from the input connector and run through two banks of 15 band graphic eq, one for each of the stereo channels. Using off the shelf prebuilt boards. These are stereo boards, so that means I will have to use one board per channel. I will need to learn how to best implement the unused channel on each of those boards. Whether to leave unconnected to the audio, shorted or maybe even cascaded to increase the range of cut or boost. I wonder if it works that way

As best I can understand it, let's say if the lowest fader was 60Hz just for random number, pulling that down would start sloping up from there and to whatever shape I set the rest of the faders. I need to learn if this would set the lower cutoff point or does the response come back up beyond this point. In other words, I have to learn if that fader just creates a dip there or a cut for everything below. If it is only a dip, then I would need to locate a single filter module to insert there as a switchable cut

This bank would be repeated in the next row to allow for active 2-way mains processing. I have to learn if I can use the 15 band eq to correctly set a bandpass here

The last bank would be for the bass. I won't call this a subwoofer channel as since the boards are stereo, which would be useful for stereo bass for active 3-way or stereo subs. I think I know how to sum that output for a mono sub. What I would need to learn is how to create a phase change knob at that output. For this bank, I have selected an easy seeming 5 band design from YouTube. This is a thru-hole type board, and I am hoping to learn to mod this to suit five dedicated bass bands. Also have to learn if this would defeat everything upper band or needs a further upper cut applied

So made up of some standalone filter modules, 4 banks of prebuilt graphic eqs and one DIY graphic eq

Thinking along the lines of a Pass H2 on each output for the tuby effect, switchable

Options
Can use 31 band graphic eqs but this would double project costs

Would be nice
If I could learn to DIY the board for the mains so that I can split them up into mono boards per channel and use lit faders alongside a dedicated level meter alongside each fader

Analog/digital hybrid option
Using digital graphic eq modules instead of the analog and having any extra filters needed in DIY analog. The problem with this is the multi action encoder that is used to select each band and to change it. I can't tell the impact that would have without trying it. The benefit is much more immediate access than using a usual DSP processor with menu diving or app control

Digital/PC option
Looks like I may be able to house a mini PC, a USB sound card and a touch screen in a custom enclosure. Finding the right program that can have the eq and filters up on the touch screen would nail it.

Digital/Android option
Here I can see another related android option. A car touch screen head unit will have touchable on screen faders for eq and all filters, as well as two pairs of stereo outs and one or two sub outs. The Pioneer in my car can do this via touch, but is only a small screen and non Android. I can see some cheap options to 10" display head units on Ali. All the eq and filters are done with DSP using the CPU and the only other thing that could take up runtime is the media player part playing back any test tracks or tones. I can create a custom housing for this and if I can find or make a USB powerbank that has a 12v out, then can be fitted inside the housing. Such a head unit has an analog input referred to as 'aux' and Bluetooth pretty standard but can also have built in power amps that could suit bench use together with a dedicated external sub amp

Compass
At this point, I can't find direction with this. The analog graphic eq and the head unit seem to be the best value options when it comes to the desired knob per function accessibility. While the digital eq hybrid seems like the more pro option. The Android head unit has some menu diving with having to bring up eq and filters in turns, but not too bad. The needed screen can be left up while in use. The mini PC option on the other hand can have multiple windows up on the touch interface

I am inclined to start with the Android head unit option to get a quicker start with projects and then take my time to learn and work towards making a completely hands on option. Thoughts?

Introduction

Hi all.
I'm Sam based in Sheffield, UK.
I've been involved with the soundsystem scene here for a year or so and have spent the last year or so building a fairly low budget DIY rig. As of may 24' we had 4x Super Scoops, 4x Cubo kicks, 3x Paraflex C-3D Kicktops & a DCX464 coax comp in a custom box. All cabs built ourselves with basic hand tools in a tiny basement workshop.

The time has come to start working on V2 of the rig, starting with subs I'm looking into various TH designs.

Time Travel

I watched "The Final Countdown" again yesterday: a pretty average film, but great footage of aircraft carrier operations and aircraft. Good ending, especially for the dog.

The plot involves the modern USS Nimitz on exercises near Pearl Harbour, which runs into a weird vortex which takes it back to 6 December, 1941. Recce aircraft find the US fleet as it was then and the Japanese fleet steaming towards Pearl.

The interesting question, discussed in the film, is what should they do?

One issue with time travel (which, according to Einstein and Prof Brian Cox, is possible) is that if you changed events, history would be different and various things and people would not exist.

If Nimitz' aircraft attacked the Japanese fleet, the tragic events at Pearl Harbour would have been avoided, but Japan would have declared war on the US for destroying its fleet. However, the Pacific war would have turned out quite differently, with, say, no invasions of New Guinea, the Philippines and the various islands.

Interesting to contemplate; many lives would have been saved and created by service men and women who survived, and the world would be quite different; and possibly, the Nimitz wouldn't exist, in which case it couldn't have travelled back in time.

Too much for me - like Bill Bailey when reading "A Brief History of Time', I have to take a break and eat a Pringle sandwich!

Geoff

Hafler Iris Preamp balance issue - fixed

For posterity, here are details on a fix I recently did to my Hafler Iris Preamp. Perhaps it will help others to keep their Iris up and running.

Problem:
The balance drifted slowly towards the left speaker. Nudging the balance or volume knob (local or remote) would cause the image to jump back to center, but in a few seconds it would drift back to the left.

Fix:
With a scope I found that the Left channel amplitude was growing over time (the Right channel was stable). After much pottering, I replaced two tantalum caps in the left channel circuitry. I replaced the 4.7uF at the TL082 Error Integrator, and the 2.2 uF at the LM308 E>I converter. Problem fixed.

Probably only one of those caps was bad, but it was easiest to just do both at one time. They both measured fine with my cap meter, in circuit and out, but under load one was obviously bad.

This is the second tant replacement I've done on this unit in recent years; next time I have to open it up I'll probably go ahead and replace all the tants and electrolytics just as a precaution.

I love this preamp - even after 30 years this thing still sounds great!

GU50 SEP Amp - developing 450v B+ power supply

Greetings Friends. I've been thinking on this amp all summer, when I wasn't doing fun summer stuff, and I've found two promising schematics on these forums for a cathode-biased Gu50 SEP amp with a 6e5p driver. The first was posted by @quikie22 with help from @Wavebourn

Gu50-6e5p-wb2.jpeg


The second posted by @Ejam
GU50-6e5p WB2.png


In both circuits there is some type of voltage regulation for the screens. I'm unfamiliar with the methods used, and was curious about using Zener diodes as described in the @blueglow 807 SE amp. 75v + 75v + 100v diodes makes 250v:

Gu50-5e6P amp schem.png


and 75v + 75v makes 100v for the driver tube. Zener diodes are noisy; what size filter cap could I use? Blueglow used 10uF 350v caps for that - I think they should be rated for the no-load voltage, 600v here. Also, does the supply cap for the driver tube really need to be 100uF? How about each driver tube gets its own 25uF supply?

As far as the power supply - with a b+ of 450v it's gonna require caps rated for 600v and the WIMA DC Link lineup looks pretty sweet, especially that 25uF 600v that's only $7.20 at Mouser. I've knocked up a PSU schematic - with thanks and apologies to @Suncalc

gu50-6e5p-ps1.jpeg


Can I have less capacitance in the power supply if the caps are higher quality? The first schematic calls for a PSU with a 720vct PT and a 47uF-10H-330uF circuit. Films have come a long way (down in price) since these circuits were drawn. Are the values I've drawn in (the top half) suitable for this amp?

Any thoughts, advice, tidbits of wisdom are welcome, thanks for taking a look!

w

Marantz NR1603

Hi have US Marantz Model NR1603, it has not been connected to the internet in sometime. After connecting to my network will not connect to any services and it will not connect to the Marantz server for a firmware update. After reading some similar posts for the NR1604 model I was thinking that maybe a new firmware update may fix the issue. I was looking to see if anyone has the latest firmware for this unit that they could send me at Duce055@yahoo.com. Thanks in advance.

New amp, old faceplate

Long ago I have gotten an used Toshiba SC-330 amp.
1721540730628.jpeg

It has the top cover too but never had the power button, the knobs and the light bulbs for the vumeters.

It played ok for a while then the right channel blew up.
Opening it I found one channel had already the original bjts in the output stage replaced with other types. I replaced them and they blew up again. So I parked the amp and almost forgotten about it.

The last year while I was searching for something else I found my Toshiba.
Initial plan was to restore the original circuit but when I seen how the pcb looks I changed my mind.
1721540587751.jpeg


I started first with putting all the parts apart and cleaning everything and then I opened up the 60vac ct transformer and separated the secondary windings making it a dual 30vac secondary because I wanted to power a ACA amp with each winding.

1721541341765.jpeg
1721541049421.jpeg

1721541084838.jpeg

1721545792400.jpeg


Then I did some dissipation testing with forced cooling and 60w of heat was manageable.

At this point I decided to draw a new pcb with the ACA on it. And I did.
1721541859895.jpeg


Then looking closer the ACA wasn’t exactly what I was searching for.

One day Nelson mentioned on the forum that he is planning an F5L so this was the spark to try and use the lateral Alfet mosfets that I got from his giveaway.
Searching a bit I came across the Cubie 3. So this time I drew a main pcb and another pcb for each amp module.

The main pcb includes dc speaker protection, A/B ssr speaker switch which uses the front switch as signal control only, initially it was switching directly the speaker signals.
It includes also vumeter drivers, vumeter backlight adjustment, fan speed control, over temperature control and bias control.
1721543512692.jpeg

1721543617818.png


Here is the schematic for the Cubie3 with lateral mosfets, 2 bias settings and standby control in case it overheats because of fan failure. And needs to be turned off.
1721543848221.jpeg

1721543899549.png


Appart the Cubie that was oscillating with laterals and needed some extra compensation everything went nice.
1721544079770.jpeg


The level potentiometers were replaced too with new ones. Now I have to search for some nice knobs.
1721544146118.jpeg


Each pcb hosts 6 smd leds.
1721546213674.jpeg


The back panel was cut to make the intake for the fans. The rca and speaker connectors were replaced too. Probably will add a grill because I caught my fingers in the blades a few times when connecting the rca connectors.
1721546239220.jpeg


At this point I still have a few things to solve.
The fans introduce some noise in the rails so a filter will need to be added in front of them.
Then I can hear some hum in the speakers from a few cm away.
Doing some ffts I seen that I have both 50hz and 100hz components.
At this point I want to search for a toroidal transformer because of the lower radiated electromagnetic field which will help with the 50hz coupling.
There is another reason that I want a toroidal transformer. This trafo has only 100va and with 4ohm loads the rail voltage drops too much.
A 200va toroidal even 300va will fit nicely in the same footprint. Beside this I will get the new transformer with lower voltages which will enable me a higher bias, probably 2x26vac.
Some cap multipliers will be added too.

In this time of the year when you have 40C temps outside a nice ab amp keeps your house cold and pleases you with a very nice sound and a lot of power too if needed.
Never listened to laterals until now and I can say that I didn’t expect them to sound so good.

Introduction, Duce055

Hi, I am Tim, mostly retired and just like messing around with audio projects.
I have had a Marantz NR1603 for sometime at my camp trailer but, never connected to the internet. Now I have internet at camp, but the unit will connect to the Marantz server to up date and will not connect to any services. I was thinking maybe a firmware update may help and was searching to see if anyone may have the latest firmware they could send me. My email is Duce055@yahoo.com

I asked the wrong question about speakers...

Hi All,

I recently posted regarding what DIY speakers I should build next for my system that includes a Pass F5 and a Korg nutube preamp. I currently have Frugel-Horn Mk3 speakers and I like them a lot. However they are not the best with music that has a lot of low end. They sound great, but the bottom octave is missing. The question that I should have asked after clarifying what I am hoping to gain by building new speakers, is how does one select a speaker design that is well matched to the electronic components of their system? I home to gain the bottom octave so that orchestral music or metal have the low end that the frugal horns cannot reproduce. My plan is to keep both sets of speakers and use either for the music that suits them.

I have heard highly rated really expensive components hooked together that sounded like crap. Matching speakers to the system seems like smoke and mirrors to me except for the obvious stuff like having enough wattage for the drivers and right Ohms and the like. Are there any nerds out there who can help me learn?

I take care to condition my power as much as I can, and room arrangement is set up for the music, not Architectural Digest. Yes my wife gets the stereo and loves it.

Thanks

DFPlayer current draw when playing without a speaker

I want to use DFPlayer to play an audio file without loading the output pins with a speaker. Those pins will be used as Line-Out to feed an external amplifier.

I need to know the current draw from a 5V supply in that configuration. I'd simply measure it myself but unfortunately, I don't have a DFPlayer module handy at the moment. I read somewhere that it draws about 15mA when idle with an empty microSD card slot, and more when playing an audio file from an SD card.

Could someone please provide the information I need, that is, the current consumption when playing an audio file but without a speaker at the output?

Simulating opamps for Rail to Rail output RRO

Simulation of many opamps to see what is the dropout voltage.
The load is around 5mA peak. Voltage is when THD is still <0.0005%
Supply voltage +/-18 Volt.
Disclaimer: It all comes down to how good the SPICE models are.

Dropout Voltage, Opamp

RRO OPamps with low dropout
0.13 OPA210
0.16 OPA2156
0.17 OPA172
0.17 OPA1688
0.20 OPA145
0.20 OPA1655
0.22 OPA182
0.22 OPA140
0.23 OPA192
0.23 OPA211
0.25 OPA189
0.36 OPA1641
0.38 OPA197
0.47 OPA1611

Not RRO but with low dropout
0.74 OPA132
0.74 OPA134
1.00 OPA828
1.08 LM4562
1.14 LME49710
1.20 OPA1677
1.30 OPA228

Not RRO with more dropout
1.81 AD847
1.81 AD797
1.83 AD825
1.94 AD8021
2.14 OPA637
2.16 OPA627
2.20 TL051
2.30 NE5534
2.50 OPA604

Not RRO and very high dropout
4.75 TL071
4.77 AD846

Is this description of a Carver tube amp for real?

Hi, members of the Forum with much wisdom.
There is a Carver amp for sale close to where I live. The description is below. My question is.. are the claims made in this advertisement for real? If so, how would this work? Has anyone got a circuit diagram?
If these claims are real, surely someone would have copied, adapted or improved these features.

Your thoughts?

Crimson 275 uses KT120 output Tubes that run thru Bobs unique DC restorer circuit. This allows the tubes to run cool and extend the life of the tube. The variable bias circuit allows you to fine tune the sonic signature and make the amp sound warmer like a classic tube amp or add detail like a more contemporary design. Set from the factory the 275 sounds amazingly close to the large 350 watt mono’s but with only 1/4 of their power and is about 30% of their cost.

Bob’s unique DC Restorer circuit makes the amp much more efficient than conventional allowing the use of hi efficient smaller output transformers. Advantages are that it runs cooler than normal tube amps, weighs less and the tubes should last forever.

Another significant feature of Bob’s design is its ability to “ listen to the room,” sometimes referred to as the speaker-microphone effect,’

Facilitated by a special current feedback loop, it allows the amplifier to hear’ the room’s reverb, along with its unique sonic signature. Each room plays its own tune, and this amp uses the speaker as a microphone by using the speaker in reverse (the theorem of reciprocity) to “listen to the room,’ thereby allowing a portion of the room acoustic to be expressed through the main speakers. Think of it this way, the room becomes an integral part of the music in a way no other amplifier allows. The sound is more majestic, more realistic, and the soundstage is larger and more compelling than it would be without this unique ability. (sells in the USA $2,750.00 + State Tax)

Specification:

Rated Power: 75 watts / 8 ohms or 4 ohms

Distortion: less than 0.5%

Line inputs: 2 x RCA

Input Impedance: 100 kohms

Gain: 30 dB (8 ohms)

Tube Complement: 1 x 12AX7, 2 x 127AT7, 4 x KT120

Bias: Rear panel potentiometer adjust, front panel metre

Source Impedance: 1.7 ohms
2131998131.jpg

Attachments

  • 2131998131.jpg
    2131998131.jpg
    438.4 KB · Views: 61
  • 2131998119.jpg
    2131998119.jpg
    659.1 KB · Views: 63
  • 2131998115.jpg
    2131998115.jpg
    371.5 KB · Views: 62
  • 2131998141.jpg
    2131998141.jpg
    483.5 KB · Views: 61
  • 2131998143.jpg
    2131998143.jpg
    360.6 KB · Views: 63
  • 2131998142.jpg
    2131998142.jpg
    459.8 KB · Views: 63

Idea for reducing crossover distortion in class AB amplifier

I recently was looking at class AB amplifiers and had an 'idea' of how to reduce crossover distortion. The idea is to prevent Q1 from completely turning off by drawing a constant current I1 of around 1mA. Conversely I2 keeps Q2 from turning off completely. The value of the current source would be a compromise between losses and distortion reduction.
This circuit is only conceptual, it may need additional blocking diodes to protect the current sources. Nevertheless, if the transistors are kept just conducting, i.e. slightly on, then the crossover distortion would be reduced.
I'm sure I'm not the first to come up with this. What do people familiar with class AB design think of this?

aa.png

What software to model complex 3d baffle shape?

I am aware of modeling software to predict the response of flat baffles of various shapes, but was wondering if anyone knew of software that could account for a third (depth) dimension. The motivation is the experiment from years ago (was it Dick Olsher?) where the response of a speaker was measured on many baffle shapes including some, like a hemisphere and pyramid, that are 3d in nature. Since it would be expensive, time-consuming, and difficult to built various complex shapes to measure, I was hoping someone was aware of software which could be adapted to this purpose. Does any exist?

Mod SB26ADC for Lower Fs?

Over the years, I've dissected a handful of mostly blown tweeters. The ones with lower Fs are all equipped with a rear chamber. Basically the center portion of the magnet structure inside the voice coil/slot is a hollow tube that goes right through the magnet structure. The backside is closed by a (usually) plastic cap which enlarges the air chamber and seals it behind the dome. Sometimes, these spaces are filled with damping -- poly fiber, foam, etc. -- which appears to lower the amplitude and Fs, if only a touch.

The SB Acoustics SB26ADC is a current DIYAUDIO darling for its good performance & modest price. Equipped with a small rear chamber, my sample of this tweeter has a Fs of 590 Hz with a peak of just 6 ohms ( double the 3 ohm norm). Xmax is rated for1.2mm (p-p), high in comparison to most other tweeters, even larger ones. The Wavecor TW030WA11, for example, a 30mm dome with Fs of 440 Hz, is rated for Xmax 0.4mm (0.8mm p-p).

Here are pics of a disassembled SB26ADC.

PXL_20231221_003616553.jpg

Unlike the 29mm series, the 26mm dome/coil appears to be user-replaceable. Clearly visible in the magnet structure is the copper ring inside the slot for the VC/former, the hollow within, and a cone on the inside of the plastic back cover. That cone is probably to reduce standing waves between the dome & the back. No damping material.

PXL_20231221_003656858.jpg

This pic shows the back cover; the total depth of the air space behind it might be 4-5mm.

It seems pretty obvious that if the total rear chamber space was enlarged, Fs would drop. Would this allow operation to a lower frequency, especially with a 6" Augerpro waveguide?

I'm want to cross as low as 1200 Hz. The high Xmax of the SB26 might make this safe enough? Or at least 1500 Hz.

The main benefits for me are... better power response in 2-way xover with 8" (or even bigger) woofer, improved dispersion/power to higher frequencies. Plus all the positives we already know about the SB26.

The mod itself looks like it should not be difficult: Pry the plastic back cover off and replace it with a half ( or smaller) portion of a hard plastic ball of suitable size. Fill it with poly or wool fibers to control resonances. I'm tempted try but would prefer not to destroy the back cover.

Thoughts anyone?

Trimmers

Do we have more than 25 turns trimmers ?
What is the resolution, one can really expect with those tiny screw 25 turns ? I would say 1/8 turn
Are they all the same among popular brands ? In other word is there a best about accuracy setting and stability.
My problem: A +/- 2mV offset that I wish to trim at 1uV accuracy.

Ian Canada Upgrade Kit for Denafrips ARES 12th/II

Hi everyone,

I purchased the upgrade kit from Ian Canada for my Ares II. I'm now thinking that it is not for the 12th edition OR the ARES II, but only for the 12th edition.

Bottom Left - The unmodded clocks on my ARES II
Bottom Right - The wiring for the upgraded clocks on the guide for the 12th edition upgrade on Ian Canada website

1724536606154.png
1724536730348.png


the PCB elements numbered 103 are likely C29 (GND) and C30 (GND), but I do not see what I would use for C121 (GND 3.3V) anywhere.

Is there any salvaging this? Do I just sell my Ares II and try and find a used 12th edition? Would likely cost about $250 to upgrade it on the used market, which I would prefer not to do right now.

Is there even such a thing as ARES 12th-2? I see 12th-1, but cannot see a 12th-2?

Thanks so much,

A pic of my whole ARES II in case it helps.
1724537041803.png

Understanding acoustic offsets vs. group delay with LR4

Hi everyone,

I'm hoping I can ask you to help me with something I've really struggled with. I've built a number of passive speakers and I think I understand the concepts of acoustics offsets and the phase relationships of LP and HP drivers and the need to account for acoustic offsets. I recently built a 3 way speaker with LR4 filters and while I was able to finish it successfully it also pointed out a huge gap in my understanding. The relationship between the physical acoustic offsets of a driver and group delay. Let me see if I can express this in a very practical way.

Consider this design with idealized drivers and zero acoustic offsets:

1723398716690.png


Simple LR4 HP/LP, sums to 1 and the phase wraps around at 1 kHz like it should. So, new to me is the all pass behavior. Below 1 kHz the LP filter now has a group delay ~ 4 mSeconds.

1723398792077.png


Ok, this part I can accept. It's the very next part where I prove how little I understand. In a "real" 2-way the woofer could be 1" or more behind (lag) the tweeter. Using DSP, this is a simple problem of tweeter delay. So my question is, how much does the GD of this LR4 filter affect my choices? In reality I ended up getting to an ideal delay by examining the null with an inverted driver, but I'm asking in theory here. What's the net effect to my delay, and why? It seems based on empirical practice that I needed much less delay than expected, and i don't now why.


Thanks for theorizing with me and helping me overcome this big mental wall I"m hitting.

Listening to a transistor's distortion

Lurker/newb here, I just had an idea: a setup which would allow you to listen to the distortion characteristic of a particular transistor.

Recently I've been reading about basic source-follower setups (i.e. headphone buffers), and how you can use two out-of-phase followers to get rid of the output capacitor (directly couple to the speaker/headphone).

Of course, if you don't have balanced input, you can use the setup in "single-ended input mode", i.e. ground one of the inputs. One of your outputs carries the signal and the other is constant.

Well, taking this a step further, if you fed both followers the same in-phase input, your speaker/headphone sees the same signal on both ends, no current flows, and no sound is produced. You can adjust the input pot all you want, it won't make any difference.

But what if we adjusted the input pots unevenly? Both followers would produce an in-phase signal, but of different amplitudes, so the speaker/headphones would see a reduced volume output.

By carefully adjusting the pots, you could increase the output signal produced by each follower while maintaining a constant volume as seen by the speaker/headphone. In this way, you could "turn up the distortion" while keeping the output volume the same.

Using this technique, you could swap out several different transistors / fets and compare what their distortion characteristic sounds like. Or you could try different bias current settings and compare what the distortion sounds like.

Perhaps an old idea, but news to me! 😀 I've never really had the opportunity to compare what different types of distortion sound like, so this idea is appealing.

Hello from the beach

Hello everyone!

I’m a young manager with a passion for all things audio, and I’m thrilled to join this forum. I run a cozy little beach bar where the sound of the waves meets great music. Being a charismatic person who loves the summer vibes, I thrive on creating the perfect beach atmosphere. Music is a huge part of what makes my bar special—I focus on finding the best tunes that fit the sunny, laid-back environment. From chilled-out beach beats to lively summer anthems, I’m always on the lookout for tracks that enhance the seaside experience.

When I’m not at the bar, you can find me exploring new music genres or diving into audio equipment reviews. I’m excited to connect with fellow audio enthusiasts here and share ideas about creating the ultimate sound experience. Cheers to great music and sunny days!
  • Like
Reactions: geoturbo

Selecting volume pot for specific output impedance

I have a tube preamplifier with an output impedance of 1.6K and I'm trying to select the correct volume potentiometer for the power amplifier to match to this. Am I correct that the general rule is 10:1, which would put the volume pot around 16k? Assuming this is the case, would 20k pot be a good choice, or would it be better to be up around 50k to be safe?
Projects by fanatics, for fanatics
Get answers and advice for everyone wanting to learn the art of audio.
Join the Community
507,534
Members
7,875,930
Messages

Filter

Forum Statistics

Threads
405,670
Messages
7,875,930
Members
507,534
Latest member
Fireball2020