Bought some pre-stain today and will test it.
Brendan
An externally hosted image should be here but it was not working when we last tested it.
Brendan
OK, so I just tried the combo on a piece of scrap, and the results were pretty shiesty..I don't know if I like the stain, as it's still a nasty colour...my guess is that the birch is really white, compared to other wood species, so there's no yellow in the wood to compliment the stain. What about oils? I can try it with tung oil tomorrow.
Brendan
Brendan
Coatings..
Hello cyberspyder, Again, I think you should try the spar urethane. Someone here mentioned their disdain for Minwax products. I cannot speak for all Minwax products, as I have not used them all. However, the Helmsan Spar Urethane has done great for me. If you apply it correctly, it should not produce a "blotchy" finish. I have never seen it produce any blotches on a wide variety of materials. As I said, it has a slight Amber to its appearence, but this can be desireable on lighter woods for sure. It provides a finish much tougher than stains. You can stain first and topcoat with the SU if you want to darken the wood, but I would try it bare first. I believe it comes in three different textures, flat, satin(good choice for speakers), and gloss. I mostly have used the satin, but whatever the case, each has served it's purpose well. I have some items that are over 15 years old that show no yellowing or degredation of the substrate, despite their constant daily exposure to sunlight. Have fun. -discreteouts
Hello cyberspyder, Again, I think you should try the spar urethane. Someone here mentioned their disdain for Minwax products. I cannot speak for all Minwax products, as I have not used them all. However, the Helmsan Spar Urethane has done great for me. If you apply it correctly, it should not produce a "blotchy" finish. I have never seen it produce any blotches on a wide variety of materials. As I said, it has a slight Amber to its appearence, but this can be desireable on lighter woods for sure. It provides a finish much tougher than stains. You can stain first and topcoat with the SU if you want to darken the wood, but I would try it bare first. I believe it comes in three different textures, flat, satin(good choice for speakers), and gloss. I mostly have used the satin, but whatever the case, each has served it's purpose well. I have some items that are over 15 years old that show no yellowing or degredation of the substrate, despite their constant daily exposure to sunlight. Have fun. -discreteouts
Hi, I should have been more specific on my Miniwax comment. I meant specifically the miniwax stains that you may want to avoid. I use Miniwax poly and Miniwax wax on some projects. My personal experience has been that the MW stains do not give as even of a finish. If you can find Cabot or Zar stains (I have no professional involvement in either brand) and give them a try you should see an obvious difference. C & Z stains seem to be slower drying and are more oily, while the miniwax is watery, splashy and soaks into the wood very quickly.
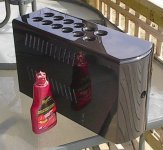
OK, so I tried the tung oil today, and I must say that it's a better finish overall..I would get the spar urethane, but they're out of stick at the closest HD, so why not just stick with what I got? Will return the stains today, here are some pics:
(top: stain, middle: plain wood, bottom: tung oil)
Brendan
An externally hosted image should be here but it was not working when we last tested it.
(top: stain, middle: plain wood, bottom: tung oil)
An externally hosted image should be here but it was not working when we last tested it.
An externally hosted image should be here but it was not working when we last tested it.
Brendan
Staining
I hope you are able to achieve results that are pleasing to your eye, they are your's after all.
That being said, I will describe an alternative, one you are free to reject.
This is only one way of doing this and I'm sure others have different ways.
Start with sanding to 200/220, then apply a "spit coat" of half shellac and half alcohol ( not Isopropol, but methanol ). If you want to start to add a warmer tone use amber shellac. When this dries, sand it again to same as the start to remove any raised grain. Put on another spit coat, let it dry. light steel wool to smooth or go a little finer sandpaper, then wipe down and apply a gel stain to your taste in color. steel wool again and wipe on two coats of poly, light buff with the steel wool optional between coats.
The shellac will fill the grain somewhat, but won't seal it, so it will take the stain. The Gel stain can be wiped on and is easy to control the color intensity.
Good luck!
It looks like very nice work so far.
John
Hey, how are you going to make the hole for the midwoofer?
I was looking around at what tools I can use, and I was wondering if I could just use a 4" hole-saw to drill it, instead of using a router with a jig (one of these - just bigger). Does anyone know if this would work?
I was looking around at what tools I can use, and I was wondering if I could just use a 4" hole-saw to drill it, instead of using a router with a jig (one of these - just bigger). Does anyone know if this would work?
Hole saws that big can cost a lot of money compared to a router bit. Personally i find the router easier to use because the hole saw can get clogged with sawdust easily, and it can splinter a veneer.
If you make a circle cutting jig for the router it cuts the hole really fast. Also if your using a router, don't cut all the way through, leave ~1mm of extra wood to hold the center chunk and punch it out after cutting.
If you make a circle cutting jig for the router it cuts the hole really fast. Also if your using a router, don't cut all the way through, leave ~1mm of extra wood to hold the center chunk and punch it out after cutting.
well, the 4" hole saw costs 20 bucks, I don't think I can build a jig + buy router bits for much cheaper than that...
also I'm not going to be drilling through veneer. It would seem to me like it would be faster to just center the drill bit, and drill down, than to route around the hole....
also I'm not going to be drilling through veneer. It would seem to me like it would be faster to just center the drill bit, and drill down, than to route around the hole....
klankymen said:well, the 4" hole saw costs 20 bucks, I don't think I can build a jig + buy router bits for much cheaper than that...
also I'm not going to be drilling through veneer. It would seem to me like it would be faster to just center the drill bit, and drill down, than to route around the hole....
Hi,
This hole saw comes with a mandrel (the arbor that the hole saw screws on to)? Or do you already have one?
Also, it takes a pretty hefty drill to run a big hole saw like that.
klankymen said:Hey, how are you going to make the hole for the midwoofer?
I was looking around at what tools I can use, and I was wondering if I could just use a 4" hole-saw to drill it, instead of using a router with a jig (one of these - just bigger). Does anyone know if this would work?
Yea, I'm going to use a 4" hole saw for the holes, have both the bit and the drill press necessary. You can rout it out, but using the hole saw is easier IMO.
Brendan
MJL21193 said:
Hi,
This hole saw comes with a mandrel (the arbor that the hole saw screws on to)? Or do you already have one?
Also, it takes a pretty hefty drill to run a big hole saw like that.
yeah, its 14 bucks for the hole saw + 6 bucks for the mandrel. I'll have to look into what power drills we have available....
cyberspyder, thanks for the answer on that, maybe I'll try the same - as long as you guinnea pig it for me

Yep, but we conversed about the Xover, because when I wanted to order the NT1 tweeter, madisound went out of stock, and I had to sub in the Dayton ND20-FB. We came to a revised layout, so that's what I used. Here's the post:
It looks like he took it off...meh. Sorry, can't help ya.
Brendan
Zaph said:Ok, I've got an untested but simple crossover mod to use the Dayton ND20 with the ZBM4. Before I post, I'd like agreement of the following:
Don't blame me if it doesn't sound good.
Don't call it a Zaph design.
Do not distribute.
Report back here on the condition and packing materials of the ND20.
It will be available for a day then gone. Note that I won't be coming up with an alternate crossover for the ZDT3. That's a bit too expensive and risky for a modification that's essentially an unverified guess.
In box raw response differences - ND20 vs NT1
Response of ND20 and NT1 using default ZBM4 crossover
Response of the ND20 dropped into the ZBM4 with no crossover changes
Suggested crossover changes for the ND20 - Switch around the L-pad resistors and add an inductor before the filter to tame the top octave.
Hope this helps. This ends my participation in this thread, off to do other things.
It looks like he took it off...meh. Sorry, can't help ya.
Brendan
April 21, 2008
-Did all my dado work, and cabinets are starting to look like cabinets. Just missing the routing & holes, then I'm GTG for finishing.
My coworker/friend/fellow student in the background
Brendan
-Did all my dado work, and cabinets are starting to look like cabinets. Just missing the routing & holes, then I'm GTG for finishing.
An externally hosted image should be here but it was not working when we last tested it.
My coworker/friend/fellow student in the background
An externally hosted image should be here but it was not working when we last tested it.
An externally hosted image should be here but it was not working when we last tested it.
An externally hosted image should be here but it was not working when we last tested it.
Brendan
This is really a tiny update, as I've just finished putting the second coat of tung oil on my sample piece, and boy is it smooth! I'm hoping after several more coats the piece will reach a semi-gloss finish, much better than polyurethane in my opinion. This coat was put on using 320 wet/dry paper and finished up with a rubbing using old t-shirts.
Oooh reflective.....
Brendan
An externally hosted image should be here but it was not working when we last tested it.
An externally hosted image should be here but it was not working when we last tested it.
Oooh reflective.....
Brendan
- Status
- This old topic is closed. If you want to reopen this topic, contact a moderator using the "Report Post" button.
- Home
- Loudspeakers
- Multi-Way
- Beginning of some DIY speakers