What drivers are you running? Where did you get those speaker grills?
I have made my own speaker cables using a nice jacket and Rembus Carbon locking plugs and splitters. They do look very nice, and it makes it acceptable to show them on the side of the Dallas II
I am using the Fostex FE206En, I think these are a very good fit for the Dallas II (originally designed for the 206e).
The speaker grills are the so called Monacor Protective Gril SG-250, I got them from a German supplier. They are fixed with four small (8x3mm disk) Neodymium magnets to the speaker's basket:
Monacor Protective Grille SG-250 buy at hifisound.de
Nice work !
The alternative cutting plan is very good - maintains the grain direction on all the external pieces.
At some point it might be worth adding a cross-section for the FE208Ez option. I'll have to check my archives, but the only change was a reduced coupling-chamber volume, achieved by adding a 0.25" or 0.5" thick piece of material behind the driver , against part 'C' ( between 'B' and 'D' ) . I'll see if I can find the value today.
Thanks for your help.
It can be used only with FE206En & FE208e∑ or also with FE206E ?
You could check the datasheets on 206E and 206En , but I think the main params like Qts, VAS and Fs are very similar, so no problem.
Dave, I take back what I said about Ron saying 100% to avoid any stuffing, not quite true, I just found this comment that supports what you mentioned :
"The only absorber i reccommend is the likes of a closed cell styrofoam positioned at a point or area where there will be a concentration of higher unwanted frequencies. And there at a minimum"
...however I'm not sure how to determine exactly where this would be. I'd guess somewhere in the middle of the coupling-chamber volume - so maybe attach a small amount to the back of the driver magnet ?
You might enjoy reading this link as well.
Modifications and Tweaks - Fostex FE206E and FE206En Fullrange Driver
Modifications and Tweaks - Fostex FE206E and FE206En Fullrange Driver
Last edited:
While it might seem to go without saying, care should be taken when applying any material to the insides of the basket legs of drivers such as the FEx6 series to avoid getting too close to the inverse surrounds. While these FR drivers have nowhere near the excursion of a big woofer, the cones still move enough that they'd be no fun to listen to if that material rubbed against the cone / surround.
It can be used only with FE206En & FE208e∑ or also with FE206E ?
It was designed for the FE206e, but can be used with the FE206En & FE208e∑. Ron made comments about small changes for using the latter — hopefully those can be added to the plan when they ar edug out. He may have commented on the former, but it may also be up to us to figure that out — so far it seems to drop in fine with no changes.
The horn dominates the performance, small changes in the air cavity volume will affect how much midrange gets into the horn.
dave
I have also used play sand(dry) for filling all the cavities. It works great, but as a disadvantage, it is very heavy (I guess weight and damping go hand in hand)...
I plan on using sand. But if I wanted to keep it lighter wouldn’t bracing and some lighter material also work?
One thing you could consider -
A year or two back I was watching Kevin Scott talking about the bi-radial mid horns he puts in the Vox Olympian. He said hardwood has a much cleaner sound than birch ply - and a richer tone. However , if he applied multiple layers of polyurethane varnish to the birch-ply horns, they sound almost the same as the hardwood ones.
When I built my prototype folded front-horn (testbed ! ) for the FE208Ez
Something stirs in the Undergrowth - Page 119 - audio-talk
..I painted all the wood surfaces in the small end of the horn , near the driver, with 3 coats of yacht varnish. 'course I didn't build another one without the varnish to compare .. ;o)
However I can see the logic of what Kevin says, at high pressures like in a horn throat or coupling chamber, I bet there's sound interaction between the acoustic wave and the material - where it's absorbed and re-emitted with some distortion. Makes sense to bind and harden the surface layer with something 'dead' like a plastic material. I have also heard first-hand the difference between 18mm birch ply and 20mm Perspex for an open-baffle, and it's not subtle in the upper vocal range.
So I’m test fitting. And the throat of the cavity leadindown into the horn is about 1 and 6/16ths inches wide. It looks a little bigger in the plans. The lengths of my boards are right and angles are right there. Does that sound right to anyone that has made these? Using 18mm stock.
Seems a bit narrow looks at the plans. But it’s hard to visualize.
Seems a bit narrow looks at the plans. But it’s hard to visualize.
The drawing says 40mm (1 19/32”).
dave
Yep. I think my D board is too long
Update
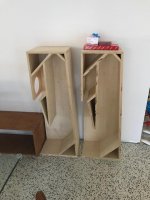
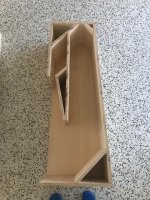
Right, so I fixed the problem with the D boards, and glued the inner part of the horn chamber together. It all fit fairly well.
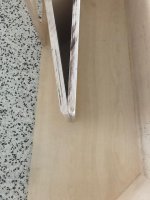
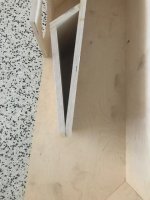
In one of my initial posts I mentioned the 12 degree angle on the C board would be a problem. I tried to put the board on a jig perpendicular with the miter, but the miter at 12 degrees won't let a perpendicular board clear its housing at that height. A second thought I had was running the board along its edge on a table saw, but the table saw bevels outward away from the fence, and not towards it. So I went with my original plan and took the number 7 jointer plane to the edge after marking the 12 degrees on the board. The No. 7 stanley made short work of it, it was great. It also did well rounding the corners. I smoothed it all with a random orbital sander and we are all good. On the first board i got a little aggressive on one side with the sanding, and in the pictures you can see a gap where I rounded off the flat surface. I will fill it later and I'm sure it will be fine. For the second board the fit was much better. Overall I'm pleased with the results. Pics attached.
I think a rational person with more tools would have used a band saw and a tilting table for that 12 degree cut, but last night taught me that a well sharpened plane can do a lot of cool stuff.
Edit: The birch looks OK - but I'm considering some higher end wood veneers to make these things really pop. Any pros, cons?


Last edited:
- Home
- Loudspeakers
- Full Range
- Dallas II Build