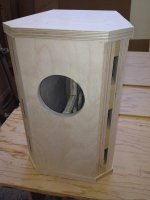
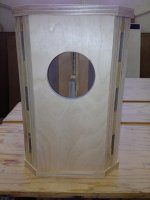
Just wanted to throw out some eye candy for those who are wanting to try the Fostex FF125WK's in one of Planet 10's new creations. I have included images, and sent my thoughts to Dave on the build. He or I will post them later today.
Attachments
Very nice, does this one have a name yet?
I think it has a name, but you would have to ask Dave? dFonken 125?
JP
Build Notes and Thoughts so Far
What a great little project for the DIYer in you. I was looking for a new project to go along with my super cool Frugal Horns and asked David over at Planet 10 if he was ready with the Fostex 125 drivers yet. They are sitting on his bench almost ready to go, but the cabinet plans were done. I asked if I could have a shot at it, as the snow was minimal and the garage was not too cold yet.
Plans: Got the pay plans the next day and set out on the trapezoid models, there are three build choices included in the plans for those who want a more square model to ease build time/effort. The plans had everything I needed without question. The included cut sheet came in handy too, as I used a 5x5 sheet of 3/4 Baltic Birch to make my speakers. The drawings even include space for the blade cut in its calculations and I only had to use 2/3 of the sheet. I know for sure this will come in handy when I chose to use bamboo as my next wood choice as it is pricey and a mistake could cost you 100 plus dollars. Included in the plans are all the angled cuts, suggestions for easier ways to cut the champers and other ideas to make it all inclusive.
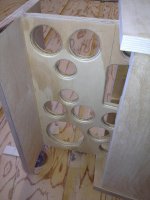
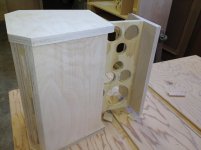
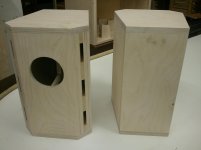
The Saw: My tools included a RIDGID table saw, router with laminate bit and 1/2 round over bit too. I followed the directions of the cut sheet and decided to make the top and bottom pieces 1/16th to 1/8 inch overhand so not to make any mistakes. I later went back and use a laminate cut bit to trim them flush with the side of the box. I like this method because it gives you some play when assembling the box. You can see from the above images that the overhang is minimal, but I think needed for minimizing my own mistakes. After making all the cuts as needed I rounded over all the holes cut in the inside brace. As this is not a specific hole cut, I placed them fairly close to the plan drawings, but David makes a note that only 40 percent removal of the material is necessary. I rounded over both sides of the holes for airflow and made the driver cut also. The notes in the plans make sure to state that the brace is primarily for the driver and not to put to much pressure on the cage. I do not have my drivers in hand, and so I may have to trim out the cut or add a shim to it later.
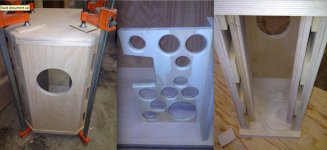
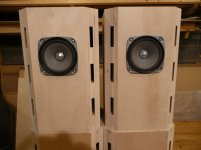
Assembly: All my cuts are done and the I began gluing the pieces together. I made the back piece removable, and glued on the brace off center as described in the plans. I will load the interior with the describe felt/batting before gluing it all together. This may or may not be necessary for everyone depending on the size of your hands (or kids) but much easier to do it prior. I plan on actually trying it both ways to see what happens. In one of the last images you can see that I used four post clamps to keep them tight and together. These will come in hand for anyone, you could use other models as well. I saw one at the hardware store for 15 dollars that would work well. You could get away with two or three if need be.
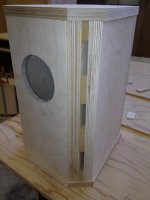
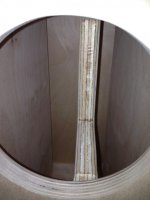
Slots: The plans suggest that the vent pieces be a different wood than baltic, and I had some extra MDF around. I used it, but after I glued it in place, I recognized I should of used a cooler hard wood to contrast/compliment the stain. This is my fault and I should have been thinking more ahead on the final project. It will look fine after I stain it, but could have been even better if I used walnut, oak, maple anything besides plan MDF.
Champers: I took the easy and most efficient way out when cutting the champed sides. I made the speaker in box form and then ran it down the table saw with the blade as high as I could get it. I knocked it out in one pass, but this may not be the case for everyone depending on their saw. I also did a mock up of a jig that would hold the box straight and I could run it down the band saw with no clearance issues at all. NOTE: depending on the tightness of your blade, there may be play in it that causes a wave in the cut-be careful with this method as you may screw it up.
Staining: I was very happy with the overall process of making this speaker. The total time involved was about 4 hours, no breaks, no extra stuff going on, I had everything out and ready to go, no trips to the store, no phone calls etc. The most difficult of the trapezoid for me was the angled cuts on the back, but the plans did make them much easier. If you were doing the square box, this would not be an issue. The stain I chose is going to be a darker stain similar to my other builds at DIY and AC. I did make a mix in the stain that added some red to it and I plan on making the vents a "milk stain red" or just pain the inside of the vents bright fire engine red. We will see how this comes out.
Speakers: I ordered a pair of 125's from Madsound this week and will install those when I get them. I will wait for David to finish the enabled versions and pick up those when they become available too. The extra 125s will go somewhere else then. I am looking forward to testing them against my Frugals with the Fostex 126en driver. I will need to pick up some stands and try different room placement. When done they will be used with a Khozmo passive preamp, Decware 3 watt pentode amp, Virtue 1.2 and 2.2 with 130 ps, Apple TV2, Apple Airport Express and I have ordered a Musical Fidelity V Dac II that should be here soon.
I appreciate all the time an effort David and the others involved at Planet 10 put in to these designs and drivers. Thank You.
Jon Parkhurst - Wisconsin
What a great little project for the DIYer in you. I was looking for a new project to go along with my super cool Frugal Horns and asked David over at Planet 10 if he was ready with the Fostex 125 drivers yet. They are sitting on his bench almost ready to go, but the cabinet plans were done. I asked if I could have a shot at it, as the snow was minimal and the garage was not too cold yet.
Plans: Got the pay plans the next day and set out on the trapezoid models, there are three build choices included in the plans for those who want a more square model to ease build time/effort. The plans had everything I needed without question. The included cut sheet came in handy too, as I used a 5x5 sheet of 3/4 Baltic Birch to make my speakers. The drawings even include space for the blade cut in its calculations and I only had to use 2/3 of the sheet. I know for sure this will come in handy when I chose to use bamboo as my next wood choice as it is pricey and a mistake could cost you 100 plus dollars. Included in the plans are all the angled cuts, suggestions for easier ways to cut the champers and other ideas to make it all inclusive.
The Saw: My tools included a RIDGID table saw, router with laminate bit and 1/2 round over bit too. I followed the directions of the cut sheet and decided to make the top and bottom pieces 1/16th to 1/8 inch overhand so not to make any mistakes. I later went back and use a laminate cut bit to trim them flush with the side of the box. I like this method because it gives you some play when assembling the box. You can see from the above images that the overhang is minimal, but I think needed for minimizing my own mistakes. After making all the cuts as needed I rounded over all the holes cut in the inside brace. As this is not a specific hole cut, I placed them fairly close to the plan drawings, but David makes a note that only 40 percent removal of the material is necessary. I rounded over both sides of the holes for airflow and made the driver cut also. The notes in the plans make sure to state that the brace is primarily for the driver and not to put to much pressure on the cage. I do not have my drivers in hand, and so I may have to trim out the cut or add a shim to it later.
Assembly: All my cuts are done and the I began gluing the pieces together. I made the back piece removable, and glued on the brace off center as described in the plans. I will load the interior with the describe felt/batting before gluing it all together. This may or may not be necessary for everyone depending on the size of your hands (or kids) but much easier to do it prior. I plan on actually trying it both ways to see what happens. In one of the last images you can see that I used four post clamps to keep them tight and together. These will come in hand for anyone, you could use other models as well. I saw one at the hardware store for 15 dollars that would work well. You could get away with two or three if need be.
Slots: The plans suggest that the vent pieces be a different wood than baltic, and I had some extra MDF around. I used it, but after I glued it in place, I recognized I should of used a cooler hard wood to contrast/compliment the stain. This is my fault and I should have been thinking more ahead on the final project. It will look fine after I stain it, but could have been even better if I used walnut, oak, maple anything besides plan MDF.
Champers: I took the easy and most efficient way out when cutting the champed sides. I made the speaker in box form and then ran it down the table saw with the blade as high as I could get it. I knocked it out in one pass, but this may not be the case for everyone depending on their saw. I also did a mock up of a jig that would hold the box straight and I could run it down the band saw with no clearance issues at all. NOTE: depending on the tightness of your blade, there may be play in it that causes a wave in the cut-be careful with this method as you may screw it up.
Staining: I was very happy with the overall process of making this speaker. The total time involved was about 4 hours, no breaks, no extra stuff going on, I had everything out and ready to go, no trips to the store, no phone calls etc. The most difficult of the trapezoid for me was the angled cuts on the back, but the plans did make them much easier. If you were doing the square box, this would not be an issue. The stain I chose is going to be a darker stain similar to my other builds at DIY and AC. I did make a mix in the stain that added some red to it and I plan on making the vents a "milk stain red" or just pain the inside of the vents bright fire engine red. We will see how this comes out.
Speakers: I ordered a pair of 125's from Madsound this week and will install those when I get them. I will wait for David to finish the enabled versions and pick up those when they become available too. The extra 125s will go somewhere else then. I am looking forward to testing them against my Frugals with the Fostex 126en driver. I will need to pick up some stands and try different room placement. When done they will be used with a Khozmo passive preamp, Decware 3 watt pentode amp, Virtue 1.2 and 2.2 with 130 ps, Apple TV2, Apple Airport Express and I have ordered a Musical Fidelity V Dac II that should be here soon.
I appreciate all the time an effort David and the others involved at Planet 10 put in to these designs and drivers. Thank You.
Jon Parkhurst - Wisconsin
Very nice, does this one have a name yet?
Dave's naming convention gets a bit convoluted - the full designation is included in Jon's thread title - I'd simply call them Fonken125T (the T is for Trapezoid shape, which has also been deployed for other Fostex as well as Mark Audio models)
and
and remember the F in fonken is for Fostex i believe....
JP
Dave's naming convention gets a bit convoluted - the full designation is included in Jon's thread title - I'd simply call them Fonken125T (the T is for Trapezoid shape, which has also been deployed for other Fostex as well as Mark Audio models)
and remember the F in fonken is for Fostex i believe....
JP
and remember the F in fonken is for Fostex i believe....
JP
I knew that - and Mark Audios are Mar-ken
I know, but I like other newbs may forget....
I know you know, but the newbs like me forget sometimes and I even have issues with the names and have to look back at the cabinets page.
In the end... they are really cool....... no matter what they are called.
JP
I knew that - and Mark Audios are Mar-ken
I know you know, but the newbs like me forget sometimes and I even have issues with the names and have to look back at the cabinets page.
In the end... they are really cool....... no matter what they are called.
JP
Very nice, does this one have a name yet?
dFonken125T = deciFostexonkenFF125wk-narrowTrapezoid
Note that there are 3 standard size trapezoids, wide wT (A12, A10.2, EL70, maybe FF125/A7.3/other 4"), medium mT (A10.2, EL70, FF125/A7.3/other 4"), narrow nT (EL70, FF125/A7.3/other 4"). The prefix is omitted for the primary width box for each driver, in this case nT is shortened to just T.
The maybe is because at this width the box will be approaching wider than tall and will look funny except sitting on top of a woof-wT (1st visualization of Twin EL166 variation with MK12T on top).
Go here to get a bit of a history on the names -- when Chris coined the term Fonken we had no idea we'd end up with a pile-up of names.
dave
Attachments

125wks
Thanks for the inspiration; I've really been enjoying my pair - but as you can see, just went "rectangle".
Pics, The pair on the right just didn't sound right, so went back and made a second pair (among others).
I put a thread on Madisound's site (some probably have read it).
The New Sheriff in Town - Fostex 125wk Full Range
Attachments

Nice work guys! I heard a pair of Fonkens many moons ago at Dave's, not sure of the driver, maybe the 127? Definitely a great design for those that want a bookshelf size cab for their fullrange drivers, and of course there's the floor standing version too.. Cool design that's not your average cookie cutter ported box, and the ones I heard sounded great too!
Thanks for the inspiration; I've really been enjoying my pair - but as you can see, just went "rectangle".
Pics, The pair on the right just didn't sound right, so went back and made a second pair (among others).
I put a thread on Madisound's site (some probably have read it).
The New Sheriff in Town - Fostex 125wk Full Range
OD: what was wrong with the first pair that they did not sound right? Were there changes to the second pair?
JP
- Status
- This old topic is closed. If you want to reopen this topic, contact a moderator using the "Report Post" button.
- Home
- Loudspeakers
- Full Range
- Planet 10 FF125wk dFonken125T 0v8