To be honest, I thought they were going to be taller than they are.
I think tiny floorstander would be the operative word.
dave
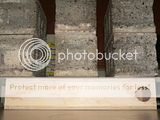
I realized last night that there are many pieces where you can use the left speaker part as a guide for gluing the right speaker part. The photo below doesn't show a box, it's two L shaped pieces that I'm gluing simultaneously. Before the glue sets, I can align the un-glued ends to make the whole thing very square. I wish I had figured this out earlier, as it seems to make it much easier to do the corners properly.
http://i69.photobucket.com/albums/i43/Ty_Bower/Buschhorn/P1140041.jpg
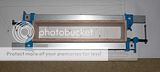
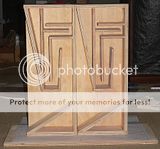
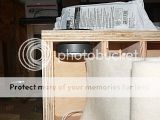
Another use of spacers, these ones are 157mm and they set the distance between the front face of the cabinet and the primary internal wall C. My concern is that the corner of one cabinet didn't turn out quite perfectly square. The top piece B is a hair more than 90 degrees to the front A. I can use the spacers glue up C now, and the distance to A will be exact. But, when I go to glue on the sides I will likely try to slightly flex B to make it align with the edges, and that is going to shift the far end of C out of alignment. I'm not quite sure what to do here.
http://i69.photobucket.com/albums/i43/Ty_Bower/Buschhorn/P1140047.jpg
http://i69.photobucket.com/albums/i43/Ty_Bower/Buschhorn/P1140041.jpg
Another use of spacers, these ones are 157mm and they set the distance between the front face of the cabinet and the primary internal wall C. My concern is that the corner of one cabinet didn't turn out quite perfectly square. The top piece B is a hair more than 90 degrees to the front A. I can use the spacers glue up C now, and the distance to A will be exact. But, when I go to glue on the sides I will likely try to slightly flex B to make it align with the edges, and that is going to shift the far end of C out of alignment. I'm not quite sure what to do here.
http://i69.photobucket.com/albums/i43/Ty_Bower/Buschhorn/P1140047.jpg
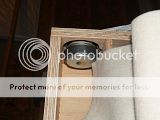
All I can say is this had better be straight and square when the glue dries and the clamps come off.
http://i69.photobucket.com/albums/i43/Ty_Bower/Buschhorn/P1140049.jpg
http://i69.photobucket.com/albums/i43/Ty_Bower/Buschhorn/P1140049.jpg
well, clearly a bit late but take a look at this gallery - providing of course that the parts are cut square and true, even without the dadoes (mark up the pattern on the sides / gables per your template) laying the internal panels on the sides helps things go pretty quick, and packing tape makes for a great single use, self adhesive adjustable (metric / imperial) band clamp
Flat Pack Prototype Build
The goal with this build was to assemble in a restricted space without screws or nails; for someone used to pace and resources of commercial production shop, the biggest challenge was self-imposed shortage of clamps and waiting for the glue to dry. Taking advantage of an air nailer and shop tools / space, it's possible to fabricate multiple pairs of a small BLH such as the BH MKII in a day - a decent veneering / finishing job will take longer than that.
well, clearly a bit late but take a look at this gallery
Thank you! Those photos are very educational. I'm still very much in the trying to figure out which techniques work phase. I'll study your gallery and see if I can apply some ideas to my own construction.
Edit: too late to edit earlier post, but I meant to say
as noted elsewhere in my posting history, I did build a pair of the larger Buschhorn MKII, but preferred the smaller enclosures overall
which is Ty's current project - when stretched to accommodate a 4" driver (i.e. FE126E, etc.) is the form factor upon which the FrugelHorn pictured in the previous gallery was predicatedit's possible to fabricate multiple pairs of a small BLH such as the BH MKI
as noted elsewhere in my posting history, I did build a pair of the larger Buschhorn MKII, but preferred the smaller enclosures overall
Last edited:
Taking advantage of an air nailer and shop tools / space, it's possible to fabricate multiple pairs of a small BLH such as the BH MKI in a day...
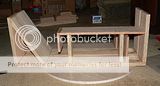
When it comes to building cabinets, I'm solidly in the "slow worker" category. I've realized that I'm not waiting for the glue to dry... it's the glue that is waiting on me. I've got to run out of pieces eventually. There are two more internal parts, then the sides will be all that remain.
http://i69.photobucket.com/albums/i43/Ty_Bower/Buschhorn/P1140064.jpg
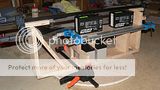
I used the concrete block again to hold down the first side. I'm not too happy about the gap at the bottom corner of one cabinet. I noticed it while gluing, and I should have taken the time to figure out why it was doing that. I dry fit everything before I started and didn't see any big problems. At the very least, I ought to have slid the thing to the edge of the counter and clamped that edge hard, rather than hoping the concrete block would flatten it out.
http://i69.photobucket.com/albums/i43/Ty_Bower/Buschhorn/P1140068.jpg
http://i69.photobucket.com/albums/i43/Ty_Bower/Buschhorn/P1140070.jpg
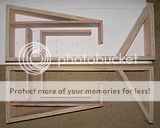
Anyway, I've got two cabinets now, except for the final side. I guess I need to figure out how to stuff & line the insides before I go any further.
http://i69.photobucket.com/albums/i43/Ty_Bower/Buschhorn/P1140073.jpg
An externally hosted image should be here but it was not working when we last tested it.
An externally hosted image should be here but it was not working when we last tested it.
http://i69.photobucket.com/albums/i43/Ty_Bower/Buschhorn/P1140068.jpg
http://i69.photobucket.com/albums/i43/Ty_Bower/Buschhorn/P1140070.jpg
Anyway, I've got two cabinets now, except for the final side. I guess I need to figure out how to stuff & line the insides before I go any further.
An externally hosted image should be here but it was not working when we last tested it.
http://i69.photobucket.com/albums/i43/Ty_Bower/Buschhorn/P1140073.jpg
I guess I need to figure out how to stuff & line the insides before I go any further.
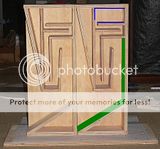
Any advice? I have a small roll of wool felt, maybe 1/4" thick at most. I figured I'd cut out some pieces, hit one side with 3M spray adhesive, and stick them in place. If you run the German website through the translator, it suggests:
The damping behavior, the best sound to be adjusted. This K is the horn mouth at the transition to the vertical section (above L) through a rolled-up mat damping material stuffed loosely - a further damping is not provided.
I've colored this area in green. I'll also put some more of the felt in the top cavity in the areas shown in blue. Or should I try to line all five sides? I'd love to keep one panel unglued so I can play with the stuffing a little more, but I'm afraid it'll never make a good seal and won't really represent how it's going to work with the side glued on.
http://i69.photobucket.com/albums/i43/Ty_Bower/Buschhorn/P1140073x.jpg
tidy work, Ty:
if you want to keep the second side removable 'til you've got the stuffing to your satisfaction (and definitely wait 'til a couple of hundred hours of playing/break-in), you could try something we've done a couple of times.
(this assumes that there will be a finish coat of veneer, paint, etc.)
use self-adhesive closed cell foam weatherstrip tape on the edges of all lateral panels, use the existing full size template to pilot drill holes through the side panels, and temporarily attach the sides with #6 x 1 1/2" flat head woodscrews. You should be able to loosen and remove the screws several times before stripping the edge core of plywood. Be sure to use larger countersink bit that the heads of the screws, or they'll most likely chip the flat grain of the side panels when you remove them,
Once you're happy with the damping levels, remove the foam tape and permanently attach the side panels - either using the existing screws, or just glue on as you did the first side. Then fill the countersunk holes and apply finish, etc.
If you hadn't intended to apply any more materials, or want to apply finish to raw box, I'd imagine there'd be enough plywood off-cuts from a full 4x8 sheet to make a fresh set of panels.
No doubt I'm spoiled by having access to all the scraps I could possibly want for any such templates or temporary workpieces. We pay over $2400 per month just to cart our solid waste to the local dump - so I guess I'm technically saving the company a few dimes on every such piece of "repurposed" material, and no, none of it qualifies for any type of green recycling
if you want to keep the second side removable 'til you've got the stuffing to your satisfaction (and definitely wait 'til a couple of hundred hours of playing/break-in), you could try something we've done a couple of times.
(this assumes that there will be a finish coat of veneer, paint, etc.)
use self-adhesive closed cell foam weatherstrip tape on the edges of all lateral panels, use the existing full size template to pilot drill holes through the side panels, and temporarily attach the sides with #6 x 1 1/2" flat head woodscrews. You should be able to loosen and remove the screws several times before stripping the edge core of plywood. Be sure to use larger countersink bit that the heads of the screws, or they'll most likely chip the flat grain of the side panels when you remove them,
Once you're happy with the damping levels, remove the foam tape and permanently attach the side panels - either using the existing screws, or just glue on as you did the first side. Then fill the countersunk holes and apply finish, etc.
If you hadn't intended to apply any more materials, or want to apply finish to raw box, I'd imagine there'd be enough plywood off-cuts from a full 4x8 sheet to make a fresh set of panels.
No doubt I'm spoiled by having access to all the scraps I could possibly want for any such templates or temporary workpieces. We pay over $2400 per month just to cart our solid waste to the local dump - so I guess I'm technically saving the company a few dimes on every such piece of "repurposed" material,
and no, none of it qualifies for any type of green recyclingtidy work, Ty
Thanks for the tips and the compliments. I'll keep an eye on the magnet clearance. If I keep the felt about 18mm back from the front panel, it shouldn't interfere. My felt isn't really that thick anyway. I guess it wouldn't have hurt to stretch the top chamber a good 30mm or so, would it? Maybe the design's aspect ratio (80mm height:110mm width) plays some role?
Good idea on the removable side panel. This project started with the leftovers from the last, so I only had two-thirds of a sheet to start. I've got enough to cut one more side panel, but not two. I do have a bunch of 1/2" OSB around that I could use for a makeshift temporary side. I could just save the two good panels for later. I'll give that some more thought. Of course, I'm impatient and won't want to wait to glue everything up and call it finished. Oh well.
http://i69.photobucket.com/albums/i43/Ty_Bower/Buschhorn/P1140080.jpg
http://i69.photobucket.com/albums/i43/Ty_Bower/Buschhorn/P1140076.jpg
http://i69.photobucket.com/albums/i43/Ty_Bower/Buschhorn/P1140078.jpg
My felt isn't really that thick
It isn't. I'd line as described by myself above with one layer and play with multiple layers on the back. It isn't really stiff enuff for friction fit... anyone in the family with tiny hands?
dave
play with multiple layers on the back... anyone in the family with tiny hands?
Sure, I've got plenty of those kind of people. Get them started on this hobby at an early age, I say. How about cutting a circle of felt and sticking it on the backplate of the FF85K magnet assembly? I do also have a very small amount of pretty thick polyester batting. It would be enough to cover just the back of the chamber.
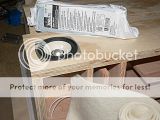
I want to fill the two triangular voids. I guess density is one of the key specifications here, but I'd also like to have something that is non-toxic, inexpensive, and biologically inert. I've seen people use kitty-litter, sand, cement, and lead shot. Lead has the highest density (~11g/cc, although shot would be lighter) but there's always the health concerns. Cement is about 3g/cc, but seems kinda messy. Dry sand is probably ~1.7g/cc, but I've heard that if it isn't really dry you're going to have problems. I think kitty litter (mostly clay) is probably the lowest density (~1g/cc?) but it's difficult to find good data due to the wide variety of types available.
I guess I'm leaning towards using kitty litter, mostly because I have cats and therefore always have a load of the stuff around. Any comments? Should I try to compact it down before I put on the last side?

http://i69.photobucket.com/albums/i43/Ty_Bower/Simple SE/P1100379.jpg
I guess I'm leaning towards using kitty litter, mostly because I have cats and therefore always have a load of the stuff around. Any comments? Should I try to compact it down before I put on the last side?
http://i69.photobucket.com/albums/i43/Ty_Bower/Simple SE/P1100379.jpg
Last edited:
I always use sand with no ill effects. The finer the sand the more dense it will be in terms of mass per volume. What "problems" have you heard of regarding sand? The only thing I can think of is not using enough glue to properly seal up that chamber forever and having it leak out. But then again that problem stems from shoddy construction....
What "problems" have you heard of regarding sand?
Now that you mention it, I don't know exactly what happens with "bad" sand. I've read several warnings that the sand must be perfectly dry, or else. Some have recommended the use of "kiln-dried" sand, and advise you stay away from the common variety play sand.
I suppose that if it is left damp, some kind of mold or mildew might start to grow in it?
I like sand, but you do need to make sure it is dry. Very dry. Here, at least in the summer when it is very dry and hot, i pour the sand out on a tarp in the sun and keep stirring it around fro a while. It gets dry & hot. An oven works too.
The playground sand i start with is pretty dry to start with. There are also industrial sands you can get where dryness is a requirement.
dave
The playground sand i start with is pretty dry to start with. There are also industrial sands you can get where dryness is a requirement.
dave
Now that you mention it, I don't know exactly what happens with "bad" sand.
Bad sand has significant water in it (can still feel dry). Not a good thing to put in a box, particularily MDF. It also engenders growth of nasty stuff.
dave
- Status
- This old topic is closed. If you want to reopen this topic, contact a moderator using the "Report Post" button.
- Home
- Loudspeakers
- Full Range
- Fostex FF85K in the Buschhorn Mk I?