Sanken amplifier listening comments.
terrible! In fact unlistenable. Until I went from passive to active mode on the Microline Drive--then, whoa momma! A little bit of "smiley face" frequency response (unmeasured but easily identified). Mainly like an Icon with smoother frequency extremes, and slightly less deep bass (dampening factor is obviously much higher than the Icon's). Joni Mitchell's "Magdalene Laundry" from the Chieftain's "Tears of Stone" cd was pretty convincing, as was Mary Black's "Song for Ireland". This setup is better overall than the Icon, the space became more 3D-like, deeper, wider..higher. Top end slightly sub-dued compared to the Icon, but doesn't attract as much attention. I guess I could try the Amp sans preamp and see how that is using it's own built in preamp.
terrible! In fact unlistenable. Until I went from passive to active mode on the Microline Drive--then, whoa momma! A little bit of "smiley face" frequency response (unmeasured but easily identified). Mainly like an Icon with smoother frequency extremes, and slightly less deep bass (dampening factor is obviously much higher than the Icon's). Joni Mitchell's "Magdalene Laundry" from the Chieftain's "Tears of Stone" cd was pretty convincing, as was Mary Black's "Song for Ireland". This setup is better overall than the Icon, the space became more 3D-like, deeper, wider..higher. Top end slightly sub-dued compared to the Icon, but doesn't attract as much attention. I guess I could try the Amp sans preamp and see how that is using it's own built in preamp.
continuing adventures...
SE 6BM8 based Phillips receiver (from 1961). er I'm kinda worried about bagging these lil'bastards.
Bass like no tomorrow, everything I thought that could be lacking in all the amps I've tried thus far. Everything is better---top end , imaging , tonality, PRAT (not PRaT, there is a difference). Thankfully very easy to do. I am using the old receiver's "tape playback" jacks and setting its own preamp at a fixed level. Attached the iMac to the inputs and control the output via the controls on the iMac.
The good news: the bass became more acceptable as I placed the speakers on some BB 1-1/2" squares X 3/4"thick on the cabinet. Now the console doesn't vibrate as much. No complaints please, I understand that this is not rigorous in any way, just what I can manage to get done in the limited space I have to use. The receiver is 50 years old, and I am sure it has the same tubes that it has always had in it (and is a beaut, cherry cabinet, 2 pairs of Phillips full rangers insitu, made in Tarawnna no less, by some genuine Canuck") )
)
The bad news: I now need a little stand alone SE 6BM8 amp, cause I can't imagine it getting much better than this. Additional power is not required. Int my dungeon, perhaps 2-3 watts SE is max required. Not trying to stir the pot, but this is by far the best combination I've tried here. I am sure the 300B would be better, and everyone has their favourite amp (catch that one chris ?).
Listening to this in a near-field position 5-6 ' isosceles triangle. kd lange's "Hallelujah" has never sounded this good. I haven't listened via the McCormack amp yet, but at 125 watts/ch RMS it should be able of expelling the little drivers out of their frames (and the enclosure). Guess I better get some power resistors to reduce the dampening factor ...
SE 6BM8 based Phillips receiver (from 1961). er I'm kinda worried about bagging these lil'bastards.
Bass like no tomorrow, everything I thought that could be lacking in all the amps I've tried thus far. Everything is better---top end , imaging , tonality, PRAT (not PRaT, there is a difference). Thankfully very easy to do. I am using the old receiver's "tape playback" jacks and setting its own preamp at a fixed level. Attached the iMac to the inputs and control the output via the controls on the iMac.
The good news: the bass became more acceptable as I placed the speakers on some BB 1-1/2" squares X 3/4"thick on the cabinet. Now the console doesn't vibrate as much. No complaints please, I understand that this is not rigorous in any way, just what I can manage to get done in the limited space I have to use. The receiver is 50 years old, and I am sure it has the same tubes that it has always had in it (and is a beaut, cherry cabinet, 2 pairs of Phillips full rangers insitu, made in Tarawnna no less, by some genuine Canuck
)The bad news: I now need a little stand alone SE 6BM8 amp, cause I can't imagine it getting much better than this. Additional power is not required. Int my dungeon, perhaps 2-3 watts SE is max required. Not trying to stir the pot, but this is by far the best combination I've tried here. I am sure the 300B would be better, and everyone has their favourite amp (catch that one chris
?).Listening to this in a near-field position 5-6 ' isosceles triangle. kd lange's "Hallelujah" has never sounded this good. I haven't listened via the McCormack amp yet, but at 125 watts/ch RMS it should be able of expelling the little drivers out of their frames (and the enclosure). Guess I better get some power resistors to reduce the dampening factor ...
That depends Dave , if you sent me one after I agreed to your terms then no I have yet to get a new message. If in fact that message is the message your referring to then I think I returned it with an answer. LOL. Let me know if theres anything you need from me, you have my e-mail addy.
Nanook, what did you use material wise for final construction? Ply and MDF or just ply? I'd like these made with Maruco Ply (way cheaper than marine ply in my area and I have a friend that owns a lumber yard....) and would like to veneer a pair in quilted maple or waterfall bubinga I have laying around, Oh I have some nice cherry also with lots of heartwood grain hmmm decisions. Anyhow my main question was how did you find construction on these, I have a brad nailer and clamps so they shouldn't be too difficult, any special tips on construction?
Chrisb, if your watching this thread.... How difficult have you found it to get good seems and nice lines with figured veneer around the ports, I'm dreading doing it by hand because the slot isn't wide enough for a flush trim bit, not any I currently have anyhow. And with an xacto knife I've had very limited success with heavy figured veneers, generally with them tearing out along my cut line or causing very uneven cuts, even with a straight edge... Any pointers....?
Anyhow thanks for your time fellahs, it'll help out.
Shane
, if you sent me one after I agreed to your terms then no I have yet to get a new message. If in fact that message is the message your referring to then I think I returned it with an answer. LOL. Let me know if theres anything you need from me, you have my e-mail addy.Nanook, what did you use material wise for final construction? Ply and MDF or just ply? I'd like these made with Maruco Ply (way cheaper than marine ply in my area and I have a friend that owns a lumber yard....) and would like to veneer a pair in quilted maple or waterfall bubinga I have laying around, Oh I have some nice cherry also with lots of heartwood grain hmmm decisions. Anyhow my main question was how did you find construction on these, I have a brad nailer and clamps so they shouldn't be too difficult, any special tips on construction?
Chrisb, if your watching this thread.... How difficult have you found it to get good seems and nice lines with figured veneer around the ports, I'm dreading doing it by hand because the slot isn't wide enough for a flush trim bit, not any I currently have anyhow. And with an xacto knife I've had very limited success with heavy figured veneers, generally with them tearing out along my cut line or causing very uneven cuts, even with a straight edge... Any pointers....?
Anyhow thanks for your time fellahs, it'll help out.
Shane
Shane,
Did you get my email of yesterday re beta?
dave
Nanook, what did you use material wise for final construction? Ply and MDF or just ply? I'd like these made with Maruco Ply (way cheaper than marine ply in my area and I have a friend that owns a lumber yard....) and would like to veneer a pair in quilted maple or waterfall bubinga I have laying around, Oh I have some nice cherry also with lots of heartwood grain hmmm decisions. Anyhow my main question was how did you find construction on these, I have a brad nailer and clamps so they shouldn't be too difficult, any special tips on construction?
Mine are mostly ply (hoop pine, best stuff I could get locally, but I can't recommend it, it's quite soft) with MDF for the port spacers only (they need to be 9mm, which may limit your choices somewhat).
Construction is trivial - build up the side walls (outer wall, spacers, inner wall) with the brad gun, then build up from the base. I found it easiest to clamp the back wall in place and glue the sides, then glue the back in (remember to add your bindings posts/terminals). Route the baffles, drop the drivers in, and test fit with the holey brace. Glue the brace in and line the walls with felt. Glue the top on, wire up your terminals, glue the baffle in, add the drivers, and listen.
[This is not necessarily the best way, just the way I've done it]
Pics tomorrow when I'm finishing the pair.
hi,
I have been reading the most posts in this thread now.. and I discovered a lot of different designs, but I cant tell which of the desktop-designs for listening in the near-field is the best?
Can you maybe give me a suggestion which design I should try for listening in the near-field?
To me it is always very difficult to decide which loudspeaker I should build, because I have no possibilities to listen to them before I have finally finished them.
greetings,
Chris
materials, cabinet design, etc...
Regarding materials, these were built using what is readily available here: Baltic Birch Ply, marine grade, 12.7 mm (1/2"). The slats for the "vents" are BB ply, 10mm, marine grade. Big believer in BB ply as a material. Used 1/2" felt carpet underlay and poly for dampening material. Drivers are Dave's CHR-70eN. The internal dimensions have been strictly adhered to, and a little input from Dave has helped. Perhaps Apple ply or similar might be available where you are at, reportedly very good for enclosures as well. I always strongly advise against MDF for enclosures. Please no "materials" comments, there have been lots of discussions about this here, as well on other forums. Also note the spray painted black vents. This will be sanded down, leaving only the internal vents left black. Every time I see a speaker with lighter coloured vents compared to external finish of the speaker, it looks wrong to me. To be wrapped in Birch veneer, and then finished. I'm thinking either polyurethane or "grain" sealer, then a very red mahogany coloured finish.
Construction is just as TheSeeker has stated, somewhat trivial. Just take your time. With enough carpenters glue, little clamping is required, but suggested. Perhaps the most difficult part is cutting the bevel on the front baffle/sides.
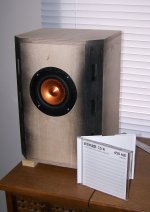
Well I must say that in the nearfield, the beta tested dMar-Ken enclosure sounds great, but is a little large. If desktop listening is what you are after, maybe some of Dave's smaller designs (μMar-Kens? cMar-Kens?) might suit. The dMarkens are approximately 325mm (H) X 230mm (W) X 210mm (D) ( 12 3/4" X 9 1/16" X 8 3/8"), so not small, but not huge either. See the attached picture.Can you maybe give me a suggestion which design I should try for listening in the near-field?
Regarding materials, these were built using what is readily available here: Baltic Birch Ply, marine grade, 12.7 mm (1/2"). The slats for the "vents" are BB ply, 10mm, marine grade. Big believer in BB ply as a material. Used 1/2" felt carpet underlay and poly for dampening material. Drivers are Dave's CHR-70eN. The internal dimensions have been strictly adhered to, and a little input from Dave has helped. Perhaps Apple ply or similar might be available where you are at, reportedly very good for enclosures as well. I always strongly advise against MDF for enclosures. Please no "materials" comments, there have been lots of discussions about this here, as well on other forums. Also note the spray painted black vents. This will be sanded down, leaving only the internal vents left black. Every time I see a speaker with lighter coloured vents compared to external finish of the speaker, it looks wrong to me. To be wrapped in Birch veneer, and then finished. I'm thinking either polyurethane or "grain" sealer, then a very red mahogany coloured finish.
Construction is just as TheSeeker has stated, somewhat trivial. Just take your time. With enough carpenters glue, little clamping is required, but suggested. Perhaps the most difficult part is cutting the bevel on the front baffle/sides.
Attachments
wood filler, etc (chrisb, can you comment on your experiences?)
I am thinking of using autobody filler to fill any gaps and create an absolutely smooth surface for the veneering. Does carpenter's glue work well with this, or would you suggest wood filler?
any comments are welcomed.
thanx
I am thinking of using autobody filler to fill any gaps and create an absolutely smooth surface for the veneering. Does carpenter's glue work well with this, or would you suggest wood filler?
any comments are welcomed.
thanx
Chrisb, if your watching this thread.... How difficult have you found it to get good seems and nice lines with figured veneer around the ports, I'm dreading doing it by hand because the slot isn't wide enough for a flush trim bit, not any I currently have anyhow. And with an xacto knife I've had very limited success with heavy figured veneers, generally with them tearing out along my cut line or causing very uneven cuts, even with a straight edge... Any pointers....?
Anyhow thanks for your time fellahs, it'll help out.
Shane
Shane
I guess there are really 2 parts to this answer, depending on
1) how you like to see the internal slot surfaces finished,
Whether a clear coat or dark paint, I pre-finish the slot internal surfaces during the fabrication of the layered walls - i.e. after the spacers are glued in place, and before attachment of the final panel.
2) the pattern of grain matching and how you actually adhere the veneer to the box
I've found paper backed sheet veneers works best with the iron-on glue method - yellow glue, velour nap paint or veneer glue roller, and clothes iron - particularly for the ease of trimming out the smaller openings we're talking about here.
edit: I'm either too lazy / rushed or short on skills to veneer a speaker enclosure with real (natural/raw) veneers - without some type of backer (kraft paper, wood backed 2-ply) they're invariably very brittle, particularly in the cross grain direction
My own practice is continuous wrapping of the 4 perimeter panels, with the front and back panels center matched from width of sheet. The sequence of overlapping is back/front*/side/side/bottom/top.
*in the case of something like the prime Fonken style with large side chamfers, the front / bevels are one continuous piece, which can be easily folded over the 45` bevel with the iron.
With the iron set to highest temp (linen), there's still a lot of working time. By using the to of the iron, you can quick distinctly outline the boundary of the slots (or rebated driver cutout) to be trimmed out.
Yes, the slots will be too narrow for even 3/8" laminate trim bit, so careful trimming with sharp Olfa utility knife or veneer knife is required. That's where the scorch marks from the hot iron guide you. With some practice (30 or 40 pairs later) the driver opening and port slots can be trimmed out in a single piece - but you might want to start from the center and slowly trim to the demarked edge. You may need to revisit the edges with the iron during the trimming process, and follow up with fine grit PSA sandpaper (150-200 to start) on a wood file or thin stock of wood to dress up the slots, and free hand on edges of rebated driver cut-outs.
Last edited:
I am thinking of using autobody filler to fill any gaps and create an absolutely smooth surface for the veneering. Does carpenter's glue work well with this, or would you suggest wood filler?
any comments are welcomed.
thanx
Chris uses bondo... he might have some tips.
dave
I think bondo etc would be the way to go, particularly if you're using the iron-glue method
I'd say it goes without saying, but as I've said before "that" doesn't work -
it is important that all edges are not rounded over before veneering - rather the opposite to a paint or fabric / vinyl / leather wrapped finish.
Well I must say that in the nearfield, the beta tested dMar-Ken enclosure sounds great, but is a little large. If desktop listening is what you are after, maybe some of Dave's smaller designs (μMar-Kens? cMar-Kens?) might suit. The dMarkens are approximately 325mm (H) X 230mm (W) X 210mm (D) ( 12 3/4" X 9 1/16" X 8 3/8"), so not small, but not huge either. See the attached picture.
Regarding materials, these were built using what is readily available here: Baltic Birch Ply, marine grade, 12.7 mm (1/2"). The slats for the "vents" are BB ply, 10mm, marine grade. Big believer in BB ply as a material. Used 1/2" felt carpet underlay and poly for dampening material. Drivers are Dave's CHR-70eN. The internal dimensions have been strictly adhered to, and a little input from Dave has helped. Perhaps Apple ply or similar might be available where you are at, reportedly very good for enclosures as well. I always strongly advise against MDF for enclosures. Please no "materials" comments, there have been lots of discussions about this here, as well on other forums. Also note the spray painted black vents. This will be sanded down, leaving only the internal vents left black. Every time I see a speaker with lighter coloured vents compared to external finish of the speaker, it looks wrong to me. To be wrapped in Birch veneer, and then finished. I'm thinking either polyurethane or "grain" sealer, then a very red mahogany coloured finish.
Construction is just as TheSeeker has stated, somewhat trivial. Just take your time. With enough carpenters glue, little clamping is required, but suggested. Perhaps the most difficult part is cutting the bevel on the front baffle/sides.
Hi Nanook,
thank you for your reply!
The size of the dMar-ken is no problem for me. The loudspeakers I am using at the moment almost have the same size.
Where can I find further information about this dmar-kens? Actually I couldnt find anything on the net, besides this thread.
And:
What is changed in Daves CHR-70eN driver? And if this special driver is required, where can I get it?
greetings,
Chris
At this moment in time, only two dMar-Ken designs exist, and neither are generally available - aside from a passing reference on the Planet10 website to the Alpair 7 version, this thread is all the information there is to find (other than the plans themselves, which can only be had by agreement with Planet10).
CHR-70eN is just the EnABLed version of CHR-70 - I haven't heard it, so I can't say whether the sound is markedly different, but the design itself will work fine with both first and second generation CHR-70's, with or without EnABL. CHR-70eN is available from Planet10 Hi-fi.
CHR-70eN is just the EnABLed version of CHR-70 - I haven't heard it, so I can't say whether the sound is markedly different, but the design itself will work fine with both first and second generation CHR-70's, with or without EnABL. CHR-70eN is available from Planet10 Hi-fi.
Last edited:
dMar-Kens and CHR-70eN
The CHR-70eN is Dave's modified driver, as seen on his website. He tends to avoid self promotion, as he is one of the moderators here, and he could end up defending himself way too much. He has never (in my experience) disrespected others' work unless a glaring fault. For the amount of work done to the drivers, the premium over the stock ones is worth the extra. The Fe127 (stock Fostex) vs Fe-127eN (modified by Dave) is a no brainer. Someplace someone did a comparison (one of the online audio magazines...6moons?) and greatly preferred the modified drivers. As I have never heard a stock CHR-70, I can't comment, but the differences are expected to be similar to the comparisons to between the Fostex drivers. Someone (not Dave), sells a kit (with instructions) to allow folks to EnABL their own (or is it eNABL?) drivers. The great thing about the CHR-70 drivers is that they have a 4.5mm one way excursion (so 9mm total excursion), which can account for the amazing amount of bass these little guys are capable of.
As I stated earlier in my listening impressions the amplifier choice and sources are very important. Thus far my old Phillips console SE 6BM8 (ECL82) receiver is the best out of class-d, Sanken powered SS, and Nakamichi "Stasis" receiver. Methinks the SE tube amps may ultimately be the best. I need to try my McCormack with them, but feel ultimately it would be at best a compromise. When I get a chance to listen to the big SS amp, I'll post my comments here.
Hi Nanook,
thank you for your reply!
The size of the dMar-ken is no problem for me. The loudspeakers I am using at the moment almost have the same size.
Where can I find further information about this dmar-kens? Actually I couldnt find anything on the net, besides this thread.
And:
What is changed in Daves CHR-70eN driver? And if this special driver is required, where can I get it?
greetings,
Chris
The CHR-70eN is Dave's modified driver, as seen on his website. He tends to avoid self promotion, as he is one of the moderators here, and he could end up defending himself way too much. He has never (in my experience) disrespected others' work unless a glaring fault. For the amount of work done to the drivers, the premium over the stock ones is worth the extra. The Fe127 (stock Fostex) vs Fe-127eN (modified by Dave) is a no brainer. Someplace someone did a comparison (one of the online audio magazines...6moons?) and greatly preferred the modified drivers. As I have never heard a stock CHR-70, I can't comment, but the differences are expected to be similar to the comparisons to between the Fostex drivers. Someone (not Dave), sells a kit (with instructions) to allow folks to EnABL their own (or is it eNABL?) drivers. The great thing about the CHR-70 drivers is that they have a 4.5mm one way excursion (so 9mm total excursion), which can account for the amazing amount of bass these little guys are capable of.
As I stated earlier in my listening impressions the amplifier choice and sources are very important. Thus far my old Phillips console SE 6BM8 (ECL82) receiver is the best out of class-d, Sanken powered SS, and Nakamichi "Stasis" receiver. Methinks the SE tube amps may ultimately be the best. I need to try my McCormack with them, but feel ultimately it would be at best a compromise. When I get a chance to listen to the big SS amp, I'll post my comments here.
- Status
- This old topic is closed. If you want to reopen this topic, contact a moderator using the "Report Post" button.
- Home
- Loudspeakers
- Full Range
- Mark Audio CHR-70 Application Thread