Erin just brought it over and it would most likely be better than the QLS QA-550
I have , it is a week night so could not fully test them against each other .
It is amusing how something so cheap ($50 AUS) can sound so damn good with a 3 wire i2S mod and and nothing else , would love to see how it would sound with a linear PSU and better regulation etc etc
I think I will throw away all my SPDIF coax cables now
I have connected the i2s lines from my Western Digital mini to my analogmetric TDA1541 DAC.
Hi Erin
Could you post a photo of this mod please
Cheers
Hi Erin
Could you post a photo of this mod please
Cheers
I will try my best to post a picture tonight. I am at work now.
Dont worry, the photo and instructions are coming! - about 9 hours away....
nice! wonder if HD or live and plus versions would be just as high performance.
I would certainly be curious to know the anwer to that one as well.
If anyone in Melbourne has one they are happy for me to mod, let me know and then we can find out....
I would certainly be curious to know the anwer to that one as well.
If anyone in Melbourne has one they are happy for me to mod, let me know and then we can find out....
Out of the box, the WD TV Live HD sounded markedly better than a friend's $50 special from Office Works.
Later Firmware perhaps ? The WD TV Live sounds better again with a good linear 12V regulated PSU.
SandyK
Hi SandyK,
Bearing in mind that IMHO, the WD mini sound terrible using analog outs or SPDIF......
But I aknowlege your comments about the other ones sounding better than the WD mini with the SPDIF output.
Running the i2s direct to an external DAC puts the WD mini in a different league.
Bearing in mind that IMHO, the WD mini sound terrible using analog outs or SPDIF......
But I aknowlege your comments about the other ones sounding better than the WD mini with the SPDIF output.
Running the i2s direct to an external DAC puts the WD mini in a different league.
Last edited:
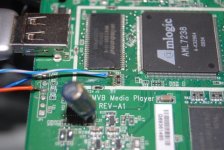
Here are the instructions for extracting i2s (philps format) from the WD mini
Here are the instructions for extracting i2s (philps format) from the WD mini media player.
1) open the case by removing the 4 rubber feet on the bottom of the case then remove the screws
2) remove the board
3) there is a metal EMR shield covering the IC's. You need to remove this shield to get access to the data line of the i2s.
Removing the shield is a bit difficult because of the lead free solder used.
there are six tabs attaching the shield to the PCB. I ended up cutting the centrally located mounting tab and then:
using some fresh solder applied to the next mounting point, and holding the iron tip in place, pry the shield away from the board until the mounting tab is free.
Repeat this process on the next tab until the shield is free at one end and keep doing this until the shield is held only by the far end centre tab, then cut this one off.
Now the shield is removed. (*note: it is probably possible to carefully cut all the tabs, rather than removing with the above method, as the shield seems to be there so the device passes EMR emissions testing, rather than to protect the circuit from interference. The unit works fine without the shield.)
4) there is a SMD resistor array of three resistors. the resistor furthest away from the DAC, and closest to the microprocessor is the one that has the i2s data line.
here you can solder your wire.
5) next to the USB port there is a blank header on the board, here you can access the other data lines.
The pinout of the header starting furthest from USB is as follows:
pin 1 3.3 v
pin 2 gnd
pin 3 master clock
pin 4 left right clock or (word select)
pin 5 unknown - but it is not data - that’s why you have to remove the shield!
Pin 6 bit clock
Now you can connect wires to the bit clock, LR clock and Data and connect these to your DAC
Photo of board to come.....
Thanks for such detail Erin
I'm fairly new to all this but am currencty working on this DAC (Welcome to the Audio DAC page) as made by many members here.
Can you give me any advise on how these units can be connected as I will be using a 75ohm RCA connection.
Failing that working as I think the voltages are different, I could just build another DAC board like this http://www.diyaudio.com/forums/swap-meet/172400-tda1541-dac-board-stuffed-more.html
Thanks again
I'm fairly new to all this but am currencty working on this DAC (Welcome to the Audio DAC page) as made by many members here.
Can you give me any advise on how these units can be connected
as I will be using a 75ohm RCA connection. Failing that working as I think the voltages are different, I could just build another DAC board like this
http://www.diyaudio.com/forums/swap-meet/172400-tda1541-dac-board-stuffed-more.htmlThanks again
Hi Dagwood,
The photos will have to wait for tomorrow night. sorry.
I'm not quite following you but i think ive covered all bases here:
Firstly for i2s you dont use 75ohm connections just a short wire
If you want to use the WD mini with a 75 ohm connection you just remove the optical (toslink) connector and fit an RCA connector in its place. But really don't bother it sounds poor with SPDIF.
To make your life easier build the analogmetric TDA1541 kit standard version http://www.analogmetric.com/goods.php?id=428.
OR a DAC that natively accepts philips i2s
OR give this pre-made one a go:
TDA1541A x4 DAC Module (CS8414 & NE5534)_USB DAC/DAC Kit_Analog Metric Limited - DIY Audio Kit
never tried it, but might be OK???
(sorry I cant help myself - I love the TDA1541 - in Non oversampling mode)
That DAC http://members.chello.nl/~m.heijligers/DAChtml/dactop.htm looks like a cool project, and I bet it sounds darn good, but to use it with this WD mini is going to cause you some trouble.
if you want to use the PCM63 you need to use shift registers, inverters, and flip flops to convert philips i2s to sony i2s. Boring!! (and i suspect a loss of naturalness of sound when doing this - just my guess - no experience here.
have a look at this website for what you would be in for if you want to do this with the PCM63. Yuk! LOL.
Justblair's Audio and Electronics Pages: Creating a DIY non oversampling DAC with PCM1704
Last edited:
Hey Erin
No hurry for the pics ( do you ever sleepIt must be 2am in Oz )
Every days a school day! man what a can of worms!
I'm still going to try and pick up a WD mini on the way through Singapore in a couple of weeks. Once settled back in NZ I will have a look into another DAC project as you have listed, I much prefer a kit or scratch building not mad keen on the cost or lack of input on ready made kits.
Anyways thanks for the advise and I will keep an eye on your thread.
 Christmas is coming!! Wife might splash out on a BOM from Mouser!
Cheers
No hurry for the pics ( do you ever sleep
It must be 2am in Oz )Every days a school day! man what a can of worms!
I'm still going to try and pick up a WD mini on the way through Singapore in a couple of weeks. Once settled back in NZ I will have a look into another DAC project as you have listed, I much prefer a kit or scratch building not mad keen on the cost or lack of input on ready made kits.
Anyways thanks for the advise and I will keep an eye on your thread.
Christmas is coming!! Wife might splash out on a BOM from Mouser!Cheers
Photo of board attached.Here are the instructions for extracting i2s (philps format) from the WD mini media player.
1) open the case by removing the 4 rubber feet on the bottom of the case then remove the screws
2) remove the board
3) there is a metal EMR shield covering the IC's. You need to remove this shield to get access to the data line of the i2s.
Removing the shield is a bit difficult because of the lead free solder used.
there are six tabs attaching the shield to the PCB. I ended up cutting the centrally located mounting tab and then:
using some fresh solder applied to the next mounting point, and holding the iron tip in place, pry the shield away from the board until the mounting tab is free.
Repeat this process on the next tab until the shield is free at one end and keep doing this until the shield is held only by the far end centre tab, then cut this one off.
Now the shield is removed. (*note: it is probably possible to carefully cut all the tabs, rather than removing with the above method, as the shield seems to be there so the device passes EMR emissions testing, rather than to protect the circuit from interference. The unit works fine without the shield.)
4) there is a SMD resistor array of three resistors. the resistor furthest away from the DAC, and closest to the microprocessor is the one that has the i2s data line.
here you can solder your wire.
5) next to the USB port there is a blank header on the board, here you can access the other data lines.
The pinout of the header starting furthest from USB is as follows:
pin 1 3.3 v
pin 2 gnd
pin 3 master clock
pin 4 left right clock or (word select)
pin 5 unknown - but it is not data - that’s why you have to remove the shield!
Pin 6 bit clock
Now you can connect wires to the bit clock, LR clock and Data and connect these to your DAC
Enjoy!
Attachments

Dagwood,
You are most welcome.
If you want to use a media player as a transport with i2s with your Burr Brown Dac, the TEAC wap2200 http://www.diyaudio.com/forums/digital-source/153462-teac-wap2200-whats-inside.html
( i think) uses EAIJ (sony format) i2s which should interface directly to your PCM63 DAC. ( but do your own research to confirm this)
Although I don't know what it sounds like and whether this is a viable alternative???
I can highly recommend the WD mini as a genuinely audiophile stand alone HDD music source. Although it sounds better with a flash drive than with the HDD.
I will have to try a USB isolator ADuM4160 USB Isolator board, bare PCB and kits « Circuits@Home and see if this makes an improvement when using a HDD.
Perhaps this is the end of this thread?
I think my question is answered.
There are many people who want a stand alone HDD source of audiophile quality.
What I have built achieves all that I wanted.
I don't have to have the computer turned on to listen to music.
It sounds about 20 times better than my best attempt at a PC source (cPlay + CMP - fully optimised ) It beats or equals many respected CD / SACD players. It gives genuinely good audiophile sound.
A downside is that although it will play 24/96 high resolution files it only outputs maximum 48khz.
I use a little 7" monitor bought from ebay for about $100 connected to the WD mini for viewing the GUI.
There is a remote control. It interfaces to my TDA1541 DAC. I couldn't be happier.
Now i just need to put it neatly into a box.
I cant recommend this highly enough.
I think this project would bring much enjoyment to many people.
happy DIYing!
Last edited:
Hi Erin,
That's a great solution for having my flacs played on my TDA1541 DAC.
Now I'm using PC(foobar)->PCM2707->I2S->TDA1541A
Are these mods also possible on the WD TV HD ?
Here are some inside pics: New WD Media Player HD Stripped Naked
Regards,
Danny
That's a great solution for having my flacs played on my TDA1541 DAC.
Now I'm using PC(foobar)->PCM2707->I2S->TDA1541A
Are these mods also possible on the WD TV HD ?
Here are some inside pics: New WD Media Player HD Stripped Naked
Regards,
Danny
Hi Erin,
That's a great solution for having my flacs played on my TDA1541 DAC.
Now I'm using PC(foobar)->PCM2707->I2S->TDA1541A
Are these mods also possible on the WD TV HD ?
Here are some inside pics: New WD Media Player HD Stripped Naked
Regards,
Danny
How you are playing music now, is virtually the same as what I was doing.
The WD mini sounds so much better than that.
The new WD HD media player uses a different chipset so I am unable to comment on that. I do believe that it is possible to strip the i2s from HDMI, but I have not done this yet. I think the above mods to the WD mini can be done to the WD live as well, but I am concerned that the network chips in the Live may add some switching noise. That is why I think the Mini is so good, because it is so simple.
Last edited:
Although it sounds better with a flash drive than with the HDD...
Hi, Erin!
Maybe the problem with the way of power supply of the HDD, I mean from the USB or external PS? Have you tried both types?
- Status
- This old topic is closed. If you want to reopen this topic, contact a moderator using the "Report Post" button.
- Home
- Source & Line
- Digital Source
- Do Audiophiles want a stand alone high end HDD source?