Hello Random_Walk,
I can't wait to PLAY the finished job
Now that the weather is cooling back down, and the temp. in my shop is livable, I should have some progress to report soon.
-Casey
Can't wait for the pictures of the finished job.
I can't wait to PLAY the finished job
Now that the weather is cooling back down, and the temp. in my shop is livable, I should have some progress to report soon.
-Casey
valveitude said:Now that the weather is cooling back down, and the temp. in my shop is livable, I should have some progress to report soon.
Look forward to it - this has to be one of the longest single on-going hi-fi projects I have read about........................
Ropie-
Thanx for the..err.. reminder
-Casey
this has to be one of the longest single on-going hi-fi projects I have read about
Thanx for the..err.. reminder
-Casey
turntable
When it comes to machining things I am a real idiot but I have been following the construction of your tabel. I currently have a Nottingham and am impressed with what you are doing. I wish I had that talent and am really excited to see the final product.
Great job and hugely impressive.
When it comes to machining things I am a real idiot
but I have been following the construction of your tabel. I currently have a Nottingham and am impressed with what you are doing. I wish I had that talent and am really excited to see the final product.Great job and hugely impressive.
Hello Fomob,
Thank you for your kind words
For those that are interested, I started the project back up this weekend . I am currently laying out my new motor assembly, and I hope to start making a mess as soon as I finalize the design and collect all the bits...I'm off to the hardware store.
Later,
-Casey
Thank you for your kind words
For those that are interested, I started the project back up this weekend
. I am currently laying out my new motor assembly, and I hope to start making a mess as soon as I finalize the design and collect all the bits...I'm off to the hardware store.Later,
-Casey
After a l-o-n-g ..umm..sabbatical, the chips are once again flyin’ in the shop. I found myself at a impasse in the battle to rid the table of noise from the motor, and needed a break to sort things out. Well, the ‘break” turned into 6 months, but I think I’m back on track.
I was approaching the noise problem the wrong way. First I was trying to get rid of it by mass loading, and when that fell short, went off on a bunny trail trying to isolate the noise in the bottom plynth from the top (bubble wrap anyone…sheesh). I have since regained at least some of my sanity and realized isolating the plynths was a bandage on my knee for a sore on my elbow...I shouldn’t have noise to isolate.
After a great deal of thought I realized I had to let the vibrational energy dissipate in a controlled manner, and I had to isolate this dissipation from the motor assembly. This is what I came up with…
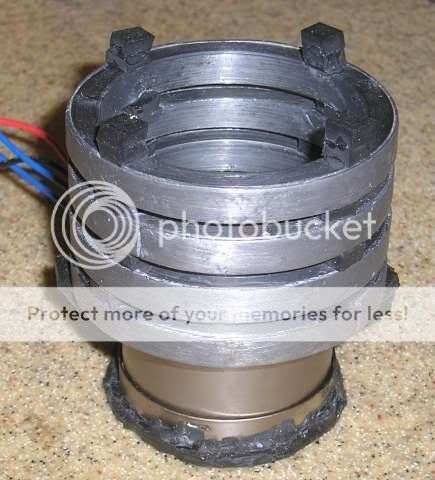
…I machined a series of steel rings and wrapped them in lead. I then suspended the rings with Sorbothane blocks between them. Each ring is allowed to vibrate all it wants, and the energy gets less and less the further up the “ladder” you go. It really is amazing how well this works. I had the "Family Units" first feel the motor and rings while it was running, and then feel a piece of steel I had sat on it in place of the plate that would get mounted on the top…I had a David Copperfield moment from the “how can that be” expressions on their confused faces…you could just barely make out the slightest vibration if you held your fingertips lightly on the top. Now this isn’t how it goes together, but it does demonstrate that in principle the theory is sound. The mount will hang from the top plate in the final assembly.
Makin’ the plate..did I mention I need a bandsaw…

…this is the 5/8” thick steel plate I chain drilled to get the stock to make the top plate. Here is the plate machined out to hold the bearings/spindle…

…and here is the spindle with the mounted bearing…
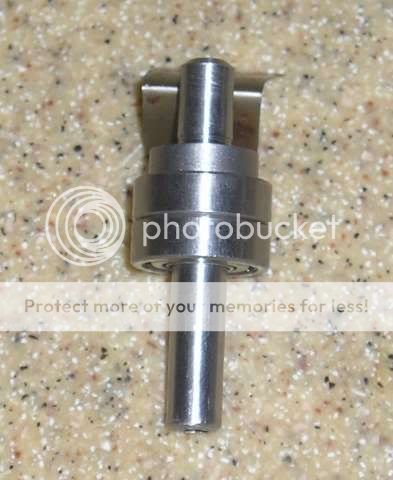
…and finally (for the moment), the pieces put together…
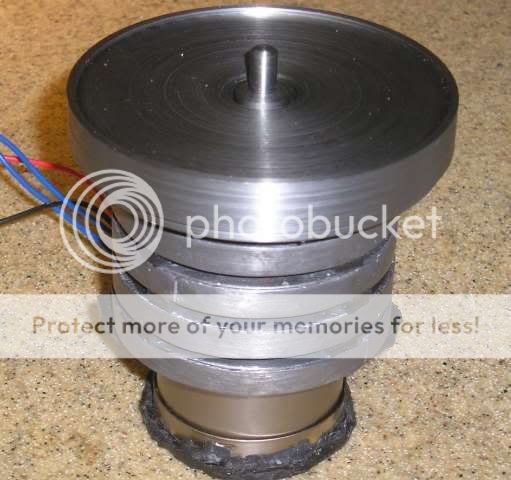
The coupler between the motor and the spindle will be similar to the motor mount...a series of steel discs separated by Sorbothane .
Stay tuned….
-Casey
I was approaching the noise problem the wrong way. First I was trying to get rid of it by mass loading, and when that fell short, went off on a bunny trail trying to isolate the noise in the bottom plynth from the top (bubble wrap anyone…sheesh). I have since regained at least some of my sanity and realized isolating the plynths was a bandage on my knee for a sore on my elbow...I shouldn’t have noise to isolate.
After a great deal of thought I realized I had to let the vibrational energy dissipate in a controlled manner, and I had to isolate this dissipation from the motor assembly. This is what I came up with…
…I machined a series of steel rings and wrapped them in lead. I then suspended the rings with Sorbothane blocks between them. Each ring is allowed to vibrate all it wants, and the energy gets less and less the further up the “ladder” you go. It really is amazing how well this works. I had the "Family Units" first feel the motor and rings while it was running, and then feel a piece of steel I had sat on it in place of the plate that would get mounted on the top…I had a David Copperfield moment from the “how can that be” expressions on their confused faces…you could just barely make out the slightest vibration if you held your fingertips lightly on the top. Now this isn’t how it goes together, but it does demonstrate that in principle the theory is sound. The mount will hang from the top plate in the final assembly.
Makin’ the plate..did I mention I need a bandsaw…
…this is the 5/8” thick steel plate I chain drilled to get the stock to make the top plate. Here is the plate machined out to hold the bearings/spindle…
…and here is the spindle with the mounted bearing…
…and finally (for the moment), the pieces put together…
The coupler between the motor and the spindle will be similar to the motor mount...a series of steel discs separated by Sorbothane .
Stay tuned….
-Casey
A slight change of plans
Diddleing around with the motor, contemplating the best way to couple the shafts, I realized that my planned disc/Sorbothane stack would change the compliance of the mount as a whole considerably. Since it would have a positive contact to the motor, and via the bearing, the top plate, it would restrict the motor movement more than I intended.
Staring at my problem, some long dormant memory cells woke up, and I recalled working on a Dremel tool I had seriously abused. It had a small piece of PVC tubing coupling the chuck to the motor to isolate the motor noise…Beauty !
Not only should this work great, it reduces the work considerably..win-win
valveitude said:akin’ the plate..did I mention I need a bandsaw…-Casey
More like a plasma cutter. Or, much better yet, a friend with a plasma cutter, so it's not in the way when you're not using it.
The gallery eagery awaits all progress.
Sheldon
Hey Sheldon,
"Hey Buddy, can you spare a plasma cutter"
or
" Honey, it's Casey again..he uses that thing more than you do"
Or, much better yet, a friend with a plasma cutter
"Hey Buddy, can you spare a plasma cutter"
or
" Honey, it's Casey again..he uses that thing more than you do"
valveitude said:
Staring at my problem...
...It had a small piece of PVC tubing coupling the chuck to the motor to isolate the motor noise…Beauty !
Not only should this work great, it reduces the work considerably..win-win
...talk about turning a problem on its head !!
Dude you make me sick !
There again, I guess you deserve to own such a cool TT after all the hours you've spent sweating over that 'little' baby of yours (!)

We're watching, & literally 'willing' you on . . .
Best of Luck Mate !
-Andy-
Hello Andy,
Don't be a hater.
I just wish I had remembered this slick trick before I roughed out the stock to make the discs.
I really appreciate the encouragement, I live in the sticks and the only people who have actually seen the project first hand are my family (naturally they feel I'm loco)...Thank you.
-Casey
Dude you make me sick !
Don't be a hater.
I just wish I had remembered this slick trick before I roughed out the stock to make the discs.
We're watching, & literally 'willing' you on . . .
I really appreciate the encouragement, I live in the sticks and the only people who have actually seen the project first hand are my family (naturally they feel I'm loco)...Thank you.
-Casey
Case,
YOUR an encouragement to US !!!
I think I'm right in saying, on behalf of everyone ....(all together now!)
"THANKS" - for taking the time to share all this with us !
We appreciate what effort it takes to take the pics, and uploading...on top of all the work you put in.
BUT, HEY - Your an international star now dude (!)
Andy-
More like “Notorious Idiot Savant”
jrevillug-
Until I bought the new motor ($80), my total investment (excluding the substantial amount of time)was around $75 up to this point..mostly fasteners and adhesive. The bulk of the materials were scrounged out of the bin. The Corion came from a cabinet shop that was tossing the sink "cut-outs", and the lead sheeting came from the "cut-offs" from the construction of a x-ray room at a hospital...both were given to me for the asking. This project wouldn't exist in its current form if I had to buy these materials at market prices.
I settled on the tubing for my de-coupler. I bought a piece of 3/16" OD piece of clear PVC tubing, and was faced with my first challenge...straightening it out. This stuff is as curly as a pigs tail ! I slid a dill bit in it, and "baked" it in the oven at 170 deg. for about 20 min. until it got soft, then let it cool. Pulling the bit out, I had a section of tubing straight as an arrow.
Now that the weekend is starting, I hope to have the rest of the motor assembly finished in the next couple of days
-Casey
Your an international star now dude
More like “Notorious Idiot Savant”
jrevillug-
I am looking at building a DIY TT, but at a super-low budget (think £75 (~145USD) inc. arm and AT-110e Cart.)
Until I bought the new motor ($80), my total investment (excluding the substantial amount of time)was around $75 up to this point..mostly fasteners and adhesive. The bulk of the materials were scrounged out of the bin. The Corion came from a cabinet shop that was tossing the sink "cut-outs", and the lead sheeting came from the "cut-offs" from the construction of a x-ray room at a hospital...both were given to me for the asking. This project wouldn't exist in its current form if I had to buy these materials at market prices.
I settled on the tubing for my de-coupler. I bought a piece of 3/16" OD piece of clear PVC tubing, and was faced with my first challenge...straightening it out. This stuff is as curly as a pigs tail ! I slid a dill bit in it, and "baked" it in the oven at 170 deg. for about 20 min. until it got soft, then let it cool. Pulling the bit out, I had a section of tubing straight as an arrow.
Now that the weekend is starting, I hope to have the rest of the motor assembly finished in the next couple of days
-Casey
jrevillug said:I agree with NjoyTHEMUSIC.
I am looking at building a DIY TT, but at a super-low budget (think £75 (~145USD) inc. arm and AT-110e Cart.)
I am not worthy
I've been playing about with a couple of TT's now, but would love to get on and champion a solid (ie, "non suspension" TT - 'Casey style' (heh heh...sorry Case, you've started something now !!)
Jrevillug, I rekon we can work on some ideas between ourselves, cobble some materials together and make a start - whadda ya say ? We can share our findings with all on here ??
AT-110e - Line contact profile If I'm correct ?? - A good basic start !
What arm are you thinking of ?
-Andy-
I settled on the tubing for my de-coupler. I bought a piece of 3/16" OD piece of clear PVC tubing, and was faced with my first challenge...straightening it out. This stuff is as curly as a pigs tail ! I slid a dill bit in it, and "baked" it in the oven at 170 deg. for about 20 min. until it got soft, then let it cool. Pulling the bit out, I had a section of tubing straight as an arrow.
Hi Casey. I thot Id wade in as this project is dear to my heart and I am so happy to see it moving again.
2 things from my past playing around - if you are going to use clear PVC for a drive coupler, fill the space between the two shaft ends with something non-compressible (i.e. not air). Even with a very small amount of torque, the PVC walls will loose their stiffness in a short while and the airspace will twist up like a used bit of kleenex, collapsing the airspace and warping the walls of the tube. Fill it with some suitable material like grease, silicon or sand, and it will not collapse.
Also, if you want to reshape PVC without any chance of overdoing the heat, shape it the way you want, then dunk it in boiling water for 30-40 seconds and let it cool. That way, no chance of shriveling it up or setting it on fire in the oven.
Don't feel bad about the time this project is taking - I just finsihed a set of hifi racks; you know... sand-filled shelves, spikes on each shelf, mass-loaded frame with full tenon jointry. They came out very nice. I built them with a buddy who has a spectacular wood shop. Despite having the best selection of tools and more than ample space and materials they still took over 6 months!

BTW: are you still using your shot-filled motor pulley design (i really liked that one
)Ever onward...
Jess
Andy-
Though I admit my TT has a unique asthetic style (for better or worse),and its the first I know of with the combinations of materials I used, but I am far from the first one to build a mass loaded table..do a search in this forum and you will find some amazing examples ( Vinyl-Addict has posted some pics of his table for example..there are many others).
JesseG-
You've got me curious (concerned) with your experience using PVC as a coupler. I can see what your saying, but, the Dremel tool I mentioned was used (abused) as a die grinder to the point it was uncomfortable to hold. The failure was the coupling..but dang..I had to try to break it. My motor has less than 3 in/oz of torque, and I'm not sure it could twist the tubing under any circumstances..I may well be wrong about this, which is why I'm asking about your experience.
The oil idea is a good one though, and I'll consider implementing it anyway. As far as forming the tube with boiling water, I wish I had thought of it. I will definately do it this way if I have to form another piece...much safer for the plastic.
Thanx,
Casey
(ie, "non suspension" TT - 'Casey style'
Though I admit my TT has a unique asthetic style (for better or worse),and its the first I know of with the combinations of materials I used, but I am far from the first one to build a mass loaded table..do a search in this forum and you will find some amazing examples ( Vinyl-Addict has posted some pics of his table for example..there are many others).
JesseG-
2 things from my past playing around - if you are going to use clear PVC for a drive coupler, fill the space between the two shaft ends with something non-compressible (i.e. not air). Even with a very small amount of torque, the PVC walls will loose their stiffness in a short while and the airspace will twist up like a used bit of kleenex, collapsing the airspace and warping the walls of the tube. Fill it with some suitable material like grease, silicon or sand, and it will not collapse.
You've got me curious (concerned) with your experience using PVC as a coupler. I can see what your saying, but, the Dremel tool I mentioned was used (abused) as a die grinder to the point it was uncomfortable to hold. The failure was the coupling..but dang..I had to try to break it. My motor has less than 3 in/oz of torque, and I'm not sure it could twist the tubing under any circumstances..I may well be wrong about this, which is why I'm asking about your experience.
The oil idea is a good one though, and I'll consider implementing it anyway. As far as forming the tube with boiling water, I wish I had thought of it. I will definately do it this way if I have to form another piece...much safer for the plastic.
Thanx,
Casey
Something that keeps nagging at me with these belt driven type TTs is the unbalanced force on the shaft of the rotating motor.
I.e. being pulled in the direction of the centre vector on the side of the LP. Which is in stark contrast to the balanced weight dispersal of say a direct motor shaft balanceing the LP on top.
Would there not be a benefit to have a "counter-belt" running around a spindle 180degrees oposite to the centre of the TT bearing i.e. you would have TT bearing/spindle assembly , motor assembly, and balanceing assembly in a straight line in that order.
With the 2 belts exerting equal but oposite force on the motor..... hmmmmm DJ table with 2 platters
- Status
- This old topic is closed. If you want to reopen this topic, contact a moderator using the "Report Post" button.
- Home
- Source & Line
- Analogue Source
- Corian Turntable Fun