Hello rdf,
Egg-suh-lent...I can feel the symptoms of my neurosis fading. The hives are drying up, and the scaly-itching is no more . I guess I'm back to plan "A" of laminating a vinyl donut made from a recycled album to the platter (assuming I can get a nice flat-glossy surface), or plan "B" of a epoxy paint finish on the Corian. If I find I manage to pepper a LP with crud, I'll look into a different mat.
Thanx.
In twenty years of use I haven't noticed any problem stemming from my VPI's hard acrylic platter. Sweeping it regularly with a record brush seems good enough.
Egg-suh-lent...I can feel the symptoms of my neurosis fading. The hives are drying up, and the scaly-itching is no more
. I guess I'm back to plan "A" of laminating a vinyl donut made from a recycled album to the platter (assuming I can get a nice flat-glossy surface), or plan "B" of a epoxy paint finish on the Corian. If I find I manage to pepper a LP with crud, I'll look into a different mat.Awesome work by the way.
Thanx.
If you're still leaning towards a soft surface you might look into something like sorbathane. www.mcmaster.com has 1/8 inch thick 12 inch by 12 inch sheets in 4 different hardnesses (?) for $15.35 plus shipping. They range from somewhat soft to fairly stiff. Going to 3/16 inch will add a 5th squirmy soft option . Page 3303 in their catalog.
Tom.
. Page 3303 in their catalog.Tom.
Hello renfrow,
I think the sorbathane would be too lossy for my platter. Materials like sorbathane are great when your trying to isolate bearing noise & platter resonance. I've attempted to build a bearing/platter combo that deals with these problems at there source(s), time will tell if I succeeded. If not ( after bumming for a while) I can always use something lossy as a bandaid.
My main goal was to find something only soft enough for a dust particle to push into instead of the vinyl, and just thick enough to accomadate said particle. I'm still interested in any and all suggestions, but after rdf's testimonial, I'm going to try my original hard surface first.
Casey
If you're still leaning towards a soft surface you might look into something like sorbathane.
I think the sorbathane would be too lossy for my platter. Materials like sorbathane are great when your trying to isolate bearing noise & platter resonance. I've attempted to build a bearing/platter combo that deals with these problems at there source(s), time will tell if I succeeded. If not ( after bumming for a while) I can always use something lossy as a bandaid.
My main goal was to find something only soft enough for a dust particle to push into instead of the vinyl, and just thick enough to accomadate said particle. I'm still interested in any and all suggestions, but after rdf's testimonial, I'm going to try my original hard surface first.
Casey
Here is another acrylic deck....
http://www.dnaudio.com/Nordic_concept.html
Heavy 80mm acrylic platter that is non-concave for constant VTA over the record surface...
http://www.dnaudio.com/Nordic_concept.html
An externally hosted image should be here but it was not working when we last tested it.
An externally hosted image should be here but it was not working when we last tested it.
An externally hosted image should be here but it was not working when we last tested it.
If you want to use a record for a matt, but are concerned about getting a nice shiny surface, look in your local dance music shop. Some white labels (short runs of a tune) are only cut on one side, the b side being blank.
I know there will still be the problem of the center and outer rim being thicker, but could they just be taken down thinner than the rest? Does that make sense?
Lovely work by the way.
I know there will still be the problem of the center and outer rim being thicker, but could they just be taken down thinner than the rest? Does that make sense?
Lovely work by the way.
In my experience, Camel leather (it is yellow and some have it to clean their car), is a very good mat material. You could perhaps give it a try. I presume that you can make your choices in the end, acoustically evaluating your SPECTACULAR construction.
Posting your construction in such a beautiful way, step by step, I’m sure you motivate many people to get into their workshop
Posting your construction in such a beautiful way, step by step, I’m sure you motivate many people to get into their workshop
Hi Nordic,
Very nice table.
Hello graeme uk,
Stellar idea ! I’ll have to see if I can find a couple of those to play with…Thank you
Hello thalis,
My wife makes baby moccasins as a hobby (someone is always having a baby), and has a lot of different soft leathers I could try…good idea.
I don’t have any audiophile friends locally, and sharing a project just makes it more fun. I decided to post the project so that I could “virtually” have some guys come over and check out my progress, and offer some advice every now and then. Knowing that people are watching is also a little motivational boost.
Thanx for the compliment.
I was really suffering from lead-in-the-****-itis this weekend, being that I’m still a little sore from the work of last weekend. I had planned to finish up the motor housing and mounting, but I never got past the motor feet…

…I also re-worked the pulley a little. My first belt was made from a well-worn VHS tape. I discovered that the optimal profile for a stretched piece of recording tape, isn’t for a proper belt made of new Mylar…go figure. The profile had too much of a curve, and getting it aligned was extremely finicky. I flattened the face enough that all but about 1/16” on either side is not contacting the pulley, and the remaining Mylar is riding on the flat section. Works great.
At least I got something done.
Casey
Very nice table.
Hello graeme uk,
Stellar idea ! I’ll have to see if I can find a couple of those to play with…Thank you
Hello thalis,
My wife makes baby moccasins as a hobby (someone is always having a baby), and has a lot of different soft leathers I could try…good idea.
I don’t have any audiophile friends locally, and sharing a project just makes it more fun. I decided to post the project so that I could “virtually” have some guys come over and check out my progress, and offer some advice every now and then. Knowing that people are watching is also a little motivational boost.
Thanx for the compliment.
I was really suffering from lead-in-the-****-itis this weekend, being that I’m still a little sore from the work of last weekend. I had planned to finish up the motor housing and mounting, but I never got past the motor feet…
…I also re-worked the pulley a little. My first belt was made from a well-worn VHS tape. I discovered that the optimal profile for a stretched piece of recording tape, isn’t for a proper belt made of new Mylar…go figure. The profile had too much of a curve, and getting it aligned was extremely finicky. I flattened the face enough that all but about 1/16” on either side is not contacting the pulley, and the remaining Mylar is riding on the flat section. Works great.
At least I got something done.
Casey
You're doing great!
I've been following your thread for awhile, just wanted to post in and let you know that we are out there! You're getting close-the way you've perservered is very, very admirable.
I bought a cheap rek-o-kut belt drive for the bearing and motor to do a project similar to yours. The bearing is great-mic'ed .0002 between shaft and bushing, with a spiral oil groove in shaft-plus, it comes with a nice Pabst motor.
Hope to be able to post photos someday, but you are giving me a high goal to attain!
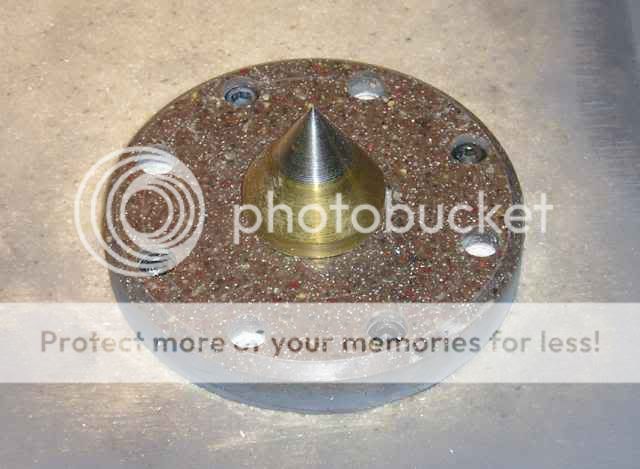
valveitude said:…I wasn’t sure my bearing would be sturdy enough for this, I shouldn’t have worried…this is not your fathers turntable bearing. I was amazed at just how little the platter vibrated during this. I do believe my lead/Corion lamination would go in the “good idea” column. [/B]
The entire Koln (cologne) cathedral is suspended or built in it's base with layers (between the bricks and slabs in the pillars) with LEAD as a method of earthquake proofing. Apparently the science is very sound. And, even then, it was supposedly an old idea by the time they used it on the cathedral.
So yeah, lead works.
valveitude said:Hello rdf,
Egg-suh-lent...I can feel the symptoms of my neurosis fading. The hives are drying up, and the scaly-itching is no more
Thanx.
Make sure you use an old record, if you play old records primarily, or a 60'-70s album if you play modern vynil, if you want the mass characteristics to match for good transfer. Transfer good, reflection bad.
motor ideas
Other neat motors are the 24 pole 'el giaganto' motors from 8" floppy drives and similar devices from that time period. One can use them in conjunction with modern variable speed motor drives. Just be sure to use custom PS, custom output section mods and custom clocks on the motor drive.
To smooth out the tape from vibration, try leaning something like a spring loaded feather duster (similar) against the tape.
Where are you Now
I just read your amazing journey building this turntable, plinth, and base. I was just wondering.... what is the state of the project at this point in time?
Have you designed and built a tone arm and mounting apparatus?
Bueautiful work. Maybe you can do a group buy for Badman and me
I just read your amazing journey building this turntable, plinth, and base. I was just wondering.... what is the state of the project at this point in time?
Have you designed and built a tone arm and mounting apparatus?
Bueautiful work. Maybe you can do a group buy for Badman and me
Hello Davet,
I have been momentarily side-tracked...I recently purchased a Fisher 800C tube receiver, and have been busy getting it sweetened up
I will be resuming the project in about a week. Currently I have been having some trouble completely isolating the AC motor noise from the top plinth. It's amazing to me that inspite of the lengths I've gone so far that ANY noise is making it to the plinth, yet using a piece of steel rod as a makeshift stethascope I can hear it...grrr I have a couple more ideas to try out before I give up and work on a DC motor instead. It is at a very low level, and the platter is free of any hum, but I have set the bar VERY high for myself.
As for the arm, I will make a Ladegaard first to get it up and running quickly, then I will be working on my own linear tracking design. Both arms will be "Pod" mounted with indexed spiked feet.
Considering my noise problem, I may have to discount it
Hello KBK,
Sorry for waiting so long to reply
Well there you go then
The floppy drive motor is on deck if I can't get the current motor isolated.
Later,
Casey
I have been momentarily side-tracked...I recently purchased a Fisher 800C tube receiver, and have been busy getting it sweetened up
I will be resuming the project in about a week. Currently I have been having some trouble completely isolating the AC motor noise from the top plinth. It's amazing to me that inspite of the lengths I've gone so far that ANY noise is making it to the plinth, yet using a piece of steel rod as a makeshift stethascope I can hear it...grrr
I have a couple more ideas to try out before I give up and work on a DC motor instead. It is at a very low level, and the platter is free of any hum, but I have set the bar VERY high for myself.As for the arm, I will make a Ladegaard first to get it up and running quickly, then I will be working on my own linear tracking design. Both arms will be "Pod" mounted with indexed spiked feet.
Bueautiful work. Maybe you can do a group buy for Badman and me
Considering my noise problem, I may have to discount it
Hello KBK,
Sorry for waiting so long to reply
The entire Koln (cologne) cathedral is suspended or built in it's base with layers (between the bricks and slabs in the pillars) with LEAD as a method of earthquake proofing. Apparently the science is very sound. And, even then, it was supposedly an old idea by the time they used it on the cathedral.
Well there you go then
The floppy drive motor is on deck if I can't get the current motor isolated.
Later,
Casey
The Fisher is singing, the speakers are thumping, and the boxes of 300+ currently un-playable LP's are calling me...time to get busy
I started playing with the motor isolation last night, and was frustrated with the lack of isolation between the top and bottom plinths...it should be considerable, but the noise level was only slightly attenuated on the top plinth, relative to the bottom.
I decided I needed to crack open my "isolation Pods" and see why they weren't isolating. Bada-Bing !! Several pieces of lead shot had pushed up between the mounting puck and the cavity wall during curing of the RTV silicon. This was pinning the puck solidly to the wall...no isolation.
After digging out all the shot, I siliconed a thick bead around the perimiter from the bottom, and left it to dry overnight. This evening I plan to coat the entire cavity in a thick layer of Plasti-Dip rubber. I will then re-fill the cavities with a slurry of lead shot in grease...that should do it.
Pictures to follow...
Casey
I addressed my motor and upper plinth isolation problems.
First the motor.
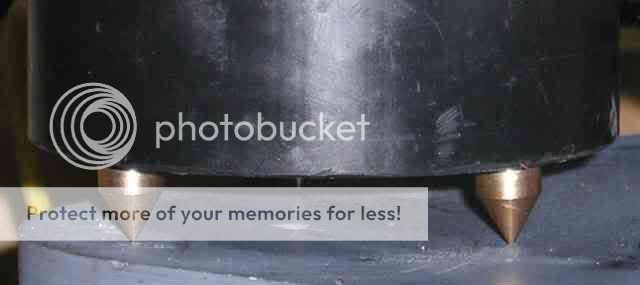
I designed a new motor isolation system, and it works well. I removed the spiked feet, and in their place I mounted rubber isolation mounts that were used with the Hurst motor in the old H/K table…
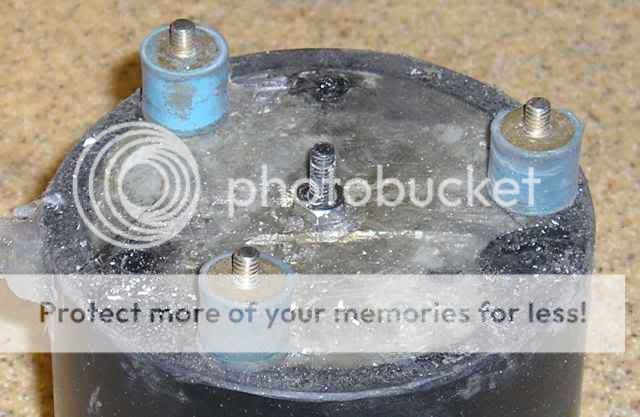
…the mounts by themselves are not solid enough to support the motor , so I added a disc that bolts to the motor in the middle, and is friction fit over the rubber….
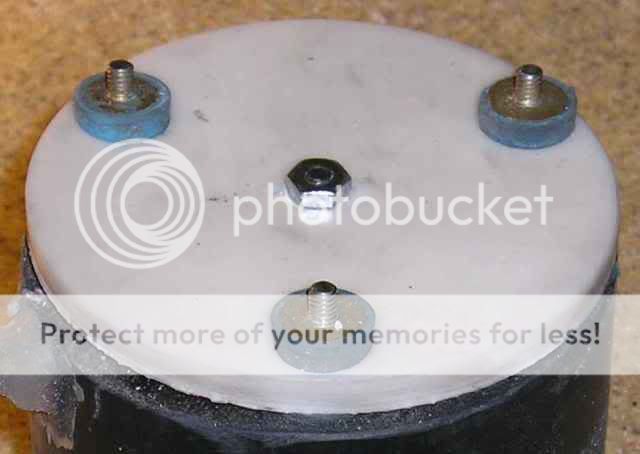
…I machined aluminum feet that screw down on the ends of the mounts…
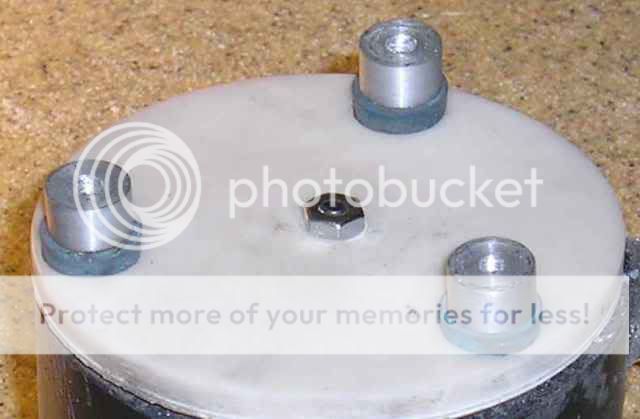
….and another disc stabilizing the feet with a snug fit…
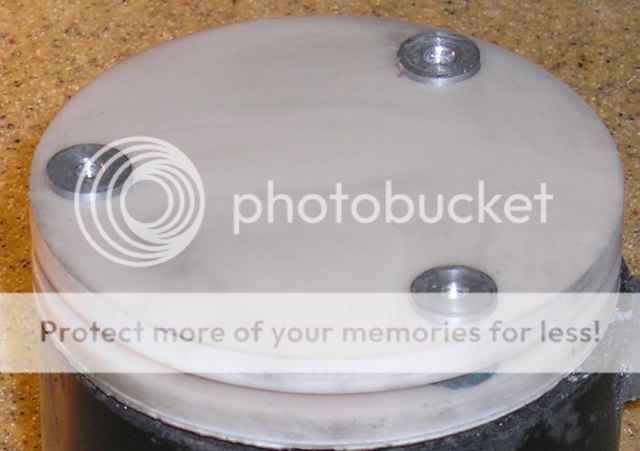
An isolated motor…
The plinth
After digging out the lead shot around the discs that had pinned them down there wasn’t a lot of RTV left, so the first order of business was re-gluing the discs from the inside with more RTV…
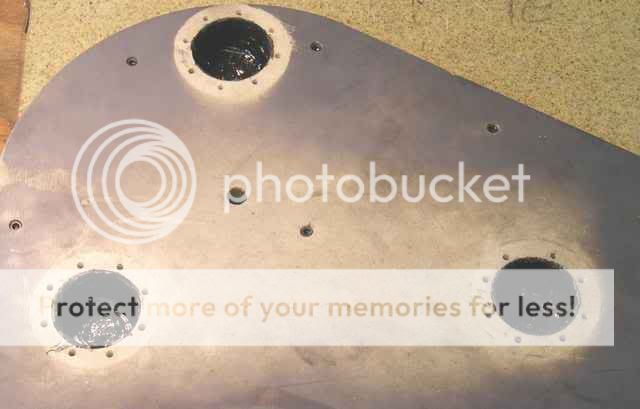
What follows is possibly the coolest innovation yet on this project.
As I was smearing the silicon glue around the inside of the cavities.. ..I realized that I had made what essentially are rubber bladders.…AIR SPRINGS !!!
As I was wrapping my head around the best way to plumb the set-up.. ..I came up with a incredibly simple solution in the form of…
..wait for it..
..wait for it..

..our friend mister bubble wrap .
.
Pre-packaged little blisters of contained air. On there own they pop with little pressure, but contained in a rigid container the could withstand more..a lot more. Think about the relationship between a tube and a tire, outside of the tire, the tube can’t hold anywhere near the pressure.
I over stuff the cavity with little pieces of bubble wrap….
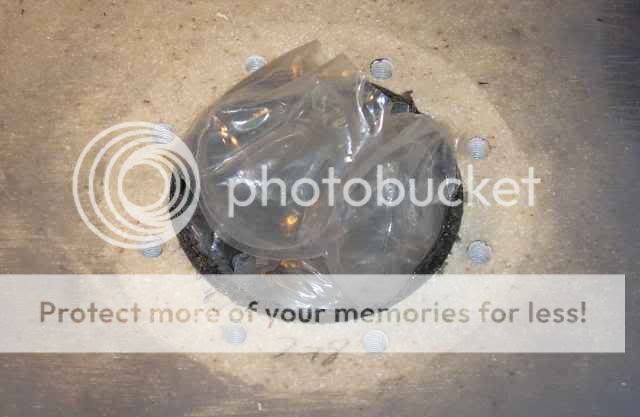
…and then slowly bolt down the foot to compress the bubble wrap …
…. I’m still experimenting to find the right number of “blisters”, when I finalize the number I will seal the feet down with RTV. This will provide an air tight chamber, so even if the blisters pop, it will retain its pressure.
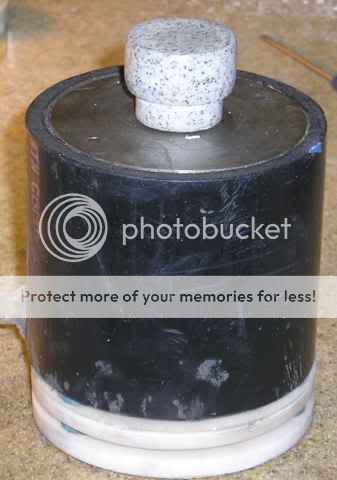
Here’s the setup so far…
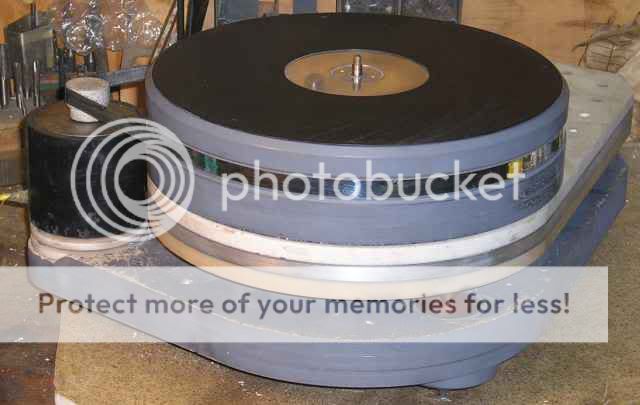
I had to under-cut the motor shelf to accomadate the new motor height.
The “Pneumatic Suspension” works like a charm..it provides an amazing amount of isolation,and if you “jab” the platter hard enough to bounce it, it decays immediately.It is extremely well damped .
I like it
Casey
First the motor.
I designed a new motor isolation system, and it works well. I removed the spiked feet, and in their place I mounted rubber isolation mounts that were used with the Hurst motor in the old H/K table…
…the mounts by themselves are not solid enough to support the motor , so I added a disc that bolts to the motor in the middle, and is friction fit over the rubber….
…I machined aluminum feet that screw down on the ends of the mounts…
….and another disc stabilizing the feet with a snug fit…
An isolated motor…
The plinth
After digging out the lead shot around the discs that had pinned them down there wasn’t a lot of RTV left, so the first order of business was re-gluing the discs from the inside with more RTV…
What follows is possibly the coolest innovation yet on this project.
As I was smearing the silicon glue around the inside of the cavities..
..I realized that I had made what essentially are rubber bladders.…AIR SPRINGS !!! As I was wrapping my head around the best way to plumb the set-up..
..I came up with a incredibly simple solution in the form of…..wait for it..
..wait for it..
..our friend mister bubble wrap
.Pre-packaged little blisters of contained air. On there own they pop with little pressure, but contained in a rigid container the could withstand more..a lot more. Think about the relationship between a tube and a tire, outside of the tire, the tube can’t hold anywhere near the pressure.
I over stuff the cavity with little pieces of bubble wrap….
…and then slowly bolt down the foot to compress the bubble wrap …
…. I’m still experimenting to find the right number of “blisters”, when I finalize the number I will seal the feet down with RTV. This will provide an air tight chamber, so even if the blisters pop, it will retain its pressure.
Here’s the setup so far…
I had to under-cut the motor shelf to accomadate the new motor height.
The “Pneumatic Suspension” works like a charm..it provides an amazing amount of isolation,and if you “jab” the platter hard enough to bounce it, it decays immediately.It is extremely well damped .
I like it
Casey
Hi HFGuy,
No bad news at all , as I said, I will seal the feet with RTV, providing an air tight chamber. I fully expect the bubble wrap itself to fail eventually, but even if they do, the pressure inside the rubberized cavity will remain the same...for a very long time.
Casey
hate to be the bear of bad news but those air bubble things slowly leak, so check em every once in a blue moon. they will need to be replaced.
No bad news at all
, as I said, I will seal the feet with RTV, providing an air tight chamber. I fully expect the bubble wrap itself to fail eventually, but even if they do, the pressure inside the rubberized cavity will remain the same...for a very long time.Casey
I spent the last couple of evening’s fine tuning my new pneumatic suspension, and I am quite happy with the results. I need to be clear here…the suspension isn’t bubble-wrap, the bubble-wrap is simply a convenient way to get more than 1 atmosphere worth of air into the suspension pods.
So, how much pressure is too much? Not that I really needed to know, I found out. I used a smaller bubble bubble-wrap and kept increasing the amount of wrap to get a handle of the effects of increasing pressure, until I got to this volume…
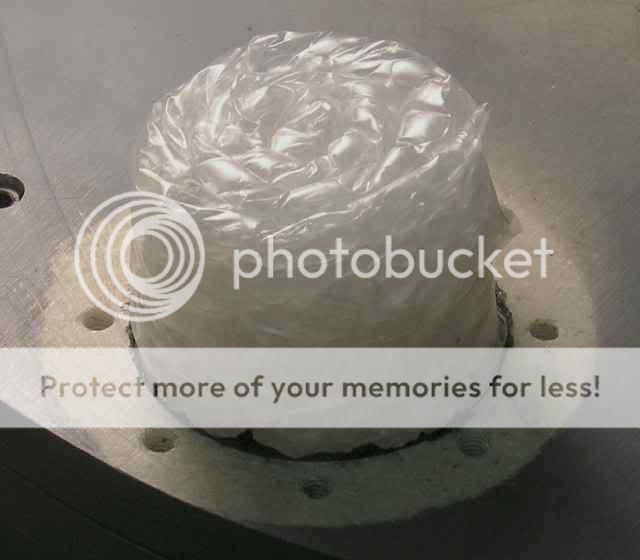
…it’s a tightly wrapped piece about 2 ½ times the volume of the pod. I have no way of measuring the pressure directly, but I guess it to be about 5 atmospheres (the wrap itself is about 2 atmospheres due to the compression of the wrap, and this is further compressed in volume approx. 2 ½ times). This was enough to blow the top disc loose from the plinth body…time to back ‘er up.
First, I put another layer of rubber in the pods to increase the strength and provide a wee bit more dampening, and then experimented with different amount of wrap. After multiple tries with various levels of wrap I came up with a good compromise. First, I found that due to the uneven distribution of the weight between the two feet directly underneath the platter, and the foot under the arm-board portion of the plinth, I needed two different levels of compliance (DUH!). When all three pods were pressurized for an optimum balance of compliance and dampening in the front, the back was to “bouncy”. This at first seemed counter intuitive..I would have thought that enough pressure too properly support the weight of the platter would be to stiff for the back. It turns out the opposite is true, due to the “pre-loading” effect of the weight, ie, the weight of the platter compresses the pods more, increasing pressure, and reducing compliance in the front pods.
I finally arrived at this combo…
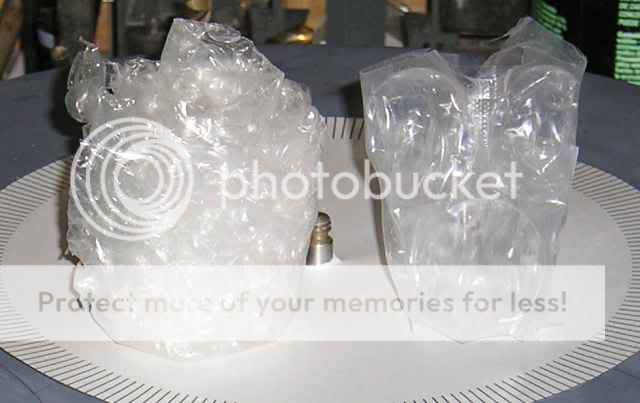
…the wrap on the left is made from the smaller bubble-wrap wrapped loosely, this goes in the back . The wrap on the right is made of the larger stuff, it is two rows of four bubbles rolled into a cylinder, and goes in the two pods under the platter. This arrangement seems to be the “magic” combo. Noise isolation is high, and it provides a nice “semi-rigid” mount that is highly dampened with about .05 inches of linear travel, after which it gets progressively stiffer. If I pound the bench it’s on with my fist, you can barely perceive movement that decays virtually instantly.
Another interesting thing I observed, was that when I increased the pressure, not only did the noise increase on the top plinth, but on the bottom as well. Apparently the “floating” top plinth absorbs energy from the bottom…a two-fer.
I am finally satisfied with the level of motor noise (very-very-low), and the plinth suspension. Walking away from this project for a few weeks, while I rebuilt the Fisher, was the best thing I could have done. I found myself up against the wall regarding these problems, and a fresh approach was just what was needed.
Casey
So, how much pressure is too much? Not that I really needed to know, I found out. I used a smaller bubble bubble-wrap and kept increasing the amount of wrap to get a handle of the effects of increasing pressure, until I got to this volume…
…it’s a tightly wrapped piece about 2 ½ times the volume of the pod. I have no way of measuring the pressure directly, but I guess it to be about 5 atmospheres (the wrap itself is about 2 atmospheres due to the compression of the wrap, and this is further compressed in volume approx. 2 ½ times). This was enough to blow the top disc loose from the plinth body…time to back ‘er up.
First, I put another layer of rubber in the pods to increase the strength and provide a wee bit more dampening, and then experimented with different amount of wrap. After multiple tries with various levels of wrap I came up with a good compromise. First, I found that due to the uneven distribution of the weight between the two feet directly underneath the platter, and the foot under the arm-board portion of the plinth, I needed two different levels of compliance (DUH!). When all three pods were pressurized for an optimum balance of compliance and dampening in the front, the back was to “bouncy”. This at first seemed counter intuitive..I would have thought that enough pressure too properly support the weight of the platter would be to stiff for the back. It turns out the opposite is true, due to the “pre-loading” effect of the weight, ie, the weight of the platter compresses the pods more, increasing pressure, and reducing compliance in the front pods.
I finally arrived at this combo…
…the wrap on the left is made from the smaller bubble-wrap wrapped loosely, this goes in the back . The wrap on the right is made of the larger stuff, it is two rows of four bubbles rolled into a cylinder, and goes in the two pods under the platter. This arrangement seems to be the “magic” combo. Noise isolation is high, and it provides a nice “semi-rigid” mount that is highly dampened with about .05 inches of linear travel, after which it gets progressively stiffer. If I pound the bench it’s on with my fist, you can barely perceive movement that decays virtually instantly.
Another interesting thing I observed, was that when I increased the pressure, not only did the noise increase on the top plinth, but on the bottom as well. Apparently the “floating” top plinth absorbs energy from the bottom…a two-fer.
I am finally satisfied with the level of motor noise (very-very-low), and the plinth suspension. Walking away from this project for a few weeks, while I rebuilt the Fisher, was the best thing I could have done. I found myself up against the wall regarding these problems, and a fresh approach was just what was needed.
Casey
valveitude said:I will seal the feet with RTV, providing an air tight chamber. I fully expect the bubble wrap itself to fail eventually, but even if they do, the pressure inside the rubberized cavity will remain the same...for a very long time.
Casey
Not as long as you might think. Air slowly diffuses out of tires (or tyres) and your construct has a much higher surface to volume ratio. Also, silicone sealant has a particularly high permeability (diffusion rate x gas solubility). You could lift the unit off the feet when you are not using it to maintain the air volume in your pads.
Sheldon
edit: or you could tap a hole into the gas chamber and fit an airtight screw. When your pads flatten too much, you can lift the table and open the screw to let a new charge in.
- Status
- This old topic is closed. If you want to reopen this topic, contact a moderator using the "Report Post" button.
- Home
- Source & Line
- Analogue Source
- Corian Turntable Fun