That's very rustic looking. Cool.
thnx, it's the good veneer i was talking about.You have to really make sure the solder is liquid before pulling capacitor off. You can fix by scratching off solder mask on track it broke off and solder jumper from there to the cap leg where lifted off. But board won't survive too many more swaps in that same position. For people who like cap rolling, PCB socket pins (single ones) are available.
Yep. I thought I'd take the lazy way out but will solder on some IC sockets on today. I think the lifted track wasn't too bad, just used some solder to fill the hole. Probably tape over it as well. hah
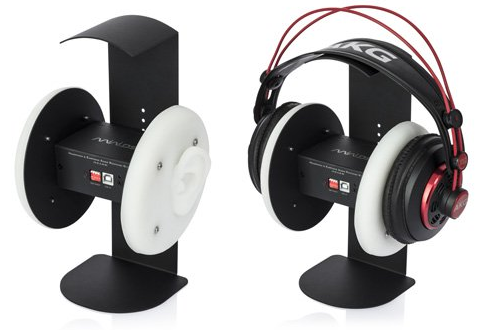
Hi X thanks live recording tip will have a look for it next time shopping CDs, today over at miniDSP site stumbled over this nice USB calibrating test jig head phone tool they intend release to market end of November, link Acoustic Measurement Tools : EARS.
Attachments

Yes its cost sound fantastic low for its segment and should be relative with in reach for everybody, they write there is two calibration files available, one for large cans and one for IEM so suppose it will work for IEM's too.
Still very satisfied using the previous shared 25 IIR EQ filters for OB-1 which is sensed make them sounds as a million, but that miniDSP unit could be used to check if correction is as right as it sounds, or if my own pair of cans is fair with in what innerfidelity's measured pair showed.
Know it was shared as convolution file too which makes it easyer to load than setting 25 complicated different FILTERs/FRQs/LEVELs/Qs, and that convolution way can perform FIR filters too but there was not used any FIR filters in the shared OB-1 correction, all of those 25 filters was pure IIR filters and based on innerfidelity's amplitude response.
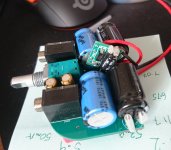
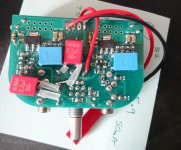
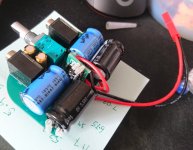
here are some pics of my first build running at 60mA. Added the cap multiplier, it fits nicely between the caps and still fits in the tin, and added a JST connector for power. It does need the higher voltage LiFePO 9V batteries now due to voltage drop over the cap mx. Had to change the 2.2uF epcos to wima to get it to fit in the tin. With the JST its easy to plug in the voltage boost board when I want to run off USB.
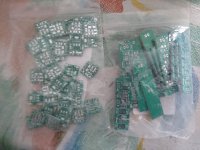
also, a picture of the sheer number of circuit boards I received from my PCB order of 10 each....
also, a picture of the sheer number of circuit boards I received from my PCB order of 10 each....
Attachments
Hi YOB,
I just got some Nichicon 2200uF 16v KA's for the outputs. They are fat little suckers. Not sure if everything is going to fit. Although it looks like you are using same ones and they do fit? Do you still have room for the batteries or you have not actually stuffed yours into a tin yet?
I just got some Nichicon 2200uF 16v KA's for the outputs. They are fat little suckers. Not sure if everything is going to fit. Although it looks like you are using same ones and they do fit? Do you still have room for the batteries or you have not actually stuffed yours into a tin yet?
X, I am interested in building a chip-based power amp (looking into the different Gainclone circuits) and using a desktop-style PCA to drive it. I know you have a ton of amps...have you tried pairing the PCA with a Gainclone or similar? I have had mixed results driving my two Class D amps with the PCA. In one instance, it makes my Sure AA-AB32155 board sing absolutely beautifully, but then with my Topping TP20, it just sounds dull. Could impedance matching be my issue? I also wonder if impedance sensitivity specs are of any consequence. Thanks.
Greetings xrk971
I stumbled upon this thread today, and am very keen to have a go at building this.
Without having read every message in this enormous thread, could you clarify a couple of things for me?
The first transistor should be a BF862 or a SST201 ?
BF862 is no longer made, I believe, but if I have the option of sourcing these, which of the two are better?
Also how would I hand-match pairs of the FETs if I buy a bulk number, to get the best sound?
Is there an update to the schematic, other than that in the first message of this thread?
Thanks
Greetings xrk971
I stumbled upon this thread today, and am very keen to have a go at building this.
Without having read every message in this enormous thread, could you clarify a couple of things for me?
The first transistor should be a BF862 or a SST201 ?
BF862 is no longer made, I believe, but if I have the option of sourcing these, which of the two are better?
Also how would I hand-match pairs of the FETs if I buy a bulk number, to get the best sound?
Is there an update to the schematic, other than that in the first message of this thread?
Thanks
You need the BF862, I don't know about the other one and have not tested or simulated with it so cannot say whether or not it would work. One thing is for sure, the BF862 is unique and it is a shame they are discontinuing it. You can still get them from Aliexpress or eBay. No one will sell you fakes for something that costs pennies to buy. I have bought from Ali before and they work well and I believe genuine. You can also buy matched pairs from my - see my Etsy shop. Otherwise you will need to buy at least 40 to get a match better than 1%. Same with the ZVN4306GTA's. In the thread, I describe how to hand match: basically build the circuit and press the part in place with pressure to get connections work and measure the current across the 1k resistor (for the BF862). For ZVN's install the BF862's and measure the current across the quad 460R resistors. Keep changing and measuring and the sort to match. This is the best way to match as it is done in the actual circuit with actual bias resistors etc that will be used. You will need to install tiny wires (soldered wire wrap wires are good) to the PCB at the test points and connect that to a DVM with alligator clips to leave your hands free to change out the FETs and press down. Be careful not to let your tweezers snap/fling them across the room - they are lost for sure given how tiny they are.
Last edited:
- Home
- Group Buys
- xrk971 Pocket Class A Headamp GB