Wow!, Peter!
I'm glad to see that "like minds, think alike."
I am new here and on the DIY/Video/Audio bandwagon. I am not new to Electronics(over 23 years) or DIY (Lifetime). I use every one of the tools You've listed every day at home and at work. I even have the bosch drill and the solder holders from the same company(usualy holding the solder holders in My mouth too!). I do have a slightly diferent solder/desolder setup, as I use a PACE solder/desolder station for all of My electronic work. I've grown VERY tired of the desolder wick or solda-pults! I agree with You on the fan next to Your soldering work, I put a switch and screen on mine(115vac fans) You can find them cheap at computer shows or surplus on-line. I just was kinda' blown away seeing that good ideas are kind of a "DIY-Techie" way of life, and that good tools show themselfs no matter where you are.
All The Best!,
Tall Shadow
(AKA)
Mark Ray
Peter:
What type of aluminum (grade??) and what thickness (0.25inch??) are you using for the panels of the chassis in your picture(s). After evaluating my heat sinks, I've decided the approach your show here will be my best bet. I need to know how to describe what I want to the metal shop My heat sinks are over 0.25 inch thick and can easily accept the screws to hold the plates in place.
My box will be deeper but not as tall. As I recall, my heat sinks (also obtained from R-Theta years ago) are about 17 inches deep by about 8 inches tall. Back then, the idea of a tall amp never entered my mind
And one other question, anybody have a good suggestion for feet? I'm guessing a solid aluminum cylinder cut to the appropriate height, attached to the chassis through a countersunk screw. Cover the bottom of the "feet" with felt, rubber, sorbothane, whatever... just glue it to the bottom.
Does this sounds feasible?
mlloyd1
What type of aluminum (grade??) and what thickness (0.25inch??) are you using for the panels of the chassis in your picture(s). After evaluating my heat sinks, I've decided the approach your show here will be my best bet. I need to know how to describe what I want to the metal shop
My heat sinks are over 0.25 inch thick and can easily accept the screws to hold the plates in place.My box will be deeper but not as tall. As I recall, my heat sinks (also obtained from R-Theta years ago) are about 17 inches deep by about 8 inches tall. Back then, the idea of a tall amp never entered my mind
And one other question, anybody have a good suggestion for feet? I'm guessing a solid aluminum cylinder cut to the appropriate height, attached to the chassis through a countersunk screw. Cover the bottom of the "feet" with felt, rubber, sorbothane, whatever... just glue it to the bottom.
Does this sounds feasible?
mlloyd1
HPotter said:Even easier is to use heat sinks as part of a chassis and mount top and bottom plate directly to the heat sinks as I did here. No brackets required.......
I believe I was using T6061 aluminum stock, 0.25" thick for my A75 amp.
As to the feet check this out: http://www.diyaudio.com/forums/show...=2942&perpage=15&highlight=feet&pagenumber=19
As to the feet check this out:
http://www.diyaudio.com/forums/show...=2942&perpage=15&highlight=feet&pagenumber=19Over the last few days I have been building some cabinetry for a recording studio, and despite having a large selection of power tools I realised one thing made life so much easier.
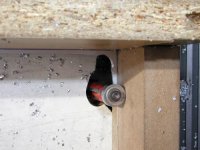
In Europe, they are sold under the name of Snappy, but I think they are also sold in the USA under the name of Lock-and-Load.
Basically, it is an adaptor that fits into any drill chuck, with a pull back locking collar that holds any ordinary hex screwdriver bit, or if you buy the kits, a full selection of other drill bits, sockets and plug cutters. They are relatively cheap, yet save so much time and effort with changing bits etc, whilst doing a job.
It's not a new tool, and some people are probably familiar with it anyway, but I think it deserves a mention
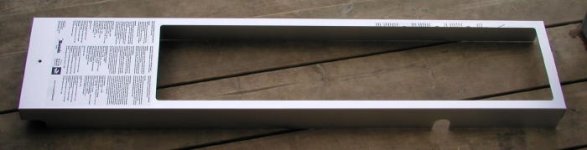
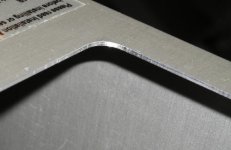
The objective is to cut the opening in an aluminum panel (8"x 36") to create a display unit. Aluminum thickness is 1/16". The cut out has to have perfectly straight edges, be very accurate and there are 12 units to be done. It has to be done using ready available tools at home, preferrably in one day. Any ideas how to go about it?
Attachments
Rotozip
May I suggest that Rotozip has enough accessories and drill bits to your needs.
Check out the www.Rotozip.net
I have no connection with the company what so ever.
My 2 cents
May I suggest that Rotozip has enough accessories and drill bits to your needs.
Check out the www.Rotozip.net
I have no connection with the company what so ever.
My 2 cents
Tricky. Soft edges means "nibbling" tool will cause uneven edges.
Tools readily available at home? Depends on who's home we are talking about...
I would test by building two identical frames in hard steel with inner dimensions as the required whole. Clamp them hard with protection to each side of the plate (and properly aligned). Now use either through-hole saw or home-made sharp punch style hole-maker run along the edges of steel frame finsihing of edges for straightness and some smoothness before finishing without frame clamped. This COULD MAYBE give straight edges and an even plate without a potato chip flatness appearance.
If one was really full of energy one could maybe also build the punch-tool for the hole.
But honestly I think it would be difficult to get right in my home...
As for the time frame of one day. Do you have enough cold beer?
/UrSv
Any ideas how to go about it?
 For when the God himself seeks help from mere mortals
You wanna do 12 in one day?
Whew... The only way I can think of to do this quickly and get nice edges is to toss them on the mill, but who has a milling machine at home?
I've often wondered if one could improvise a mill by putting a cutter onto a drill press, and setting that sucker up at it's highest speed... with thin material, it might actually work... ? I imagine you could plunge the cutter through (or pre-drill the corners), then run the part along a fence like you were using a router table. If you don't need to plunge through the material, a 4-flute cutter would probably do a nicer job than a 2-flute, and should work better at the lower speeds too. Just be careful to keep a firm grip on the thing! Additional safety fences and stops may be required.
Actually... router... mill... hmm. Could a router turn slow enough? A little homework would be in order here, to check that you can get the right speed. Maybe a router set to a low speed could be your mill? But how to mount the cutter?
I dunno. Just throwing the idea out there.
jag said:
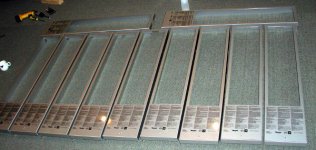
Actually I was teasing you guys a bit to grow some interest before I post technique.
Chris, I believe you don't have any connection with the "company" what so ever, otherwise you wouldn't recommend the product. (just couldn't resist the joke)
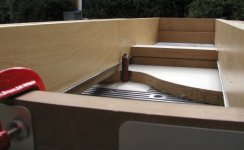
While Rotozip might be good for some jobs, I grade it at the same level as Dremmel tools which means light hobby tasks.UrSv and hifiZen were on a right track because both forms and router were used. Here are all 11 of them, done in 6 hours.
Attachments
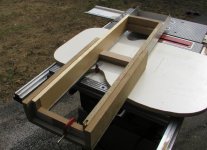
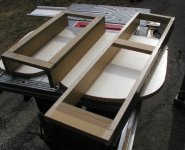
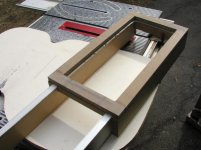
Because those covers suppose to be used in commercial display units (at the shows) so everything had to be done to the highest standards and material shouldn't get scratch in a meantime. I decided to make some forms out of particle board and MDF. The forms were used both to draw the cutout outline as well as the guide for the router bit. Also as a protection when cutting out the hole with a jigsaw and moving the piece on a table.
Attachments
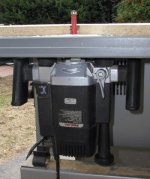
And here is my trusty router. I have it mounted permanently on Ryobi table saw. Comes handy any time.
While that job had not much in common with stereos, technique used here might be incorporated in many other applications. Just use your imagination and don't be afraid to experiment.
While that job had not much in common with stereos, technique used here might be incorporated in many other applications. Just use your imagination and don't be afraid to experiment.
Attachments
I was thinking about routing around the edge and knowing your feelings for the "edge trimmer" bit I should have guessed. As for the jig-saw I suspected it might have too much ripping action to actually produce a nice edge but when used at a distance from the finished edge and combined with the router it seemed to work out nicely.
Great work. Now where do I find a place other than my kitchen to do this type work?
/UrSv
Great work. Now where do I find a place other than my kitchen to do this type work?
/UrSv
- Status
- This old topic is closed. If you want to reopen this topic, contact a moderator using the "Report Post" button.
- Home
- Design & Build
- Equipment & Tools
- Useful tools and techniques