A clear coat can be applied in the sealing process of the anodizing to improve the shine. This is likely what you are seeing on the Nakamichi part. It helps with UV protection for the dye too.
Anodizing is actually a really simple process to do yourself, but there's a lot of bad information out there about it. A prime example it the use of Rit cloth dyes. That will look good for a couple weeks, then look bad, except for black. That will look bad instantly. Black is the hardest colour to do, and requires expensive dye.
Anodizing is actually a really simple process to do yourself, but there's a lot of bad information out there about it. A prime example it the use of Rit cloth dyes. That will look good for a couple weeks, then look bad, except for black. That will look bad instantly. Black is the hardest colour to do, and requires expensive dye.
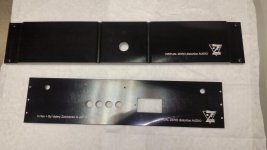
This is what I got on my journey:
Grainy and bad brushing (Alloy 5754) and dull (Alloy 6060, remember, the best for anodizing) with white spots.
Remember, these were "Pro" anodizing companies, who dared to send this back
The last image shows what I want. These are samples from the anodizing company Kwangdong.
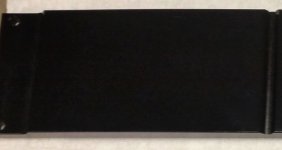
I just got a closer look at the pictures. This looks like a combination of poor metal and overheated finishing, making the surface porous. Aluminum surface finish is best if you can retain a T6 temper. Here's an example of some cases fly cut (that why it has the swirls), then anodized with no surface prep in between other than proper cleaning.
Attachments
Hi Jeff,Here's an example of some cases fly cut (that why it has the swirls), then anodized with no surface prep in between other than proper cleaning.
the design looks nice. But your answer shows the problem that I have to deal with
for three years. I Immediately recognize grey stains, visible
on the left side of the upper panel. These are irregularities in the structure of the alloy.
Only visible after anodizing.
This is probably why I also had seven blunders until now, even from companies that produce for High End Audio.
Many of them produce dull enclosures to cover the faults.
Standards are poor.
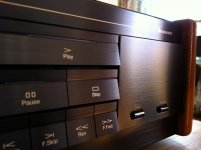
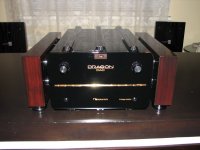
Three examples from older days, glossy gear from, Nakamichi (Could be Sony as well) and (almost) today T+A.
As you see, the surface is very dull.
Maybe milled in one place and anodized in another, with a lot of etching to clean the parts.
But the Nakamichi parts will probably have been milled / stamped and anodized by the same company, maybe in one rush, made of alloy solely welded for this purpose.
Well,who wants a three-ton-group - buy? Any garage to store it?
Should be equally far away from Europe, Asia and the Americas for this is a worldwide forum. I am even a little serious about this.

Story I told before in this forum:
A manufacturer for High End Audio front panels had 30% loss after anodizing
(due to the imperfections described) when they bought aluminium from traders.
They cut their loss down to 5% when they had the aluminium forged, welded and certificated.
Attachments
Last edited:
I can't see the patch you're talking about in the picture. There isn't any irregularities on the amp. If there's something showing in the picture, it's likely from the camera (phone).
Black finish can be miserable at times to get a good finish, but an error is erased in a 10 minute bath in the stripper tank and the results of the second attempt are usually excellent, which to me means the first attempt had contaminants on the surface. 3mm screw holes are a source of problems too. They are too small to properly flush oil and acid out of, so they often have white streaks.
I'm not sure of the quality of raw materials on your side of the globe. We're fortunate here in Canada to have good quality supplies.
As I said, I'll try to match the Nakamichi finish the next time I warm the tanks up. I would like to try that finish on a couple of my own projects. Another couple finishes that I've been meaning to try is glass bead blasted and shot peened. I've tried sandblasted with very dull results.
I mean the greyish stains with a slight blue tint. Made a blow up.
Could be the compression, but on my experience, macroblocking looks different.
Could be the ceiling reflecting.
Who are your suppliers?
I am very interested in future results!
Could be the compression, but on my experience, macroblocking looks different.
Could be the ceiling reflecting.
I'm not sure of the quality of raw materials on your side of the globe. We're fortunate here in Canada to have good quality supplies.
Who are your suppliers?
I am very interested in future results!
Attachments
Last edited:
That's compression. 4200k lighting in my shop also tends to make things look bad. There's none of that in the amp finish.
The picture also doesn't show the fly cut finish well. It still retained the purple and gold reflections from the fly cut after anodizing. it's actually a much brighter finish than I prefer.
The picture also doesn't show the fly cut finish well. It still retained the purple and gold reflections from the fly cut after anodizing. it's actually a much brighter finish than I prefer.
The picture also doesn't show the fly cut finish well. It still retained the purple and gold reflections from the fly cut after anodizing. it's actually a much brighter finish than I prefer.
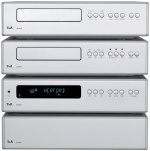
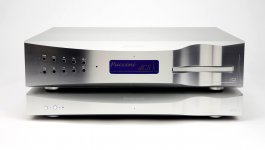
Some companies seem to try to preserve the look of the cutting tools, like the image attached, DCS from Britain.
An Italian company told me that they use special cutting tools that leave a "pleasant" looking surface for knobs,
with the cutting fluid acting as polisher. No brushing needed.
No kidding:
By chance I see grey stains on this DCS Player around the Power and Eject buttons.
Also some vertical structures right from the volume buttons.
Have I gotten mad...?
Attachments
Last edited:
I think the vertical grain you are seeing is the CNC pattern from the multiple passes required to do that shape. Each pass is at a different height to make the curve back. Some people like this look, some not so much. I see the mess bt the volume buttons. It's hard to say for sure what that is. Bad finish, fingerprints, crap on the camera lens... I have all three of these in a lot of my pictures.
The DCS definitely has staining. But that looks more like finger prints. Perhaps slight corrosion from the human skin that was not removable with the photographers cloth wipes.
About making a brass enclosure I have to mention one thing. The excellent free machining / free cutting brass is a bit of a thing of the past. It was made possible with lead, and as you may imagine, this is not really an option any more.This is bit of a problem for watch makers who are used to tools and materials 200 years old. I know there has to be a solution for this in the biz, but the only sure thing is that these speciality brasses are difficult to find and buy. The normal free cutting brasses should be fine for your project though. A bit of a pain in the **** for the machinist, but I bet he knows how to manage. Brushing will be problem, especially if you are looking for that absolutely perfect Swiss watch finish. Decent result can be obtained though.
One other tidbit on brass is the fact that you will never get a nice metallic look on it that lasts on it's own because lacquered surfaces look like plastic and are near impossible to implement perfectly. But it takes platings decently, so you can have the problems of anodizing on a whole new level with chrome, nickel or silver plating. You mentioned painting which is possible but why go through all this song and dance for a plastic surface? Mild steel is significantly easier to machine, brush and paint for the front panel. Heat sinks could be lower quality aluminium.
About making a brass enclosure I have to mention one thing. The excellent free machining / free cutting brass is a bit of a thing of the past. It was made possible with lead, and as you may imagine, this is not really an option any more.This is bit of a problem for watch makers who are used to tools and materials 200 years old.
I've found the same. It's hard to find brass that cuts without the cutter squealing and the finish being chattered. If you look at a brass fitting, the extruded finish is good, but the threads are terrible looking. They can't cut it smoothly in mass production where they have a huge budget for a machine. It's unlikely a hobbiest or small machine shop will have much better luck.
Sorry for the off-topic...
You use cutting tools with rake angle of 0 degrees? And cut a bit deeper versus mild steel? Even the modern alloys should be "decent" for turning, but milling on the other hand... I rather run stainless. That at least is supposed to be difficult. But again, it is possible to do a decent job with brass if you know what you are doing and can do little adjustments to the drawings. Not perfect mind you, but something.
I've found the same. It's hard to find brass that cuts without the cutter squealing and the finish being chattered. If you look at a brass fitting, the extruded finish is good, but the threads are terrible looking. They can't cut it smoothly in mass production where they have a huge budget for a machine. It's unlikely a hobbiest or small machine shop will have much better luck.
You use cutting tools with rake angle of 0 degrees? And cut a bit deeper versus mild steel? Even the modern alloys should be "decent" for turning, but milling on the other hand... I rather run stainless. That at least is supposed to be difficult. But again, it is possible to do a decent job with brass if you know what you are doing and can do little adjustments to the drawings. Not perfect mind you, but something.
I don't do a lot of brass because I don't like working with it, but usually it's milling or tapping. Tapping even sounds bad! I only machine 316 stainless too. Had enough of 304 work hardening mid cut. One of the perks of my job. I choose the materials, someone else pays for it.

Still not a solution but one option...
I agree with this. Also machining the shapes out of a big piece of stainless steel is very expensive, either in machine time or material wise (There are some beautiful special alloys available but often not in small scale or in usable shapes for this. (6 meters of ROUND bar is the best case scenario)) And perfect surfaces might again be very difficult to do.
One option is variation of the mild steel front panel method I mentioned earlier. Do your chassis out of aluminium, heat sinks and all but add a thin decorative strip of stainless on front. Just glue and trim. Easy, if your machinist is willing to do it and cheapish.
Deco range | Outokumpu Pro family | Products & properties | Global | Outokumpu
Stuff like this is sometimes made to very very high standards in architecture projects. At least buying a big piece and choosing where to cut is a possibility. Of course it will not be Japanese water stone ground perfect, but as you have noticed, perfection just gets further and further when you learn what to look for.
Edit: Oh, I forgot. The free cutting brass, as it is known, is C36000 in American, BS2874 or CZ124 in British and CuZn36Pb3 or CW603N in European. It seems there should be people still making this, so perhaps you can find a supplier that has a strip or two left. If possible please mention it here as I at least would love some leaded brass.
316L is stainless steel. That's not a good choice for a chassis material. It doesn't conduct heat and is much too heavy.
I agree with this. Also machining the shapes out of a big piece of stainless steel is very expensive, either in machine time or material wise (There are some beautiful special alloys available but often not in small scale or in usable shapes for this. (6 meters of ROUND bar is the best case scenario)) And perfect surfaces might again be very difficult to do.
One option is variation of the mild steel front panel method I mentioned earlier. Do your chassis out of aluminium, heat sinks and all but add a thin decorative strip of stainless on front. Just glue and trim. Easy, if your machinist is willing to do it and cheapish.
Deco range | Outokumpu Pro family | Products & properties | Global | Outokumpu
Stuff like this is sometimes made to very very high standards in architecture projects. At least buying a big piece and choosing where to cut is a possibility. Of course it will not be Japanese water stone ground perfect, but as you have noticed, perfection just gets further and further when you learn what to look for.
Edit: Oh, I forgot. The free cutting brass, as it is known, is C36000 in American, BS2874 or CZ124 in British and CuZn36Pb3 or CW603N in European. It seems there should be people still making this, so perhaps you can find a supplier that has a strip or two left. If possible please mention it here as I at least would love some leaded brass.
Last edited:
Edit: Oh, I forgot. The free cutting brass, as it is known, is C36000 in American, BS2874 or CZ124 in British and CuZn36Pb3 or CW603N in European. It seems there should be people still making this, so perhaps you can find a supplier that has a strip or two left. If possible please mention it here as I at least would love some leaded brass.
CZ121 (BS) or CW614N (ISO) is an another, perhaps easier to buy in Europe. You can even find some from eBay. I think I might get some... 10mm on sale and a promise to be able to get any thickness you want.
A clear coat can be applied in the sealing process of the anodizing to improve the shine.
As gar as I know, the shine is dependent on base material (99.7 0r 6060 being the best) how the part is brushed and how it is etched. I was told by one anodizing company that nitric acid was very common for etching to produce shine prior
to anodizing. A thin layer helps as well. But maybe I missed the fact that addidives for sealing have been developed to add shine. Sealing means traditionally that the part is simply put into cooking deionized water reduce porosity.
You mentioned painting which is possible but why go through all this song and dance for a plastic surface?
I would not regard a grand piano or sportscar as "plastic" in appearance.
Also a scratch can always be repaired, impossible with an anodized surface.
Last edited:
- Status
- This old topic is closed. If you want to reopen this topic, contact a moderator using the "Report Post" button.
- Home
- Amplifiers
- Solid State
- Thick Brass for Amp Enclosure - Good Heat Dissipation Guaranteed?