Hi all,
Group buy details as mentioned above are posted over in the GB section:
https://www.diyaudio.com/community/threads/f5pi-gb-for-us-mosfets-bom-etc.409406/
Fran
Group buy details as mentioned above are posted over in the GB section:
https://www.diyaudio.com/community/threads/f5pi-gb-for-us-mosfets-bom-etc.409406/
Fran

For those interested in duplicating our prototype, sorry to keep you waiting :
https://www.diyaudio.com/community/...shiba-q-set-for-the-f5pi.410439/#post-7630849
https://www.diyaudio.com/community/...nal-pcb-set-for-the-f5pi.410440/#post-7630856
Thank you for your interest,
Patrick
https://www.diyaudio.com/community/...shiba-q-set-for-the-f5pi.410439/#post-7630849
https://www.diyaudio.com/community/...nal-pcb-set-for-the-f5pi.410440/#post-7630856
Thank you for your interest,
Patrick
This weekend, I have substantially finished the build of an F5Pi using USA mosfets as provided in the recent group buy, while varying a little from the current group buys for F5Pi PCBs.
I used the relaixed system from Jos von Eijndhoven for source selection and attenuation, along with separate supplies for front end and output stage. The chassis is made from sheet alu cut to make the individual panels, as I had some damaged heatsinks of the appropriate size, I pressed those into service rather than see them go to waste. The front panel is 8mm black acrylic.
I mounted most of the "amplifier" parts on each heatsink - output stage power supplies, front end and power boards, and the speaker protection keeping cable runs as short as possible. It also helps with thermal management for the regulated output stage supply. The floor of the amplifier then has the aux power supply, relaixed soft start module, an earthing circuit breaker, transformer (hidden under the platform with front end supplies) and the front end supplies themselves (the ones with the blue talema transformers). The source select and attenuator board is mounted on the rear panel to keep lines as short as possible.
The amplifier both measures well, handles reactive loads well, and sounds great. For those who might be planning a build using the group buy boards, you will find there is a significant amount of work in the build, but you will be very well rewarded at the end. I would also say my work was increased because of the extra metalwork.
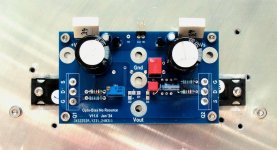
Modules mounted on the heatsink:

Internal view of the completed amp. Transformer is under the platform at the front of the chassis under the smaller front end transformers.

Finished front view - excuse the tripod showing the photo, its hard to avoid reflections in what is really a mirror!

I used the relaixed system from Jos von Eijndhoven for source selection and attenuation, along with separate supplies for front end and output stage. The chassis is made from sheet alu cut to make the individual panels, as I had some damaged heatsinks of the appropriate size, I pressed those into service rather than see them go to waste. The front panel is 8mm black acrylic.
I mounted most of the "amplifier" parts on each heatsink - output stage power supplies, front end and power boards, and the speaker protection keeping cable runs as short as possible. It also helps with thermal management for the regulated output stage supply. The floor of the amplifier then has the aux power supply, relaixed soft start module, an earthing circuit breaker, transformer (hidden under the platform with front end supplies) and the front end supplies themselves (the ones with the blue talema transformers). The source select and attenuator board is mounted on the rear panel to keep lines as short as possible.
The amplifier both measures well, handles reactive loads well, and sounds great. For those who might be planning a build using the group buy boards, you will find there is a significant amount of work in the build, but you will be very well rewarded at the end. I would also say my work was increased because of the extra metalwork.
Modules mounted on the heatsink:
Internal view of the completed amp. Transformer is under the platform at the front of the chassis under the smaller front end transformers.
Finished front view - excuse the tripod showing the photo, its hard to avoid reflections in what is really a mirror!
F5Pi builders will notice that this is compatible with the F5 Frontend.
https://www.diyaudio.com/community/threads/the-holy-grail-follower-output-stage.406850/post-7671867
At least in simulations, it doesn't improve things for the Toshiba M2OPS.
So I would not hold back the build because of this.
For the other MOSFET pairings, it does seem to lower distortion of the OPS itself.
Whether it does when combined with the frontend remains to be seen.
But it works, and is not too complicated.
Once we have finished all measurements, we shall publish.
Will take time.
Patrick
.
Attachments
Apologies if there's a better place to ask this.
Build notes recommend an analogue signal generator. Most are dac-based, however @EUVL post #88
What are the options for analogue signal generators? - specific models would be helpful as I'll be searching eBay etc.
Tia
Build notes recommend an analogue signal generator. Most are dac-based, however @EUVL post #88
ringing comes from the digital signal generator, probably cable reflections interacting with its output stage.
...
Replace the digital signal generator with an analogue one, and 100kHz square wave was absolutely smooth.
What are the options for analogue signal generators? - specific models would be helpful as I'll be searching eBay etc.
Tia
If you are only testing with sine or triangular waves, you can also use digital signal generators.
It is only when you test with square wave that it becomes picky.
We have an old analogue signal generator in the lab.
That is what we used.
Since we already tested multiple examples, we know the circuit is stable.
But if you do want to test yourself, I guess you are looking for something low cost.
I can only suggest you take a look at ICL8038 or XR2206 based solutions.
But you need to make sure the output is AC coupled and suitably buffered, such that the output impedance is not more than 600 ohm.
Patrick
- Home
- Amplifiers
- Pass Labs
- The F5Pi -- F5P Voltage Gain Stage + M2 Output Stage = Perfectly Integrated