We have some chassis to anodize black later this week, so we'll put this set in with the batch. I'll post a picture when we get them back.
Wire/cable choice is up to you. I chose to basically continue the tonearm wire. It's small and fits easily out the factory cable clamp. But you're right, if it gets snagged on something, it will break.
Wire/cable choice is up to you. I chose to basically continue the tonearm wire. It's small and fits easily out the factory cable clamp. But you're right, if it gets snagged on something, it will break.
davefl,
Where are the details about your armboards for different tonearms?
Technics SL1200 mods or projects that may or may not be effective. you decide.
1. fluid tonearm damping
2. tonearm rewire
3. have all electronics moved outboard into a new chassis(box)
How effective is the aluminum top plate and rubber base?
My $0.02 -
Fluid damping of the original arm, from what I have read about, is universally heralded as an improvement.
The tonearm rewire was significant, and a much bigger improvement than I was expecting. See it here - http://www.diyaudio.com/forums/analogue-source/239122-sl-1200-tonearm-rewire.html
Externalizing the PSU is the single biggest mod you can make to the deck. - SL-1200 DC Power Supply DIY
Dave can fill you in about the different armboards, he made mine, found here - Jumping off the deep end... mounting a Graham tonearm I love it. It can be modified for your arm. He has also made a few mods to the armboard since, and things are tighter and better supported. He also has some press-in nuts for the chassis so the armboard mounting is significantly easier than I had.")
If you are interested in modifying your SL-1200, I suggest you become a member over at Art of Sound, the resources there are incredible. I can tell you from first hand experience that a tricked-out SL-1200 will easily keep it's own against any turntable made. Period.
Fluid damping of the original arm, from what I have read about, is universally heralded as an improvement.
The tonearm rewire was significant, and a much bigger improvement than I was expecting. See it here - http://www.diyaudio.com/forums/analogue-source/239122-sl-1200-tonearm-rewire.html
Externalizing the PSU is the single biggest mod you can make to the deck. - SL-1200 DC Power Supply DIY
Dave can fill you in about the different armboards, he made mine, found here - Jumping off the deep end... mounting a Graham tonearm I love it. It can be modified for your arm. He has also made a few mods to the armboard since, and things are tighter and better supported. He also has some press-in nuts for the chassis so the armboard mounting is significantly easier than I had.
If you are interested in modifying your SL-1200, I suggest you become a member over at Art of Sound, the resources there are incredible. I can tell you from first hand experience that a tricked-out SL-1200 will easily keep it's own against any turntable made. Period.
Last edited:
I'll get details of the armboards posted as soon as I can. We have quite a bit of chassis work right now so I've been quite slow to get info posted. I also have a tidbit to add about the arm rewire I did, so will post that too.
So far I've had little time to even listen to the mods, but am quite pleased with what I've heard so far.
So far I've had little time to even listen to the mods, but am quite pleased with what I've heard so far.
Looks very nice! I've done enough woodworking to know I couldn't make a living at it
As for the SL1200 parts, we have every intention of posting info on our website. In the mean time, please PM me with any questions you have.
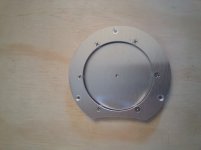
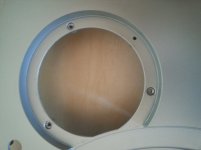
As requested, here's info on the SL1200 armboard.
This is actually intended as somewhat of a DIY project where we would supply a blank armboard and you'd make your specific arm mounting holes. However, if you know the required hole spacing (as was the case with 6L6's arm), then we can make the cutouts for your particular application.
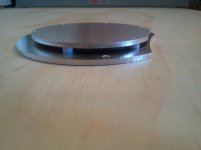
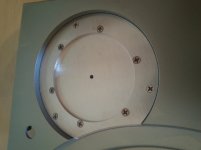
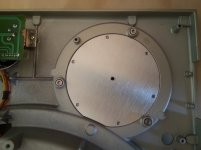
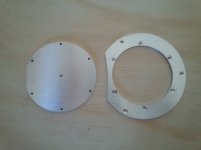
Below are pictures of what we've done for the blank. The two-piece assembly can be setup with different spacers to get the arm base where it needs to be. We have a supply of 1/8 inch, 3/16 inch and 1/4 inch spacers that we can provide along with the appropriate length screws.
If your particular arm doesn't need to be lowered, we can make this in a single piece too.
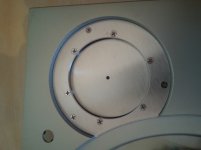
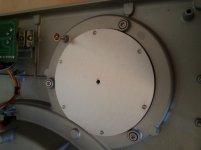
You can also see in some of the pictures that we put threaded inserts in the factory arm mounting holes. These just happen to fit perfectly. They install with minimal force and stay in place when the arm is removed. They can also be removed quite easily! A bonus if you ever want to return to stock or just don't like making irreversible modifications.
So this is where our thoughts took us for making a "DIY blank." We're certainly open to other suggestions here. But keep in mind, this is intentionally simple to keep the price down, and we'd prefer to keep it that way.
This is actually intended as somewhat of a DIY project where we would supply a blank armboard and you'd make your specific arm mounting holes. However, if you know the required hole spacing (as was the case with 6L6's arm), then we can make the cutouts for your particular application.
Below are pictures of what we've done for the blank. The two-piece assembly can be setup with different spacers to get the arm base where it needs to be. We have a supply of 1/8 inch, 3/16 inch and 1/4 inch spacers that we can provide along with the appropriate length screws.
If your particular arm doesn't need to be lowered, we can make this in a single piece too.
You can also see in some of the pictures that we put threaded inserts in the factory arm mounting holes. These just happen to fit perfectly. They install with minimal force and stay in place when the arm is removed. They can also be removed quite easily! A bonus if you ever want to return to stock or just don't like making irreversible modifications.
So this is where our thoughts took us for making a "DIY blank." We're certainly open to other suggestions here. But keep in mind, this is intentionally simple to keep the price down, and we'd prefer to keep it that way.
Attachments
-
 20140927_134556.jpg182.9 KB · Views: 251
 -
 20140927_134707.jpg172 KB · Views: 247
 -
 20140927_134946.jpg193 KB · Views: 244
 -
 20140927_135057.jpg193.8 KB · Views: 243
 -
 20140927_135148.jpg191.9 KB · Views: 234
 -
 20140927_135606.jpg202.9 KB · Views: 70
 -
 20140927_135744.jpg243.1 KB · Views: 68
 -
 20140927_140712.jpg188.7 KB · Views: 79
- Status
- This old topic is closed. If you want to reopen this topic, contact a moderator using the "Report Post" button.
- Home
- Source & Line
- Analogue Source
- Technics SL1200 internal brackets, regulator and external power supply