I compared the datasheet of 7294 and 7293. The parallel example is not same. With 7293 the slave +- inputs connected directly to the -VS:
and:
-----------------------
The datasheet of 7294 is different:
and:
Really MUST be connected +- IN pins same as in datasheet depending on type of chip, or one of them good for both ICs?


An externally hosted image should be here but it was not working when we last tested it.
and:
An externally hosted image should be here but it was not working when we last tested it.
-----------------------
The datasheet of 7294 is different:
An externally hosted image should be here but it was not working when we last tested it.
and:
An externally hosted image should be here but it was not working when we last tested it.
Really MUST be connected +- IN pins same as in datasheet depending on type of chip, or one of them good for both ICs?
 I think the example of 7294 is better for 7293, but I don't think the slave-mute pins MUST be connected to the ground....
http://www.audiobuilder.biz/TITLE3/2Amplifier/JL-1/4.PDF
the above link shows 8pcs tda7294 in parallel bridge mode
the above link shows 8pcs tda7294 in parallel bridge mode
StratoFan said:Thanks Artur! Unfortunately 7294 have no pin 11, what I want to use with 7293. 1000uF bootsrap cap isn't too much?
that seems to be a lot. I only use 220uF, but i guess anything above 66uF will be enough (according to datasheet, 3x22uF)
Dude,
check http://www.ub-elektronik.de/download/a100-daten-301.pdf
It's in german, but there are also schematics ! Mute/Standby are connected to ground and not V- in those schematics.
check http://www.ub-elektronik.de/download/a100-daten-301.pdf
It's in german, but there are also schematics ! Mute/Standby are connected to ground and not V- in those schematics.
StratoFan said:Yes, I know this PDF, this is the reason why I think the example in 7293 datasheet is wrong.
it is correct. the pcb i built have mute and stby in parrallel, and IN+/IN- of the slaves connected to V-
the mute and stby of 7294 and 7293 is the same
StratoFan said:Thanks quekky.
It's interesting. You say, the +- inputs of 7294 must be connected to the -Vs if slave, but if the chip is 7293, the inputs must be connected to the ground.

Sorry, I want to say: 7294 inputs must be connected to the ground, but 7293 most be connected to the -Vs... Why different?????
quekky said:
it is correct. the pcb i built have mute and stby in parrallel, and IN+/IN- of the slaves connected to V-
the mute and stby of 7294 and 7293 is the same
quekky, here is another datasheet of 7293:
http://ml.blastnet.ee/supikas/tda7293.pdf
The inputs of slave connected to to the ground, and the table on page 3 is not same.
i think it doesnt make a difference. When i started to look around with 7293 around july, ST gave this datasheet (with IN to gnd). several months later i checked ST website and they gave a different datasheet, this time it is IN to V-
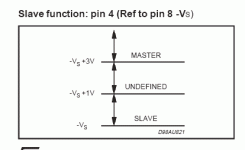
look at this image, taken from the old datasheet (blasnet). seems like what determines the slave is pin 4. and if it's slave what goes into IN is not important
look at this image, taken from the old datasheet (blasnet). seems like what determines the slave is pin 4. and if it's slave what goes into IN is not important
Attachments
quekky said:i think it doesnt make a difference. When i started to look around with 7293 around july, ST gave this datasheet (with IN to gnd). several months later i checked ST website and they gave a different datasheet, this time it is IN to V-
look at this image, taken from the old datasheet (blasnet). seems like what determines the slave is pin 4. and if it's slave what goes into IN is not important
Yes I think same. The date of the datasheet where the slave inputs (pin 2,3) connected to the ground is year 2000. The another where the inputs conected to the -Vs dated 2003. But I visited the PCB of parallel example on the datasheet, and I see, the pin 2 and 3 not used on slave chip. So I think, the pin 2 and 3 of slave is really not important, because it's off via pin 4. Thanks
))Finaly I did PCB for bridge/parallel 7293 chipamp. Not tested yet, I will back soon with photos when I changed my older amp to this new
the PCB is 30cm long for stereo amps, included protection with UPC1237, and with PWM fan controller.
Capacitors and 7293 chips will be included soon
I'am not sure, it was a good idea to put resistors and capacitors very closed tho the chipamps. Maybe the chips will too hot...
the PCB is 30cm long for stereo amps, included protection with UPC1237, and with PWM fan controller.
An externally hosted image should be here but it was not working when we last tested it.
Capacitors and 7293 chips will be included soon
An externally hosted image should be here but it was not working when we last tested it.
I'am not sure, it was a good idea to put resistors and capacitors very closed tho the chipamps. Maybe the chips will too hot...
Hello!
The schematic is very simple, here is on PDF:
download here
Bill of material
placement plan
And some photos (more 4 chips and 8 capacitors required, but three chips demaged)
I hope this help
The schematic is very simple, here is on PDF:
download here
Bill of material
placement plan
And some photos (more 4 chips and 8 capacitors required, but three chips demaged)
An externally hosted image should be here but it was not working when we last tested it.
An externally hosted image should be here but it was not working when we last tested it.
I hope this help
Hi again!
I finished the test of this "gainclone".
First I changed the toroid from 600VA to 1200VA with soft start.
The toroid is 8 kg
the softstart circuit is very simple and working well:
-----------------------------------
After I changed the poweramp on rack:
While testing, the 2nd chip demaged. Because 2 pins shorted. Not at all, later the "-" part of power supply disconnected from the plug. All included chips demaged. Finaly the bridge with 4 chips working well, the parallel chips will be tested later.
I finished the test of this "gainclone".
First I changed the toroid from 600VA to 1200VA with soft start.
An externally hosted image should be here but it was not working when we last tested it.
The toroid is 8 kg
the softstart circuit is very simple and working well:
An externally hosted image should be here but it was not working when we last tested it.
-----------------------------------
After I changed the poweramp on rack:
An externally hosted image should be here but it was not working when we last tested it.
While testing, the 2nd chip demaged. Because 2 pins shorted
. Not at all, later the "-" part of power supply disconnected from the plug. All included chips demaged. Finaly the bridge with 4 chips working well, the parallel chips will be tested later.- Status
- This old topic is closed. If you want to reopen this topic, contact a moderator using the "Report Post" button.
- Home
- Amplifiers
- Chip Amps
- TDA729X paralel/bridge project