On a couple of other threads where I have builds based on TC9FD and folks built using the Fountek FE85 - they have all noticed very harsh highs - not smooth at all. May be related to either aluminum cone or not sufficient BSC. Just something to be aware of - the TC9FD is indeed a special 3.5 in driver and not easily swapped (other than going with Vifa's fiberglass cone).

Well, since it is my first foray into a line array, I've decided to try the cheap drivers at first.
The sound is not the best, but it's not bad either. The best about it is off-axis, very little loss up to 60 degrees.
I'll use 16 drivers for each column. Once this first array is done, I'll play with it a while, then I'll probably sell it (already have some interests around here) by mounting them on small sub enclosures (maybe 6.5" or 8" drivers) to be used as floor standing.
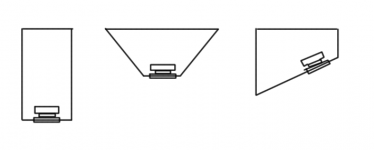
Now, I am confused about the shape of the array.
I came up with 3 designs, wondering which would be better for an array that will be placed close to the back wall.
I'm guessing the one on the right.
My problem is that I don't have a table saw, so I have no idea how to cut angles on boards sides so it would fit. I am afraid of not doing a great job using a hand plane.
The sound is not the best, but it's not bad either. The best about it is off-axis, very little loss up to 60 degrees.
I'll use 16 drivers for each column. Once this first array is done, I'll play with it a while, then I'll probably sell it (already have some interests around here) by mounting them on small sub enclosures (maybe 6.5" or 8" drivers) to be used as floor standing.
Now, I am confused about the shape of the array.
I came up with 3 designs, wondering which would be better for an array that will be placed close to the back wall.
I'm guessing the one on the right.
My problem is that I don't have a table saw, so I have no idea how to cut angles on boards sides so it would fit. I am afraid of not doing a great job using a hand plane.
Attachments
Last edited:
Middle option
Hiya,
I would go for the middle design, best acoustically for wall mounting and most flexible for re-sale later.
An important point...
Try to get metal " Key hole " mounting blocks and securely recess them into the back panel ( 18mm thick back) so you can mount the speakers with a tight fit against the wall. Simply use two heavy gauge screws / raw plugs to hang the cabinets on.
This is very, very important. Not just to eliminate annoying rattles and vibrations, tight fit to the wall means the speaker cabinet takes on the
" infinite mass" of the wall.
This will vastly improve every aspect of the sound, from bass detail and dynamics to image solidity and voice intelligibility.
A light weight flimsy cabinet will ruin the sound of any driver(s) , floor standing, stand mount or whatever....It will "rock & roll" in all the wrong ways!
Mount any set of drivers in 200Kg of hewn from solid lead and they will sound way better than the same drivers in 2Kg of flimsy plastic / metal /wood etc.
Take advantage of heavy solid walls ( assuming you have them!) and use the correct mounting techniques to structurally "bond" your wall mounted cabinets to them.
Lastly always cover the rear panel in 2mm to 3mm thick soft rubber / neoprene or similar as this helps ensure a tight fit without rattles.
I use a specialised self adhesive gas blown neoprene designed for under floor sound insulation, its expensive but very good.
All the best
Derek.
Hiya,
I would go for the middle design, best acoustically for wall mounting and most flexible for re-sale later.
An important point...
Try to get metal " Key hole " mounting blocks and securely recess them into the back panel ( 18mm thick back) so you can mount the speakers with a tight fit against the wall. Simply use two heavy gauge screws / raw plugs to hang the cabinets on.
Got the Chinese word for that keyhole system? I don't think that I can go at the hardware store and simulate the mounting block by putting a finger into my other hand forming a hole.
") I'm pretty sure I'd get weird looks, or completely shocked clerks!
I'm pretty sure I'd get weird looks, or completely shocked clerks! No worries, I'll find it! Don't want to make such a fool of myself.
Take advantage of heavy solid walls ( assuming you have them!) and use the correct mounting techniques to structurally "bond" your wall mounted cabinets to them.
Lastly always cover the rear panel in 2mm to 3mm thick soft rubber / neoprene or similar as this helps ensure a tight fit without rattles.
We got cement houses here (with all the earthquakes and typhoons/hurricanes we get) so a hard wall is no problem.
I was thinking of using either neoprene or minicell trims, like the ones used for sealing doorsteps, and trace the back contour of the tower.
One question still remains... how do I cut the boards' side at an angle without a table saw? Possible? I'll search the Youtube carpenter wannabies for some solution...
I think they are called "Keyhole Mounting Plates".
e.g., Single Keyhole Mounting Plate (2pk) | Klingspor's Woodworking Shop
e.g., Single Keyhole Mounting Plate (2pk) | Klingspor's Woodworking Shop
Light weight version
Looks close, and will be fine for light weight cabinets I think.
The ones fitted in the back of my speakers are solid blocks of brass, about 40mm tall 20mm wide and about 10mm deep. They have four mounting holes and each block is rated at 50Kg.
Some of my big speakers weigh 40Kg each which is ok if split between two mounting blocks.
Cheers
Derek.
Wow, I am really behind the times now.
While looking at upgrading my old circular saw (has sentimental value...) I saw that new models allow for beveled cutting!!?? Well, I just figured out how to cut the sides of a board at an angle.
I got to start shopping some more to find what other technology has been introduced!
Found the Hitachi C7SS or the Bosch GKS190 that would seem to fit my budget and needs.
Cool!
Good news!
A Dewalt DW364 circular plunge saw is on its way to me! I'll add this yellow beast to my collection!
Since I decided to go with the cheap drivers, I emailed the seller, and after confirming qty and pricing, he called me back, saying he was out of that model, but he had another 3" in stock. Hmm... He gave me an extra discount and a couple extra drivers for the trouble.
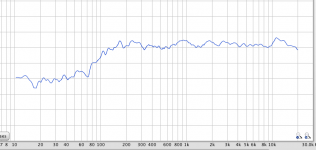
Thing is.... this driver is better! I put it in a test enclosure, and it responds a lot better to EQ tweaking... especially on the lower end. The curves are pretty good, and adding EQ makes it even better. Off-axis is very good as well.
I may have found a sweet little driver. Since it sounds so good, I think I will go back to 25-driver towers.
The only problem is that the mounting plate is very small, not much play around the basket, so it will be a pain to fit on a baffle. I thought of going with a plywood baffle made from 2 plys of thinner plywood, but I think it will be difficult!
Here's the new driver (on the right side) next to the original one. The original one had a fiberglass cone, this new one looks like a polymer cone.
A Dewalt DW364 circular plunge saw is on its way to me! I'll add this yellow beast to my collection!
Since I decided to go with the cheap drivers, I emailed the seller, and after confirming qty and pricing, he called me back, saying he was out of that model, but he had another 3" in stock. Hmm... He gave me an extra discount and a couple extra drivers for the trouble.
Thing is.... this driver is better! I put it in a test enclosure, and it responds a lot better to EQ tweaking... especially on the lower end. The curves are pretty good, and adding EQ makes it even better. Off-axis is very good as well.
I may have found a sweet little driver. Since it sounds so good, I think I will go back to 25-driver towers.
The only problem is that the mounting plate is very small, not much play around the basket, so it will be a pain to fit on a baffle. I thought of going with a plywood baffle made from 2 plys of thinner plywood, but I think it will be difficult!
Here's the new driver (on the right side) next to the original one. The original one had a fiberglass cone, this new one looks like a polymer cone.
Attachments
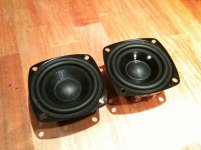
Construction and stiffness of the surrounds feel the same, but it handles a bit better than the fiberglass one. The fiberglass cone sounded a bit muffled on the high end of the spectrum. This polymer cone has the crispness of the $20 paper cone driver, with the better low end of the fiberglass.
Here's the curve I got from one driver:
Here's the curve I got from one driver:
Attachments
WRT fitment, perhaps back-mount them to the baffle and use a router to put a nice radius/chamfer on the circular opening?
Not the most perfect waveguide (and only 19mm deep shouldn't do too much), but it might ultimately make construction easier and allow you to get the driver-driver spacing very tight.
Not the most perfect waveguide (and only 19mm deep shouldn't do too much), but it might ultimately make construction easier and allow you to get the driver-driver spacing very tight.
I did a back-mount on my test box. Since they will be place very near (or on) the back wall, I was worried of loosing the side dispersion to the back wall if I mount them behind the baffle and put a radius like a smallish horn.
Trying to figure out the baffle. I have thought of these 3 options.
1- glue a 3-piece baffle. 1/8 plywood + 1/4 MDF + 1/8 plywood for a 1/2" (13mm) baffle. Would that be too thin? Back-mount the drivers and round out the outside.
2- glue a 3-piece baffle. 1/4 plywood + 1/4 MDF + 1/4 plywood for a 3/4" (19mm) baffle.
Back-mounting the drivers looks like a mini horn. Effects on dispersion?
3- Same as 2, but glue 1/4 plywood + 1/4 MDF then flush front mount drivers, then glue 3rd layer of 1/4 plywood on top.
Help!
Regarding baffle thickness I am only using 12mm (~1/2") MDF for my 20driver towers. The baffle width is 110mm and due to the narrow width extra stiffness may not be required. There will be full height glue joints, 4 extra stifferenes supporting it from the rear so I hope it will work out. A thinner baffle also allow the driver to breath more easily.
Should it be insufficient in thickness I will add a second layer over the front baffle, also allowing the drivers to flush mount.
Should it be insufficient in thickness I will add a second layer over the front baffle, also allowing the drivers to flush mount.
- Status
- This old topic is closed. If you want to reopen this topic, contact a moderator using the "Report Post" button.
- Home
- Loudspeakers
- Full Range
- Short Line Array (line source) build