Dayton ambience tweeter
I have tried both front/rear firing, with different crossover frequencies and attenuation. I think that the Dayton ND20FA-6 tweeter placed on the rear panel is the best option, however it has to be damped about 4dB.
It is now crossed at 13250Hz with a single capacitor (1.5 uF).
Padding 2 ohm in series with the tweeter and 1.2/47 ohm as attenuation circuit.
Sound stage gets even wider, cymbals sounds much better and I think that the Fe126 sounds also much better in the top.
Maybe it is due to lower impedance above 10K as the tweeter is partly in parallel with the FE126 or maybe it is because of the speaker grille, which is shaped as wave guide.
Anyway I am more than pleased with the result.
Anders
An externally hosted image should be here but it was not working when we last tested it.
An externally hosted image should be here but it was not working when we last tested it.
Hi, A126 builders! I have had my Ron's A126's built for a couple of years but am now just getting the finishing steps done as I moved in a different direction from back-loaded horns.
I see there was a lot of discussion in this thread regarding the CC dimensions and, knowing the history of this design and some of it's early adopters, I went on a different tack, the adjustable compression chamber:
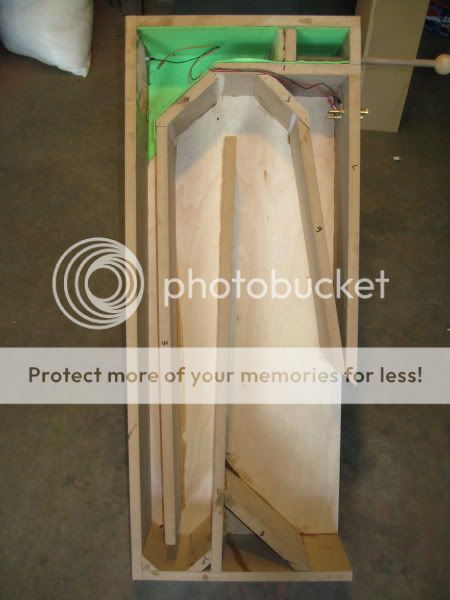
The compression chamber volume is controlled by the sliding block that is attached to the dowel, protruding from the back. I was able to calculate that the volume comprises Ron's original volumes up to a volume sufficient for a Fostex 108 Sigma, should I choose to do that.
Great labors were taken to insure good sealing of the chamber. Besides the usual glues and such to mechanically seal the CC, felt lining, a sheeps wool batten, and very precise cutting and shaping of the sliding block were done.
I discern no air leaks and adjusting the chamber does result in consequential frequency response and horn db changes. Adjustment toward the middle turned out pretty well for my ears.
I am in the process of applying the last finish pieces and will post some pics of the finished pair and some opinions about the cabinet and driver at that time. I've attached some pics of driver treatments, as well.
I see there was a lot of discussion in this thread regarding the CC dimensions and, knowing the history of this design and some of it's early adopters, I went on a different tack, the adjustable compression chamber:
The compression chamber volume is controlled by the sliding block that is attached to the dowel, protruding from the back. I was able to calculate that the volume comprises Ron's original volumes up to a volume sufficient for a Fostex 108 Sigma, should I choose to do that.
Great labors were taken to insure good sealing of the chamber. Besides the usual glues and such to mechanically seal the CC, felt lining, a sheeps wool batten, and very precise cutting and shaping of the sliding block were done.
I discern no air leaks and adjusting the chamber does result in consequential frequency response and horn db changes. Adjustment toward the middle turned out pretty well for my ears.
I am in the process of applying the last finish pieces and will post some pics of the finished pair and some opinions about the cabinet and driver at that time. I've attached some pics of driver treatments, as well.
Attachments
Westend:
Cute trick indeed; I guess others adopting this could use a threaded rod and insert nut on the movable block. In combination with removable mounting plate & or suprabaffle, it would be easy to accommodate experimenting with drivers - and once the right tuning is achieved, the rod could be removed to prevent "accidents".
I can appreciate that many folks might find higher domestic acceptance factor with the more conventional rectangular shape of the enclosure, but you may well have compromised one of the important features of Ron's design by eliminating the curved mouth openings.
Feedback: A126 with FE126eN
It’s now nearly two years since I built my horns. I enabled the drivers from the start. Didn’t have the Micro gloss, so rather than getting the stuff I decided to buy a new pair of matched drivers from Planet 10. Very Impressive logistics Dave, ordered the drivers on Thursday and they arrived on Monday!
I started to swap the LH speaker as it was a slightly “dull”, turned the music on and suddenly the RH speaker was the one that sounded less musical.
Many things have been said about these pieces of art…
…They reveal flowing music in a completely different way. Try to measure the difference as I did: Not much to see or analyse, yet they sound so much better.
(Pink curve =FE126eN, Cyan curve = Home-style enabled well-broken-in FE126)
The response above is measured at 1m. My speakers have rear firing tweeters. The measurement is not affected so close to the speakers, but the ambience tweeter tribute to the overall impression. The trick is to cross it high and level it so it’s barely audible.
Another improvement: Ron commented about the ugly puck on the original drivers. I was too lazy to add the pucks on the new drivers, so now the cc is 2.2l, seems to be the right size.
FE126eN without “ugly pucks” makes my life even better.
/Anders
It’s now nearly two years since I built my horns. I enabled the drivers from the start. Didn’t have the Micro gloss, so rather than getting the stuff I decided to buy a new pair of matched drivers from Planet 10. Very Impressive logistics Dave, ordered the drivers on Thursday and they arrived on Monday!
I started to swap the LH speaker as it was a slightly “dull”, turned the music on and suddenly the RH speaker was the one that sounded less musical.
Many things have been said about these pieces of art…
…They reveal flowing music in a completely different way. Try to measure the difference as I did: Not much to see or analyse, yet they sound so much better.
(Pink curve =FE126eN, Cyan curve = Home-style enabled well-broken-in FE126)
An externally hosted image should be here but it was not working when we last tested it.
The response above is measured at 1m. My speakers have rear firing tweeters. The measurement is not affected so close to the speakers, but the ambience tweeter tribute to the overall impression. The trick is to cross it high and level it so it’s barely audible.
Another improvement: Ron commented about the ugly puck on the original drivers. I was too lazy to add the pucks on the new drivers, so now the cc is 2.2l, seems to be the right size.
FE126eN without “ugly pucks” makes my life even better.
/Anders
Fine tuning A126
It seeems as the A126 sounds better with a little stuffing in the last horn section. Too much midrange causes some resonance in the horn mouth.
I added one layer of one inch sheep wool in and after the last bend. (inspired by Dhenryp´s bugelhorn treatment)
The result is deeper and more defined bass as the midrange interference is reduced.
/Anders
An externally hosted image should be here but it was not working when we last tested it.
ordered the drivers on Thursday and they arrived on Monday!
You have to thank post offices that are trying to get competitive with couriers... still that is very impressive delivery time.
Many things have been said about these pieces of art…
…They reveal flowing music in a completely different way. Try to measure the difference as I did: Not much to see or analyse, yet they sound so much better.
")
I'm just digging my A126 out and will try your damping trick... thanx.
dave
Creating definitive A126 plans
Reading through the posts about enclosures for the Fostex 126's, its clear that Rob's A126 is regarded as a high quality box for these drivers. Its unfortunate then that there seem to be no really "definitive plans" for them, something of professional quality that I could send to a cabinet maker.
Are there already well made plans available? If not, my goal is to create a set of plans to share with the community that can be passed off to a carpenter to have a high quality A126 cut.
I haven't used CAD software before, it would be great if someone here with experience wanted help, otherwise I'll either hire an engineering student to help me with the CAD work or I'll bite the bullet and learn it myself (knowing myself, I'll likely want to learn it anyway!). Are there any existing CAD design files I can use as a starting point? I'll need to make diagrams that are accurate in the metric system, earlier in the post there seem to have been some problems that were found with dimensions. My build will be a metric build, so I'll be a test case for this!
The issues I feel are not completely clear:
1. Compression chamber size
I think this is the biggest issue to resolve. FlorianO, in this thread's original post, wrote that the speaker spec's indicated a 2.2l volume instead of the 1.1l chamber in the original plans. This seems to have been resolved by many people by removing the front panel and adding the suprabaffle.
Dave provides modified 126eN's which everyone raves about and I've ordered for this build. Has anyone taken into account the impact of the damping clay and wool backing that he adds on the chamber volume? Does the 2.2l volume take into account that the driver itself will be in it?
My idea here is to make the chamber a bit bigger then ideal, and to adjust volume by using different radius styrofoam cylinders in the back. We can drill three mounting dowels into the back, drill three small holes that match up on the cylinder, which we can lightly glue together, letting us tweak the CC volume. Could these cylinders be made of solid wood or could a "cylinder" with random wave dispersal shapes all over it work even better??
It seems everyone agrees the suprabaffle is an improvement and it looks cool when it sits in front of the main front panel, so thats the design I want to use. So I'll make sure the CC is planned with that in mind.
As I've understood, its better to be on the small side of ideal, if the CC is made too big, the entire horn effect will fail. Is this correct?
2. Suprabaffle
It seems that the baffle size and shape generates a lot of debate. Im wondering if there is a way the design could allow the builder to temporarily mount and remove the baffle allowing changes and tuning. This is a low priority goal.
Is there some agreement on ideal shapes, sizes and outside bevel and inside speaker bevel angles? Is it better to rear mount the speaker on the SB and angle the outside surrounding, or front mount? Chrisb rear-mounted the driver in the baffle like in this post:http://www.diyaudio.com/forums/full...n-a126-metric-freak-newbie-2.html#post1210426
For purely aesthetic reasons, I'm considering adding 3 more layers of wood behind the baffle, to make it look more like a "bubble" then just a baffle.
3. Rounding the bends
Ive seen a cement-like product used to round the corners. However, this will reduce the volume of the bends. Was the board placement moved into the bend to deal with the altered volume and should they actually be moved out of the bends a bit to provide proper volume when using material to create real bends? Would a non-resonant material like a cement / putty be good in the corners will the wood be better? Any ideas on making the best bends? CNC the curves with solid wood or arches and fill the voids with sand?
4. Mass loading spaces
Is it best to use some heavy sand in all the sealed areas like the horn bends and behind the CC?
5. Bracing
In a CNC'ed A126 I saw a horizontal brace going from the front to the back. Was that simply to brace the delicate cut, or could this be useful in the build to brace the horn walls, such as in the TL design below?
http://homepage.mac.com/tlinespeakers/FAL/box-plans/classicTL-revisited-WD.pdf
6. Front panel across the entire width
I prefer the look of having a solid front, instead of having the sides extend to the front. This will add some complexity though designing the cut out for the CC. Is there a reason supporting this style of cabinet construction, with the full sides, instead of a full front panel other than ease of construction with the SB?
7. Stuffing
The resulting plans should show the recommended stuffing areas, which seem to be
a. a styrofoam cylinder in the CC
b. light padding in the curves
c. possibly a 1" wool layer in and after the last bend as per http://www.diyaudio.com/forums/full...n-a126-metric-freak-newbie-3.html#post1963593.
8. Wiring
Is there a best placement of posts and wire to use? Single strand cat5? Is there a best wire placement practice? I happen to be using a st-70 tube amp if it makes a difference. Should the wire to the driver just run up opposite sides? Im thinking to put the posts inside, at the bottom of the horn mouth, as I've seen most other do.
Are terminal posts preferable to a terminal block for sealing reasons? With posts, it would seem you lose the possibility to add a tweeter later due to wiring issues, unless you do a bit of surgery.
9. Adding a tweeter
Since I haven't heard A126's at all, I can't say if a tweeter is justified at all. Its worth noting how this one was implemented in this post:
http://www.diyaudio.com/forums/full...n-a126-metric-freak-newbie-3.html#post1705262. Are there many people out there who felt the speaker needed a tweeter? I want to build a true single driver fullrange speaker, so I'm hoping this won't be needed.
10. Wood to use
Void free baltic birch plywood seems to be the way to go. 18mm seems to be the typical choice, is there a benefit to using thicker wood, like 20mm, especially for the large sides? If I would use 20mm outside, I'd still stick to 18mm inside to avoid having to alter plan dimensions.
11. Making building easier
I'd like to send plans to the carpenter that include a board cut layout with joining dowel drill points. These obviously have to be done just right, but would really be helpful especially making the placement of the inner panels more simple. Do you think the carpenter would manage this ok, or should I do this by myself when the cut wood arrives?
12. Deflector design
There are two vesions I've seen out there, a "W" and a "V" shape. Which of these is preferred? Could this deflector be improved by CNC'ing a more rounded version?
Rob wrote: "The deflector is a necessary as it prevents the wave front from being sent back to the mouth as well as providing the final wave expansion which allows a more spherical front to develop," in http://www.diyaudio.com/forums/full-range/96999-horn-decision-2.html#post1153777
Its a lot, I know! These are the issues that I'm still not sure about in the A126 build. Maybe I'll find more as I work, but with answers to these issues I hope to make a definitive plan for this enclosure that could also be posted to frugel-horn.com.
creating definitive A126 plans
I am interested in building a pair of A126s too and applaud your ambitions to create a set of definitive plans. I have struggled with some of the same issues you want to address. There is one question that I haven't seen an answer to that may affect your plans. The Fostex 126e has been discontinued and I don't know if the new fe126En will work without modification to the compression chamber. I think I need to hurry and order a set of 126eNs from Planet10 before its too late! I wish I could help but I'm the newest of newbees. Good luck and I'll be watching your progress.
I am interested in building a pair of A126s too and applaud your ambitions to create a set of definitive plans. I have struggled with some of the same issues you want to address. There is one question that I haven't seen an answer to that may affect your plans. The Fostex 126e has been discontinued and I don't know if the new fe126En will work without modification to the compression chamber. I think I need to hurry and order a set of 126eNs from Planet10 before its too late! I wish I could help but I'm the newest of newbees. Good luck and I'll be watching your progress.
Andrew,
I'll get back on the other questions, but i do have DXFs of an iteration of Chad's drawings and have a CAD drawing started -- time for me to finish it.
Our A126 went off to a friend's house for use as "computer" speakers with his new 27" iMac. He has a small room that is particularily synergistic. Performance is staggering.
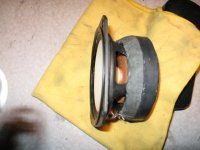
His are the green drivers with the new underpainting trick i've recently learned (picture doesn't do them justice).
dave
I'll get back on the other questions, but i do have DXFs of an iteration of Chad's drawings and have a CAD drawing started -- time for me to finish it.
Our A126 went off to a friend's house for use as "computer" speakers with his new 27" iMac. He has a small room that is particularily synergistic. Performance is staggering.
His are the green drivers with the new underpainting trick i've recently learned (picture doesn't do them justice).
dave
I am interested in building a pair of A126s too and applaud your ambitions to create a set of definitive plans. I have struggled with some of the same issues you want to address. There is one question that I haven't seen an answer to that may affect your plans. The Fostex 126e has been discontinued and I don't know if the new fe126En will work without modification to the compression chamber. I think I need to hurry and order a set of 126eNs from Planet10 before its too late! I wish I could help but I'm the newest of newbees. Good luck and I'll be watching your progress.
Based on our own and other anecdotal reports, you'd likely be more than happy with which ever version of the FE126E you find in the A126 - but FWIW, I think the polka dots are definitely worthwhile
I was just thinking, what about using something like the ikea wooden bowl trick as the SB, for example as posted here: http://www.diyaudio.com/forums/full-range/176830-ikea-bowl-speaker-drivers.html
I was just thinking, what about using something like the ikea wooden bowl trick as the SB, for example as posted here
Similar ideas have certainly passed thru my head... just needs to be the right width.
dave
Air Cavity
Compression Chamber is not the correct term. We have found that enlarging it and then adding irregular fill works well.
SupraBaffle
Ron has carefully sized the sB size to flatten response down to meet the output from the horn, you doesn't want to muck with that much.
The best shape is likely a the teardrop shape as exemplified by the midrange pods in the B&W Natilus 800s or the FujitsuTENs.
An externally hosted image should be here but it was not working when we last tested it.
As to shape, if you look at Page 23 of Olson, you can see that the shape that Ron presents is a really good compromise between best & buildable.
Chrisb rear-mounted the driver in the baffle
Actually in this case the driver is flush mounted to a vestigal baffle and the supraBaffle with built-in waveguide fits over top. This was done a/ so that we could hear the difference with & without sB, and b/ because Chris felt like it
For purely aesthetic reasons, I'm considering adding 3 more layers of wood behind the baffle, to make it look more like a "bubble" then just a baffle.
[/quote] Rounding the bends[/quote]
Ron thot this was a good idea, but it does extend the HF bandwidth of the horn, which in things like the Olson-Nagaoka style horns degrades performance,
Mass loading spaces
You should. Stops cavities from resonating. As in the FH, they can also be opened up to the outside world.
Bracing
I am a big advocate of bracing. Push panel resonances up till they won't get excited.
Front panel across the entire width
No problem
Wiring
Whatever works best for you. We like using single strands of CAT5 (usually cryotreated), for both avoid the wire-wars and maintain frugal-phile(tm) status.
We like to use removable cups so as to maximize future versatility. MPO is that posts should have as little metal in them as possible (ie plastic nuts instead of the big metal ones.
The ones Mark Audio is working on look good (unless, like us, you use double bananas to make comparison swapping easy). Bare wire is the sonically best ternination, the best trick is to use binding posts simply to clamp the bare wire from the drivers to the bare wire from the amp.
Adding a tweeter
I don't feel a tweeter is needed, one on the back can help the power response, but note that with the 4dB padding as in the example you posted the tweeter is 6 dB down on the output of the FE126 so isn't adding very much.
Wood to use
What you suggest is fine.
A dado made by a CNC (one side only) is even easier.Making building easier
Stick to exactly the shape Ron designed. The 2nd version with the deflector inside was i believe still in development, haven't seen any builds of this version.12. Deflector design
dave
A126 building tips
Hi A126 builders. I just wanted to share my experience with this speaker. It is a tricky speaker to build and here are some lessons learnt:
//Anders
Hi A126 builders. I just wanted to share my experience with this speaker. It is a tricky speaker to build and here are some lessons learnt:
- Doublecheck the ply dimension. 18mm ply is nominal 17.7 mm +0.4, -0,6mm. In my case it was 17.5mm in practice. My ACAD-dwg is based on this dimension. It may seem a little overkill but dimensions and angles must be correct when you build this horn.
- I did the drawing the hard way, first on paper and then in Autocad.
- Once you have the cad drawing, plot the side view in full scale and glue it onto a hardboard. It makes it much easier when you have a master in scale 1:1.
- Cut the parts and verify that they match the template.
- If you want to use my cad-version, all you have to do is to add dimensions and angles in ACAD. I can provide the file and then it is up to you to use it as it is.
- My opinion is that the CC should be 2.2l , the driver itself is 0.26l.
- SB is a great addon, deflector aswell unless you have a subwoofer.
- Ambience tweeter does not kill the fullrange sound. My way of doing it is inspired of The Cyclops 3 Way
//Anders
Attachments
Member
Joined 2009
Paid Member
- Status
- This old topic is closed. If you want to reopen this topic, contact a moderator using the "Report Post" button.
- Home
- Loudspeakers
- Full Range
- Rons Austin A126 for the metric freak newbie