Which might or might not be supported? ;0)
...have you been flossing regularly? could that be the cause of all this contention on a subtle unperceived level
 Its important to floss regularly
 sooooooooooooo, Im considering various options for rewiring my RB250...I am rather happy with the Isotone Solid Silver straight loom from tonearm to rca's http://www.cabezon.eu/product_info.php?products_id=82 I have used with my RB300 so far --- its hard to imagine one could get improvement on that sound...., however --- I am wondering if there is a proven better solid silver solution for tonearm rewire that is price-to-performance ratio justified for my RB250...
Anyone have any ideas? suggestions --- with regards to silver?
Anyone have any ideas? suggestions --- with regards to silver?
Last edited:
I am actually impressed with the Isotone Solid Silver straight loom as far as defined sonics go..., one has to be careful of binding etc however. Im not sure how well they anneal the silver...there was a site I came accross that used nicely annealed soft silver of varying guages that one could choose from, the Isotone seems a bit stiff-ish, like it has not been annealed enough, but does sound good. It also seems to be a larger than average wire guage..., and it is all ready made. With the other I would have to make it up as one balanced/shielded loom, but it would not be that difficult really...
Last edited:
Tonearms, the one area where cables make any real difference. I'm a fan of the Cardas wire internally and Audio Note wire externally.
The Cardas internal wire; isn't that typically copper? Im not sure what the Audio Note one is externally; I know the one in the UK has solid silver internal wire which is considered quite good; then there is the original Audio Note in Japan, which uses silk insulating material, which must be better...
Is there any reason you dont prefer to use a straight loom from cartridge to RCA's?
i'll just pipe in here if i may (i'll admit i know nothing). don't get to strung out about the rigidity of a tonearm as rigidity does not play that much a part in tonearm design as if that were the case then no one would use uni-pivot arms. i had a Hadcock GH228 super arm for a while but got rid as it was way to fiddly to use but my lord it sounded amazing once set up.
anyway as mentioned the only downside of the RB300 is in fact the spring which brings me to a little experiment i will be conducting at some point. there is a product on the market called plastidip and i reckon that a thin paint on one side of the spring might just dampen the ringing effect.
anyway as mentioned the only downside of the RB300 is in fact the spring which brings me to a little experiment i will be conducting at some point. there is a product on the market called plastidip and i reckon that a thin paint on one side of the spring might just dampen the ringing effect.
i'll just pipe in here if i may (i'll admit i know nothing). don't get to strung out about the rigidity of a tonearm as rigidity does not play that much a part in tonearm design as if that were the case then no one would use uni-pivot arms. i had a Hadcock GH228 super arm for a while but got rid as it was way to fiddly to use but my lord it sounded amazing once set up.
anyway as mentioned the only downside of the RB300 is in fact the spring which brings me to a little experiment i will be conducting at some point. there is a product on the market called plastidip and i reckon that a thin paint on one side of the spring might just dampen the ringing effect.
I cut minature slithers of an expanding foam ear-plug and placed about 3 of them inbetween the spring coil and the ringing stopped. Works rather well...I just set it at max ie: 3+ and its the best you can get it...
In/Out was just with reference to those who have plugs in the bottom of the arms. My own arm is one piece of Cardas end to end.
I might just use the Isotone solid silver straight loom again. Its working rather well on my RB300, might as well use it on the RB250...I dont think you can get much better than that really, anything else seems to be quite negligable and maybe only a bat could tell the difference...
...making low-slung counterweight...
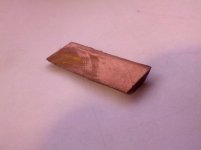
I decided to make my own low-slung counterweight so that it was almost right on top of the pivot-point of the RB300 tonearm. I went to the local plumbing store (of course) and selected a brass fitting of some description which almost had a 1/2" diameter and lugs with holes. I then went to my local engineering shop and purchased a 50mm length of solid brass rod.
*
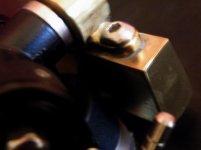
I then proceeded to engineer this counterweight by placing in a vice and drilling the hole in the plumbing part to 1/2 inch. First attempt failed as the part started to spin and broke of a lug (see photo). The second attempt was a success, due to very VERY firmly placing in vice. I then cut it to size so that it was even on both sides, and proceeded to cut slices off the brass rod with a very fine cutting wheel for 4" grinder. I cut both sides off, and weighed, then shaped via a bench grinder constantly weighing and calculating final weight. I left a bit over just for adjustments.
*
I super glued the arm-end housing part I created to the newly formed weight, and then drilled a bit into each hole. I had to reglue as it came apart due to the drill action moving it, so I cleaned with acetone and drilled the rest of the hole measuring the length of the stainless bolts I got for this, then taped the hole to suit the bolts, super-glued the housing to the weight, and then put some araldite into the hole (not too much) and onto the bolt thread; then tightened and allowed to set. The super-glue is quite hard when dry and would couple the 2 parts more tightly; and the araldite is for extra measure and to keep the counterweight set hard so it works as one piece.
*
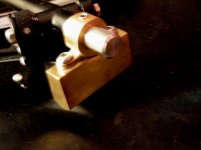
I slid the counter-weight on arm to test. Arm was very limited in movement upwards due to how low and close weight was to tonearm base, so I measured and cut in a v-type groove with a round file and half-round file until it matched and could lift high enough. A good thing I left some extra weight on the counterweight. I drilled a hole on top for a very small stainless grub screw, and then taped the hole with thread to suit, and polished the counterweight with a dremel and small buffing wheel with brasso on it.
*
In all the time I was engineering this; I was always using accurate digital scales to check the weight and estimating/calculating constantly. Its imperative this is done religously and with great thought and care. The placement of this counterweight is completely set up on my Rega Planar 3 as is seen in the photos, very close to the pivot point by a fraction which is how I intended it to be. Just important to remember the groove on the inside for arm lift (see last photo with that part encircled)
*
I placed the counterweight on the tonearm and adjusted it straight by gravity and sight correction, then very very lightly moved the allen key to the grub screw and lightly turned until tight enough to turn more securely. I have never looked back, and it made more improvement to the sound with no tracking issues.*
*
If you have the time, its a great mod to make and feel good about achieving...*
*
Cheers ...*
I decided to make my own low-slung counterweight so that it was almost right on top of the pivot-point of the RB300 tonearm. I went to the local plumbing store (of course) and selected a brass fitting of some description which almost had a 1/2" diameter and lugs with holes. I then went to my local engineering shop and purchased a 50mm length of solid brass rod.
*
I then proceeded to engineer this counterweight by placing in a vice and drilling the hole in the plumbing part to 1/2 inch. First attempt failed as the part started to spin and broke of a lug (see photo). The second attempt was a success, due to very VERY firmly placing in vice. I then cut it to size so that it was even on both sides, and proceeded to cut slices off the brass rod with a very fine cutting wheel for 4" grinder. I cut both sides off, and weighed, then shaped via a bench grinder constantly weighing and calculating final weight. I left a bit over just for adjustments.
*
I super glued the arm-end housing part I created to the newly formed weight, and then drilled a bit into each hole. I had to reglue as it came apart due to the drill action moving it, so I cleaned with acetone and drilled the rest of the hole measuring the length of the stainless bolts I got for this, then taped the hole to suit the bolts, super-glued the housing to the weight, and then put some araldite into the hole (not too much) and onto the bolt thread; then tightened and allowed to set. The super-glue is quite hard when dry and would couple the 2 parts more tightly; and the araldite is for extra measure and to keep the counterweight set hard so it works as one piece.
*
I slid the counter-weight on arm to test. Arm was very limited in movement upwards due to how low and close weight was to tonearm base, so I measured and cut in a v-type groove with a round file and half-round file until it matched and could lift high enough. A good thing I left some extra weight on the counterweight. I drilled a hole on top for a very small stainless grub screw, and then taped the hole with thread to suit, and polished the counterweight with a dremel and small buffing wheel with brasso on it.
*
In all the time I was engineering this; I was always using accurate digital scales to check the weight and estimating/calculating constantly. Its imperative this is done religously and with great thought and care. The placement of this counterweight is completely set up on my Rega Planar 3 as is seen in the photos, very close to the pivot point by a fraction which is how I intended it to be. Just important to remember the groove on the inside for arm lift (see last photo with that part encircled)
*
I placed the counterweight on the tonearm and adjusted it straight by gravity and sight correction, then very very lightly moved the allen key to the grub screw and lightly turned until tight enough to turn more securely. I have never looked back, and it made more improvement to the sound with no tracking issues.*
*
If you have the time, its a great mod to make and feel good about achieving...*
*
Cheers ...*
Attachments
-
 1 Raw material for arm.jpg289.2 KB · Views: 406
 -
 2 raw material from weight formation.jpg463.6 KB · Views: 406
 -
 3 counterweight side.jpg323.3 KB · Views: 398
 -
 4 counterweight close up side.jpg278.2 KB · Views: 384
 -
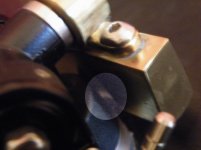 4a indent_groove inside .jpg345.6 KB · Views: 375
 -
 5 counterweight rear angle.jpg350.1 KB · Views: 143
I started by getting some thin high density foam from a rubber/foam store, and cut to size to place under the rubber feet of plinth and under the motor housing. It worked OK, but kept getting ideas from reading posts about using the gel found in mouse arm-pad rests. I had an old one I cut apart and used slices I cut from it (very very messy and sticky to work with - quite a challenge) and placed them under the feet of the plinth. The whole thing moves like its floating on aeroplane jelly/air, however it DOES make an added difference. In effect, all the mods with isolated motor housing and now this creates quite an effective floating platter effect I believe would be difficult to beat...
*
...I just have to find a way of making my own very thin gel pieces or find a source for them...* *
*
*
...I just have to find a way of making my own very thin gel pieces or find a source for them...*
*...I cannot remember hearing anything so good - so crisp, dynamic, with soundstage - transparency and depth, that is unnerving and the next best thing to going to a live venue... I don't need to spend any $$$ ... but will work on the solid slate base next with custom Rega style TT with some significant innovations ... 
...I cannot remember hearing anything so good - so crisp, dynamic, with soundstage - transparency and depth, that is unnerving and the next best thing to going to a live venue...
I think moding stuff it great, I really do. Differences in commercial products that cost hundreds are often small things you can replicate yourself so keep doing what you're doing.
But when you start using hyperbole and making ridiculous claims for small modifications you just loose people. These sorts of tweaks are relatively small, incremental improvements, if they work at all that is. I love the Planer 3 and RB300, in fact they are two of my all-time favourite Hi-Fi products, but live sound? Give me a break.
Rega mods
I've been considering modding it for a while such as buying an after market sub-platter and machining an acrylic platter ( I have a machine shop), but using a "filler" such as you did might achieve the same result. I also wondered about expanding foam. Any thoughts?
Regards John L.
I've been reading your thread with interest. Do you think the mods you made would work as well on a Rega RP1?...I cannot remember hearing anything so good - so crisp, dynamic, with soundstage - transparency and depth, that is unnerving and the next best thing to going to a live venue... I don't need to spend any $$$ ... but will work on the solid slate base next with custom Rega style TT with some significant innovations ...
I've been considering modding it for a while such as buying an after market sub-platter and machining an acrylic platter ( I have a machine shop), but using a "filler" such as you did might achieve the same result. I also wondered about expanding foam. Any thoughts?
Regards John L.
Last edited:
If you have a machine shop maybe you should make your own sub-platter... That would be cool.
And, if you happen to have a well-stocked scrap bin, look for some 304 or 316 stainless and make the platter from that. Rotating mass is your friend in platters. (and needs to be non-ferrous)
And, if you happen to have a well-stocked scrap bin, look for some 304 or 316 stainless and make the platter from that. Rotating mass is your friend in platters. (and needs to be non-ferrous)
Well, the sub platter has some significant manufacturing difficulties, namely making the spindle (that is non-standard size and hardened at the tip) run perfectly true with the aluminum rotating mass. It can be done, but I don't think we could do it as cheaply as they are available from manufacturers and beside that, they also supply a ruby or sapphire bearing to replace the existing hardened steel ball. The main platter though is a different story as there is no spindle to encase in the aluminum or acrylic or whatever material one uses. I like the idea of acrylic as it has more mass than the resin type platters that Rega supply. They don't even run true and I expect it's because they are totally molded.
Well, the sub platter has some significant manufacturing difficulties, namely making the spindle (that is non-standard size and hardened at the tip) run perfectly true with the aluminum rotating mass. It can be done, but I don't think we could do it as cheaply as they are available from manufacturers and beside that, they also supply a ruby or sapphire bearing to replace the existing hardened steel ball. The main platter though is a different story as there is no spindle to encase in the aluminum or acrylic or whatever material one uses. I like the idea of acrylic as it has more mass than the resin type platters that Rega supply. They don't even run true and I expect it's because they are totally molded.
The idea of these mods was to make the most of standard OEM equipment, to easily and cost effectively bring the Rega 3 to its best..., however I have some solid slate plinths, in which I will use better aftermarket components and make my own variation of the Rega 3+ with...
I've been reading your thread with interest. Do you think the mods you made would work as well on a Rega RP1?
I've been considering modding it for a while such as buying an after market sub-platter and machining an acrylic platter ( I have a machine shop), but using a "filler" such as you did might achieve the same result. I also wondered about expanding foam. Any thoughts?
Regards John L.
I am not familiar with the Rega RP1, however the same principles generally apply IMO. I would go through the steps and consider logically what can be applied and the end result should always be an improvement.
I think moding stuff it great, I really do. Differences in commercial products that cost hundreds are often small things you can replicate yourself so keep doing what you're doing.
But when you start using hyperbole and making ridiculous claims for small modifications you just loose people. These sorts of tweaks are relatively small, incremental improvements, if they work at all that is. I love the Planer 3 and RB300, in fact they are two of my all-time favourite Hi-Fi products, but live sound? Give me a break.
...you can say that sitting in your chair, however have you made the mods yourself??
...aside from having an adequate amp, I have been using British speakers modified with solid silver lead capacitors and solid silver strips to speakers from crossover with Mundorf silver solder and also all connections resoldered accordingly...and it DOES give a live-like sound with refined clarity and feeling, which a number who have auditioned have commented on in this regard - regardless of what you think...
... most ordinary thinking folks assume that the more $$ they spend the more they will get dependant on commercial information given...without thinking outside the square - and actually doing it.
...first try - with adequate equipment - then comment...
Last edited:
".. most ordinary thinking folks assume that the more $$ they spend the more they will get dependant on commercial information given...without thinking outside the square - and actually doing it.
...first try - with adequate equipment - then comment..."
And besides - it's a challenge and keeps yer brain active. I'm messing about with new ideas all the time. My main thing is attention to detail so that the finished product looks good.
Regards Johnno
...first try - with adequate equipment - then comment..."
And besides - it's a challenge and keeps yer brain active. I'm messing about with new ideas all the time. My main thing is attention to detail so that the finished product looks good.
Regards Johnno
- Home
- Source & Line
- Analogue Source
- Rega Planar 3/2 - Significant modifications