Banned
Joined 2002
planet10 said:Here is a pic of the pheonix* amp my buddy Chris made from a donor console hifi amp... a Frugal-phile(tm) special (under $25 USD invested)
Stereo -- 2 tubes & 1 is a rectifier -- gotta love it. Sounds good too.
An externally hosted image should be here but it was not working when we last tested it.
ELL80 (2 EL95s in one bottle) straped in triode for about 1.5 W. Rectifier is a hybrid bridge with an EZ81
dave
*(as in risen from the ashes)
This looks like something like i have on my floor right now powering my Day-Line's : O )
planet10 said:Good to see you here blackie... welcome
maybe you can start a thread on your universal -- hung from a string -- power amp?
dave
thanks mister! a thread...hmmm. not much to say about that one except...it really sounded best w/ chinese kt66's...and i swear the prototype with the cheap hammond ot's sounded better!
resident said:@Blackie
Daaaaaamn,
Nice guitar amp!!!
I'll see Detroit Cobras live tomorrow!
COBRAS I AM SOOO JEALOUS!
electronaut said:Hi Blackie,
Beautiful stuff, for sure.
What are those terminal strip things in the guitar amp?? Did you make those or are they an off-the-shelf product?
E. Lectreau
those are big, ol' skool bakelite-looking barrier strips i got from mouser for a build and never used...they were a whole lot huger than i expected when they arrived...sat on my shelf for a year and then one day...THEY WERE PERFECT hehe
funny how that happens.
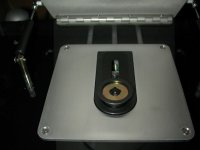
I have sanded back the power tranny of my (yet to be) PP 6L6 amp..
I've got to place masking tape around the top and bottom edge and cover + seal the terminals on the faceplate ontop.
Thought you guy's might like a look before it's painted, I know I did =)
Gardners Model # RS 3134
Specs are: 350-300-0-300-350 200mA = 70w
With: 10-0-200-220-240 Mains Primary taps, the extra 10 is for 250v operation (afaik)
1x 6.3v 3A, 1x 6.3v 1A and 0-5-6.3 2A for both 6.3 and 5v rectifier operation or whatever...
An externally hosted image should be here but it was not working when we last tested it.
rcavictim said:When you paint it, try not to get overspray on your keyboard!If I were to paint over my key lettering I'd be in trouble.
That might look ok just clear coated with spray lacquer. Depends on the look you are after of course.
OH NO! I'm not that much of a pack rat
I have got plenty of space in the doorway of the shed...spray lacquer?, hey you know it just might, a few days rubbing back with some wet&dry to smoothen it up as much as possible then lacquer it clear, Thanks!
You should try to sand the metal in one direction only creating striaght lines as you go. I notice the finish so far looks like your wobbling all over the place. try using a 220 to 400 grit sanding belt from a belt sander and polish it like you would a good pair of shoes. You will need to hold the tranny steady while you do this. The surface should end up looking somthing like this.
Regards
Anthony
Regards
Anthony
Attachments
Coulomb said:You should try to sand the metal in one direction only creating striaght lines as you go. I notice the finish so far looks like your wobbling all over the place. try using a 220 to 400 grit sanding belt from a belt sander and polish it like you would a good pair of shoes. You will need to hold the tranny steady while you do this. The surface should end up looking somthing like this.
Regards
Anthony
I'm going to try some wet&dry today and see how that comes out, if that doesn't work I'll buy some fine grit belts and try that

eeka chu said:A foam buffing mop on a drill and some very fine polishing compound could probably get it reflective!
If I were to do that I will have to take the top and bottom caps off, so far I can't seem to get them off, if I left them on and buffed them they would tear the mop apart because of the edges...

Anyway! I'd rather do it by hand for now as I'm worried of getting fine grain metal and paint inside the windings...
Thanks everyone =)
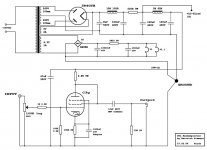
C3G headphone amp
This is my first ever tube project, actually my first ever electronic project ....
A headphone amp based on a design I found on the german site "Jogi's Roehrenbude", which definitely might sound unpronouncable for some...
It uses a tube made for the german post in the 60's (?) and that was used in audio repeater amplifiers for long distance.
The only changes to the original schematic are using a tube rectifier and way more chokes....It worked instantly not frying any parts and I only had some minor grounding issues.
Sound is promising and relaxed, although still a little "boomy", like some emphasis on the middle bass registers. Anyone got suggestions how to improve that?
rgds,
Oliver
Attachments

- Home
- Amplifiers
- Tubes / Valves
- Photo Gallery