tiroth said:Looks great to me.I envy you the sliding miter saw...those cuts were a pain on the table saw.
Cheers Tiroth,
Usually I'll do something and I'll either like it instantly or scrap it and try something a little different. In this case I was confused because it looked great in CAD but the finished article is less so.
After overlaying vectors on the photo I can see that its all the nasty joints that confuse and lead the eye away from whats really going on.
PS. The new toy does indeed make light work of this sort of stuff, providing you've worked all the angles out correctly to begin with that is
Without it I think I would have given up on sloping sides and baffle.
I like the look, that computer enhanced version remids me of darth vador for some reason. I am usually all for nice real woods with glossy finishes but I think they could potentially look very modern.
I dont think in the UK you will have any problems with MDF expansion et al. We rarely drop below 60% humidity and do go upto 90%+ sometimes but its not a problem. Indeed all these americans worrying about making speakers out of real wood, here in the UK you need not worry.
I have also never had any swelling problems with my MDF boxes that are left "raw" as it were.
Little more done today.
Driver cutouts and recess almost done, front baffle & cabinet have been filled and then sanded smooth.
Starting to look like a speaker now:
Last off we have the mitre saw that has had some serious use these past few days
Plan to finish the midrange cutout tommorow, its hard work since the baffle is so thick, actually I doubt I will have it finished since I'm thinking about all the awkward shaped involved for the mounts inside the baffle. Bloody ATC and there 'internal mounting' ways!
Driver cutouts and recess almost done, front baffle & cabinet have been filled and then sanded smooth.
Starting to look like a speaker now:
An externally hosted image should be here but it was not working when we last tested it.
An externally hosted image should be here but it was not working when we last tested it.
An externally hosted image should be here but it was not working when we last tested it.
An externally hosted image should be here but it was not working when we last tested it.
An externally hosted image should be here but it was not working when we last tested it.
Last off we have the mitre saw that has had some serious use these past few days
Plan to finish the midrange cutout tommorow, its hard work since the baffle is so thick, actually I doubt I will have it finished since I'm thinking about all the awkward shaped involved for the mounts inside the baffle. Bloody ATC and there 'internal mounting' ways!
5th element said:I like the look, that computer enhanced version remids me of darth vador for some reason. I am usually all for nice real woods with glossy finishes but I think they could potentially look very modern.
I dont think in the UK you will have any problems with MDF expansion et al. We rarely drop below 60% humidity and do go upto 90%+ sometimes but its not a problem. Indeed all these americans worrying about making speakers out of real wood, here in the UK you need not worry.
I have also never had any swelling problems with my MDF boxes that are left "raw" as it were.
Love the starwars movies, so the Vader thing is cool.
I don't know whether its just me or what but I have to be quite meticulous with the MDF to ensure that I don't get the joints poping back through after sometime. Stange thing is that I've found 25mm MDF to be better in this regard than the 18mm, go figure but I've definitely noticed a difference. Veneering lets you get away with more than spraying, especially if the finish is gloss and I think its the worst thing to have joints showing, I'd sooner have crap sound than that
ShinOBIWAN said:
Love the starwars movies, so the Vader thing is cool.
I believe the reviewer Ken Kessler was the first to make this connection with respect to the watt/puppies, calling them "Darth Vader's rubbish bins.."
..yeah, I like the look too.
ShinOBIWAN said:
Love the starwars movies, so the Vader thing is cool.
I don't know whether its just me or what but I have to be quite meticulous with the MDF to ensure that I don't get the joints poping back through after sometime. Stange thing is that I've found 25mm MDF to be better in this regard than the 18mm, go figure but I've definitely noticed a difference. Veneering lets you get away with more than spraying, especially if the finish is gloss and I think its the worst thing to have joints showing, I'd sooner have **** sound than that
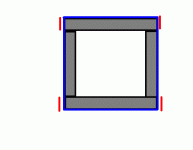
View the pic attached.
Grey surrounded by black is MDF, blue represents veneer. Grey may be green I am colour blind and cant tell the difference unless the green is bright.
Are you meaning that where the red lines are become visible and you can see where the MDF join is? I get this and would really like to know how to get rid of it. I know its the MDF swelling a little, but I thought it was because of the glue I put on the joint when veneering and not moisture problems.
Edit post - oops no picture

Attachments
5th element said:
View the pic attached.
Grey surrounded by black is MDF, blue represents veneer. Grey may be green I am colour blind and cant tell the difference unless the green is bright.
Are you meaning that where the red lines are become visible and you can see where the MDF join is? I get this and would really like to know how to get rid of it. I know its the MDF swelling a little, but I thought it was because of the glue I put on the joint when veneering and not moisture problems.
Edit post - oops no picture
Yep you've captured what I mean perfectly in your picture.
You can eliminate it with judicious use of filler, building up a thin layer say 0.2-0.5mm thick but I've had some success with PVA/water mix of 60/40, doing 2 coats with sanding in between on everything including the internals. Personally I do both on things like translams, such as the front baffle, other area's I tend to design around the problem and seal with the PVA mixture; If you take a look at the 3rd or 4th pic down a couple of post above you'll see I've skinned the over the joints of the cabinet with an extra layer of 9mm MDF and then routed the edges at 45 degrees to meet flush with the MDF carcass. Looks nice and prevents this creep that you tend to get on the 'raw' edges.
I've also found that the some paints and finishes are layed down thicker and are generally of a higher quality. This also helps minimise the joints creeping.
Combine all these techniques and you'll get a cabinet that looks great for a long time, like I said though it a laborious process but well worth it for the sake of sanity, especially when your going for a piano black finish like I'm doing here.
Okedoke I shall try filling the next pair I make and see if it makes a difference. The creep that I get when veneering seems to be instant and is there as soon as the cabinet is sanded. Time (im talking a couple of months here) doesnt seem to make any difference whatsoever. Also raw MDF boxes I have made dont have any drift either so im thinking it is the glue from veneering that makes this happen. Its quite running and would soak into MDF "endgrain" well but not so much into the parts. I will try filling with glue first, letting it swell then sanding it flat. I have made a translam and veneered that with glue that is not absorbed at all and this has remained stable.
Anyway thanks for the tip.
Ofcourse the other thing is that the MDF could loose the additional water it gained from the glueing as it approaches standard humidity and shrink back but I think that would take a long time.
Anyway thanks for the tip.
Ofcourse the other thing is that the MDF could loose the additional water it gained from the glueing as it approaches standard humidity and shrink back but I think that would take a long time.
I'm not sure exactly what is going on with the endgrain telegraphing, although I've definitely experienced that. I have tried building water-based acrylic sealer before applying veneer and it didn't help. I suspect that it may be the endgrain absorbing water differently than the face, so I've sealed first with shellac on my current speakers...we'll see if that makes any difference.
About cutting the aluminum--your saw should make short work of it. Just lay a piece of MDF on top.
About cutting the aluminum--your saw should make short work of it. Just lay a piece of MDF on top.
tiroth said:I'm not sure exactly what is going on with the endgrain telegraphing, although I've definitely experienced that. I have tried building water-based acrylic sealer before applying veneer and it didn't help. I suspect that it may be the endgrain absorbing water differently than the face, so I've sealed first with shellac on my current speakers...we'll see if that makes any difference.
About cutting the aluminum--your saw should make short work of it. Just lay a piece of MDF on top.
I've got some Zinsters Bullseye Shellac lying around here from last year. If its still OK I'll have a go on a quick test joint to see how it does. PVA/Water is the best I've tried so far though and it doesn't affect the type of finishing coats that shellac does.
The alu is already cut to size but thanks for the tip.
Hello all, what a day!
Finished the recess for the ATC, this is the last time I use these drivers EVER! Don't care how good they sound, its just too much of a headache to mount them.
I shudder at the thought of having to do the second one, ugh. Its taken me 4 hours to get the driver so it fits satisfactoraly then another hour or so sanding and perfecting the finish. So nearly 6 hours work.
Wish I'd cut each of the four 18mm sheets before glueing. That way I could have used the router but alas 3" was just to much for it and I ended up killing it - bushes are nackered so the motor is sparking like crazy. After this I had to finish the job with the Stein Multitool(similar to a Dremel but more heavy duty).
No pics today as I'm off out for a drink
ShinOBIWAN said:Wish I'd cut each of the four 18mm sheets before glueing. That way I could have used the router but alas 3" was just to much for it and I ended up killing it - bushes are nackered so the motor is sparking like crazy.
Was the the router a bosch too? I can't remember every seeing that happen to a router. Although I've never tried to cut through something 3" thick either, all in one pass!
jdybnis said:
Was the the router a bosch too? I can't remember every seeing that happen to a router. Although I've never tried to cut through something 3" thick either, all in one pass!
ScottG said:
yup.. thats the problem.
Are you guys insane! There's no way any hand held router would cut through 3" in one pass. The bit would be huge for a start and it would probably take your arm off as soon you hit the wood.
No, this was a simple case of an elderly router just giving up. I'm always respectful to tools and the most I take out in one pass is around 1/5"-1/4" on each pass, with the correct speed setting too rather than just whack it up to max because of faster cuts quicker mentality - wrong, with routers the larger the bit the slower the speed.
Bit gutted about the router because I was hoping to just replace the bushes and get it back up and running but after doing that its making a strange electrical burning type smell when you use it. Think the motor is ******ed
Anyone have any suggestions for a very good router as a replacement? Budget is around £200($400)
tiroth said:I know they are cheap, but the Ryobi I have actually got excellant reviews from one of the woodworking mags. 1/2" chuck, a good micro depth adjustment--a nice router for around US$100 here.
Cheers Tiroth,
The dead one I've got at the moment is a Festool, its about 5 years old, might be more actually but has had some serious use in that time both by myself and my father who is a joiner.
Unfortunately I've just taken a look at the prices on the modern day Festools and they are expensive at £300-450, can't justify that sort of money.
Got a couple of Ryobi bits and have nothing bad to say about them, so I'll certainly have a look.
The Hitachi, Bosch and Metabo look nice though. Wanting something with softstart, fine height adjust, 1/2" shank, 1500w+ and a smooth plunge action - I hate routers that have a stiff plunge.
pinkmouse said:A new motor will probably be only about £50 to get fitted. Google for a festool service centre near you and give them a bell.
Cheers PM.
I'll get a quote.
wow
looks like a very impressive project so far, will be very keen on seeing the finished article.
i was wondering, seeing as there are some very expensive commercial amps available, how the amps a lot of people use in active systems compare? does the qualitiy of the amp not have as much effect as the amps are only handling a small range of the audio spectrum?
and I sympathise with you about the router- i recently killed my dremel in a similar fashion
pinkmouse- what part of chatham do you come from? im over in strood on the other side of the river
- Status
- This old topic is closed. If you want to reopen this topic, contact a moderator using the "Report Post" button.
- Home
- Loudspeakers
- Multi-Way
- 'Perceive' Contruction Diary