Construction Update:
We have been having a record setting cold wave for the last 5 days now and that really slowed me down on my construction of Mamboni's Walsh 5 remakes but I did manage to get some work done over the weekend.
The 1st thing to report on is the stencil test for BudP's EnABL pattern. The test was a bust - the Polly S coating that Bud uses is simply to thin to be used with a silkscreen type stencil. We will try to thicken it up some with some acrylic thickener and see if that works next.
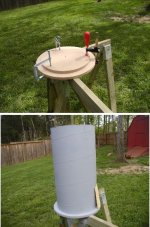
The 2nd thing is the construction of the Mamboni SonoTube base units and assembly went fairly well after I got over the learning curve of using my new plunge router. I purchased the Hitachi KM 12VC unit after I read some reviews on different routers and I have to say that I'm pleased with this unit. I wish it had a vacuum hose port because it sure makes a lot of dust when carving up MDF and I needed to manually vacuum stuff up between carving / cutting up pieces. I did wear a respirator, dust suit, safety goggles etc. but it took me as much time to clean up the work area as it did to do the actual work!
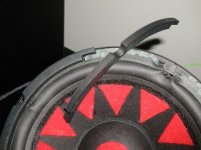
Once I put the base plate and center brace into the Sonotube and had everything glued up, braced, etc. I performed a knuckle test on the tube and determined that this thing really needs sound damping BAD! I'm not sure if simply filling it up half way with ACOUSTA-STUF POLYFILL is going to be enough damping because the tube resonates like a - well like a big cardboard tube! I believe that Mamboni's outter covering of carpet serves to deaden the tube quite a bit but I'm going to also apply some damping treatment to the inside of the tube in addition to the Acousta-Stuf and then adjust the stuffing to my personal taste. Hopefully I can finish this test unit tomorrow and start to break it in for a week or so.

We have been having a record setting cold wave for the last 5 days now and that really slowed me down on my construction of Mamboni's Walsh 5 remakes but I did manage to get some work done over the weekend.
The 1st thing to report on is the stencil test for BudP's EnABL pattern. The test was a bust - the Polly S coating that Bud uses is simply to thin to be used with a silkscreen type stencil. We will try to thicken it up some with some acrylic thickener and see if that works next.
The 2nd thing is the construction of the Mamboni SonoTube base units and assembly went fairly well after I got over the learning curve of using my new plunge router. I purchased the Hitachi KM 12VC unit after I read some reviews on different routers and I have to say that I'm pleased with this unit. I wish it had a vacuum hose port because it sure makes a lot of dust when carving up MDF and I needed to manually vacuum stuff up between carving / cutting up pieces. I did wear a respirator, dust suit, safety goggles etc. but it took me as much time to clean up the work area as it did to do the actual work!
Once I put the base plate and center brace into the Sonotube and had everything glued up, braced, etc. I performed a knuckle test on the tube and determined that this thing really needs sound damping BAD!
I'm not sure if simply filling it up half way with ACOUSTA-STUF POLYFILL is going to be enough damping because the tube resonates like a - well like a big cardboard tube! I believe that Mamboni's outter covering of carpet serves to deaden the tube quite a bit but I'm going to also apply some damping treatment to the inside of the tube in addition to the Acousta-Stuf and then adjust the stuffing to my personal taste. Hopefully I can finish this test unit tomorrow and start to break it in for a week or so.Attachments
Construction update:
After a night of thinking about my available options as far as damping the megaphone like resonant reverberations from my SonoTube base units I decided to keep things within the boundary of DIY and select materials available to the average builder. Lead is difficult to obtain - and is fairly costly as well. I considered a dense heavy rubber matting but the material is costly and requires ordering - but there are some internet sites that offer it for around $6.00 a square ft. - ugh Heck - I can purchase some nice wood flooring for less than that! Foam rubber as used under indoor carpeting is available for a reasonable price but the materials I found were not dense enough for my taste - but I will keep them on my list for future usage. Rubberized asphalt is available at the local hardware store and might be useful - but is messy, hard to clean up, and smells very much like you have just tared your speakers and now all you need to do is find some feathers to finish the job with.
I wound up with a couple of things that looked affordable and workable. 1st was some automobile undercoating in an aerosol can. I tried a can of this material and for my uses I found it to be a waste of time and money. I was supposed to provide some degree of sound insulation but in fact provided little more than simply spraying the inside of the speakers black - plus it's messy!
I had considered gluing cut to fit wool blankets (purchased used at the local Army surplus or thrift store) or felt to the inside of the speaker - but I wanted more damping that they would provide.
In the end I stopped off at the local carpet store and purchased a 9ft. by 12 ft. carpet remnant for $65.00. That should provide enough material for my two personal speakers plus my two test speakers. At around $0.60 per sq. ft. - plus $5.00 bucks for a can of spray adhesive I'm thinking that this pretty much fits the bill without braking the bank.
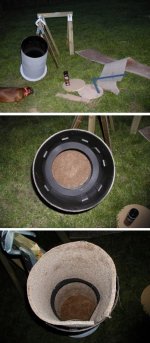
I cut up a piece for the bottom of the SonoTube bass and glued it down - large improvement in reducing reverberations were noted. Still had quite a bit from the side walls - so I cut up a bit more carpet and hand fit it in for testing (no glue - yet) - great improvement and I now fell that using this oversized toilet paper roll for a speaker enclosure just might have a chance of coming out fairly decent.
I still have Acousta-Stuf to play with if more "tuning" is needed but I think the 1st speaker is about ready to fire up and get burned in.
Stay Tuned!
BTW - my little four legged supervisor is named Murphy and today is her 2nd birthday
After a night of thinking about my available options as far as damping the megaphone like resonant reverberations from my SonoTube base units I decided to keep things within the boundary of DIY and select materials available to the average builder. Lead is difficult to obtain - and is fairly costly as well. I considered a dense heavy rubber matting but the material is costly and requires ordering - but there are some internet sites that offer it for around $6.00 a square ft. - ugh
Heck - I can purchase some nice wood flooring for less than that! Foam rubber as used under indoor carpeting is available for a reasonable price but the materials I found were not dense enough for my taste - but I will keep them on my list for future usage. Rubberized asphalt is available at the local hardware store and might be useful - but is messy, hard to clean up, and smells very much like you have just tared your speakers and now all you need to do is find some feathers to finish the job with. I wound up with a couple of things that looked affordable and workable. 1st was some automobile undercoating in an aerosol can. I tried a can of this material and for my uses I found it to be a waste of time and money. I was supposed to provide some degree of sound insulation but in fact provided little more than simply spraying the inside of the speakers black - plus it's messy!
I had considered gluing cut to fit wool blankets (purchased used at the local Army surplus or thrift store) or felt to the inside of the speaker - but I wanted more damping that they would provide.
In the end I stopped off at the local carpet store and purchased a 9ft. by 12 ft. carpet remnant for $65.00. That should provide enough material for my two personal speakers plus my two test speakers. At around $0.60 per sq. ft. - plus $5.00 bucks for a can of spray adhesive I'm thinking that this pretty much fits the bill without braking the bank.
I cut up a piece for the bottom of the SonoTube bass and glued it down - large improvement in reducing reverberations were noted. Still had quite a bit from the side walls - so I cut up a bit more carpet and hand fit it in for testing (no glue - yet) - great improvement and I now fell that using this oversized toilet paper roll for a speaker enclosure just might have a chance of coming out fairly decent.
I still have Acousta-Stuf to play with if more "tuning" is needed but I think the 1st speaker is about ready to fire up and get burned in.
Stay Tuned!
BTW - my little four legged supervisor is named Murphy and today is her 2nd birthday
Attachments
c2cthomas said:Construction update:
After a night of thinking about my available options as far as damping the megaphone like resonant reverberations from my SonoTube base units I decided to keep things within the boundary of DIY and select materials available to the average builder. Lead is difficult to obtain - and is fairly costly as well. I considered a dense heavy rubber matting but the material is costly and requires ordering - but there are some internet sites that offer it for around $6.00 a square ft. - ugh
How about trying this? Why not use concentric tubes, and fill the space in-between with sand? They don't even need to be made of the same material - you can use a plastic tube and a cardboard tube, for example.
Be sure the sand is dry - I think the dry variety is called Silver Sand. Oh yeah - once it's filled with sand it'll be VERY HEAVY, fair warning here.
Hi Lynn,
Thank you for the feedback!
I have considered double wall construction using sand, or expandable foam, or as I'm fond of kidding BudP about - pudding (no particular flavor). I acutually looked into the silicon rubber used to make those artificial soft rubber fishing lures because I think a soft but dense jelly like rubber could be of some use - needs testing of course - but discovered that it's a two part silicon made by GE and intended for injection molding and needs to be "cured" at 300 - 400f. Seeing as how the SonoTube is to large for my regular sized kitchen range and I no longer have access to an autoclave I decided to pursue that idea at a later date.
I have checked the next size of SonoTube and that is 18 inch ID and yeah - I have it on my short list.
I just use "playground" sand available at the local hardware superstore chain. I would love to get my hands on some of that very fine grain white sand you can find at places like Panama City Fla. - but I believe the local officials rather frown upon people stealing their beach front!
BTW - I'm loving your thread and thoughts on "Beyond the Ariel"
Thank you for the feedback!
I have considered double wall construction using sand, or expandable foam, or as I'm fond of kidding BudP about - pudding
(no particular flavor). I acutually looked into the silicon rubber used to make those artificial soft rubber fishing lures because I think a soft but dense jelly like rubber could be of some use - needs testing of course - but discovered that it's a two part silicon made by GE and intended for injection molding and needs to be "cured" at 300 - 400f. Seeing as how the SonoTube is to large for my regular sized kitchen range and I no longer have access to an autoclave I decided to pursue that idea at a later date. I have checked the next size of SonoTube and that is 18 inch ID and yeah - I have it on my short list.
I just use "playground" sand available at the local hardware superstore chain. I would love to get my hands on some of that very fine grain white sand you can find at places like Panama City Fla. - but I believe the local officials rather frown upon people stealing their beach front!
BTW - I'm loving your thread and thoughts on "Beyond the Ariel"
Hi R. Jamm,
I just finished hooking up the test unit and began it's "burn in" using the HT system to just run stuff through it for a week or so. Put on a collection of oldies that have Nat King Cole, Perry Como, Julie Andrews and a bunch of others singing classics. It is not critical listening at all - simply a break-in period. Could not help myself from doing a little bit of A - B sampling tho. I have the other ESS AMT2 that was the mate to the damaged unit being morphed into this speaker and I chose it for the mate during burn-in. I also have some Fostex 167e full rangers to compare with and they are my normal base test units - I'll fire them up for an A-B test after break these units in. Right from the get go the test speaker kicked the AMT2's butt. Much cleaner sound - much better resolution - much less coloration especially in the mid range. I haven't even had a chance to tweak 'em any (yet)
The EQ is a little off as they stand right now. The Heils are a little hot and the bass needs to come up a bit - but I'll wait a little to allow the Pioneer to break in a bit before I do anything. Most likely I'll up the resistor value going to the Heil up a peg or two and see how that works 1st. Mamboni was using a dome tweeter on his design and that most likely explains the difference in balance between the Pioneer and the tweeter. Heils are darn efficient compared to just about anything else so cutting them back a bit is the place to tweak. Heck - the Pioneer is hooked up straight to the amp - so there really isn't anything to do there except use the bass control on the amp.
I bought the wife in to give it little listen as she plays both organ and piano and she walked over the the Walsh Mamboni unit and then the ESS unit - looked up and said - "turn that one off" as she pointed to the AMT2 - "the other one is so clear that it isn't even a contest". Then she gave me a little smooch and went off to bed.
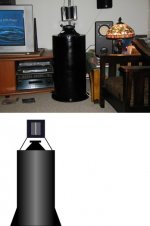
I'm attaching a photo of the test tube speaker - it's not even been positioned yet - it will sit about where it is at now but will start out at about 3 ft. from both the back and side wall to start with - and then go from there. I currently have the Heil just hanging from a support pole to play around with height adjustment before I commit to final design of the speakers I'll use day to day. The height of the tweeter in this photo is at 40 inches center.
For the real speakers I'm currently of a mind to do something like the attached photo using epoxy resin and a piano black gloss finish. But that's what I'm thinking today -
I cut the circle with a jig I purchased at the local hardware superstore. The problem there is that the fine print on the box didn't say that it would not cut circles less than 6 inches in diameter! I wound up making my own little jig out of thin plywood for the small cuts on the baffle. Guess I'll need to break down and get the Jasper jig from PE after all.
Now that the 1st unit is built I'll have some time to get back to BudP's EnABL pattern for test tube #2.
I just finished hooking up the test unit and began it's "burn in" using the HT system to just run stuff through it for a week or so. Put on a collection of oldies that have Nat King Cole, Perry Como, Julie Andrews and a bunch of others singing classics. It is not critical listening at all - simply a break-in period. Could not help myself from doing a little bit of A - B sampling tho. I have the other ESS AMT2 that was the mate to the damaged unit being morphed into this speaker and I chose it for the mate during burn-in. I also have some Fostex 167e full rangers to compare with and they are my normal base test units - I'll fire them up for an A-B test after break these units in. Right from the get go the test speaker kicked the AMT2's butt. Much cleaner sound - much better resolution - much less coloration especially in the mid range. I haven't even had a chance to tweak 'em any (yet)
The EQ is a little off as they stand right now. The Heils are a little hot and the bass needs to come up a bit - but I'll wait a little to allow the Pioneer to break in a bit before I do anything. Most likely I'll up the resistor value going to the Heil up a peg or two and see how that works 1st. Mamboni was using a dome tweeter on his design and that most likely explains the difference in balance between the Pioneer and the tweeter. Heils are darn efficient compared to just about anything else so cutting them back a bit is the place to tweak. Heck - the Pioneer is hooked up straight to the amp - so there really isn't anything to do there except use the bass control on the amp.
I bought the wife in to give it little listen as she plays both organ and piano and she walked over the the Walsh Mamboni unit and then the ESS unit - looked up and said - "turn that one off" as she pointed to the AMT2 - "the other one is so clear that it isn't even a contest". Then she gave me a little smooch and went off to bed.
I'm attaching a photo of the test tube speaker - it's not even been positioned yet - it will sit about where it is at now but will start out at about 3 ft. from both the back and side wall to start with - and then go from there. I currently have the Heil just hanging from a support pole to play around with height adjustment before I commit to final design of the speakers I'll use day to day. The height of the tweeter in this photo is at 40 inches center.
For the real speakers I'm currently of a mind to do something like the attached photo using epoxy resin and a piano black gloss finish. But that's what I'm thinking today -
I cut the circle with a jig I purchased at the local hardware superstore. The problem there is that the fine print on the box didn't say that it would not cut circles less than 6 inches in diameter! I wound up making my own little jig out of thin plywood for the small cuts on the baffle. Guess I'll need to break down and get the Jasper jig from PE after all.
Now that the 1st unit is built I'll have some time to get back to BudP's EnABL pattern for test tube #2.
Attachments
what a thread!
just a thought (besides my idea that I'll treat every driver from now with at least one -Mamboni or BudP treatment) :
one side of the cone treated with " usual " EnABL
other side of the cone treated with Mamboni felt way,but formed in sort of augmented EnABL pattern?
just a thought (besides my idea that I'll treat every driver from now with at least one -Mamboni or BudP treatment) :
one side of the cone treated with " usual " EnABL
other side of the cone treated with Mamboni felt way,but formed in sort of augmented EnABL pattern?
BudP said:Zen Mod
Most cone speakers will benefit from the Mamboni on the backside. This should take care of 70 to 80% of the problems emited from the front side. C2C's comments seem to back this up. The EnABL process is supposed to control only the refracted energy from surface terminations, like the edge of a cone or the glue pad of a surround. This should be the remaining 20 to 30% of what needs to be cleaned up on the front.
Treating only the back with the EnABL process will provide the same results. I am not certain that they are exactly identical but certainly everything Mamboni and C2C speak of is very familiar to me from just applying the EnABL treatment. Treating only the front side with EnABL blocks also provides only 70 to 80% of all you get when both sides are treated
The two processes are going to interact and we do not yet know how. It is good that C2C is a few thousand miles from either of us, so he cannot get his hands on our necks in case things go awry.....
Seriously, I expect the two processes to be throughly compatible and highly complementary. I will use them together on a test driver myself, but only after C2C has had his fun first.
I do not think I would deviate much from Mamboni's plan, though I would explore Lynn 's notion of variable geometry sets of sizes just to see if that adds an audible benefit. I don't think I would try to duplicate the EnABL pattern with that many small Mamboni triangles but I have no experience at all, so try it, who knows what you will discover.
Bud
tnx for reply
I must say that you boyz pretty good succeeded in basic explanation how Mamboni and EnABL thingies (hehe) works; I'm more than enough educated in elementary physics to understand this (even if I can hardly wait to see (if ever) can I understand your findings in OPT area
) , but more important thing is that these two techniques (two sides of one coin etc . ) aren't in any way and in any moment in same league as many Fi-FI tricks .........anyway- what I meant with this little idea is :
one side of cone treated with "classic" EnABL (two circles of many little rectangles of paint )
other side of cone - two circles of relatively bigger (EnABL like) felt rectangles .....
I don't know when I'll have time to try difference between already established Mamboni-EnABL treatment and this small idea of me .......
too many everyday things to do,and just 24 hours in day......
anyway- in nearest future I have obligation to decide what to do with probably no less than 3 pairs of Sonido FR 8" ,so my time will be limited even more .......
but- I'm sure that at least my pair will be enabled with at least EnABL ,if not Mamboni too........
ps
I have pair of olde Philips 12".......perfect for this game

burn-in testing - day 2:
Well I have the Mamboni Walsh5/Pioneer/Heil Version 1 Mod Zero alpha version test mule (say that three times fast!) placed into the 1st listening slot. It is 2 ft. (61 cm) from the rear wall - 3ft (91 cm) from the side wall and separated from the AMT2 reference speaker by 9 ft. (274 cm) - my listening position #1 is 12 ft (3.6 m) away and centered between the two speakers and position # 2 is 10 ft. (3 m) distance and to the left of center by 3 ft. (1 m).
Today I let temptation get the better of me and did some fooling around with things - even though the Pioneer 10 inch is only about 3 hours old - couldn't help myslef!
The Mamboni unit is really kicking the AMT2's butt all over the place in terms of just about anything! But - yeah there are some but's - as always - there are some things that need a bit of tweaking - as always! Bass response is "clean" and free of any signs of muddiness and seems quick enough to keep up with the Heil tweeter well into lower mid-range. The lower base response is tight but could use a bit more punch and I believe that to be my fault by using carpet in the inside of the Sonotube to damp the cardboard echo it had. On the next unit I will stuff with Acousta-Stuf to 1/2 full per Dr. Mamboni's original design - and damp the SonoTube wall on the outside with carpet. This very well could be key into fabricating a unit with a bit more kick in the lower base. My good friend BudP has also made some suggestions concerning mid frequency response that I will incorporate into the 2nd unit and report about.
It should be understood by all that this design does provide a responsive and clean bass but it does not provide sub-woofer performance - and it never will because it is not intended for that use. Those (like me) that want the lower octaves will need to use a proper (and quick) sub-woofer.
The mid-frequencies are rather good - even with a 3 hour old unit that most likely needs another good 80 to 100 hours to season. Not only is this (the 10 inch Pioneer) a brand new unit - it has the Mamboni triangles freshly applied and I suspect that between all of the speaker dope and felt that things will only get better with a bit of "stretching" from being worked in (or worked over ).
).
I am wondering about the placement height of the Pioneer because I notice that I get about a 3db (guessing by use of calibrated ear) of gain when I stand up (I'm 6 ft. tall) as to when I'm sitting. The mids sound fuller and richer as well. I know that mids are fuller by placing my ear near the speaker (about 1 ft. away) and then doing some deep knee bends to get myself below the speaker baffle which is horizontal in this case. When I slowly rise to a full standing position I can listen to Pioneer improve in fullness - and it starts getting "sweet" when I'm about 1 ft. above it (while still 1 ft. away). I'm thinking that on the 2nd test unit of chopping off about 6 inches in height of the SonoTube and playing with the rather wide baffle I used in this 1st test unit. I'm thinking that for the speaker baffle I will consider a stepped baffle that would resemble the stepped pyramids used by the Inca's and Mayan's - but it would only have two or three "steps" - I know I will use BudP's EnABL pattern around the edge of the baffle - but I'll do that after the 1st test is finished.
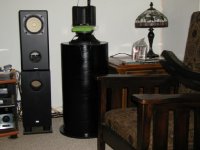
I have my Heil unit suspended above the rear port of the Pioneer speaker - The Pioneer is one of those that have a hole in the middle of the rear of the speaker for venting - and it's reflecting off of the bottom of the Heil tweeter. Mamboni's original design used a metal bracket to mount his tweeter with and that bracket helped to block the vent noise being radiated from the front of the speaker and this is worth some consideration. In the attached photo you can see where I have placed a damp sponge in front of the vent hole for testing purposes and it does help prevent the speaker vent from adding a bit of "clutter" to things.
The Heil units are "shinny" or "bright" with that added "sss" sound often presented by the whizzer cone on my Fostex 167's (or any untreated whizzer cone for that matter). If I reduce the treble by using the tone control on the amp the "sss" goes away - but then so do a lot of other things - and the high end starts sounding rather dead and uninvolved. Seeing as how I can't whip on one of Dave's (Planet10) phase plugs on the Heils I believe that a BudP EnABL pattern placed just next to the diaphragm inner and outer edges of the magnet flange will be worth a try. Yeah I know that the flange next to the diaphragm dose not flex like a speaker cone - but BudP's pattern will also work on fixed surfaces like speaker baffles - so I'm sure that it will provide some benefits here. I'll just need to make it a bit 3 dimensional by using a thick paint - say about 3-5 mills worth.
Well - That was a bit of a long post - especially for just a bit of fooling around today - not even really testing yet - but I thought I would share what I've learned to date for those of you that are looking at building a set of these speakers.
Are they good?
When I came in from running errands this morning my wife was playing "ABBA" and dancing with her dachshund and having a blast!
It would not be polite (or wise ) to reveal my wife's age. I will tell you that she is a Grandmother and has a 35 year old son.
I will give her a new American Indian name - and I am part (small part) American Indian - I will now call her "Dances with Dachshunds".
There are not a whole lot of speakers in the world that are musical enough to get a Grand Mama up and dancing with her dog. That vision alone is worth the price of admission!
Well I have the Mamboni Walsh5/Pioneer/Heil Version 1 Mod Zero alpha version test mule (say that three times fast!)
placed into the 1st listening slot. It is 2 ft. (61 cm) from the rear wall - 3ft (91 cm) from the side wall and separated from the AMT2 reference speaker by 9 ft. (274 cm) - my listening position #1 is 12 ft (3.6 m) away and centered between the two speakers and position # 2 is 10 ft. (3 m) distance and to the left of center by 3 ft. (1 m). Today I let temptation get the better of me and did some fooling around with things - even though the Pioneer 10 inch is only about 3 hours old - couldn't help myslef!
The Mamboni unit is really kicking the AMT2's butt all over the place in terms of just about anything! But - yeah there are some but's - as always - there are some things that need a bit of tweaking - as always!
Bass response is "clean" and free of any signs of muddiness and seems quick enough to keep up with the Heil tweeter well into lower mid-range. The lower base response is tight but could use a bit more punch and I believe that to be my fault by using carpet in the inside of the Sonotube to damp the cardboard echo it had. On the next unit I will stuff with Acousta-Stuf to 1/2 full per Dr. Mamboni's original design - and damp the SonoTube wall on the outside with carpet. This very well could be key into fabricating a unit with a bit more kick in the lower base. My good friend BudP has also made some suggestions concerning mid frequency response that I will incorporate into the 2nd unit and report about. It should be understood by all that this design does provide a responsive and clean bass but it does not provide sub-woofer performance - and it never will because it is not intended for that use. Those (like me) that want the lower octaves will need to use a proper (and quick) sub-woofer.
The mid-frequencies are rather good - even with a 3 hour old unit that most likely needs another good 80 to 100 hours to season. Not only is this (the 10 inch Pioneer) a brand new unit - it has the Mamboni triangles freshly applied and I suspect that between all of the speaker dope and felt that things will only get better with a bit of "stretching" from being worked in (or worked over
).I am wondering about the placement height of the Pioneer because I notice that I get about a 3db (guessing by use of calibrated ear) of gain when I stand up (I'm 6 ft. tall) as to when I'm sitting. The mids sound fuller and richer as well. I know that mids are fuller by placing my ear near the speaker (about 1 ft. away) and then doing some deep knee bends to get myself below the speaker baffle which is horizontal in this case. When I slowly rise to a full standing position I can listen to Pioneer improve in fullness - and it starts getting "sweet" when I'm about 1 ft. above it (while still 1 ft. away). I'm thinking that on the 2nd test unit of chopping off about 6 inches in height of the SonoTube and playing with the rather wide baffle I used in this 1st test unit. I'm thinking that for the speaker baffle I will consider a stepped baffle that would resemble the stepped pyramids used by the Inca's and Mayan's - but it would only have two or three "steps" - I know I will use BudP's EnABL pattern around the edge of the baffle - but I'll do that after the 1st test is finished.
I have my Heil unit suspended above the rear port of the Pioneer speaker - The Pioneer is one of those that have a hole in the middle of the rear of the speaker for venting - and it's reflecting off of the bottom of the Heil tweeter. Mamboni's original design used a metal bracket to mount his tweeter with and that bracket helped to block the vent noise being radiated from the front of the speaker and this is worth some consideration. In the attached photo you can see where I have placed a damp sponge in front of the vent hole for testing purposes and it does help prevent the speaker vent from adding a bit of "clutter" to things.
The Heil units are "shinny" or "bright" with that added "sss" sound often presented by the whizzer cone on my Fostex 167's (or any untreated whizzer cone for that matter). If I reduce the treble by using the tone control on the amp the "sss" goes away - but then so do a lot of other things - and the high end starts sounding rather dead and uninvolved.
Seeing as how I can't whip on one of Dave's (Planet10) phase plugs on the Heils I believe that a BudP EnABL pattern placed just next to the diaphragm inner and outer edges of the magnet flange will be worth a try. Yeah I know that the flange next to the diaphragm dose not flex like a speaker cone - but BudP's pattern will also work on fixed surfaces like speaker baffles - so I'm sure that it will provide some benefits here. I'll just need to make it a bit 3 dimensional by using a thick paint - say about 3-5 mills worth. Well - That was a bit of a long post - especially for just a bit of fooling around today - not even really testing yet - but I thought I would share what I've learned to date for those of you that are looking at building a set of these speakers.
Are they good?
When I came in from running errands this morning my wife was playing "ABBA" and dancing with her dachshund and having a blast!
It would not be polite (or wise
) to reveal my wife's age. I will tell you that she is a Grandmother and has a 35 year old son.I will give her a new American Indian name - and I am part (small part) American Indian - I will now call her "Dances with Dachshunds".
There are not a whole lot of speakers in the world that are musical enough to get a Grand Mama up and dancing with her dog. That vision alone is worth the price of admission!
Attachments
mamboni said:Hello Bud:
You're EnABL approach
I believe the fibers are acting as a huge surface and providing for a much more efficient coupling of vibrating cone surface with air. tiny hairs
Micro fibers ?
http://ohioline.osu.edu/hyg-fact/5000/5546.html
Greg,
Interesting link, thanks. I suspect they would work well with Mamboni's process, if we could devise a way to embed them into the cone or in a material that has the same properties as the glue he uses.
Would be neat to mold them into the cone mix and be able to etch them free in just the areas you wanted them. Pipe dreams for sure.
Not sure they would work for EnABL though. It is a process of exclusion and impedance, though the fibers might help somewhat in getting more energy off of the boundary layer, right at the beginning of the EnABL process.
Never the less, something to let simmer for a bit and see what rises to the surface.
Bud
EnABL application technique?
Hi Bud, I've enjoyed your posts greatly. I had an idea for a simple method of applying the EnABL pattern: make a simple paint roller. Use a short length of dowel, say 25-40mm diameter and similar length or thereabouts, depending on the pattern size, and attach porous raised rectangles made from thin adhesive foam tape to the roller as per the pattern. The paint can be applied to the foam and then the roller used to apply the pattern to the surface in question. Hope I've made my description clear, do you think it would work?
Best regards,
Mike Spence
Hi Mike,
I think it would definitely work for cabinet surfaces, baffles used in dipole set ups and any other surface where the blocks in two rows were the same size. You might have to add a rubber O ring to make drive contact, off to one side, just to ensure that the roller turned. Paint might not always provide enough "sticktion" to keep the roller from smearing a block.
For angled, curved, cones, the problem will be more difficult, but I think the idea is sound. Take a look back through these pages until you come across an unrolled conic section, down load it, print it, cut it out and tape it back up into a cone to begin to see the difficulties you would face. Not overwhelming if you are clever in solid geometry.
I suspect you would have to turn a dowel down to match the cone's swept diameter difference, between the top and bottom of a row. Still you might actually be able to print both rows of blocks at one time, if you were a lot more clever than I am.
Bud
I have discovered a new edge treatment for the speaker surround - and I strongly recommend that others do not attempt it!
I decided to install some longer screws into the speaker frame to insure that it was well sealed against the baffle. I was fairly sure that it was - but I was also aware that the screws I used were just short enough to be in question - and I wanted to eliminate them as a possible source for air leakage. As I was backing them out of the speaker I noticed some sticky black rubber adhering to the screw threads and I figured it was some of the black silicone glue I had used to secure the gasket to the baffle - but alas - that was not to be.
Once I had the speaker removed it became apparent that the "sticky black rubber" was in fact the butyl rubber surround of the speaker - and it was now in need of a new surround.
So a word of caution - trim that little piece of black rubber material away from the screw hole used for mounting the speaker to the baffle. When front mounting a speaker this usually is not a problem - but driving the screws in from the back side of the speaker will "grab" the rubber surround - and - and - sob - sob - I just can't stand to go on and say the unmentionable
Good for me I have a second speaker with the Mamboni triangles applied! Good for me that I also have another spare speaker to mod. Plus - on the bright side - I'll to learn how to repair a speaker surround!! OH BOY!! - Just shoot me and get it over with!!
Attachments
Thomas,
Sorry to hear of your accident. As they say now...IT happens. I wonder if you might like to take this opportunity and try an experiment with what is left. It seems to me that using the speaker face down as you are now that dome which covers and keeps dirt out of the voicecoil gap does nothing helpful for you. It creates a resonant chamber and the material it is made of adds mass, hurting the HF resonse of the cone. Why not carefully remove it and give it another audition. Actually from what I see of your surround damage I think you can fix that with some soft glue and the repair will not be seen when it is mounted. I just successfully repaired a large tear in a foam rubber roll surround on a 1 inch P-P excursion 12 inch sub using Goop.
Sorry to hear of your accident. As they say now...IT happens. I wonder if you might like to take this opportunity and try an experiment with what is left. It seems to me that using the speaker face down as you are now that dome which covers and keeps dirt out of the voicecoil gap does nothing helpful for you. It creates a resonant chamber and the material it is made of adds mass, hurting the HF resonse of the cone. Why not carefully remove it and give it another audition. Actually from what I see of your surround damage I think you can fix that with some soft glue and the repair will not be seen when it is mounted. I just successfully repaired a large tear in a foam rubber roll surround on a 1 inch P-P excursion 12 inch sub using Goop.
C2C,
If the surround is not actually torn, just messed with, you do not have to do anything. If the Goop doesn't appeal you can go on safari to the big city and go to a dive products store and purchase a small tube of foam gasket repair material. Or, possibly the glue used to repair tears in dive suits. We used to repair the occasional screw driver hole in surrounds with the real PVA compound which never quite set up hard. But then we were also coating the entire cone and surround in PVA , which is a reasonably viable alternative to the Mamaboni and EnABL process. Will provide maybe 70% of our control over ringing and spurious refractions. Of course, you can only buy the stuff in 10 gallon buckets, but maybe your neighbors would like their various surfaces painted too.......
If you want to stick the thing back down use Elmers White Glue. It is not pure PVA (Poly Vynil Acrylic... I think) but it is close enough and PVA is the surround and spider glue, to basket, of choice. Surround to paper cone is a different story and it will be easier on your store of blue language to just go looking for a replacement cone with surround and voice coil from an authorized dealer/repair shop, buy a plastic shim stock kit from McMaster Carr to align the new cone and voice coil in to the gap with, preattach a new spider with two part black epoxy they sell you from the dealer/ repair shop, by sliding the coil into the gap with shim stock just to the point where the surround touches the basket and then glue the spider with the epoxy and wait a day, before gluing anything else, and then putting runny PVA on spider and surround mounting surfaces and, while carefully holding on to the plastic shims, wound into the voice coil, slide the whole apparatus down just far enough to make contact between surround and basket and spider and basket........ .......just buy another driver if you can't repair the surround... lot's easier on your heart.
Bud
Hi rcavictim
- thank you for your post and suggestions.
I have installed the 2nd test speaker and while I was at it yanked out the carpet I had lined the walls of the SonoTube with and filled it half full of Acousta-Stuf packed to a "medium" (calibrated by guess) density. I also soldered in another 4 ohm 10 watt resistor (total of 8 ohm's now for those who are keeping count) in series with the Heil tweeter to trim it back a bit.
Your point about the rear vent of the Pioneer being open and facing up to collect lord only know what (spiders, dust, roof plaster ) is well taken and I'll go slap a piece of felt over it for the testing phase. The dome of the Pioneer has a 3/4 in hole cut into the center of it per Mamboni's design and the felt is being used as a vaiovent type of port. BTW - with the amount of air it forces out of the vent I might not need to worry very much because it is exhausting a good amount of air from that vent!! No "chug chug" sounds tho.
I have already ordered a surround repair kit for Simply Speakers - alway good to have one on hand. I repaired quite a few back in my stereo repair days - but that was like 30 years ago - back when we used the canvas off of old sailing ships if we couldn't get any buffalo hide. A patch might well do the job - need to find some thin rubber - perhaps one of those bicycle inner tube repair kits would work
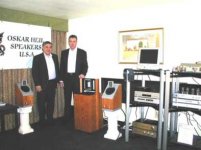
The speaker is back into burn-in and playing just fine - so just a slight delay. I'm also going to knock together a unit with the Pioneer facing upwards as you have suggested - Very similar in concept to the speakers the folks at Oscar Heil Speakers are showing off in the photo.
- thank you for your post and suggestions.
I have installed the 2nd test speaker and while I was at it yanked out the carpet I had lined the walls of the SonoTube with and filled it half full of Acousta-Stuf packed to a "medium" (calibrated by guess) density. I also soldered in another 4 ohm 10 watt resistor (total of 8 ohm's now for those who are keeping count
) in series with the Heil tweeter to trim it back a bit.Your point about the rear vent of the Pioneer being open and facing up to collect lord only know what (spiders, dust, roof plaster
) is well taken and I'll go slap a piece of felt over it for the testing phase. The dome of the Pioneer has a 3/4 in hole cut into the center of it per Mamboni's design and the felt is being used as a vaiovent type of port. BTW - with the amount of air it forces out of the vent I might not need to worry very much because it is exhausting a good amount of air from that vent!! No "chug chug" sounds tho. I have already ordered a surround repair kit for Simply Speakers - alway good to have one on hand. I repaired quite a few back in my stereo repair days - but that was like 30 years ago - back when we used the canvas off of old sailing ships if we couldn't get any buffalo hide.
A patch might well do the job - need to find some thin rubber - perhaps one of those bicycle inner tube repair kits would work The speaker is back into burn-in and playing just fine - so just a slight delay. I'm also going to knock together a unit with the Pioneer facing upwards as you have suggested - Very similar in concept to the speakers the folks at Oscar Heil Speakers are showing off in the photo.
Attachments
Hi BudP,
Good to hear from ya buddy!
There are two good sized tears in the edge of the surround - so some type of patch is in order. I think I'll try a thin rubber patch similar to repairing an inner tube - should be OK - I think
If not then it's surround repair time - which the last time I did one was a bunch easier than a cone replacement. Just carefully remove the existing surround and glue on the new one - trim it up a bit and glue the new surround to the speaker frame being careful about fit and tension - and not getting glue all over everything!
BTW - yanking out the carpet and replacing it with the Acousta-Stuf was a break even - pretty much no difference. I might need to take out a little tho - the bass seems a little weak.
Thomas,
There appears to be confusion referring to the front and rear of a speaker because of the way you are using it...backwards. To me, regardless of use, the back is the side the magnet sticks out OK ?
I was not suggesting you use the speaker with the front (concave side of cone) facing upwards. As a bending wave Walsh type transducer you have it facing down into the cabinet. I meant to leave that alone. I merely suggested the dome in the middle of the cone front is not helping you now and it might be better gone. I saw that you had punched a hole in it and added felt as a variovent. I did not comment about plugging the vent hole through the magnet center pole piece. With the dome removed from the front there will be no piston action to move cooling air through the hole in the pole piece so even a solid plug could be applied otherwise at the rear of the magnet or you will have another port into the airspace below the speaker diaphragm into the bass cabinet. If left open I suppose you could levitate a ping pong ball over it with a good loud bass note from a sine generator, the same way a beach ball can be levitated above a blowing vacuum cleaner nozzle. If the bass cabinet has a port as in bass reflex perhaps not.
Hi Bob,
Thank you for clarifying - but I still want to try the Oscar Heil configuration with the cone facing upwards as well - just to see what it sounds like. I still have an untreated Pioneer to use in that manner - although I'll put BudP's EnABL pattern on it and leave the dome intact. It does mean that I may need to port the enclosure tho - but I'll go with a sealed version 1st.
Just doing what all good DIYer's do - fooling around with stuff!!
- Status
- This old topic is closed. If you want to reopen this topic, contact a moderator using the "Report Post" button.
- Home
- Loudspeakers
- Multi-Way
- OHM Acoustics "Walsh F" Speaker remakes