Hi... New to diyaudio.com. I just built the Analogmetric TDA1541A DAC from the bare board. I'm interested in the I2S attenuator. Can I apply that to my DAC? I'm so far not doing anything at pin 16, 17 with regards to the Dem clock. I haven't had time to look to deep into that. I do have a small noise problem. Before popping out the SAA7220 P/B for an NPC filter with glue logic I thought I should ask about this. Oh, the output board is a 7th order GIC filter built back in 1998 from the Audio Amateur magazine. I/V is AD811, GIC legs OPA604's and output OPA627. I will be checking that for misbehaviour too. Dave
Hi... New to diyaudio.com. I just built the Analogmetric TDA1541A DAC from the bare board. I'm interested in the I2S attenuator. Can I apply that to my DAC? I'm so far not doing anything at pin 16, 17 with regards to the Dem clock. I haven't had time to look to deep into that. I do have a small noise problem. Before popping out the SAA7220 P/B for an NPC filter with glue logic I thought I should ask about this. Oh, the output board is a 7th order GIC filter built back in 1998 from the Audio Amateur magazine. I/V is AD811, GIC legs OPA604's and output OPA627. I will be checking that for misbehaviour too. Dave
Hi Dave,
i think this is the wrong thread for your question.
Please post it here:
http://www.diyaudio.com/forums/digital-line-level/79452-building-ultimate-nos-dac-using-tda1541a.html
The next evolution... V2.1
An externally hosted image should be here but it was not working when we last tested it.
Changes
- added I2S Attenuator
- canceled DEM-CLK Slave output
The final PCB V2.2
Changes
- BCK attenuator choke added
- Ground plane on the upper layer added (not to see on picture)
Now this final layout will be produced.")
I am very curious about the results with the PSU and shunt regulator modules....
An externally hosted image should be here but it was not working when we last tested it.
Changes
- BCK attenuator choke added
- Ground plane on the upper layer added (not to see on picture)
An externally hosted image should be here but it was not working when we last tested it.
Now this final layout will be produced.
I am very curious about the results with the PSU and shunt regulator modules....
Hi Maurizio,
if everything works well, i will be ready in the next 2 weeks with the DAC-Module. I´m still waiting to the Sanyo OS-CON SEPC Caps i will use.
Normally i haven´t a GB in my mind, but if there is enough interest from the community i could think about it.
Cheers,
Oliver
if everything works well, i will be ready in the next 2 weeks with the DAC-Module. I´m still waiting to the Sanyo OS-CON SEPC Caps i will use.
Normally i haven´t a GB in my mind, but if there is enough interest from the community i could think about it.
Cheers,
Oliver
OK..i will wait news from you.
Is it possible to connect a CD pro2 directly to your dac? And also an external clock? Like tent labs..?
Thanks.
AFAIK the CD-Pro2 Modules have an I2S output, so yes.
The clock is needed at the input receiver (CS8412/8414 ect.) side, not for the DAC chip.
On the module i insert ecdesigns DEM-Reclock circuit, that syncronize the build-in DEM-Oscillator with the extrenal BCK-Clock signal.
I would like to use the CDPro2 like slave..
Guido tent already sell CDPRO2 transports modified to be reclocked externally..
Anyway, as your dac is ready, i will need more informations about..my skills in Digital are very poor..
IS it possible to use the input module form DDDAC with your DAC.!
Thanks again and greetings fro Italy.
Maurizio.
Guido tent already sell CDPRO2 transports modified to be reclocked externally..
Anyway, as your dac is ready, i will need more informations about..my skills in Digital are very poor..
IS it possible to use the input module form DDDAC with your DAC.!
Thanks again and greetings fro Italy.
Maurizio.
IS it possible to use the input module form DDDAC with your DAC.!
Of course, yes.
Very nice work thus far on the 1541 project -- it's about time someone filled this popular niche....if everything works well, i will be ready in the next 2 weeks with the DAC-Module....
I see some "unused" footprint space directly under the 1541 IC. For bypassing / decoupling to be as effective as possible, it should be done as close to the respective IC as possble. I was wondering whether some of the bypass caps' electron path-to-ground could be shortened by using the space directly under the 1541 IC?
Actual status of my work on the TDA1541A DAC-Module
As posted, i am still waiting to the Sanyo OS-CON SEPC Caps. All other parts are in place.
Wima caps (12x 0,2µF & 2x 1µF for the TDA1541A)
PRP 9372 resistors
TL431A shunt regulators
So stay tuned!
Here is the actual status
An externally hosted image should be here but it was not working when we last tested it.
An externally hosted image should be here but it was not working when we last tested it.
An externally hosted image should be here but it was not working when we last tested it.
As posted, i am still waiting to the Sanyo OS-CON SEPC Caps. All other parts are in place.
Wima caps (12x 0,2µF & 2x 1µF for the TDA1541A)
PRP 9372 resistors
TL431A shunt regulators
So stay tuned!
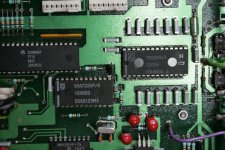
Very nice. I'm a DF / OS fan, so for a kit-style PCB like yours, I'd like to see an option for a DIP-sized DF IC (like SAA7220 or PMD100). The placement of the DF IC is critical, IMO. Perhaps the best commercial TDA1541 machine was (is) Naim's CD2. If you look Naim's IC layout (image below), you may see why their CDPs are decent...Here is the actual status...
Attachments
Last edited:
Nice lookk.!!!
Just a question..
Every slave module will have only one tda..? Or like in the Doede Duma DAC a tower is expected to be used..? I mean more TDA1541 in a parallel..
Thanks.
Hi Maurizio,
if you want to build a DAC with more than one TDA, than you
could parallel a complete module. So each module has it's own
voltage regulators and DEM-Reclock circuit.
Eight (8) 1541's??!!! Isn't a PMD100 digital filter with eight (8)x simpler, cheaper and way better sounding?Hi..
So..if i'm wrong..if i want a 8X1541dac..like Ec Design..i need 8 pcbs?
Is it right?
To make a real "Reference Project" you should think about each stage from the start to the end.
So let´s look to the start...
The Main Transformer
Custom build on double C-Cores
The cores were made from Vacuumschmelze Germany for Siemens military equipment transformers.
My good old friend John Eekels from the Netherlands could buy a couple of those old double C-Core transformes in an auction from the German military.
AE-Europe, also from the Netherlands, made a wonderful new transformer on that cores to my specifications.
Thank´s Kim for your support!!
Here are the tap´s
Input:
115V
0
0
115V
So 115V & 230 V is possible.
Output:
200V
150V
120V
0
120V
150V
200V
for various B+ of a tube output stage, including a center tap for a tube rectifier.
20V
salas shunt regulator input for the -15V line of the TDA1541A
12V
salas shunt regulator input for the -5V line of the TDA1541A
12V
salas shunt regulator input for the +5V line of the TDA1541A
12V
salas shunt regulator input for the +5V line of additional digital parts
6,3V
0
6,3V
for the output tube heaters. So 6,3V and 12,6V heaters could be used.
6,3V
5V
for the heater of various tube rectifier
The next step would be to connect all modules an power them up...
So stay tuned!
So let´s look to the start...
The Main Transformer
Custom build on double C-Cores
An externally hosted image should be here but it was not working when we last tested it.
The cores were made from Vacuumschmelze Germany for Siemens military equipment transformers.
My good old friend John Eekels from the Netherlands could buy a couple of those old double C-Core transformes in an auction from the German military.
AE-Europe, also from the Netherlands, made a wonderful new transformer on that cores to my specifications.
Thank´s Kim for your support!!
Here are the tap´s
An externally hosted image should be here but it was not working when we last tested it.
Input:
115V
0
0
115V
So 115V & 230 V is possible.
Output:
200V
150V
120V
0
120V
150V
200V
for various B+ of a tube output stage, including a center tap for a tube rectifier.
20V
salas shunt regulator input for the -15V line of the TDA1541A
12V
salas shunt regulator input for the -5V line of the TDA1541A
12V
salas shunt regulator input for the +5V line of the TDA1541A
12V
salas shunt regulator input for the +5V line of additional digital parts
An externally hosted image should be here but it was not working when we last tested it.
6,3V
0
6,3V
for the output tube heaters. So 6,3V and 12,6V heaters could be used.
6,3V
5V
for the heater of various tube rectifier
The next step would be to connect all modules an power them up...
So stay tuned!
Last edited:
- Status
- This old topic is closed. If you want to reopen this topic, contact a moderator using the "Report Post" button.
- Home
- Source & Line
- Digital Line Level
- My take to the "Reference" TDA1541A DAC with I2S-BUS architecture