The attachment was provided by GM. I just di dnot know initially if the attachment would link.
Unfortunately that particular shot does look extreme.
If done at a plain 45d angle, the job looks rather attractive.
I used a cheap standard half round file. As you work out the waste,
you can also smooth by using the file side to side as well as in and out of the cutout.
Using sandpaper and a length of PVC didn't get me very far. The file was the best tool.
chuyler1 said:Mounting hardware will be included...unless you want T-nuts.
The driver comes with a gasket and some small wood screws.
To use t-nuts you'll want some nice black anodized machine screws.
They have those at Parts Express
The t-nut is inserted on the rear as shown in the picture above. The best way I've found to secure the t-nut in it's hole is to use some sacrificial machine screws (not good black ones) with a wide fender washer.
The fender washer is a large washer with a small hole. As the screw is tightened it will draw the t-nut into the wood and (hopefully) not mar the surface.
This aligns the t-nut with it's screw rather than trying to drive the t-nuts in straight.
You do this before actually putting the speaker in.
If you use front mounted threaded insert fittings, you can chamfer the entire rear of the driver opening, with a router. I like to use a steel M4 x 10mm insert and black button head machine screws.
However, with the built up layers of these supra-baffles, it's too late to get a router in there now.
Also, I think Dave alluded to this before - it looks like the enclosure's front panel has the same size hole as on the suprabaffle. Before attaching the SB, that really should be enlarged to at least the larger diameter of the beveled opening.
The FE126E has a very large diameter magnet assembly, and very shallow basket. With a baffle any thicker than a single layer of 1/2" (12mm) this can create a very tight restriction, with I suspect, no good results.
The documentation on the website is unfortunately rather vague in this area.
italynstylion said:Does anyone know the diameter of the mounting holes for the Fostex 126's?
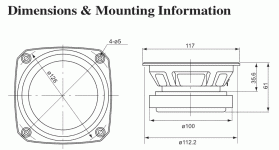
Fostex published data
dave
Attachments
planet10 said:
Fostex published data
dave
One important dimension missing from that sketch is the actual driver cut-out size - which I just calipered at 104mm. While I'm fortunate enough to have a CNC available to route these with flush rebate for the pincushion frame, I've found that an exactly 4" holesaw has just enough tooth set to work for the drivers with this basket size ( FE126/7 & FF125K). Hand bombing the rebate with a router is less fun
With less than 8mm margin on the narrow sides of the basket flange, and with only 4mm diameter difference (i.e. 2mm gap) to the magnet, the FE126 is a tight squeeze.
edit - correction on measurement
I might give those threaded inserts a shot. They've been suggested to me for other stuff as well. I've used T-nuts many times with great success but I feel like the threaded insert would be the best choice for the reason that Chris stated. I'll be able to further reduce the amount of wood restricting the driver if I don't have to worry about T nuts on the other side.
Chris, would these work?
http://yardleyproducts.thomasnet.com/item/fiber-sert-regular/-self-tapping-insert-regular-series-metric-threads/4007l16-26br?&seo=110
Chris, would these work?
http://yardleyproducts.thomasnet.com/item/fiber-sert-regular/-self-tapping-insert-regular-series-metric-threads/4007l16-26br?&seo=110
italynstylion said:I might give those threaded inserts a shot. They've been suggested to me for other stuff as well. I've used T-nuts many times with great success but I feel like the threaded insert would be the best choice for the reason that Chris stated. I'll be able to further reduce the amount of wood restricting the driver if I don't have to worry about T nuts on the other side.
Chris, would these work?
http://yardleyproducts.thomasnet.com/item/fiber-sert-regular/-self-tapping-insert-regular-series-metric-threads/4007l16-26br?&seo=110
There's more than a types of TI fittings, but these look fine to me - the only caveat would be to buy at least a few spares to allow testing your technique ( some types need special install tool bits)
Andrewbee said:I prefer inserts myself. Securely anchoring T-nuts is not as simple as it first appears.
Which kind do you use?
T-nuts are plain difficult, especially when there are heaps of them - I have used them before, with the thought of easily removing and replacing drivers - then have not ever removed them once..... I will use timber screws in future.
When using T-nuts, I flattened the spike parts out, then inserted them into holes made slightly too big, just enough to allow some wiggling - make sure the driver will fit nicely, then remove it - then apply epoxy glue to the base of the T-nuts and rescrew the driver in - the T-nuts will now be epoxied into the perfect pattern for the drivers holes.
When using T-nuts, I flattened the spike parts out, then inserted them into holes made slightly too big, just enough to allow some wiggling - make sure the driver will fit nicely, then remove it - then apply epoxy glue to the base of the T-nuts and rescrew the driver in - the T-nuts will now be epoxied into the perfect pattern for the drivers holes.
Epoxy is a good idea. But defeating the purpose of the spikes seems contradictory.
One of the problems with the t-nuts is the fact that you have to be delicate in putting the screws in, engaging the thread and then not backing the t-nut out.
The advantage is that they are not mounted on the face of the baffle which might produce damage with repeated use.
One of the problems with the t-nuts is the fact that you have to be delicate in putting the screws in, engaging the thread and then not backing the t-nut out.
The advantage is that they are not mounted on the face of the baffle which might produce damage with repeated use.
I'm still trying to find a way to draw the T-nuts into the back without harming the front mounting surface. I've done it with a large washer but I'm not sure if that will work well in this case. I might stick the bolt though a piece of .5" wood and put the washer on top of that to pull it in. That would seriously increase the surface area the bolt has to work on.
I've decided against threaded inserts only because I'd have to order them online and I don't know what size I'd need.
I've decided against threaded inserts only because I'd have to order them online and I don't know what size I'd need.
Hi,
a sacrificial timber/mdf board is a good idea.
Try drilling three pilot holes to half depth to get the spikes/tangs started, is essential in any of the "hard" boards.
A heavy duty pop rivet gun with a threaded mandrel to fit the Tee nut would be ideal for pulling the Tee nut to final depth.
a sacrificial timber/mdf board is a good idea.
Try drilling three pilot holes to half depth to get the spikes/tangs started, is essential in any of the "hard" boards.
A heavy duty pop rivet gun with a threaded mandrel to fit the Tee nut would be ideal for pulling the Tee nut to final depth.
AndrewT said:Hi,
a sacrificial timber/mdf board is a good idea.
Try drilling three pilot holes to half depth to get the spikes/tangs started, is essential in any of the "hard" boards.
A heavy duty pop rivet gun with a threaded mandrel to fit the Tee nut would be ideal for pulling the Tee nut to final depth.
Jeez, I don't even know what that last thing is.

Agreed that increasing the surface area is a very good idea to avoid dimpling. Once the t-nut is in there and straight, not a lot of torque is needed to snug up the driver to it's gasket. Added torque from the screw driver could bend the frame.
Have you used one of those before with wood? I think I can get that locally at a Northern Tool store that's by me.
Same thing right?
http://www.northerntool.com/webapp/wcs/stores/servlet/product_6970_200308963_200308963
Same thing right?
http://www.northerntool.com/webapp/wcs/stores/servlet/product_6970_200308963_200308963
Have you used one of those before with wood?
Not with wood, only with steel. Car roof bars are sometimes held on with the type of threaded inserts shown. You really need a bigger tool for those, or a grip that could strangle a horse.
It is overkill really for for the type and size of insert used for speakers. As has been said just use a bolt screwed into your insert of choice with a sacricial piece to protect the baffle.
Line the insert up to your predrilled hole and gently tighten the bolt until the insert is fully home, job done. I like these
John
- Status
- This old topic is closed. If you want to reopen this topic, contact a moderator using the "Report Post" button.
- Home
- Loudspeakers
- Full Range
- My Frugel-Horn Build