Eighteen months of struggling with linear bearings.
I messed around with some special bearings called simplicity bearings.
Learnt a lot about moment loading, but gave up as the simplicity bearings were placing too much friction on the shaft.
Thanks for reminding me about that post I'll have to track it down and update my findings.
But yeah, very sad!
Might try again with standard linear bearings and see how that goes, but too frustrating to continue down that path.
Hence the visit to this page. Trying to keep it simple, not really interested in air pumps and the likes.
Now what to do with a shaft and bearings.......
Can't even find my own thread I started?
Last edited:
Hi enzedone & welcome.
All,
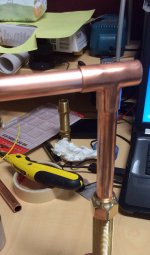
I'm going down the plumbing route with this one as well, large 38mm dia copper for the main column 15mm for the suspension arm.
This thread also needs to focus on some of the pertinent details:
The position of the two screws etc that will suspend the Golf Ball.
I know they need to be equidistant about its central axis, but I also believe that they are set below the centre line. Though by how much I'm not sure.
The type of Thread to be used;
As the Arm is relatively light, less that a 100g aver all, only a very light weight mono filament need be used.
Or Would a heavy weight cotton thread be better?
As its is possible to use the same thread to set the Overall height + VTA & Azimuth.
How best (simply) would this be achieved ?
Ie Use 2 adjusting screws at the top of the Arm, this could get a bit messy.
The silicone: grade /type of fluid
Damping of the arm tube; fine dry sand or some other type of material.
I just happen to have some volcanic ash from the unpronounceable volcano in Iceland, Its quite sand like but very fine so it's going in mine, but its worth mentioning as it could get overlooked.
If you look at the newer arms they don't seem to drill the Ball anymore, instead they mount the tube on top of the ball.
I think they use a piece of machined aluminium, (I would say this is more of a cosmetic thing & perhaps even cost effective, given what I know about this kind of production) & for most of us out of the question.
Though it could be replicated with modelling clay or epoxy putty.
Before going down this route what would be the advantages of setting the tube above the ball.
Lets have a list if you like, of things 'necessary' for a WTA Clone.
Pics & drawings will all be useful aides.
I think i've covered most things, if you can think of anything else thats pertinent then lets have them All together in one post.
enzedone,
With those long Brass fittings what is your approach going to be.
All,
I'm going down the plumbing route with this one as well, large 38mm dia copper for the main column 15mm for the suspension arm.
This thread also needs to focus on some of the pertinent details:
The position of the two screws etc that will suspend the Golf Ball.
I know they need to be equidistant about its central axis, but I also believe that they are set below the centre line. Though by how much I'm not sure.
The type of Thread to be used;
As the Arm is relatively light, less that a 100g aver all, only a very light weight mono filament need be used.
Or Would a heavy weight cotton thread be better?
As its is possible to use the same thread to set the Overall height + VTA & Azimuth.
How best (simply) would this be achieved ?
Ie Use 2 adjusting screws at the top of the Arm, this could get a bit messy.
The silicone: grade /type of fluid
Damping of the arm tube; fine dry sand or some other type of material.
I just happen to have some volcanic ash from the unpronounceable volcano in Iceland, Its quite sand like but very fine so it's going in mine, but its worth mentioning as it could get overlooked.
If you look at the newer arms they don't seem to drill the Ball anymore, instead they mount the tube on top of the ball.
I think they use a piece of machined aluminium, (I would say this is more of a cosmetic thing & perhaps even cost effective, given what I know about this kind of production) & for most of us out of the question.
Though it could be replicated with modelling clay or epoxy putty.
Before going down this route what would be the advantages of setting the tube above the ball.
Lets have a list if you like, of things 'necessary' for a WTA Clone.
Pics & drawings will all be useful aides.
I think i've covered most things, if you can think of anything else thats pertinent then lets have them All together in one post.
enzedone,
With those long Brass fittings what is your approach going to be.
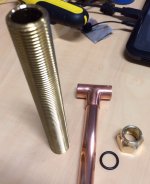
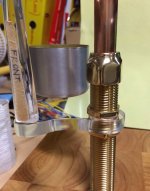
I will be using the brass fittings so I can adjust the overall height of the complete plate with bowl and all. The copper tube is held in place with a nut and 'o' ring which will then allow me to adjust the height of the cross beam/and golf ball.
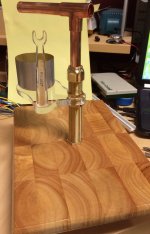
I'm using this as that's all I have. I'm going to house the whole thing on a separate board, which will not be attached to the plinth.
Specs
I too am struggling with the detail of the ball. I may be wrong here but having the string running through a small tube that runs right through the ball IMO would allow for better movement? As opposed to screws?
Tone arm: I will not dampen down the tone arm at this stage, will wait and see how it goes.
String: I'm just using fishing line. Something that is rated at a couple of kilos surely wouldn't stretch under this load?
Plans: hmmmmmmmm what's that? I just dream it up as I go along, I will draw out a plan for the main plate that holds the bowl(which will be made from acrylic) but that's about it I'm afraid.
Length:
Apart from space limitations are there any critical issues that need to be addressed if I wish to extend this arm out to 15-18inch?
Cable:
I have and are using mouse cable which is litz copper and is great to work with. I picked up ten mouse units off the net for $10. You will get about 700mm of litz wire per unit which will easily be enough.
These are getting cheap as people are moving wireless.
Last edited:
I have large dia 38 mm nuts for the sam thing but am not happy with the courseness of the thread.
tube seems a good idea but Arm will slide around unless it has blu tac etc to prevent any movement.
Its the postion of the Hole / Screws, to the Arm tube, to one another, thats important.
Anyone have details of the string fixing in relation to its position to the arm tube.
Whatever angle you use for the headshel just manetain the tip of the stylus is on the center line of the armtube
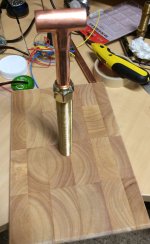
And this is it assembled.
Will never be that high of course, but just to give you an idea of what it could look like.
I will cut a short piece of that thread and use it to run the string around. It will be held in place by two o rings, one either side to stop it moving, but will still be adjustable.
Will never be that high of course, but just to give you an idea of what it could look like.
I will cut a short piece of that thread and use it to run the string around. It will be held in place by two o rings, one either side to stop it moving, but will still be adjustable.
Attachments
The only olives I know of come out of Greece")
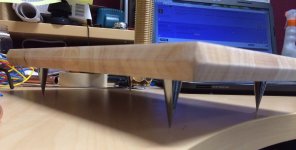
Here is my board. This comes from a highly regarded and very we'll respected audio company that's been around for years. They are based in Veitnam and have been making these very expensive 'Audio Grade' bread boards for years
$8
What the heck is an 'olive' gents?
Here is my board. This comes from a highly regarded and very we'll respected audio company that's been around for years. They are based in Veitnam and have been making these very expensive 'Audio Grade' bread boards for years
$8
What the heck is an 'olive' gents?
Attachments


That's very neat work.Lovely shine on the brass and the acrylic.
Jay I haven't bought any yet but the local fishing shop has various threads which I think are used for attatching the hooks to the fishing line proper.I've made a start and have four arms and golf balls assembled but not glued yet.Gonna try both alluminium and carbon fibre in 9" and 10.5" lengths.Do you know where to obtain setting up measurements for the 10.5" arm?
Jay I haven't bought any yet but the local fishing shop has various threads which I think are used for attatching the hooks to the fishing line proper.I've made a start and have four arms and golf balls assembled but not glued yet.Gonna try both alluminium and carbon fibre in 9" and 10.5" lengths.Do you know where to obtain setting up measurements for the 10.5" arm?
- Status
- This old topic is closed. If you want to reopen this topic, contact a moderator using the "Report Post" button.
- Home
- Source & Line
- Analogue Source
- My DIY WTL Tonearm