


Makizou :: P1120569.jpg picture by Ty_Bower - Photobucket
Makizou :: P1120577.jpg picture by Ty_Bower - Photobucket
Makizou :: P1120573.jpg picture by Ty_Bower - Photobucket
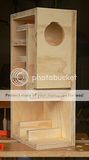
I found that concrete block works every bit as well as the SLA batteries, only more so. Finally started putting one of the sides on. In hindsight, maybe I should have begun with building up the interior pieces directly on the side? Anyway, no changing it now. Maybe next time. The other photos don't show it well, but I tried to cut a chamfer on the inside of the speaker cutout. It seems like I could have taken it a little farther than I did. Hopefully, the drivers will arrive tomorrow and I can test fit them in the holes.
http://s69.photobucket.com/albums/i43/Ty_Bower/Makizou/P1120578.jpg
http://s69.photobucket.com/albums/i43/Ty_Bower/Makizou/P1120584.jpg
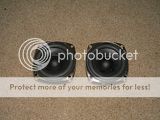
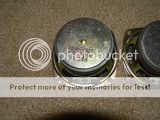
Does anyone happen to recognize these drivers? I was originally going to try them out in the M-8BH enclosure, but I'm guessing they aren't very good. Besides, the frame is a little too large to fit into the 72mm hole I cut in the front panel. Even still, I'm curious if these drivers are worth my time...
Makizou model nano
Wow ! This is my Web site.
Makizou model is a quite nice speaker.
I like it very much.
By the way, I also made just half size of Makizou M-8BH, too.
Here it is. (I call it as M-8BH nano.)
http://networkentry.blog22.fc2.com/blog-entry-148.html
http://networkentry.blog22.fc2.com/blog-entry-154.html
I also put auto-color-changing LED inside Speaker.
It's cool !
Many thanks to you, NetworkENTRY. I appreciate your contribution here. Perhaps you can offer some recommendations for others trying to build these cute little speakers.


http://s69.photobucket.com/albums/i43/Ty_Bower/Makizou/P1120586.jpg
http://s69.photobucket.com/albums/i43/Ty_Bower/Makizou/P1120590.jpg
I learned two more things I shouldn't do. First, the idea of "building up the internal pieces" on one of the sides must be a poor idea. I've found that if you glue down three corners of a reasonably square piece of wood, the fourth corner will do its darnest to move out of square. I wish I had glued ALL of the inside pieces together first, then stuck on the sides. Reading through NetworkENTRY's blog, I see there are a few clever techniques for assembling all of the inside pieces and keeping them aligned. Doing it this way avoids the wood's natural tendency to twist itself into a pretzel. Now I'm trying to use the spreader to stretch the bad corner back into alignment. I can't imagine trying to build a six foot tall horn without good fundamental woodworking techniques.
The second thing I learned was to make absolutely sure that ALL of the middle pieces (i.e., not the two sides) are EXACTLY the same width. Somehow my front baffles are two tenths of a millimeter narrower than most of the rest of the stuff. You might not see it in the photo, but the flashlight inside is shining through the crack. Will this be airtight? Can I trust the glue to fill the gap? I'm tempted to try to use the orbital palm sander to grind down the high spots, but experience has shown that my sanding technique tends to crown the edges of the plywood. What was once a square edge will become rounded. Will this be worse than what I have now?
You might not see it in the photo, but the flashlight inside is shining through the crack. Will this be airtight? Can I trust the glue to fill the gap?
I can see the gap, and I will say that IME you need not worry. Simply use the few clamps you have start right at the point where there is a gap. A clamp can produce quite a bit of force, it should easily bend the wood into the baffle. This will mostly relieve the airtightness problem, but the bend may show itself where the panels that define the CC (the top piece and the small piece around midway down) are wider. You should be able to see if there will be a problem by "dry fitting". If the appearance of the bend is too much to bear (if it's there at all), use no clamps at that point, and you can reasonably hope that the glue will fill it in. If not, no problem, fill the gap with wood putty. It will look less amatuer than you might think. Can you guess that this may have happened to me before?
You are right on about the importance of the width of all panels in this type of build. Owning a table saw with a properly functioning fence is the best bet (if a mistake is discovered, you have the means to correct it). A cabinet shop will yeild good results if you can find one to do small jobs, but at additional cost, and risk of finding a mistake after it's too late. Last in line is a sawboard, but certainly not least, as many get fine results using one. Google "sawbord" and "saw board" for dozens of cheap and effective examples.
Is this your first build? If so, then outstanding job. If not, then only excellent job.
Can I trust the glue to fill the gap?
Hi, Ty_Bower !
If you applied a certain amount of Glue, then the gap was filled by Glue and no problem.
(I guess you used a glue which became transparency after cure.)
By the way, I scanned the manual and posted them in my Blog.
Also, the dimension information is the article, too.
Thank you.
Network ENTRY M-8BH Manual

http://s69.photobucket.com/albums/i43/Ty_Bower/Makizou/P1120600.jpg
I couldn't find any binding posts or terminal plates that were compact and inexpensive, so I made these myself out of a set from Radio Shack. The posts were $3.99 for the set of four (2 red, 2 black). The fiberboard was found in my basement, and measures 2" by 1". I think I'll just glue it onto the back of the enclosure.

http://s69.photobucket.com/albums/i43/Ty_Bower/Makizou/P1120604.jpg
I test fit the Fostex FE-87E, but they wouldn't go in! I had to cut a small keyhole slot in order to provide clearance for the terminal connections. I decided to put them at the top of the box to keep the speaker wiring short and direct.
http://s69.photobucket.com/albums/i43/Ty_Bower/Makizou/P1120609.jpg
Side view... I guess this is the last time I'll see the insides.
Last edited:

http://s69.photobucket.com/albums/i43/Ty_Bower/Makizou/P1120676.jpg
Too late for that. One is done, and the glue on the other is curing. I'm trying to decide if and how I should finish the boxes. Polyurethane? Lacquer? Oil? Maybe I should just spray paint everything black to hide the sloppy glue mess.
Actually, I'm pleased by how well they sealed up. There is surprisingly little gap between the panels, and now that the side is glued I can't see any light leaking through. I will admit to a little sanding before I glued on the last side. It turned out well, despite my fears that I would round off the edges.
Everyone has their opinion on finishes. Here is mine...of all the finishes I've used on my seven horn speaker builds, my favorite by far is Minwax Antique Oil Finish. You may have to visit a few stores to find it. It is durable, but most of all, it is extremely easy/fast to apply a professional looking, natural, finish with it. It is hard to screw up. If you look at my blog, (Flea Watt) you'll see a pair of Maple Saburo's with walnut veneer around the driver on the front baffle. This pair was done with Minwax Antique Oil finish and turned out the best of all my builds. I've tried other oil finishes, water based poly, oil based poly, stain/poly combos, etc. & like the Minwax Antique Oil best.
Good Luck and Enjoy!!
Good Luck and Enjoy!!
I haven't used that product before. Just test it out on scrap wood of the same type before putting it on your speakers. Also, in case you haven't visited, there is a permanent thread on wood and finish for speakers. So as this thread doesn't skid sideways. A lot of good information from guys who have built many more cabinets than I.
A lot of good information from guys who have built many more cabinets than I.So as this thread doesn't skid sideways.

http://s69.photobucket.com/albums/i43/Ty_Bower/Makizou/P1120682.jpg
Sorry...
I'll try to keep it to Makizou. The drivers will get installed tomorrow, after the oil dries. I have a set of Fostex FE87E that I will be using. I was speaking briefly with NetworkENTRY, and it sounded like he enjoyed the FF85K as well. Perhaps that can be an experiment for a later time. I've got some pieces of fiber batting to stuff down the bottom of the front cavity. I still need to find some bags of sand or aquarium gravel or something to put in the two voids at the bottom of the mouth.
So far I'm pleased enough with the way these are turning out. I didn't expect much from my first try, and I took lazy shortcuts in several places because I didn't plan on these being "keepers". I learned at lot of things to do, and even more not to do. I hope I build another pair of these, and I'm sure the next set will be quite a bit better. I also feel like this little project has given me enough experience that I think I might have the confidence to tackle a much larger set of horns in the future. I'd really like to try to make a large set of double mouth horns, maybe something like the Sachiko or Saburo projects.
Of course, we'll see how these guys sound after the drivers are installed and broken in for a while.
Have you ever used Watco Danish Oil? The directions on the can seem really easy to follow, and it's on sale cheap at the Home Depot. I wonder if it turns out looking nice?
WATCO is currently my finish of choice. Most tung oil based products require a buff down while the finish is wet. WATCO does not. Simply wipe on a thin coat and go away for 24 hours. And I do mean a thin coat. Just enough to wet the surface and never so much as to cause a run. If the finish starts to bead at the bottom, you have put on too much. Buff the surface with 0000 steel wool between coats. I find that it usually takes 4 coats to bring up a nice sheen.
Bob

http://s69.photobucket.com/albums/i43/Ty_Bower/Makizou/P1120683.jpg
http://s69.photobucket.com/albums/i43/Ty_Bower/Makizou/P1120685.jpg
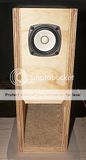
Here's the FE87E, just before it went in. I put a fair amount of stuffing into the front chamber. Hopefully I didn't overdo it. I also found something to put in the bottom, at least temporarily until I can find some nice bean bags or something. How do they sound? Surprising clear and pleasant to listen. The bottom end goes a little deeper than I would have expected for a 3" driver, but everything is relative. These are speakers for your bedroom or a small apartment, so don't expect loud booming bass. It would be entirely appropriate to want a subwoofer for these, but it might spoil the coherency. I never did have much luck seamlessly matching a sub to the mains. I'll give them a while for the drivers to loosen up a little, and see how things go. Overall, a nice little project and I'm glad that I built them.
- Status
- This old topic is closed. If you want to reopen this topic, contact a moderator using the "Report Post" button.
- Home
- Loudspeakers
- Full Range
- Makizou, I finally did it.