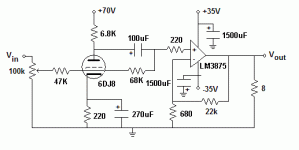
Keeping basically the same circuit and supplies ,
you should try the following changes.
Anode resistor raised to 6.8K.
Grid resistor raised to 47 K.
Feedback resistor increased to 68K.
Add 22k resistor from + Input to ground of the LM3875
This will also drop the distortion at 1 volt dramatically !
have fun.
Cheers.
you should try the following changes.
Anode resistor raised to 6.8K.
Grid resistor raised to 47 K.
Feedback resistor increased to 68K.
Add 22k resistor from + Input to ground of the LM3875
This will also drop the distortion at 1 volt dramatically !
have fun.
Cheers.
I am using the PCB bought from Peter Daniel with an input resistor to the LM3875 of 220-ohm. I am reattaching the updated circuit layout. Should I still use the 22k resistor from the Vin+ of the Lm3875 to ground or should I use a larger value since I had indicated an input resistor 10K? Also I don't have any more space on the pcb to add this resistor to connect it from Vin+ to ground, so do you have any suggestions on how to mount this into my design?
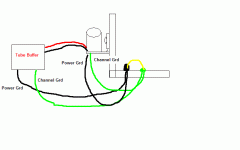
Also, I was wondering about the star grounding scheme. Should I have a signal ground coming from the tube circuit and the LM3875 circuit that connect at the Star earth? Right now I have the tube circuit ground connected to a point on the chassis, along with the channel ground from the LM3875 chip connected to the same point. My supply ground wires are connected (one from tube supply and one from LM3875 supply) to the chassis at one point. Should I then connect these two together with a single wire?
Where should I pull the signal out ground from? The point where all these wires connect? Sorry for the newbie questions. I will post my wiring setup so it makes more sense shortly. Thanks again for the help.
Attachments
It's 3.40 am here and I'm awake . Not because of the Net but because I woke up as we are having very heavy rain and I was afraid that water would enter the house ! Our living room is lower than the rest of the house .
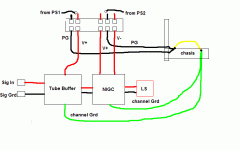
I modified your earthing scheme. The previous one has too many long wires and a loop at the chassis is not good. Loudspeaker ground should be to the supply ground. This might possibly be on the lm3875 pcb. The 3875 ground on the pcb could be the star ground point. The input should also b egrounded there and it should not touch the chassis. The chassis should be connected to teh star ground either directly or through a 10 ohm resistor ( to break any ground loop ) with say a 0.1uF capacitor in parallel with the 10 ohms to short it for RF frequenies.
The input of the LM3875 might already have a resistor to ground. Measure it with a meter and check. Typically the +ve input to ground resistance should be equal to the resistor from the negative input to output if the -ve input is not grounded directly via 680 ohms ( as you have ). This is to ensure low offset voltage at the output of the LM3875. With low resistor values this shouldn't be a problem. You already have a resistor to ground via the tube circuit resistors. That varies from about 100K to 200K or less , depending on the volume setting and any external resistors present at the input.
I would still put a resistor say anything from 10 K to 33K from input to ground. You could solder one on the rear side of the pcb.
Try it out.
Cheers.
Attachments
The offset voltage
You will get an offset voltage at the output of the tube circuit if it has no resistor to ground from the output capacitor to ground.
The meter or scope resistance is very high and will charge up the capacitor slowly. You should use a dummy load of say 10K to 33 K between the output terminal and ground while testing your tube circuit.
The capacitor will then charge up quickly and the output should be at practically 0 V if your capacitor is not leaking.
The grid stopper resistor ( in series with the grid ) should not affect dc conditions. However I hope your input is fully connected as shown with potentiometer.
Cheers.
Doesn't look like I will be able to go back to sleep now!
It's already past 4 am .
I doubt you ground is causing the dc offset. Must be what I mentioned above.
In the diagram that you edited, how should I connect the wires at the power ground point? Should I connect them to a piece of alluminum or something different from the chasis ground? or should I just connect them all together without connecting them to an actual ground point. Thanks for the help.
I am actually using a Microsoft Zune player to test the amp. I do not have the pot connected at all right now as I was using the player to control the volume. So the input is connected directly to the 47K grid resistor Does this have any effect on the dc offset. I'm sorry but I'm confused how to fix the offset. Thanks again.
If all the wires cannot be soldered at your chosen point , you could use a "small" stub of copper wire ( as thick as you can handle easily ) and solder one end of it to your chosen star point and solder all other wires as close to each other as possible on that stub of copper wire ( no aluminum please !).
So connect all of the channel grounds and the power supply grounds to a piece of copper and then have a single wire that is connected to the chasis. At this point I don't really have a chasis but rather a decent sized aluminum. Now everything is connected to the chasis. What type of material should i connect all of the channel grounds and power grounds to. does it have to be metal or could it be plastic or some other material?
Whew , I can see you are a Newbie !")
You can connect the aluninum chassis to the star earth and even locate the start earth on it. But all other ground wires must terminate at that point . As you cannot reliably solder on to aluminum You should use a machine screw ( bolt and nut ) and fix some solderable metal tags ( or a piece of copper wire ) on to the screw and solder all wires to that. I'd prefer the star to be located on the LM3875 pcb and take a single thin wire to the aluminum plate from the star ground.
You can connect the aluninum chassis to the star earth and even locate the start earth on it. But all other ground wires must terminate at that point . As you cannot reliably solder on to aluminum You should use a machine screw ( bolt and nut ) and fix some solderable metal tags ( or a piece of copper wire ) on to the screw and solder all wires to that. I'd prefer the star to be located on the LM3875 pcb and take a single thin wire to the aluminum plate from the star ground.
Yes I am a newbie, and I thank you so much for helping me out. I am actually working on a college project that I don't know how I got myself into. I'm actually a computer engineer and am not very good with circuit design as you can see. Could I use one or two solder tags to connect all of the grounds together and then run a wire from this point to the chassis? If i use the lm3875 pcb board for the star ground would I just solder all wires to a common ground point on the pcb? This may work. I am going to check the dc offset voltage now that I got the resistor from ground soldered in.
"...Could I use one or two solder tags to connect all of the grounds together and then run a wire from this point to the chassis?...." Yes !
And Yes to the point about soldering all wires to the ground on the pcb. However I wouldn't know if you would have enough space to solder all wires properly. A copper stub would be OK too I guess. All wires as close as possible on to a stub and the other end to the pcb.
And Yes to the point about soldering all wires to the ground on the pcb. However I wouldn't know if you would have enough space to solder all wires properly. A copper stub would be OK too I guess. All wires as close as possible on to a stub and the other end to the pcb.
I am still getting a dc offset at the output of the amp, but it is dropping a lot faster now that I added the 100k resistor from the input to ground. It seem to drop to around 2 volts at the output of the amplifier (including the gain of the LM3875). Is there anything else that might be the cause of the dc offset? I'm stumped right now. Thanks
- Status
- This old topic is closed. If you want to reopen this topic, contact a moderator using the "Report Post" button.
- Home
- Amplifiers
- Tubes / Valves
- Low Voltage Plate Follower 6DJ8 Buffer Power Supply