Tung oil is a great way to get a good finish with minimal sanding and maximum waiting.  I use it all the time for furniture projects that don't get subjected to a lot of abuse (liquid spills, putting feet on, etc.).
Here is my method-
1- Sand it perfectly before applying the first coat, never sand it again
2- Apply first coat of tung oil liberally (really slop it on, don't be stingy) and wait ten to fifteen minutes
3- Apply more tung oil being especially careful to hit the areas that soaked up all the first coat, wait ten to fifteen minutes and gently wipe off, don't buff at this stage
4- Wait 24 hours and buff vigorously with a clean, lint-free cloth
5- Do steps 2, 3 and 4 at least two more times, that is put on three total coats minimum waiting 24 hours between applications (that's what I mean about maximum waiting!)
Tung oil won't give a glossy finish like gloss polyurethane, but can give a quite nice sort of satin finish. If you want a smooth gloss finish with tung oil then let it dry for a minimum of 72 hours (I wait a week on furniture) and apply a good furniture wax. Don't use a wax that says "good for floors" anywhere on the label! They are too hard and require too much buffing to get a quality finish.
For an amplifier case that won't be subjected to the abuse that something like a coffee (or Kofi?) table gets the finish should last a long time and is easy to touch up with more wax.
I use it all the time for furniture projects that don't get subjected to a lot of abuse (liquid spills, putting feet on, etc.).Here is my method-
1- Sand it perfectly before applying the first coat, never sand it again
2- Apply first coat of tung oil liberally (really slop it on, don't be stingy) and wait ten to fifteen minutes
3- Apply more tung oil being especially careful to hit the areas that soaked up all the first coat, wait ten to fifteen minutes and gently wipe off, don't buff at this stage
4- Wait 24 hours and buff vigorously with a clean, lint-free cloth
5- Do steps 2, 3 and 4 at least two more times, that is put on three total coats minimum waiting 24 hours between applications (that's what I mean about maximum waiting!)
Tung oil won't give a glossy finish like gloss polyurethane, but can give a quite nice sort of satin finish. If you want a smooth gloss finish with tung oil then let it dry for a minimum of 72 hours (I wait a week on furniture) and apply a good furniture wax. Don't use a wax that says "good for floors" anywhere on the label! They are too hard and require too much buffing to get a quality finish.
For an amplifier case that won't be subjected to the abuse that something like a coffee (or Kofi?) table gets the finish should last a long time and is easy to touch up with more wax.
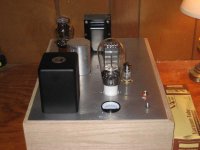
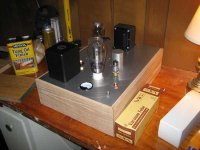
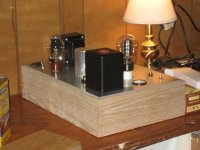
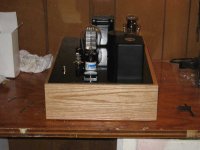
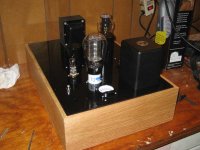
I'm still working the tung oil into the test board and it looks really good so far. Here are some pictures of the unfinished cabinet and plate.
The cabinet will get the tung oil treatment and the plate is going to have the living frogging snot sanded out of it and a few nice coats of black epoxy paint added.
The cabinet will get the tung oil treatment and the plate is going to have the living frogging snot sanded out of it and a few nice coats of black epoxy paint added.
Attachments
astouffer said:... Its hard to tell from the pics but does the wood chassis sit flat or use some kind of feet? You'll need some room for air to be drawn in the bottom.
Excellent point. When I make wooden bases I usually do two things. The first is I cut a slot in the two sides and the front near the bottom of the base. In the rear of the base I cut all the way through the wood at the same height as the slot on the other three sides. The slot receives a perforated sheet of aluminum which allows airflow into the base. The rear being cut as high as the slot (usually about 3/8" to 1/2" up from the bottom) allows quite a bit of air movement. The aluminum sheet is screwed to the rear with a single screw. That setup protects fingers from slipping underneath and possibly touching a cap that isn't discharged when moving the amp.
The second thing I like to do is route the bottom of the other three sides on my router table, in effect creating "feet". That leaves another 1/4" slot on the other three sides for additional airflow. Not strictly necessary in every case but it does allow a bunch of air movement if ventilation holes are drilled in the top around the tubes.
Well, drill the holes if you want but your 300B and rectifier have a bit of air around them. More than enough I think and your plate is finished. You do want to vent under the chassis a bit. A slot in the upper rear would be good if it is still convenient but only if. You do need some feet. With a 3/8 or better gap at the bottom, with this amp heat probably will not be a real problem…John
Yes you would want the holes around the 300B, and possibly the rectifier also because they produce the most heat. Its hard to tell from the pics but does the wood chassis sit flat or use some kind of feet? You'll need some room for air to be drawn in the bottom.
OK-- so, I added a ring of holes around the rectifier and the 300b. I plan to add feet to the chassis, so ventilation should not be a problem.
Excellent point. When I make wooden bases I usually do two things. The first is I cut a slot in the two sides and the front near the bottom of the base. In the rear of the base I cut all the way through the wood at the same height as the slot on the other three sides. The slot receives a perforated sheet of aluminum which allows airflow into the base. The rear being cut as high as the slot (usually about 3/8" to 1/2" up from the bottom) allows quite a bit of air movement. The aluminum sheet is screwed to the rear with a single screw. That setup protects fingers from slipping underneath and possibly touching a cap that isn't discharged when moving the amp.
This is a great idea that assumes reasonable woodworking skills, which Kofi ain't got. Take a look at the box and note that the corners don't exactly match to Boeing specifications and you'll get what I mean.
I think I'll actually just use some perforated aluminum for the bottom and then some feet. If I can con my Irish laborer friend into doing as you suggest, however, this'll be a winner.
Well, drill the holes if you want but your 300B and rectifier have a bit of air around them. More than enough I think and your plate is finished. You do want to vent under the chassis a bit. A slot in the upper rear would be good if it is still convenient but only if. You do need some feet. With a 3/8 or better gap at the bottom, with this amp heat probably will not be a real problem…John
Well, the holes are already drilled. They look kinda cool, actually, even if a bit asymmetrical.
You know, Kofi's really trying to do a good job here folks, but this thing is going to wind up having some Kofi-fied aspects to it that may not be a winner in the aesthetics department, but will make it exclusively mine and, more importantly, un-sellable. You never know when Mrs. Annan will decide we need some cash and having an amp I love with enough flaws to keep it off the market would be pretty valuable then.
Man, I drilled a buttload of holes yesterday. Now I need to do it all over again for the other monoblock.
No more monoblocks. Never again.
Kofi
Very sharp. I do have to try painting my top plate some day but as you can see I have enough trouble dusting. Here’s mine, Lundahl output under the hood…John
Shot with KODAK DX3600 DIGITAL CAMERA at 2007-08-05
An externally hosted image should be here but it was not working when we last tested it.
Shot with KODAK DX3600 DIGITAL CAMERA at 2007-08-05
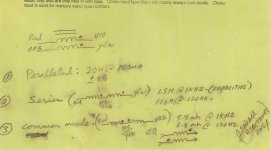
OK-- wiring question here. I had Jack Eliano wind a common-mode choke for me for this project. He scrawled some instructions on some paper when he sent them to me and I'm not sure what he means.
Take a look at the attached. I think this means that the red would be the B+ in and the violet would be the B+ out while the orange and yellow would be tied to ground.
He did scrawl something at the bottom ("common mode?"), but this doesn't make sense to me.
Anyway, please let me know what you think.
Kofi
Attachments
Look at the top and lower right sketch. The dots mark one end of the winding, either the start or end. The top is a parallel connection.
In one side out the other, the same for both the top and bottom. looking right to left, R-V and O-Y.
To run common like your schematic you flip one of the windings around by connecting the top R-V and the bottom Y-O.
Don’t think B+ and ground at this point, Chokes are for AC. How about hi side, low side. and source and load.
Or if your me, Gozinta, gozouta. Of course it can take years of study before your qualified to use such rarefied technical terms…John
In one side out the other, the same for both the top and bottom. looking right to left, R-V and O-Y.
To run common like your schematic you flip one of the windings around by connecting the top R-V and the bottom Y-O.
Don’t think B+ and ground at this point, Chokes are for AC. How about hi side, low side. and source and load.
Or if your me, Gozinta, gozouta. Of course it can take years of study before your qualified to use such rarefied technical terms
…JohnThanks! I think I understand about the windings, but I'm clearly missing a concept here. As a result, please review the below dumbass question:
I have always thought of things in ground and not ground even in AC terms, so I thought that since both the yellow and orange would be "grounded" it wouldn't matter what position they're in.
So, for example, I was going to single-point ground the circuit, with all the power-stage grounds and the first-stage grounds tied to the ground point from the first 4uF cap. Based on your answer, this sounds like it may not be correct and I have some learning to do.
Is it that the yellow and orange leads are not really at ground but are acting as a return for ground currents? If so, are would the grounding scheme I described above still be correct?
Kofi
Well, Take a look at the schematic you sent, Now imagine that each coil is a resistor, which to AC it pretty much acts like. Now if you connect both ends of the resistor to the same point there will be no current through it and it won’t do anything. As you see in the schematic the current path is from the right hand cap through the coil to the left hand cap. It’s the same for the bottom coil. It’s still in the current path regardless that you call it ground, return B- or whatever…John
This is how dumb I am.. I have to clarify this:
Are you saying that the current path though all grounded components is the same irrespective of grounding scheme? Should I, then, keep the scheme I mentioned before?
I'm so, so sorry for my ignorance, but I think I'm beginning to understand this concept and I'd like to make sure I'm right. In my defense, I've had a reasonable quantity of Gulden Draak (a Viking beer, apparently) this evening and am 10.5% stupider than normal.
Kofi
Are you saying that the current path though all grounded components is the same irrespective of grounding scheme?
No I did not mean to imply that. What I meant was the two coils, top and bottom work the same way.
I see the confusion. You are looking at the ground path as an absolute. Looking to the left of the choke coil (top b+ one) that is pretty much true. It is a piece of wire or a Ground buss. If you move your meter lead along it, you will read the same everywhere (we will ignore the little bit of resistance of the wire itself).
But moving right you get to the choke coil. It is in the path back to the transformer not just connected to it like one end of a cap. It is effectively a resistor. Now to the DC, it’s not a large one, go ahead and measure it with your meter. But to any AC it’s very large. And that’s what it’ there for to knock down the AC…John
- Status
- This old topic is closed. If you want to reopen this topic, contact a moderator using the "Report Post" button.
- Home
- Amplifiers
- Tubes / Valves
- Kofi Annan in: "Kofi Makes a 300b DRD... and You Get to Help!"