Well it wasn't a dollar sign, yen? In central America, I bought stuff that had 4 digit price tag, converted was only few dollars. Maybe it's like that.if you send them 2300$, I'm sure they'll manage

Yah, I don't know the original price of the Hakko 936D, but it was originally listed NIB at $175 on eBay. So I am guessing maybe around $200 new. I can usually get by with just on tip, as most of my soldering is similar, but for the heavier stuff, I am hoping to find a more robust tip for the 936.
Guys, I appreciate all of the help from your actual experience. It makes choices easier, even I after I consider our differences in soldering needs or styles.
FWIW, I got my Hakko desoldering gun running right again. Can't understand how the bellows disc was leaking, but the new one solved the problem.
Got power all good, 15 volts and 0 offset. The LEDS on twister do not light. Flat on led is oriented with flat side of silkscreen, I think. Hard to tell, one side the lines seem to go behind, others more "flat looking."
Before I unsolder and re orient the LEDs, thought I better ask. I guess I could re orient one and seeI f it works...anything else to check? These are 2021 boards...I saw the note that the 21 boards are oriented opposite from the newer boards.
Before I unsolder and re orient the LEDs, thought I better ask. I guess I could re orient one and seeI f it works...anything else to check? These are 2021 boards...I saw the note that the 21 boards are oriented opposite from the newer boards.
Sort of did. I had one red led not installed. I'm thinking (always dangerous) that if I touch this LEDs legs to the two leed stubs from installed led. If legs touching but loose led is reversed, it would light up when selected, right? Wrong. Occasionally one would very dim light up, but not the one whose legs were being touched. There would be one place where both loose and installed led would light up bright, but not one selected. Experiment failure!
Guess I can try reversing one and see if it lights up. Starting to remember following the picture in the build guide where LEDs are installed, but Leeds not cut yet. You can see the orientation of the short/long legs, and I arranged mine like that. Let me stare at the build guide picks of twister board and determine if it is the same as mine or the 2023 board. If different from mine, then the LEDs are indeed backwards. If so, remains to be seen if that is only problem!
Guess I can try reversing one and see if it lights up. Starting to remember following the picture in the build guide where LEDs are installed, but Leeds not cut yet. You can see the orientation of the short/long legs, and I arranged mine like that. Let me stare at the build guide picks of twister board and determine if it is the same as mine or the 2023 board. If different from mine, then the LEDs are indeed backwards. If so, remains to be seen if that is only problem!
what resistor did you use for the Led's? This will not be the problem, but I just want to know if you stuck to the value given or deviated.
If you are like me, there is also a chance that it becomes just as well to remove everything and start over testing one at a time as you go.
If you are like me, there is also a chance that it becomes just as well to remove everything and start over testing one at a time as you go.
God first gave us Wheel
right after that He gave us Quarter Window (just to delay recognition of need for AC in cars)
right after that He gave us Paper
then He gave us DMM
paper - to write ideas, DMM to check ideas we wrote on paper
I'm rather finding DMM very useful, it keeps me of writing on the Forums 29hrs per day

Note: depending of one's choice, "He" can be substituted by anything appropriate
right after that He gave us Quarter Window (just to delay recognition of need for AC in cars)
right after that He gave us Paper
then He gave us DMM
paper - to write ideas, DMM to check ideas we wrote on paper
I'm rather finding DMM very useful, it keeps me of writing on the Forums 29hrs per day

Note: depending of one's choice, "He" can be substituted by anything appropriate
Either It came in one or the two kits, or I used standardwhat resistor did you use for the Led's? This will not be the problem, but I just want to know if you stuck to the value given or deviated.
If you are like me, there is also a chance that it becomes just as well to remove everything and start over testing one at a time as you go.
Did you forget the jumper like I did?
I got 15V all dialed in, went to check the rotary switch....no joy. Luckily @ItsAllInMyHead pointed me to this J1 jumper....which I had somehow missed. Jumper in and viola, light and music!
I got 15V all dialed in, went to check the rotary switch....no joy. Luckily @ItsAllInMyHead pointed me to this J1 jumper....which I had somehow missed. Jumper in and viola, light and music!
Last edited:
If I posted a pic of insides of my Iron Pre with tiny sack with jumpers in it "so I wouldn't lose it" you guys would never let me hear the end.
I'm sure I will find something else to screw up
before finish. However once twister working, all that's left is signal wiring. Stand by, I can tear up iron bar.
Try jumper, maybe maybe not works, then signal wiring. Failing that knashing of teeth and picture taking with jumper in place!
I'm sure I will find something else to screw up
before finish. However once twister working, all that's left is signal wiring. Stand by, I can tear up iron bar.
Try jumper, maybe maybe not works, then signal wiring. Failing that knashing of teeth and picture taking with jumper in place!
Russ,
I damned near made the same mistake the Iron Pre, only noticing that a jumper was missing after all was complete. I got lucky and asked the right question from the right person. I wonder just how long it would have taken if I missed the jumper?
And FWIW, I followed my own advice to you about restarting a project in my shop. I had made a mistake and just had to walk away for a few days. Just now got everything apart, soldered the proper switches in, and will put together soon. Kind of a relief, but hard for me to get inspired to rip everything back apart and do it all over again.
yeah
again and again .......... this could be born in just one Country, nowhere else :
View attachment 1289930
Greece?
Germany?
Sure, sure, they look lovely, and you spend a lot of time looking at the mechanicals, close up.
Pfftt..
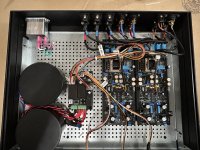
^ Wire management is not my strongest attribute. 
In all seriousness, after I figured out a layout that sorta made sense, it wasn't too big a deal.
If I had it all to do over again... and I won't... there are a few things I might change -
- I used Mogami 2552 for the balanced I/O. With these chassis dimensions and the layout (right and left are "stacked" on the back panel vs. to the left and right of the chassis), I'd opt for something a little thinner to allow tighter bends // shorter cable runs / neater wiring. It could also be my lack of skills and my trepidation to bend it too much or put too much stress on the wires at the boards and jacks.
- I may use a taller chassis to allow stacking the boards and greater separation between the toroids / auxiliary stuff and the boards.
- I might make up some of my own connectors for the Muses boards to allow longer / shorter runs as needed. This still nags at me.
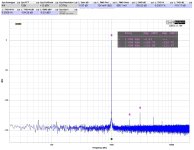
It's got the lid on... and I can't see it... and it's <140dB noise floor (if I did it right). It's fine.
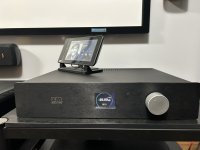
Again... it's no secret that I really like this pre-amp. It's playing now with Lynn's HG follower... nifty stuff.

Last edited:
- Home
- Amplifiers
- Pass Labs
- Iron Pre Essentials Kits For The DIYA Store - Register Your Interest


