Here's a couple of pictures, to get you going.
It does'nt have to be very advanced.
Cheers
Lars
Thanks for the pics, I am looking at a similiar footprint. Looking at giving a 120v 6 rpm microwave turntable motor I have a go to see if it has adequate torgue. If that motor works I would probably change to a 3 rpm one.
Looking for a couple of measurements that would be helpful if anyone knows.
Width of spacers to accomidate 8 lp's?
Height of spindal above top of ulrasonic machine to?
Brad
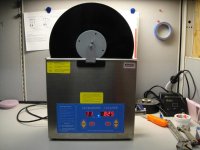
What make and model?Finally bought a ultra sonic cleaner!!! Will post pics over the upcoming month. I have some I think good ideas worked out that I think will be a good contribution.
Brad
I read through this thread with great interest a few months ago, but have hesitated to pay something like $300 price I've seen for a cleaner large enough for LP's. Harbor Freight has a very inexpensive one ($69) that appears just barely too small for the grooves of an LP to be fully immersed into it:
2.5 Liter Ultrasonic Cleaner
A tank that's only slightly larger would be ideal for me, as I would be happy to clean one LP at a time. With my crude homemade vacuum setup (cheap Garrard turntable, Genie brand shop-vac, hose, homemade PVC-pipe-based nozzle), I only clean one LP side then play it immediately so I KNOW it doesn't get any dust on it.
I recall discussion of the idea of making/getting a larger tank and putting a smaller cleaner's transducers on it. Has anyone done this?
Yes, it appears MUCH more power is needed. The ultrasonic cleaner I just linked to says "Maximum output power: 160 watts." Dunno if that's electrical power into the transducers, or the acoustical power into the water, but either way it's a few orders of magnitude greater than the 555 circuit you linked to. I'm familiar with those devices, they are used for, among other things, motion sensors to turn on lights when someone enters a room, and for burglar alarms. It can't be more than 1/10th of a watt electrical power into the transducer.Which brings up the question of what frequency are we looking at? I see transducers are quite cheap in the 40kHz realm (which is what most water bath cleaners I've seen seem to use), as are timer chips. Circuits seem quite simple (e.g. Ultrasonic Transmitter Circuit - www.ECELab.com), so if one could find a bath of adequate size and find a way to isolate/waterproof the transducer circuit, wouldn't DIY of the cleaner machine itself be fairly simple?
Since I'm pretty limited in my electronics background I'm probably missing something here...Thanks for enlightening me!
Carl
Edit - Hmmm, maybe the circuit above isn't quite adequate as it's for a proximity sensor in air. More power?
The drive circuit for an ultrasonic cleaner surely has big power transistors on heat sinks. (anyone have any naked ultrasonic cleaner pics?)
ETA: Here's a (crude ASCII) circuit diagram and description of a certain model cleaner:
http://www.repairfaq.org/sam/samschem.htm#schahv5
Last edited:
Benb,
Yep, that's what I realized shortly after posting. Decided to leave it for educational purposes - there must be others with my electrical (in)aptitude! In any case, I may play around with this to figure out what the cost to homebrew it might be. I've been reading a little about using piezo buzzers as transducers and I've seen them potted in epoxy for hydrophones, so maybe there'd be a lower power way to get the ultrasound source directly into the water. If I do I'll post back, but lots of help would be welcome. Your circuit link proves helpful. Cheers!
Carl
Last edited:
I have no argument, except that some Harbor Freight stuff may be less junky than others. Here are two "review" websites:I bet with a hammer would make that tank big enough to get the entire grooves of a record wet.I have no faith in harbor freight junk though.
Buyer Beware, A Harbor Freight Buying Guide: The Good Enough, The Bad and the Abysmal - ToolCrib.com Blog
Harbor Freight Reviews - Home of Reviews, Ratings, and Comments on Harbor Freight Tools and Equipment
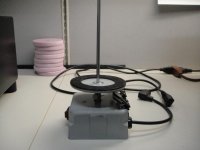
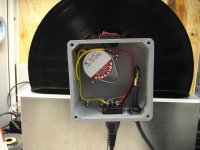
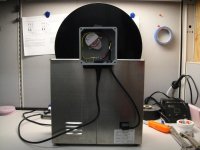
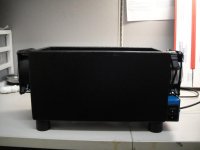
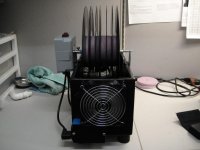
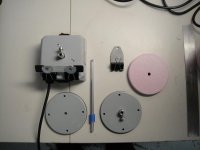
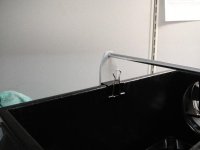
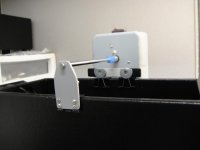
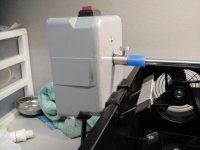
Junction box is used as a stand to load albums.
120v 1 rpm motor.
Added whip to JB so only one cord is needed.
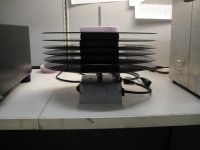
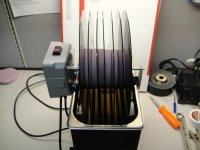
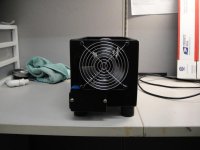
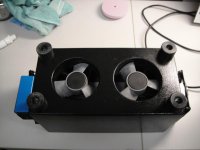
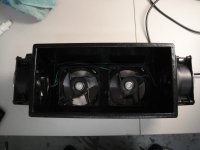
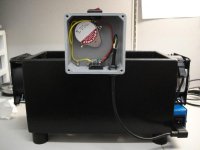
Made box to dry albums. Width is the same as tank, length is slightly longer. Fans are 120v equipment rack fans. Drying time is around five minutes.
120v 1 rpm motor.
Added whip to JB so only one cord is needed.
Made box to dry albums. Width is the same as tank, length is slightly longer. Fans are 120v equipment rack fans. Drying time is around five minutes.
Attachments
-
 DSC01210.jpg45.5 KB · Views: 977
 -
 DSC01211.jpg46.3 KB · Views: 956
 -
 DSC01212.jpg48.6 KB · Views: 951
 -
 DSC01216.jpg42 KB · Views: 458
 -
 DSC01215.jpg63.3 KB · Views: 944
 -
 DSC01214.jpg59.4 KB · Views: 943
 -
 DSC01218.jpg63.2 KB · Views: 395
 -
 DSC01219.jpg57.5 KB · Views: 447
 -
 DSC01221.jpg42 KB · Views: 429
 -
 DSC01222.jpg53.7 KB · Views: 364
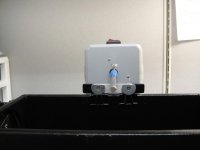
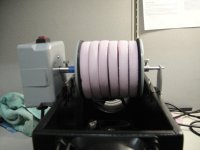
Top and bottom view of dryer. 1" x 1" rubber feet. Blue shallow electrical box with combo swith and plug on side.
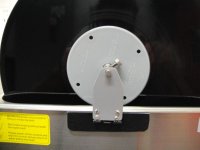
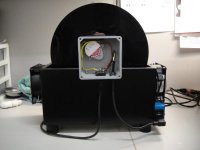
Breakdown of assembly. Pink spacer is 1/2" insulation board.
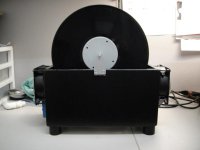
Office clamps make for quick removal for UL cleaner to dryer. Four screw in each office camp.
Breakdown of assembly. Pink spacer is 1/2" insulation board.
Office clamps make for quick removal for UL cleaner to dryer. Four screw in each office camp.
Attachments
-
 DSC01226.jpg57.1 KB · Views: 285
 -
 DSC01225.jpg49.7 KB · Views: 286
 -
 DSC01224.jpg47.3 KB · Views: 365
 -
 DSC01227.jpg48.5 KB · Views: 283
 -
 DSC01228.jpg38.8 KB · Views: 254
 -
 DSC01229.jpg40.6 KB · Views: 283
 -
 DSC01232.jpg37 KB · Views: 262
 -
 DSC01231.jpg35.3 KB · Views: 261
 -
 DSC01230.jpg37.1 KB · Views: 263
Dryer was made with 1/2" birch plywood. A light coat of fiberglass resin was applied before painting. For office clamps to work on UL cleaner, spacers were used on the exterior where clamps go so to keep the clamps square when clamped.
This has been a long awaited project which has proved to be well worth the wait. Thanks to all who have contributed and hope to see some more built.
Brad
This has been a long awaited project which has proved to be well worth the wait. Thanks to all who have contributed and hope to see some more built.
Brad
Attachments
Last edited:
This has been a long awaited project which has proved to be well worth the wait. Thanks to all who have contributed and hope to see some more built.
Brad
Really a great efford there Brad! And a very good design as well.
Are you happy with the cleaning result? Please tell us what your experience are.
Regards
Lars
Hey Lars, I can't say as of now that it cleans better than any other cleaning machines. Will do some testing of friends lp's that have already been cleaned with nitty gritty's and VPI's pretty soon and will report my findings.
My finding so far show some lp's had dramatic differance and others not so much. As we know cleaning won't change a damaged album.
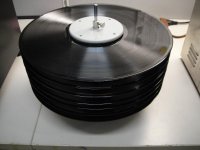
The max my setup can handle is 7 albums. I only did one run with that amount and it felt like the UL action was decreased by doing a finger test (UL action on my finger with one album compared to seven was quite differant). I can say that after cleaning 7 albums at a time there was quite a bit of sediment when settled. Will try 5 albums tomorrow to see if there is a differance. Did you experience similiar whereas more albums cuts down on the UL action?
Tried two differant formula's so far.
1 gallon water, 32 ounce of alcohol, one drop of dishwasher soap.
the other I included two ounces of Sporicidin.
Sporicidin Enzyme Mold Cleaner
It's still early in the game, I have a few more ideas that need to be tried.
Brad
My finding so far show some lp's had dramatic differance and others not so much. As we know cleaning won't change a damaged album.
The max my setup can handle is 7 albums. I only did one run with that amount and it felt like the UL action was decreased by doing a finger test (UL action on my finger with one album compared to seven was quite differant). I can say that after cleaning 7 albums at a time there was quite a bit of sediment when settled. Will try 5 albums tomorrow to see if there is a differance. Did you experience similiar whereas more albums cuts down on the UL action?
Tried two differant formula's so far.
1 gallon water, 32 ounce of alcohol, one drop of dishwasher soap.
the other I included two ounces of Sporicidin.
Sporicidin Enzyme Mold Cleaner
It's still early in the game, I have a few more ideas that need to be tried.
Brad
As far as sediment and cleaning (I thought of this months ago as I read this thread, but I don't think I've posted this idea yet), I'm thinking two successive cleaning runs with the same album(s) would be a good test. Clean out the sediment between runs. If there's sediment on the second cleaning, that's evidence that the first cleaning wasn't long enough to fully clean the albums.
For a cleaning solution I've used Alconox powder, mixed as the maker recommends (IIRC, 1 part by volume to 100 parts distilled water from a dehydrator) in my homebrew vacuum record cleaning machine with good results. It appears to be made for or suggested for ultrasonic cleaning:
Alconox, Inc. - Home: The leader in critical cleaning detergents
I got the quart sized box (apparently the smallest amount they sell online) about ten years ago, it's practically a lifetime supply, unless your LP collection numbers in the tens of thousands.
I suppose additional substances can be added (Photoflo, dishwashing soap, alcohol and/or whatever else), but I've done very little experimenting with that, so I won't guarantee that whatever you mix won't damage LP's. but the Alconox and water mix works well for me.
Last edited:
Will probably give the Alconox powder a try, eBay sells small packets.
Free rinsing caught my eye, found meaning here.
Critical Cleaning - Alconox, Inc.: Defining Free Rinsing
Do you find the need to rinse?
Brad
Free rinsing caught my eye, found meaning here.
Critical Cleaning - Alconox, Inc.: Defining Free Rinsing
Do you find the need to rinse?
Brad
I used a vpi record cleaner to clean all of my albums for a few years then took those same albums and cleaned them with the ultrasonic cleaner and found considerable amounts of debris on the bottom of the ultrasonic cleaner. The lp's seemed cleaner but didn't really sound that much better and in the end i found it was the drying process that made the difference. I have found that the drying process is almost as important as the cleaning.
At first i just let the record dry on its own in a dish rack for 45 min. then played it and found it wasn't that quiet. Next i tried drying it on my VPI record cleaner and it was slightly better but not as good as i had expected. The last method i tried and now use for every album i clean is a home made Loricraft type record cleaner. This completely removes all water that might be in the groove or any deposits that may have been left behind that were suspended in the water. I have actually confirmed this by looking at the album under a microscope. Using the Loricraft type cleaner after the ultrasonic cleaner it removed all water and deposits from the groove and the album sounds much much better. However if the album was allowed to partially dry before the Loricraft type cleaner was used some of the deposits that were in the water would dry back on the album and would effect the sound, so i re-wet the album with Audio Intelligent Vinyl Solutions ultra pure water and it would remove the left behind deposits.The best method i have found is remove the album from the ultrasonic cleaner and put it straight on the Loricraft style cleaner then re-wet with AIVS ultrs pure water and vacuum the water off. Now my albums are the quietest i have ever heard , on some of my older albums i have tracks that have only 1 or 2 small pops or cracks that are audible , when played for some of my friends they don't believe that an album is playing they think it is a CD since it is so quiet.
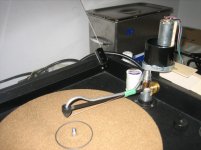
I have posted a shot of my converted VPI to a Lorcraft type cleaner. The unit is a prototype only and just drops right in to the hole that would normally support the suction wand. A stand alone vacuum pump provides the suction that dumps into a glass jar. Simple to build and cost me less than $50 to build including the vacuum pump.
Todd
At first i just let the record dry on its own in a dish rack for 45 min. then played it and found it wasn't that quiet. Next i tried drying it on my VPI record cleaner and it was slightly better but not as good as i had expected. The last method i tried and now use for every album i clean is a home made Loricraft type record cleaner. This completely removes all water that might be in the groove or any deposits that may have been left behind that were suspended in the water. I have actually confirmed this by looking at the album under a microscope. Using the Loricraft type cleaner after the ultrasonic cleaner it removed all water and deposits from the groove and the album sounds much much better. However if the album was allowed to partially dry before the Loricraft type cleaner was used some of the deposits that were in the water would dry back on the album and would effect the sound, so i re-wet the album with Audio Intelligent Vinyl Solutions ultra pure water and it would remove the left behind deposits.The best method i have found is remove the album from the ultrasonic cleaner and put it straight on the Loricraft style cleaner then re-wet with AIVS ultrs pure water and vacuum the water off. Now my albums are the quietest i have ever heard , on some of my older albums i have tracks that have only 1 or 2 small pops or cracks that are audible , when played for some of my friends they don't believe that an album is playing they think it is a CD since it is so quiet.
I have posted a shot of my converted VPI to a Lorcraft type cleaner. The unit is a prototype only and just drops right in to the hole that would normally support the suction wand. A stand alone vacuum pump provides the suction that dumps into a glass jar. Simple to build and cost me less than $50 to build including the vacuum pump.
Todd
Attachments
Very interesting.
In what condition was your vacuum wand? (My own seems to be due for a replacement of its velvet pads...)
Next i tried drying it on my VPI record cleaner and it was slightly better but not as good as i had expected
In what condition was your vacuum wand? (My own seems to be due for a replacement of its velvet pads...)
The velvet strips were brand new and i even replaced them with Mint LP Solutions velvet strips and it was better. The VPI wand distributes the vacuum over the full width of the wand but the Loricraft is over a small single hole area thus it creates a very high velocity rush of air through the grooves at a much higher vacuum that removes the water and debris out of the groove better than anything i have tried. I have dried an album on the Vpi and looked at it under a microscope and could see water still in the groove .Now some people will say just let it sit and dry for a while which is ok but the water has debris in it that gets left behind and causes noise during playback. When i look at the album under the microscope after it comes off the Loricraft type cleaner i see no water residue left behind thus a much cleaner and quieter album.
Also i should mention the o ring on the VPI really helps in keeping the album from picking up dust and debris from the mat when cleaning.
Todd
Also i should mention the o ring on the VPI really helps in keeping the album from picking up dust and debris from the mat when cleaning.
Todd
Last edited:
- Status
- This old topic is closed. If you want to reopen this topic, contact a moderator using the "Report Post" button.
- Home
- Source & Line
- Analogue Source
- I made myself a record cleaner