I'm happy to report that the delay and eq features just added meet my requirements: that is there is sufficient to confirm that a model is within equalization distance of a good response. I do see there is a small problem with filter parameter save. Thanks, David.
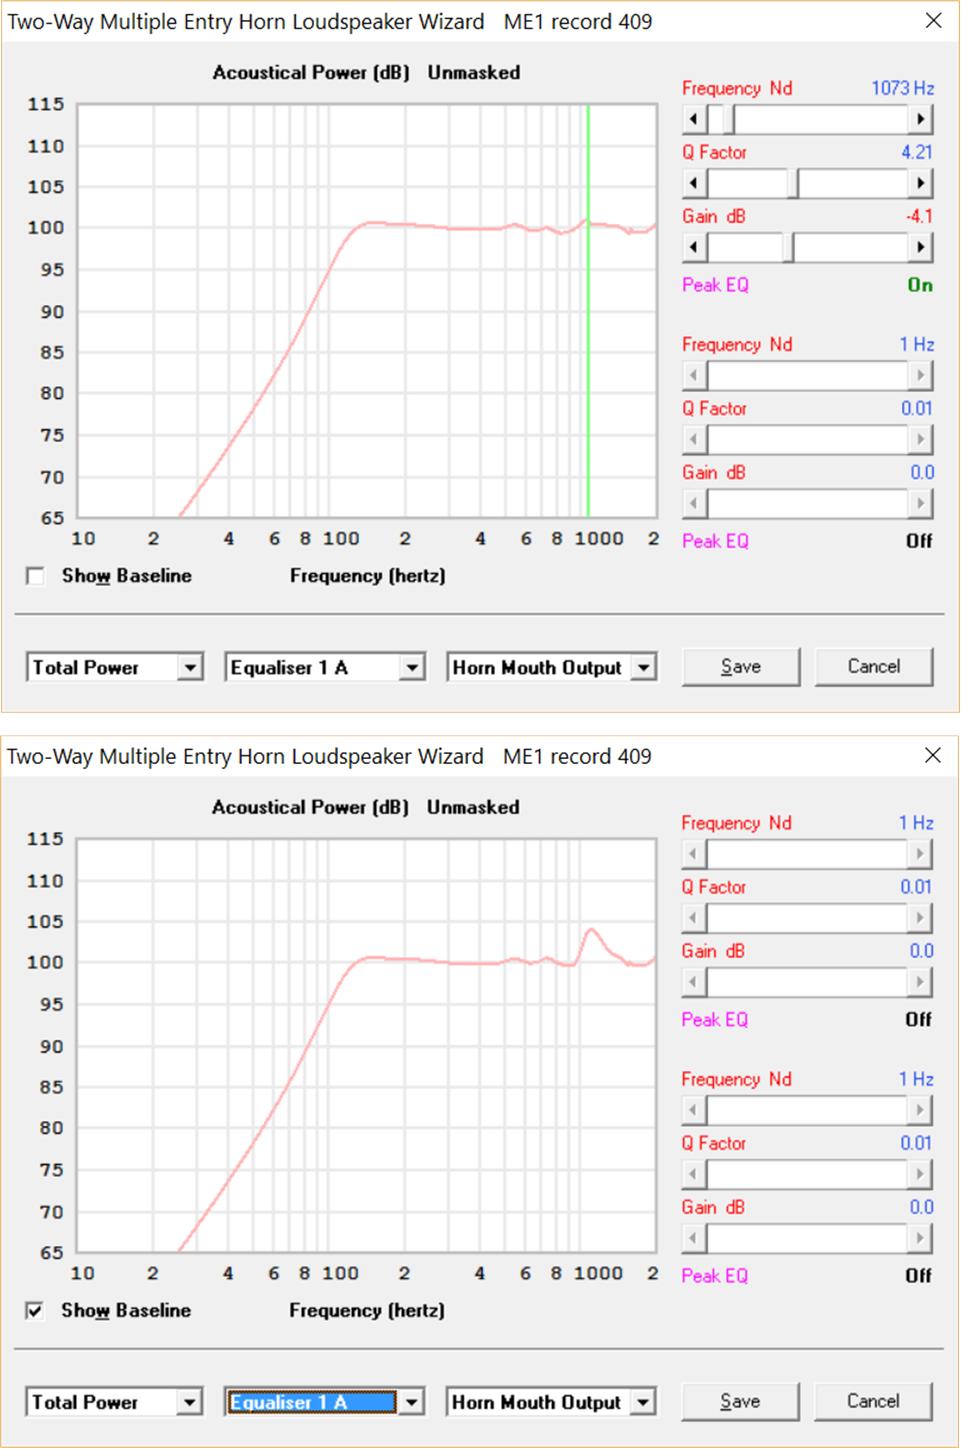
In the top graph, I've used 3 EQ2 PEQs and a single EQ1 PEQ together with some differerntial gain and delay to get a flatter FR than I will likely ever see in a real room. I press "SAVE" to save those settings and then re-open the wizard. After switching to total power display, I see the bottom graph in which the EQ1 PEQ has been both turned off and set to its default settings. Re-tweaking the settings for flat total power and the top picture returns. The other settings apparently remain intact over the save/open loop.
Is it only me that has these save problems? Why me?")
In the top graph, I've used 3 EQ2 PEQs and a single EQ1 PEQ together with some differerntial gain and delay to get a flatter FR than I will likely ever see in a real room. I press "SAVE" to save those settings and then re-open the wizard. After switching to total power display, I see the bottom graph in which the EQ1 PEQ has been both turned off and set to its default settings. Re-tweaking the settings for flat total power and the top picture returns. The other settings apparently remain intact over the save/open loop.
Is it only me that has these save problems? Why me?
Attachments
I'm doing an Intro to Hornresp video, something I've thought about for a few years now but never got around to. This would be for beginners that can't learn well from help files or text based tutorials. Some things might be helpful to people that have been using Hornresp for awhile too.
This is turning out a bit different than I imagined. I thought it would be a simple 15 minute video but my first take turned out to be 2 hours long with a file size of over 2 Gb and I only covered about half of what I want to get to so far. I guess there's a lot to talk about.
I'm looking for a bit of input on what would be useful. Should I cut everything out except the absolute basics? Make it into several shorter videos? Make it long but with bookmarks you can skip to?
I don't even have any idea where to host something with a filesize like this. Not really sure what to do with this.
I think you already know this: one big long video won't work. The info might all be there but few viewers will sit still that long and others won't be able to find the one topic they need help with, to say nothing of the hosting problems you alluded to. A number of short, focused videos will be much better and likely easier to produce. Power point presentations can be effective also, especially if they are annotated, and you can make a video of yourself presenting the slides with the slides keeping you on topic...
Ok, here are some ideas, not only on hornresp, but it could be used to explain, showing sims, a lot of stuff...
How to simulate a budget BP for home, how to simulate a no compromise PA TH, how to simulate a simple unity horn...how to deal with speaker parameters, what looking at to optimise a BR... And some anexe video about speaker choice compromise : Xmax, inductance (non linear with excursion, non show...), or about box characteristics : bandpass lowering distortion, tapped horn using back wave to damp more or less (as bjorno master so much for SQ). How to interpret impedance graph... What the difference between small long throw, or multiple, or big subwoofer (lot of stuff to explain). Subwoofer mass/inductance effect (^^).
I've readen here a lot of interesting stuff, that JAG have proven his wish to fight for his understanding of it. Lot of those stuff i didn't understood 1 year ago...
Bounce
The first video should be an overview to David's program.
Here you want to present a comprehensive but concise and well organized structure to introduce the two sets of segments that are to follow:
1 The Functional group that contains segments to address specific program horn design functions; e.g., Back Chambers, Front Chambers & Phase Plugs, Throat Profiles, Horn Folds/Bends, Body Segmentation, Mouth Bells, Driver Types, Driver Parameters, Driver Selection. Also issues concerning Pattern Control, Reflectance Reduction. HOM Mitigation, Driver Loading and Horn sizing should be addressed.
2. The Application group that contains segments to address specific Design applications; e.g. Straight Horns: Bass, Midrange, High frequency; Folded Corner Bass, and Midrange Horns; Tapped Bass Horns, Multi-Driver Synergy Horns.
This is what comes to mind at the moment.
I am sure there is more to add and other ways to 'slice the pie'.
Regards,
WHG
I'm doing an Intro to Hornresp video, something I've thought about for a few years now but never got around to. This would be for beginners that can't learn well from help files or text based tutorials. Some things might be helpful to people that have been using Hornresp for awhile too.
This is turning out a bit different than I imagined. I thought it would be a simple 15 minute video but my first take turned out to be 2 hours long with a file size of over 2 Gb and I only covered about half of what I want to get to so far. I guess there's a lot to talk about.
I'm looking for a bit of input on what would be useful. Should I cut everything out except the absolute basics? Make it into several shorter videos? Make it long but with bookmarks you can skip to?
I don't even have any idea where to host something with a filesize like this. Not really sure what to do with this.
The first video should be an overview to David's program.
Here you want to present a comprehensive but concise and well organized structure to introduce the two sets of segments that are to follow:
1 The Functional group that contains segments to address specific program horn design functions; e.g., Back Chambers, Front Chambers & Phase Plugs, Throat Profiles, Horn Folds/Bends, Body Segmentation, Mouth Bells, Driver Types, Driver Parameters, Driver Selection. Also issues concerning Pattern Control, Reflectance Reduction. HOM Mitigation, Driver Loading and Horn sizing should be addressed.
2. The Application group that contains segments to address specific Design applications; e.g. Straight Horns: Bass, Midrange, High frequency; Folded Corner Bass, and Midrange Horns; Tapped Bass Horns, Multi-Driver Synergy Horns.
This is what comes to mind at the moment.
I am sure there is more to add and other ways to 'slice the pie'.
Regards,
WHG
Last edited:
Thanks for the suggestions. Like you guys, I thought it would be pretty easy to go through a lot of information very quickly.
But then I started recording and found out it's not like that at all. I clipped off the first half hour of what I recorded and it only covers download, install, set Ang and Eg, enter t/s, explain the input boxes used for a sealed box, briefly describe the different graphs that are produced and briefly walk through the loudspeaker wizard.
That's absolute basics with a very quick look at a Vbox = Vas sealed design. THAT'S IT. And it took up 1/2 hour.
If I scrap all the rest of what I recorded and do the next part over, I could cover a simple ported box, straight, positive and negative taper tl, flh, tapped horn, OB (flat baffle U frame, H frame), 4th and 6th order bandpass in the next 1/2 hour - 1 hour segment. And that's not optimized designs, that's grabbing the dimension data from MJK's alignment tables and Soho54's EZ horn, entering a design, looking at the graphs for a second and moving on to the next design. Basically just covering how to input the parameters for each alignment, looking at what the graphs should look like and that's it.
That would eat up another 1/2 hour - 1 hour. And it's still just barely skimming the basics.
I don't really want to do this as an unpaid job, writing up scripts alone would take probably a full day per 1/2 hour episode, then recording and editting would take up another day per episode.
What I have now is not great, it's stream of consciousness, no real specific order, rhyme or reason, the audio is not very good and there's a couple of rough edits (I've never made a video before, I'm learning this as I go, and the sum total of my experience is what I did today.)
The topics you guys have suggested sound more like a full week seminar than a youtube video.
I'll see if I can upload my first video so you can see what I'm talking about. I just have to find somewhere to host it. It's 113 Mb. I've never uploaded to youtube before, maybe I'll try to figure that out tonight.
I uploaded the first part to youtube. Be prepared for really bad audio - sorry. This is my first time.
This gives an idea how much time is wasted on the absolute basics. 1/2 hour here and hardly anything got covered.
Thoughts? Suggestions? Should I just stop now? (LOL, probably I should.)
https://www.youtube.com/watch?v=eMpX3lRdm3w
This gives an idea how much time is wasted on the absolute basics. 1/2 hour here and hardly anything got covered.
Thoughts? Suggestions? Should I just stop now? (LOL, probably I should.)
https://www.youtube.com/watch?v=eMpX3lRdm3w
Last edited:
@ just a guy
First off, Great idea & Very nice of you to consider doing it, so Thanx upfront
I don't think you need to spend time on the basic, basics, such as download/install & entering T/S. People should already know how to do that. If they don't, then HR might not be for them !
What i think would Definately be useful is, showing how to input & design all the various options. I would start with the less difficult ones & then move on to the others, but with a popularity build bias. For eg,
1 - Closed box
2 - Ported
3 - TL's - various types not just tapers.
4 - TH's
5 - BP's
6 - Synergy's
7 - FLH
8 - BLH
9 - OB's
10 - Passive radiator
A video is an option, but instead step by step Clear screenshots with arrows & text might be a viable & less time consuming alternative. Plus the file size & bandwith would be a Lot less.
All the best with this
I havn't seen the vid yet, but will later on today hopefully
@ just a guy
First off, Great idea & Very nice of you to consider doing it, so Thanx upfront
I don't think you need to spend time on the basic, basics, such as download/install & entering T/S. People should already know how to do that. If they don't, then HR might not be for them !
I've seen quite a few people over the years download Hornresp, take one look at the input screen, say Nuh uh, delete Hornresp and that's the end of their Hornresp experience. Then they either quit totally or move on to WinISD or some junk like that. That is unfortunate, and that's actually the main reason I wanted to do this. I've also had a few people tell me they don't learn well by reading, whether that's reading a paper, a powerpoint presentation or anything else. The kids today are all about video. But ...
What i think would Definately be useful is, showing how to input & design all the various options. I would start with the less difficult ones & then move on to the others, but with a popularity build bias. For eg,
1 - Closed box
2 - Ported
3 - TL's - various types not just tapers.
4 - TH's
5 - BP's
6 - Synergy's
7 - FLH
8 - BLH
9 - OB's
10 - Passive radiator
A video is an option, but instead step by step Clear screenshots with arrows & text might be a viable & less time consuming alternative. Plus the file size & bandwith would be a Lot less.
All the best with this
I havn't seen the vid yet, but will later on today hopefully
For the people that know the basic basics they could skip the first video and then the second one would be about all the other stuff you mentioned here.
Anyway, I just watched the video I posted start to finish for the first time and ... it's really bad. I don't really think I have much future in this. I don't think anybody will want to watch that. To be honest I didn't want to watch it. I think for somethng like this to work it has to be scripted and that's a HUGE amount of work that I don't really want to do. The audio definitely needs a higher production value as well but I don't have a mic.
Last edited:
using the new delay feature with negative ME2 delay, i get desired acoustic power really coherent with Akabak sim.
That is excellent news
.we cannot have BPF and EQ at the same time=> So activating BPF turn off EQ automatically, and so desactivating BPF does not reactivate EQ...
Hi papasteack,
I thought things would be less confusing that way
.The functionality can be easily be changed to allow band pass filters and parametric equalisers be used together. Would this be better?
Kind regards,
David
Birdy, birdy in the sky, dropped some white-wash in my eye, thank god elephants don't fly. (Circa 1040's)
The quote obviously pre-dates Dumbo (1941)
.Attachments


Hi Jack,
Excellent.
This is very strange indeed. I tried exactly the same sequence of events and the slider settings for all four parametric equalisers (1 x 1A, 2 x 2A and 1 x 2B) were retained over the save/open cycle. I have no idea why you should be having these problems, but I will continue to search for possible reasons.
What happens if you use the first 1A equaliser only (single EQ1), with the other seven equalisers turned off. Are the single EQ1 settings lost in this case?
Just lucky, I guess.
Kind regards,
David
I'm happy to report that the delay and eq features just added meet my requirements: that is there is sufficient to confirm that a model is within equalization distance of a good response.
Excellent
.In the top graph, I've used 3 EQ2 PEQs and a single EQ1 PEQ together with some differerntial gain and delay to get a flatter FR than I will likely ever see in a real room. I press "SAVE" to save those settings and then re-open the wizard. After switching to total power display, I see the bottom graph in which the EQ1 PEQ has been both turned off and set to its default settings. Re-tweaking the settings for flat total power and the top picture returns. The other settings apparently remain intact over the save/open loop.
This is very strange indeed. I tried exactly the same sequence of events and the slider settings for all four parametric equalisers (1 x 1A, 2 x 2A and 1 x 2B) were retained over the save/open cycle. I have no idea why you should be having these problems, but I will continue to search for possible reasons.
What happens if you use the first 1A equaliser only (single EQ1), with the other seven equalisers turned off. Are the single EQ1 settings lost in this case?
Why me?
Just lucky, I guess
.Kind regards,
David
Well thanks that does seem to make sense and the result is a lot more reasonable. Clearly I was thinking the same thing as Andrew T.
The correlation to MJK is still very poor though, not sure if the reason is because of Hornresp's circular baffle vs MJK's square, or diffraction, or something else.
Hi just a guy,
Now that I have five minutes to spare, I thought it might be worthwhile re-visiting the finite flat baffle simulation question. My initial response was really just an 'off the cuff' suggestion to get the results to better match
. I can see now how my Post #6558 could be quite misleading and potentially confusing, and really requires further clarification / qualification.As far as the true theoretical path length difference is concerned, you are correct in thinking the same as Andrew T
. Pythagoras does indeed rule when the listener is at a distance from the loudspeaker.In the case of Hornresp, if the diameter (width) of the finite circular baffle is W and the listener is on-axis one metre away from the loudspeaker, then the path length difference in metres from the front and rear sides of the driver diaphragm to the listener is given by:
Path length difference = W / 2 + ((W / 2) ^ 2 + 1) ^ 0.5 - 1
Where:
Term 1 or W / 2 is the straight-line path length from the rear side of the diaphragm point source to the edge of the baffle.
Term 2 or ((W / 2) ^ 2 + 1) ^ 0.5 is the straight-line path length from the edge of the baffle to the listener (thanks to Pythagoras).
Term 3 or 1 is the straight-line path length from the front side of the diaphragm to the listener.
If the baffle is 1 metre in diameter then the path length difference becomes:
1 / 2 + ((1 / 2) ^ 2 + 1) ^ 0.5 - 1 = 0.62 m.
The result for a circular baffle as simulated by Hornresp will be quite different to that for a square or rectangular baffle. Indeed the very worst shape for an open baffle is circular because the sound from the rear arrives at the front at the same time whichever radial path is taken. At those frequencies where the radial path length is a multiple of the wavelength the front radiation is partially cancelled, causing a comb filter effect. This effect will be considerably "smeared" when a rectangular baffle is used and the driver is offset from the centre.
Kind regards,
David
EDIT
I guess a circular baffle with the driver offset from the centre might make things a bit better
.
Last edited:
Hi just a guy,
The area of the flat baffle is equal to S1, so for your example the baffle radius is Sqrt(3716 / Pi) = 34.4 cm.
The driver is analysed as a point source which means that the path length difference from the front to rear sides of the diaphragm, around the baffle, is 2 times the radius of the baffle, or 68.8 cm. Using that path length difference gives the combined power response result shown in the attachment.
Kind regards,
David
What does the program require us to enter as the Path value?Hi just a guy,
Now that I have five minutes to spare, I thought it might be worthwhile re-visiting the finite flat baffle simulation question. My initial response was really just an 'off the cuff' suggestion to get the results to better match
As far as the true theoretical path length difference is concerned, you are correct in thinking the same as Andrew T
In the case of Hornresp, if the diameter (width) of the finite circular baffle is W and the listener is on-axis one metre away from the loudspeaker, then the path length difference in metres from the front and rear sides of the driver diaphragm to the listener is given by:
Path length difference = W / 2 + ((W / 2) ^ 2 + 1) ^ 0.5 - 1
Where:
Term 1 or W / 2 is the straight-line path length from the rear side of the diaphragm point source to the edge of the baffle.
Term 2 or ((W / 2) ^ 2 + 1) ^ 0.5 is the straight-line path length from the edge of the baffle to the listener (thanks to Pythagoras).
Term 3 or 1 is the straight-line path length from the front side of the diaphragm to the listener.
If the baffle is 1 metre in diameter then the path length difference becomes:
1 / 2 + ((1 / 2) ^ 2 + 1) ^ 0.5 - 1 = 0.62 m.
The result for a circular baffle as simulated by Hornresp will be quite different to that for a square or rectangular baffle. Indeed the very worst shape for an open baffle is circular because the sound from the rear arrives at the front at the same time whichever radial path is taken. At those frequencies where the radial path length is a multiple of the wavelength the front radiation is partially cancelled, causing a comb filter effect. This effect will be considerably "smeared" when a rectangular baffle is used and the driver is offset from the centre.
Kind regards,
David
EDIT
I guess a circular baffle with the driver offset from the centre might make things a bit better
;-)
When I was a young boy, all I got from Walt was a Pinocchio.
Regards,
WHG
The quote obviously pre-dates Dumbo (1941)
When I was a young boy, all I got from Walt was a Pinocchio.
Regards,
WHG
Attachments

Last edited:
Hi Jack,
Excellent
This is very strange indeed. I tried exactly the same sequence of events and the slider settings for all four parametric equalisers (1 x 1A, 2 x 2A and 1 x 2B) were retained over the save/open cycle. I have no idea why you should be having these problems, but I will continue to search for possible reasons.
What happens if you use the first 1A equaliser only (single EQ1), with the other seven equalisers turned off. Are the single EQ1 settings lost in this case?
Just lucky, I guess
Kind regards,
David
I zeroed out EQ2A and EQ2B, made some settings in EQ1A and EQ1B. saveded and re-opened and both the EQ1A and EQ1B settings were back to default.
I hadn't used EQ2B before so I made settings there, saved and re-opened, and verified those settings were unchanged.
For the record, my BPF and amp settings are preserved through the cycle.
Lucky
The result for a circular baffle as simulated by Hornresp will be quite different to that for a square or rectangular baffle. Indeed the very worst shape for an open baffle is circular because the sound from the rear arrives at the front at the same time whichever radial path is taken. At those frequencies where the radial path length is a multiple of the wavelength the front radiation is partially cancelled, causing a comb filter effect. This effect will be considerably "smeared" when a rectangular baffle is used and the driver is offset from the centre.
Hence the rational around the standard IEC baffles. Both shape and driver positions are optimised to best effect.
The functionality can be easily be changed to allow band pass filters and parametric equalisers be used together. Would this be better?
Hi David,
That would be very helpful to see how the combination of both would alter response, delay, excursion, etc. like in the real world when a HPF, LPF and EQ are used in conjunction.
How time-consuming would it be to include phase response in the filter wizard?
Never-ending thanks for your tremendous contributions
Cheers!
Hi David,
Never-ending thanks for your tremendous contributions
Cheers!
+1!
- Home
- Loudspeakers
- Subwoofers
- Hornresp