So nice to see you back at this one John. I hope the forum has helped give you that little, sometimes needed push. I know it does for me.
Wouldn't those be equilateral?
so I have six isosceles triangles horizontally.
Wouldn't those be equilateral?
So nice to see you back at this one John. I hope the forum has helped give you that little, sometimes needed push. I know it does for me.
Wouldn't those be equilateral?
You're correct Cal. It really is an equilateral triangle. And even though it is also an isosceles triangle, it is only so in an equilateral one. Slap my face!
And yes, some of the members have been a bit insistent with me. One of the contributers earlier on this thread is a member at my political forum, and he occasionally gives me a jab, just to keep me alert.
But the truth is that I have several ulterior motives for finishing this project. One is that my grandson is going to turn twelve in July, and he is very musically inclined. he is a saxophone player in his school band, so he would really appreciate something like this.
I'm also going to give him a tube amplifier to go with it. His dad is one of those 'more is better' guys, who just spent a thousand dollars on one of those new fangled home theatre receivers. I just can't get him interested in something a nonessential as tubes. Go figure.
And secondly, I am not really all that happy with the way the finished cabinet width finished out. I can just barely fit a 12" driver into it, and its uncomfortably close. And too, the cabinet is just too tall. If I use the left drawing, which I like best, the units will be 59" tall. That's just a little bit too tall for someone sitting down. I'm even considering building a jig and cutting them down about six or seven inches. It wouldn't be hard to do. Their height also makes for a lot of interior space that really is not necessary. At over 3 3/4 cu/ft, that is an awful lot of space behind the driver.
Also, I just don't particularly like that ugly walnut. The pattern on the cabinet is best for bringing out the character of the wood, but it is still walnut. I just don't understand what people see in that dark, dreary, stuff. I want something that makes the cabinets really stand out and invite people look closeily.
But lastly, I just hate having them sitting around, reminding me of my failure to complete them. I see them every day I work in my basement shop, and they are like a nagging woman. One can only put up with just so much of that before a) getting up and leaving; b) throwing the thing out; c) pulling out a gun and using it to good effect, or 4) just biting the bullet and doing what was started.
Oh, one other thing. I have made a lot of mistakes on these units, and have learned that there are better ways to make them look, and sound, better. The next pair would benefit from my experience here.
Anyway, thanks for the input. Feel free to jump in anytime, ok?
Which one of the two drawings do you like best: the left one, or the right one?
Well, John, the left one. But...seems like there's a lot more going on than just the aesthetics between the two, so even given the other differences, I'd say that one has a lot of promise - along with substantially more effort and cost. Cheers.
Well, John, the left one. But...seems like there's a lot more going on than just the aesthetics between the two, so even given the other differences, I'd say that one has a lot of promise - along with substantially more effort and cost. Cheers.
I think the left one would be a bit easier to make, to be honest. With that one, I only need to make one mold. Then pour pairs, turn one over and stack their bases together, and the rest is straight forward.
I have quite a bit of that walnut veneer left over. I'm not sure, but probably enough to make another cabinet with it. Having all that walnut would make it easy for me to construct a top piece from scratch. Or I could even cut off seven inches from the top of the cabinet and us it.
Yup, nag, nag, nag. I know the feeling well.But lastly, I just hate having them sitting around, reminding me of my failure to complete them.
Glad to know you're human.Oh, one other thing. I have made a lot of mistakes on these units,
Isn't that the truth. Speakers contribute the highest amount of "If I had only..." in my life.The next pair would benefit from my experience here.
Speakers contribute the highest amount of "If I had only..." in my life.
save that thought for your 40th wedding anniversary - or maybe revise to "if only I hadn't"

I've done some pouring the last few days, and only need to finish the second half to the top section, which I probably won't use. I like the second speaker in my drawing and will probably work toward that end.
Two nights ago I poured the lower lense section. Instead of pouring it all at once, with a wetter slurry, I did it in smaller portions in order to build up the plaster, then add the wooden outer sections, and continue doing this until I reached the top. As soon as each small batch was poured, I would immediately begin on another small portion. That way I could ensure getting all the wooden fillers set in the box. I used the wood fillers because I didn't want the plaster cast to be too heavy to work with, but its still heavy.
The morning after pouring the bottom lense, I used a metal straight edge(framing square) and scrapped across the cast frame in order to get rid of any uneven plaster. Then I left it to harden up more.
This evening I put the mold on my work table, and attached a lid over the mold where I had poured in the plaster. I countersunk holes and then screwed in 2" screws, all around the top edge. Then I turned the mold over, and removed what was the wooden bottom. By doing this the base was now the top. I just reversed the mold. Here is what greeted me.
If you look closely at the bottom right, you can see where the plaster failed to flow evenly into the mold on my first pouring. I had waited just a little too long to pour it, and some air bubbles must have gotten trapped. It shouldn't make any difference.
The next thing I did was cut four wooden triangles and use my Duo-Fast stapler to staple them to the corners of what was now the top. I did this so the 'blank' would be able to drop out of the silicone. I also took some extra 2" polyfoam lying around from an old job I did for a designer client. I took my electric knife and cut out a piece that fit nicely inside the wooden triangles. That way, when I turned the mold upside down and tapped it, the green ware ceramic 'blank' would fall out on to the polyfoam and not break.
Frankly, I didn't know what would happen, but I didn't think it would break when it came loose from the silicone. I turned it over, gave the frame about three hits on the sides, and lifted the frame. I couldn't tell if the 'blank' had come out, so I lifted the mold higher and there it was, sitting neatly on top of the polyfoam. And best of all, there was no damage to it, so I can use it again in the future. Wonders never cease.
And here's the mold, on its side, with the silicone still neatly sitting in the plaster. So far so good.
And here's the inside of the mold, warts and all. At the bottom, which used to be the top of the 'blank', somehow the plaster cracked and there were bubbles that left a few low places. I'm not sure what to do there, but perhaps I can just work around them.
My two biggest mistakes this time around are all related to the silicone. First, I should have ordered twice the silicone, so I would have a more robust, and flexible inner mold. Secondly, and by far worse, was the fact that I slit the side of the silicone. That was a huge mistake on my part, because I really didn't need to take that precaution. Now I will not only have a seam to contend with, but I will have to use something to keep the bottom of the silicone mold(the actual point of the lense) from spreading apart more. Had I not cut a seam, I wouldn't have this trouble at all. Oh well, live and learn.
Now I will have to wait for a couple of weeks for the plaster to cure enough and lose a lot of the moisture still in the plaster. I'm sure the mold will weigh less when it cures.
In the meantime, I just might decide to make another mold of the lense, and do it right this time. I can probably get by with what I have, but want to learn as much as I can while I am building this project. And the cost will have been worth it. After all, the hard way is the way that sticks around for all time.
Two nights ago I poured the lower lense section. Instead of pouring it all at once, with a wetter slurry, I did it in smaller portions in order to build up the plaster, then add the wooden outer sections, and continue doing this until I reached the top. As soon as each small batch was poured, I would immediately begin on another small portion. That way I could ensure getting all the wooden fillers set in the box. I used the wood fillers because I didn't want the plaster cast to be too heavy to work with, but its still heavy.
The morning after pouring the bottom lense, I used a metal straight edge(framing square) and scrapped across the cast frame in order to get rid of any uneven plaster. Then I left it to harden up more.
This evening I put the mold on my work table, and attached a lid over the mold where I had poured in the plaster. I countersunk holes and then screwed in 2" screws, all around the top edge. Then I turned the mold over, and removed what was the wooden bottom. By doing this the base was now the top. I just reversed the mold. Here is what greeted me.
An externally hosted image should be here but it was not working when we last tested it.
An externally hosted image should be here but it was not working when we last tested it.
If you look closely at the bottom right, you can see where the plaster failed to flow evenly into the mold on my first pouring. I had waited just a little too long to pour it, and some air bubbles must have gotten trapped. It shouldn't make any difference.
The next thing I did was cut four wooden triangles and use my Duo-Fast stapler to staple them to the corners of what was now the top. I did this so the 'blank' would be able to drop out of the silicone. I also took some extra 2" polyfoam lying around from an old job I did for a designer client. I took my electric knife and cut out a piece that fit nicely inside the wooden triangles. That way, when I turned the mold upside down and tapped it, the green ware ceramic 'blank' would fall out on to the polyfoam and not break.
Frankly, I didn't know what would happen, but I didn't think it would break when it came loose from the silicone. I turned it over, gave the frame about three hits on the sides, and lifted the frame. I couldn't tell if the 'blank' had come out, so I lifted the mold higher and there it was, sitting neatly on top of the polyfoam. And best of all, there was no damage to it, so I can use it again in the future. Wonders never cease.
An externally hosted image should be here but it was not working when we last tested it.
And here's the mold, on its side, with the silicone still neatly sitting in the plaster. So far so good.
An externally hosted image should be here but it was not working when we last tested it.
And here's the inside of the mold, warts and all. At the bottom, which used to be the top of the 'blank', somehow the plaster cracked and there were bubbles that left a few low places. I'm not sure what to do there, but perhaps I can just work around them.
An externally hosted image should be here but it was not working when we last tested it.
My two biggest mistakes this time around are all related to the silicone. First, I should have ordered twice the silicone, so I would have a more robust, and flexible inner mold. Secondly, and by far worse, was the fact that I slit the side of the silicone. That was a huge mistake on my part, because I really didn't need to take that precaution. Now I will not only have a seam to contend with, but I will have to use something to keep the bottom of the silicone mold(the actual point of the lense) from spreading apart more. Had I not cut a seam, I wouldn't have this trouble at all. Oh well, live and learn.
Now I will have to wait for a couple of weeks for the plaster to cure enough and lose a lot of the moisture still in the plaster. I'm sure the mold will weigh less when it cures.
In the meantime, I just might decide to make another mold of the lense, and do it right this time. I can probably get by with what I have, but want to learn as much as I can while I am building this project. And the cost will have been worth it. After all, the hard way is the way that sticks around for all time.
And here's the inside of the mold, warts and all. At the bottom, which used to be the top of the 'blank', somehow the plaster cracked and there were bubbles that left a few low places. I'm not sure what to do there, but perhaps I can just work around them.
Herein is where the silicone might be of service even though this project doesn't have the detail and overhangs that make silicone especially useful - particularly if you do it again without slitting it. The cracks and bubbles in the plaster shouldn't cause any real harm since the plaster isn't the moulding surface. Such a load of plaster will almost always crack due to shrinkage and temperature changes, but the silicone inner will provide a smooth casting surface.
Keep it up, John.
Sigh, I had written up a nice long post, commenting about more things, and I accidentally erased it all, while editing it. I was moving back and forth, and I just screwed up.
I'll try to repost it when I can feel better about all the wasted time. And it was all my fault. Again........Sigh.
I'll try to repost it when I can feel better about all the wasted time. And it was all my fault. Again........Sigh.
An externally hosted image should be here but it was not working when we last tested it.
I just wanted to let you all know that I have reordered more silicone, and it has been over a week now, but it has not arrived yet. I am going to do this a little different,in that I have ordered twice the amount of silicone, so as to have a more sturdy inner mold. And instead of using more plaster, I'll go with a urethane outer 'mother mold' which is much lighter and easier to handle.
I don't believe I have mentioned this, but I also have another, yet smaller, lense portion, I had thought of using for a smaller project, before taking my leave of absence. Where the one in the picture above is 13.5" in diameter, this one is right at 11.5".
Here is a picture:
It had been sitting in the back corner of my walk-in closet. While comparing it to the larger one, and letting my mind roam, I remembered that I was still having trouble thinking of a good way to suspend the lense assembly with six metal tubes. Originally I had planned on drilling recesses into the lense and letting the tubes sit firmly into that recess, anchored by a metal washer.
But I had another problem as well. The larger part of the lense is 13.5" in diameter, which is the hexagon's shortest point(measured from half way between the two corners of a side, and over to the opposite side. Somehow the diameter of the lense did not look as pleasing as it would if the diameter had been 16", which is the distance between each corner and its opposite on the other side of the cabinet. Were I to be able to come up with a larger lense, I would not only be able to have a larger one, but also have a means of moving the supporting rods out further toward the corners. But I didn't know how I was going to be able to do this.
And then, right before going to sleep, I had an answer. I could make an outer section, made of high grade plywood, and support the lense from the outer section. But how was I going to affix the outer section to the inner lense? Well, here is where the smaller lense comes in.
If you go back to the image at this post, you are able to see how it is done at Duevel. The Sirius uses two lense assemblies, the bottom one deflecting sound, and an upper one that appears to be channeling the high frequencies. I don't believe this one is critical, and I am going to stick with just one main lense.
But if you look at how the outer section is set up, it is different from the bottom one. On the upper lense assembly, the outer section is partially cut away, leaving the lower section to support the entire lense. This is very straight forward, and easily obtainable. All I would have to do would be to use two 1/4" pieces of plywood, and cutting different size holes to accommodate two different size lenses, which would be glued together. But how could I come up with a smaller lense.
Well, I already have one. It is the smaller one that was sitting in my closet. If I were able to make a smaller lense, and use it as the one facing downward, and also make the larger one, used as the one facing upward, I would be able to create an outer wooden section that would support the entire assembly. I could take the two pieces of plywood, use my router and accurately cut a 16" outer shape. Then I could cut out the holes for each half of the lense, and glue them together. That way the smaller diameter section would be able to support the urethane resin lense assembly. And I could do all of my drilling into the wood, not the urethane lense. It would look exactly like the outer section of the upper lense in the picture.
Here are some videos, which do a better job of explaining how I will make the mold for each of the two parts. I don't plan on using the PolyTec resin used in this video, but the videos made by this business are the best I could find, which explain how all this is done.
Making a brush on mold with silicone
Making a Resin Support Mold.
Here is also a good video, by the same people. But instead of a one piece mold, it shows how to make a two piece. Of particular interest is how they use the outer shell, and drill holes in the two pieces of the resin mother mold, so nuts and boles can keep the two pieces together. The lense shaped side, which is for making the outer lense, is the most important piece for my needs.
Mold Making Techniques: Resin Mothermold Process
I still will need a second part of the mold, so I can build up an inner bottom base, where I can glue the two pieces together. But I think I can use a flat board, or plastic sheet, which has been well sealed and finished. Before I clamp the two pieces, I can cut a large hole in the center of the base, allowing me to pour in each mixture, and use a brush-on technique, rather than strictly a pour-on one. A second sheet of the same shape, but with only several small overflow holes could be used later for filling in the center of the mold with expanding urethane foam, and allow the excess foam to escape through the holes.
I will be able to pour the first coat into the large hole, which could have a bronze powder mixed into the urethane, for a metallic outer look. Or I could use pecan shell powder, which this sold by most of the resin suppliers, and can be applied just like the bronze powder to give it a wood grain effect. Then I can spread it around the entire mold so as to completely coat the surfaces.
Don't forget to check out Daisy-Mae with the big boobs in one of the other YouTube videos.
Rather than pour in a solid inner portion, I will keep brushing on several more coats to the inner surface, and remaining applications can be of regular resin, which is less expensive, and not seen. This video shows how bronze powder is used in the technique I want to use.
Resin Casting: Cold Cast Bronze Process
After brushing on several coats of resin, in order to make the shell solid and sturdy, I can either leave it hollow, or pour in a urethane foam, which would expand inside the mold, and then harden. I could then break off any overflow, remove the flat portion of the mold first, and then the main mold will be able to come out of the main mold.
Here is a video, showing how a solid urethane foam is used in a smaller mold, without applying a hard outer coating: Casting with PolyFoam .
I like the way the bottom part of the main mold has been cut away to allow the use of fingers for demolding the finished resin casting.
I'm sure I have left out some important parts of what I'm going to do. Please feel free to make suggestions, or ask questions. Once the silicone arrives, I'll start making the two parts of the lense assembly molds.
I don't believe I have mentioned this, but I also have another, yet smaller, lense portion, I had thought of using for a smaller project, before taking my leave of absence. Where the one in the picture above is 13.5" in diameter, this one is right at 11.5".
Here is a picture:
An externally hosted image should be here but it was not working when we last tested it.
It had been sitting in the back corner of my walk-in closet. While comparing it to the larger one, and letting my mind roam, I remembered that I was still having trouble thinking of a good way to suspend the lense assembly with six metal tubes. Originally I had planned on drilling recesses into the lense and letting the tubes sit firmly into that recess, anchored by a metal washer.
But I had another problem as well. The larger part of the lense is 13.5" in diameter, which is the hexagon's shortest point(measured from half way between the two corners of a side, and over to the opposite side. Somehow the diameter of the lense did not look as pleasing as it would if the diameter had been 16", which is the distance between each corner and its opposite on the other side of the cabinet. Were I to be able to come up with a larger lense, I would not only be able to have a larger one, but also have a means of moving the supporting rods out further toward the corners. But I didn't know how I was going to be able to do this.
And then, right before going to sleep, I had an answer. I could make an outer section, made of high grade plywood, and support the lense from the outer section. But how was I going to affix the outer section to the inner lense? Well, here is where the smaller lense comes in.
If you go back to the image at this post, you are able to see how it is done at Duevel. The Sirius uses two lense assemblies, the bottom one deflecting sound, and an upper one that appears to be channeling the high frequencies. I don't believe this one is critical, and I am going to stick with just one main lense.
But if you look at how the outer section is set up, it is different from the bottom one. On the upper lense assembly, the outer section is partially cut away, leaving the lower section to support the entire lense. This is very straight forward, and easily obtainable. All I would have to do would be to use two 1/4" pieces of plywood, and cutting different size holes to accommodate two different size lenses, which would be glued together. But how could I come up with a smaller lense.
Well, I already have one. It is the smaller one that was sitting in my closet. If I were able to make a smaller lense, and use it as the one facing downward, and also make the larger one, used as the one facing upward, I would be able to create an outer wooden section that would support the entire assembly. I could take the two pieces of plywood, use my router and accurately cut a 16" outer shape. Then I could cut out the holes for each half of the lense, and glue them together. That way the smaller diameter section would be able to support the urethane resin lense assembly. And I could do all of my drilling into the wood, not the urethane lense. It would look exactly like the outer section of the upper lense in the picture.
Here are some videos, which do a better job of explaining how I will make the mold for each of the two parts. I don't plan on using the PolyTec resin used in this video, but the videos made by this business are the best I could find, which explain how all this is done.
Making a brush on mold with silicone
Making a Resin Support Mold.
Here is also a good video, by the same people. But instead of a one piece mold, it shows how to make a two piece. Of particular interest is how they use the outer shell, and drill holes in the two pieces of the resin mother mold, so nuts and boles can keep the two pieces together. The lense shaped side, which is for making the outer lense, is the most important piece for my needs.
Mold Making Techniques: Resin Mothermold Process
I still will need a second part of the mold, so I can build up an inner bottom base, where I can glue the two pieces together. But I think I can use a flat board, or plastic sheet, which has been well sealed and finished. Before I clamp the two pieces, I can cut a large hole in the center of the base, allowing me to pour in each mixture, and use a brush-on technique, rather than strictly a pour-on one. A second sheet of the same shape, but with only several small overflow holes could be used later for filling in the center of the mold with expanding urethane foam, and allow the excess foam to escape through the holes.
I will be able to pour the first coat into the large hole, which could have a bronze powder mixed into the urethane, for a metallic outer look. Or I could use pecan shell powder, which this sold by most of the resin suppliers, and can be applied just like the bronze powder to give it a wood grain effect. Then I can spread it around the entire mold so as to completely coat the surfaces.
Don't forget to check out Daisy-Mae with the big boobs in one of the other YouTube videos.
Rather than pour in a solid inner portion, I will keep brushing on several more coats to the inner surface, and remaining applications can be of regular resin, which is less expensive, and not seen. This video shows how bronze powder is used in the technique I want to use.
Resin Casting: Cold Cast Bronze Process
After brushing on several coats of resin, in order to make the shell solid and sturdy, I can either leave it hollow, or pour in a urethane foam, which would expand inside the mold, and then harden. I could then break off any overflow, remove the flat portion of the mold first, and then the main mold will be able to come out of the main mold.
Here is a video, showing how a solid urethane foam is used in a smaller mold, without applying a hard outer coating: Casting with PolyFoam .
I like the way the bottom part of the main mold has been cut away to allow the use of fingers for demolding the finished resin casting.
I'm sure I have left out some important parts of what I'm going to do. Please feel free to make suggestions, or ask questions. Once the silicone arrives, I'll start making the two parts of the lense assembly molds.
Last edited:
The two silicone kits finally arrived. Last night and early this morning, I set up the two parts of the lense for brushing and building up the silicone.
The smaller lense was entirely too thick at its base, so I need to add something to eliminate a portion of the height. By taking the lense and drawing an outline on a piece of 17" x 17" piece of 1/4" plywood, the next step was cutting out the center of the plywood.
My goal was to go for a 3/8" edge, but the 1/4" wasn't enough. I had to go out and buy some thin cardboard, and add two layers under the plywood before I got the edge I wanted. Then I just stapled the cardboard to the base, and set the cut plywood down and around the lense.
For the bigger one, I left it alone, even though the edge was a little thicker than 3/8". Using a 1/4" piece of plywood would have made the edge far too thin. So I set it up on a flat piece of plywood.
Then I took modelers clay and filled in the openings on the edges, followed by using a square edge to trim out the excess. All of the plywood surfaces were sealed, and once I had the edges trimmed, I sprayed both work surfaces with silicone, in order to make it easier to release the clay samples.
As soon as everything cures, I'll start applying the silicone in several layers until I have used all the silicone. Then I'll order all of the urethane for covering the silicone with a urethane mother mold. Fortunately the urethane is the same as the one used in the mold, so I only have to order just one base. I'll use additives and fillers to achieve different finishes.
The smaller lense was entirely too thick at its base, so I need to add something to eliminate a portion of the height. By taking the lense and drawing an outline on a piece of 17" x 17" piece of 1/4" plywood, the next step was cutting out the center of the plywood.
My goal was to go for a 3/8" edge, but the 1/4" wasn't enough. I had to go out and buy some thin cardboard, and add two layers under the plywood before I got the edge I wanted. Then I just stapled the cardboard to the base, and set the cut plywood down and around the lense.
An externally hosted image should be here but it was not working when we last tested it.
For the bigger one, I left it alone, even though the edge was a little thicker than 3/8". Using a 1/4" piece of plywood would have made the edge far too thin. So I set it up on a flat piece of plywood.
An externally hosted image should be here but it was not working when we last tested it.
Then I took modelers clay and filled in the openings on the edges, followed by using a square edge to trim out the excess. All of the plywood surfaces were sealed, and once I had the edges trimmed, I sprayed both work surfaces with silicone, in order to make it easier to release the clay samples.
As soon as everything cures, I'll start applying the silicone in several layers until I have used all the silicone. Then I'll order all of the urethane for covering the silicone with a urethane mother mold. Fortunately the urethane is the same as the one used in the mold, so I only have to order just one base. I'll use additives and fillers to achieve different finishes.
Last edited:
I was thinking fiberglass would be another way to accomplish the lens. A thick enough piece shouldn't resonate unduly. Fill with expandable foam for extra stability without too much weight.
For that matter, you could hand carve the shape in hard foam (make a cross section template to check against), and coat with epoxy and bondo to seal before painting.
Those look great John! Can't wait to see how everything comes out.
For that matter, you could hand carve the shape in hard foam (make a cross section template to check against), and coat with epoxy and bondo to seal before painting.
Those look great John! Can't wait to see how everything comes out.
You're right, fiberglass may work. However fiberglass is made with polyester resin, and would have to be used in a well ventilated room, or outside. Polyester is cheap, but can be dangerous. Epoxy is probably the best, but it is by far the most expensive. Its quite safe, and makes a hard body.
I am compromising here, by using urethane in those departments. Its far less expensive than epoxy, can be mixed and used indoors, although it does leave some harmful fumes. But what is nice about it is that it is easily pourable, and the one I am expecting to use will take additives, such as pecan shell powder, or bonze/brass/etc powder in order to use a 'cold casting' to make the sculpture look like it is solid metal. There is a world of things that can be done with it.
I just got back in from running errands and about to go down to the shop and start brushing on the silicone.
This entire project has been very complicated and frustrating. Let's hope I get this right, so I can move on to the drivers, crossover, and finishing up.
Oh, here is what I am seriously considering. Lets say the mold comes out ok, and I am ready to start on the lense assembly. I'm inclined to use a first coat, which has had either pecan shell powder mixed in, or perhaps bronze powder. After mixing all this together I'd pour the mixture into the lense mold. Then by reaching into the inner portion of the mold I can brush the entire surface of the mold with this outer coat containing the pecan/bronze mixture*. I can even pick up the mold and carefully slouch it around, so as to coat everything. As it starts setting, quickly brush the urethane all over the inner mold, so as to evenly coat it.
From there, I can mix two or three more batches and do the same thing, so as to build up the outer shell. But instead of pecan, or metal power, I can use filler, which will make the mixture a bit thicker, and easier to spread. One of the above videos shows this. When this has set up, I can remove the mold base with the big hole, and replace it with a base having only three overflow holes. Also I can screw in two or three 3" screws down into the mold. This base would have a handle set up, and then removed.
But before removing the bottom, having the large hole, I can mix and pour some urethane foam into the hole, and quickly brush the foam all over the inner portion, just to ensure even coverage. Then quickly remove the base with the big hole, and replace it with the plate, the one with the three holes and the screws placed into it. By using a release spray on the silicone portion of the mold, and the fact that the urethane foam is pretty stiff, I should be able to lift the lense out of the mold.
When the foam expands, any overflow will expand through the three small holes of the second base, and completely fill in the inner cavity of the mold. After it sets thoroughly, I would just break off the overflow, unlock the bottom plate, install the handle I had removed earlier, and gently pull the urethane lense out of the mold.
I got this idea of putting in screws, or other objects, so as to pull out the lense, from a designer client, who has worked with molds, and resin pouring. East Carolina has its interior design department rolled into its art department, so he has had a lot of art courses, which exposed him to mold making. At most universities the interior design department is part of the College of Architecture, but not where he went to college.
I went out yesterday, and measured a home that he is designing, and I will be assisting him with all the window treatments, spreads, dust skirts, and other items. BTY its what I do for a living. Afterwards we discussed this in length, and it was his idea to insert something that will make it easy to pull the lense out of the mold. Makes sense to me. And Michael is one of the most talented artists I have ever met. So that is what I plan of doing.
*Note: another thing that is neat about urethane, is that it adheres to almost anything. This includes paint.
Lets say you want to finish the lense with a black outer finish. Instead of finishing the lense, by spray painting a nice black, or any colour you wanted. Instead of waiting for later, just spray paint the inner mold with what you want.
When the urethane is poured/painted for the outer coat, it will automatically adhere to, and pick up, all of the paint you sprayed on to the silicone. When you remove it from the mold, you will have a perfectly smooth, and very black, lense, that would be hard to duplicate by spraying afterwards.
Last edited:
I just finished with the silicone portion of the new molds. I wound up applying about six coats, three per kit. That means I really did twelve mixes, and used each mix per lense, rotating back and forth. They were smaller than the mixes I did before, but I gave my attention to one lense at a time.
Another advantage to doing many applications is because of gravity. The more I applied, the more tried to run down to the base. And this still occurred regardless the number of applications. That meant that work was not finished until after midnight, but this morning they were nice and thick, just the way I wanted them to be this time. Here are two pictures of the silicone before and after trimming off the excess around the bottom.
I am going to write up a list of all the ingredients I need, and order them this weekend.
Another advantage to doing many applications is because of gravity. The more I applied, the more tried to run down to the base. And this still occurred regardless the number of applications. That meant that work was not finished until after midnight, but this morning they were nice and thick, just the way I wanted them to be this time. Here are two pictures of the silicone before and after trimming off the excess around the bottom.
An externally hosted image should be here but it was not working when we last tested it.
An externally hosted image should be here but it was not working when we last tested it.
I am going to write up a list of all the ingredients I need, and order them this weekend.
Last edited:
I wish I had found this thread much sooner...
I have actually made full ceramic speakers using slip casting in a plaster mold for a university project.
I haven't had the chance to read the whole thread, but if I understand correctly, you are trying to create a female mold from which to cast a composite cone?
I think the easiest way would be the plaster mold, with a small hole through at the top. This way, once you lay you fiberglass and resing and let it set, you can force a bit of compressed air through the top and free the whole thing.
I'll try and illustrate what I mean after work tonight.
There's also no reason you couldn't actually make this out of cast clay...
I'm stuck waiting on one of the ingredients that I ordered. As soon as it arrives, I'll begin the process of making a pair of lenses.
Sorry for the delay.
Alright I'll take that...
We're all sitting firmly on the edges of our seats for this one (or at least I am)
I'm not sure if you are still planing on using plaster for the support mold. But if you are, I would use plaster for ceramic mold making, I'm not sure if the difference between this and industrial plaster is very big but I imagine it would be a finer grit of plaster which is need for retaining extra detail.
This is just a general guide to mixing plaster for this purpose from my university ceramics lab:
Measure your water at 21C (70 F). It should feel
cool, not cold or warm. Too warm and the plaster cures too quick, too cold and it takes forever
Weigh your plaster in a clean, dry, container. Any leftover cured plaster in the container will activate a fresh mix quite a bit faster
Sieve or sprinkle plaster into the water. Standard kitchen sieve would do, but the finer grit the better.
Slake the plaster for 3 minutes undisturbed, except for the occasional tap on the side of the container. You could let it slake for quite a while before running in to any issues. Another thing to look for is the water will creep on the dry plaster mound, once the whole surface is slimy looking, you can start mixing.
Mix by hand for 4-5 minutes, making sure you donʼt
introduce air bubbles. Look for the little trails.
Pour your plaster gently so you donʼt introduce any
air bubbles.
Bang the table top a few times to dislodge any bubbles on your mold face.
Getting the ratio right the first time also helps, for this you want 66ml of water to every 90g of plaster.
A good mix of plaster should not crack.
If you want to get the nicest surface with plaster, you can mix a small batch and brush it on. this will get a nice bubble free surface. After that, you can just plaster over it without worrying about bubbles and whatnot. Instead of pouring the plaster over, you can also wait for it to get to the consistency of sour cream and just slap it on with a spatula or something. This method wouldn't even require a box, but its tricky to get the timing right.
Instead of doing all this, could you not just lay fiberglass on the existing greenware mold? After that sets and is removed, you can sand and smooth the interior surface, rub some mold wax and lay fresh fiberglass in.
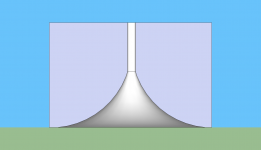
I've tossed in a quick render of what I meant for the mold. essentially you would have a small (size of a pen) hole towards the top from which you can send compressed air into the cast.
This is just a general guide to mixing plaster for this purpose from my university ceramics lab:
Measure your water at 21C (70 F). It should feel
cool, not cold or warm. Too warm and the plaster cures too quick, too cold and it takes forever
Weigh your plaster in a clean, dry, container. Any leftover cured plaster in the container will activate a fresh mix quite a bit faster
Sieve or sprinkle plaster into the water. Standard kitchen sieve would do, but the finer grit the better.
Slake the plaster for 3 minutes undisturbed, except for the occasional tap on the side of the container. You could let it slake for quite a while before running in to any issues. Another thing to look for is the water will creep on the dry plaster mound, once the whole surface is slimy looking, you can start mixing.
Mix by hand for 4-5 minutes, making sure you donʼt
introduce air bubbles. Look for the little trails.
Pour your plaster gently so you donʼt introduce any
air bubbles.
Bang the table top a few times to dislodge any bubbles on your mold face.
Getting the ratio right the first time also helps, for this you want 66ml of water to every 90g of plaster.
A good mix of plaster should not crack.
If you want to get the nicest surface with plaster, you can mix a small batch and brush it on. this will get a nice bubble free surface. After that, you can just plaster over it without worrying about bubbles and whatnot. Instead of pouring the plaster over, you can also wait for it to get to the consistency of sour cream and just slap it on with a spatula or something. This method wouldn't even require a box, but its tricky to get the timing right.
Instead of doing all this, could you not just lay fiberglass on the existing greenware mold? After that sets and is removed, you can sand and smooth the interior surface, rub some mold wax and lay fresh fiberglass in.
I've tossed in a quick render of what I meant for the mold. essentially you would have a small (size of a pen) hole towards the top from which you can send compressed air into the cast.
Attachments
- Status
- This old topic is closed. If you want to reopen this topic, contact a moderator using the "Report Post" button.
- Home
- Loudspeakers
- Full Range
- Hexagon Pioneer B20FU20 Enclosure