Very cool project. It'd be a good idea to gouge a couple key holes into the side of the mold if your intention is to make a two piece mold. That's the usual trick for alignment.
You probably could have gotten away without using the silicone rubber compound for this, since the shape doesn't have fine detail, but it certainly won't hurt.
If you scroll up a few posts and look at the silicone that is pulled back from the lens, look to the bottom outer edge of the lens. There you can see that I have marked the outer edge of the blank where it will match the seam of the sliced silicone.
Once I finish pouring the last half of the plaster portion of the mold, I'll also notch the plaster with the silicone so as to ensure the silicone is exactly lined up with everything.
But you are right, it really is important to have everything matched, because nothing is perfectly round, or even.
Last edited:
What an experience, John. I've worked with that plaster and yes, it does set up quickly. You can change that a little with the amount of water you add, but not much. 15 minutes or so will usually be your MAX working time. Doing multiple pours isn't a bad idea as the plaster will heat up quite a lot when mixed in large batches and can take a LONG time to fully cure. I think so long as the plaster hasn't fully cured, multiple batches should bond properly, but I don't know for sure.
What an experience, John. I've worked with that plaster and yes, it does set up quickly. You can change that a little with the amount of water you add, but not much. 15 minutes or so will usually be your MAX working time. Doing multiple pours isn't a bad idea as the plaster will heat up quite a lot when mixed in large batches and can take a LONG time to fully cure. I think so long as the plaster hasn't fully cured, multiple batches should bond properly, but I don't know for sure.
Carl, this is my first experience with plaster since my childhood. And I have forgotten almost all of my experiences with it. Fortunately, I've been doing a lot of research before hand. But I still have to learn the hard way.
I checked out the left half of that mold this morning, and it is still very wet. I also read somewhere that it will take up to two weeks for the plaster to cure thoroughly. This is time consuming, and not to mention that it is getting expensive. And I'm just talking about the lens horns. That initial investment is always costly. But once I have some ready to use molds, they can be used a good many times.
Maybe I can entice some others to do this too, in order to defray the initial costs of those darn lenses. And the cabinets don't have to be hexagonal either. The latest one from Duevel, the Sirius, is squared. Aren't they beautiful?
An externally hosted image should be here but it was not working when we last tested it.
You know, I could take the bottom lens, and just make two of them, turn one upside down, and fuse the two together. Then make a box for the top, where I could use a high compression horn to radiate downward on a separate lens. And it would work nicely with a hexagon, or a square box base.
Can you just imagine finishing something like that and having guests check them out? Those Sirius above are going for $35,000 a pair. Can you believe that? And I'll bet you the overwhelming majority are in the cabinets.
Anyway, I'm going down stairs tonight and set up the larger bottom part, getting it ready to pour tomorrow. Only this time I'm just going to set the blank in the box and just fill in the cracks along the edge of the blank since the plaster sets up so quickly. It won't have a chance to start seeping under things before it begins setting up.
Duevel cloning
John,
neat find on the new Duevel. I think they make beautiful speakers, but don't have a clue where they can be auditioned in the states....
Regarding your spitballing on turning the diffusers, you could use something like this:Dayton Audio H10RW 10" Round Waveguide 1" Threaded 270-310 Or one of it's siblings, as the waveguide part under the top box, and it wouldn't even be visible.
Just a little more spitballin' here....
John
As for auditioning them, they are not the kind to show up in a lot of places. The $35000 price tag puts them way up there in the 'blueblood' range. But there have been a few high dollar writers who have listened to them. Reviews on all the Duevel gear are quite positive. But there is one cavet here. Due to their openness and 360 degree dispersion, they have to be placed in just the right location to obtain the maximum advantage. That is the only real serious drawback. But if they are set up in a large enough room, such as living room or den, and moved about three feet from the back and side walls, they should do a great job of making a large room become suddenly a much larger one. The depth should be considerable, and you just can't obtain that from a regular pair of speakers, even the EconoWaves.
The funny thing is that I had looked at this waveguide you show here, and didn't come up with the solution for using it with the upper box, for the high frequency horn, until I read your post.
I'll show you what I mean. Let me bring up a picture on how the Sirius is supposed to work. Its a partial cutaway drawing, and explains a lot on the mechanics of that speaker.
Here it is:
An externally hosted image should be here but it was not working when we last tested it.
Using that plastic waveguide as the top most flare of the equation, it could be turned face down and screwed into the bottom of a slightly deeper upper cabinet frame, like what the Sirius has sitting on top. By attaching it to the bottom of the upper frame, there would not be a need for two separate lenses: only one, which would have two of the bottom halves of the lenses I am currently making. One half would be pointed downward, and the other half would be pointed upward, and both fused together, in order to make the bottom assembly as shown on the Sirius drawing. There wouldn't be a separate upper lense, as in the drawing. Rather, there would be the waveguide you show, and it would be screwed into the bottom of the box, and the high frequency driver would be screwed on top of the waveguide.
I'll have to make a drawing and post it here. I really need to learn Sketchup, but don't know how to use a drawing program yet. So I will do it by hand and then scan it into my computer.
But basically, the upper frame housing would have to be a little bit deeper than the one in the Sirius drawing because the height of the waveguide is 5 inches and the high frequency driver(Selenium D220Ti ) is 52mm, which is 2.02 inches. That means we will need 7 inches, plus the thickness of the top board, and the bottom board, of the frame. That would be at least 8.5 inches tall. I don't know if it would look too top heavy, but its a starting point.
I'm going to go to PE and check out some more round horns/guides and see if I can come up with something shallower. I'll be back later.
While I am gone, also look at how Duevel attaches the outer ring to the wooden lens lense horns. Obviously they first form halves of the wooden lens assembly on computer guided lathes as shown on this page. I can't tell if they make the upper and lower portion of the lense in one piece, but I just don't see how they could accomplish this on a lathe. The blanks have to be secured to a plate that is secured to the lathe motor in order to turn the blank accurately.
But however they manage this, once the lense horns are ready to be set up for the Sirius, there is an outer ring built into the lenses which have been shaped by the lathe.
Now look closely at how they attach that outer ring. they use either a saw blade, or a router bit, and make a thin dado cut all around the outer ring of the wooden lense, and then affix it to the assembly. What this means is that the outer ring can be used to hold up the lenses and the dado cuts will allow this ring to hold up the lens assembly. And there does not need to be any holes drilled into the lenses themselves. Very practical method for supporting that load.
And one more thing too. the need for having a tailor made lense for every type of speaker would be eliminated because the outer ring could be expanded or contracted, depending on the size of the cabinet assembly. And too, the entire process of using it all as a lense horn would still be maintained and look very professional.
My only problem with all this is that it suffers from the German tendency to over-engineer everything. The final result is fantastic, but it has so many parts it takes longer to produce, and costs much more in the process. This is why they lost WWII: they couldn't produce enough material(the MG42 being the lone exception) because they just had to make everything perfect and complicated.
Anyway, to my thinking there is no need for that other lense. Its just too much desire for perfection IMO.
Anyway, I'll get a drawing sketched up showing what I mean.
John
I'm glad you got the gist of what I was intending. I've spent ( probably wasted ) a fair amount of time looking at the different iterations of " Omni Directional " loudspeakers on the web. I have an interest at some point of trying to come up with an Omni design of my own.
I got to hear a set of the Mission HT omni's at an acquaintances house recently. I was favorably impressed with the sound, but didn't have the heart to tell him that putting the surround speakers in the corners at the back of the room was kind of defeating the purpose of the design....
Still, if they came available at the right price I would consider them for my LR, for HT use.
I didn't mean to sidetrack the thread, I just saw what you posted and read the text, and the first thing that came to mind were those O.S. waveguides I linked to....
Hope your plaster gets hard soon.
John
Some of the 8" full-rangers have a frequency response that keeps rising out to 10khz or so. I'm thinking specifically of the Fostex FE206En, the Visaton b200, and the Seas FA22RCZ. One of those might work pretty well in that sort of enclosure without using a tweeter-if you didn't mind losing a little in the top octave. Your diffuser horn would counteract the beaming in the treble, and it might even out the response pretty nicely.
BTW: a super-simple (yet effective) way to build an omni:
www.audiofaidate.org - Diffusori omnidirezionali "Periakusma" (AKA Walkaround)
(English translation of the above by Google)
www.audiofaidate.org - Diffusori omnidirezionali "Periakusma" (AKA Walkaround)
(English translation of the above by Google)
BTW: a super-simple (yet effective) way to build an omni:
www.audiofaidate.org - Diffusori omnidirezionali "Periakusma" (AKA Walkaround)
(English translation of the above by Google)
Thanks for the input.
For some reason my Opera browser is having trouble going to all the links. Can you show me an image of the Omnidirectional speaker that was chosen? I was able to see some, but believe I am missing out on the most important ones.
Hi John,
I am silicone and mould making and resin casting expert. I just happened to catch the back end of what you are doing here and could probably help you out significantly but I am trying to catch up on reading back into the thread to see why you are making a 2 piece mould of an object with no undercuts? I think you could have made a one piece mould here. Plus, there are ways to make light weight mother moulds (shells) without using 10lbs of plaster. I am not sure what your objective is here in making the mould but if I better understood the objective I could help you out better.
I am silicone and mould making and resin casting expert. I just happened to catch the back end of what you are doing here and could probably help you out significantly but I am trying to catch up on reading back into the thread to see why you are making a 2 piece mould of an object with no undercuts? I think you could have made a one piece mould here. Plus, there are ways to make light weight mother moulds (shells) without using 10lbs of plaster. I am not sure what your objective is here in making the mould but if I better understood the objective I could help you out better.
Last edited:
In all honesty, I'm really worried that I won't be able to finish it. The problem is that the two pieces for the lenses are unfired green ware. And in order to make a mold I'm going to have to pour plaster around each piece.
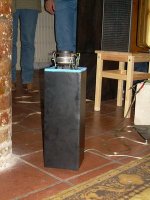
I never showed what they look like, but here they are together.
An externally hosted image should be here but it was not working when we last tested it.
I'm only going to get one shot at this, because the plaster, when it sets up, will expand, rather than shrink like everything else. And the force is going to crack each clay piece and ruin them. If it doesn't work out right, I'm screwed.
But lets say I get the two molds to work, what am I going to do then? I already have pictures of the two completed mold frames but haven' had time to post them here. So if they do work, what am I going to use to pour inside the mold? And how much is this going to cost?
And here is where I will need some help. If I use an epoxy resin, its going to cost a good bit. Each mold will be just a one piece mold, with the inside open. I will use something to help fill up the space, but it will still require a whole lot of resin. And resin is really expensive. It will most likely require 2 gallons too, one for each diffusion lens.
Of course there is another approach. I could use a fiberglass application. It would be less expensive, but come with all the bad fumes and headaches.
So I will need to see if there is anyone who has worked with epoxy resins, fiberglass, or both. If so, perhaps that someone can give me some expert advice, because I have never worked with either of the products.
Are you trying to make 2 of these in resin but need to make a mould first? Your intentions are that these 2 clay pieces stacked should be a one piece resin lens - one for each speaker?
Correct. But I am also toying with the possibility of using the bottom section, and making two of them. Then putting both together and using a high definition compression horn on top, firing downward, with the low frequencies firing upward. The picture of the Sirius above is the second possibility.
Correct. But I am also toying with the possibility of using the bottom section, and making two of them. Then putting both together and using a high definition compression horn on top, firing downward, with the low frequencies firing upward. The picture of the Sirius above is the second possibility.
So you would need one mould of the bottom piece to cast 4 resin pieces, which would be the easier thing to do. I think you could make an open one piece mould of the bottom piece following and using the materials supplied by Smooth-on How to Make a Mold | Tutorials, FAQs and Free Guide from Smooth-On. One issue that will come up is then in casting the resin you will need a pressure pot to control exotherm and bubbling. There is another way to approach this in making a cut mould and then slush casting the resin piece in the mould.
To put this into a bit of context as I was scanning through this forum (or other DIY speaker forums) I look at the wood work that you are doing with amazement. To look at it one might think that it should be simple enough to make a speaker box out of wood, all you need is some wood and a saw and some glue. But really you need a lot more than that. Its the blades and the bits and the clamps and saws and routers and even the right table & space to work in combined with the experience & knowledge. What you are trying to do is not difficult for an experienced mould maker but you have to be willing to spend the money on the right materials to do the job right or you will forever be fussing at it. I have a few options for you if you want to give me a PM.
To me, the wood working is far easier than the mold making, because I have a whole lot more experience in that field. The mold making may well be easier, but like everything else, there are many, many tricks to the trade.
As for Smooth-On, I have watched about every video they have put out on mold making, resins, and others. You wouldn't believe all the YouTube videos I have watched. But no matter how much one tries to take in, it is never really enough.
I have drawn up a sketch, to scale, of what my original goal has been(the right one), and what it would look like under the newer approach(the left one). Please pardon the quality of the scan, but I am not fluent in a drawing program, so I had to do this in a more primitive manner.
An externally hosted image should be here but it was not working when we last tested it.
I wonder which approach others like best? Somehow, to my taste, the original approach is a little light on top. And using a hexagon top, with the same veneer used on the base, just looks more natural. What do you all think of this?
As for the materials used to make the lense parts, I have pretty much settled on polyurethane resin. The cheapest is Polyester, but the fumes are so bad I will not be able to do this in my basement shop. And epoxy is very expensive, and urethane is much less . Also, the urethane, from watching the videos, pours a lot easier. But I have not gotten that far yet, so I am open to suggestions.
Oh, the drawing on the left would finish out at 59.5 inches in height. That's starting to get up there in height. The Sirius above is 1400mm, or just a hair over 55 inches tall. I'm probably a little bit higher than where I really want to be.
Some of the 8" full-rangers have a frequency response that keeps rising out to 10khz or so. I'm thinking specifically of the Fostex FE206En, the Visaton b200, and the Seas FA22RCZ. One of those might work pretty well in that sort of enclosure without using a tweeter-if you didn't mind losing a little in the top octave. Your diffuser horn would counteract the beaming in the treble, and it might even out the response pretty nicely.
There's a Japanese builder who makes Omni's with the Fostex drivers, he uses both round, and square diffusers on his. I wish I could remember how I found his site, it's a commercial site, and I don't read Japanese so I could only look at the pictures.....I wish the translation programs worked better too.
I'm sure I found it with Google, but it's been a couple of years ago now...
Just for reference I would be interested in how he made his.
Oh, another thing. I never really did a detailed equation on the cubic feet within the enclosure, but I just did. I had done some rough measuring and estimated I had between 2.66-2.75 cu/ft.
Well I set out a while ago to find out just how much space was currently within my enclosures. And to make certain I did a search on how to figure this out. E-How had the answer. I had learned this as a teenager, but that was decades ago.
Anyway, to measure a hexagonal enclosure, the internal volume makes up six triangles. In my case the dimensions are equal, so I have six isosceles triangles horizontally. And with each side being exactly 8 inches, and the diameter from corner to corner being 16 inches, the rest was easy.
An externally hosted image should be here but it was not working when we last tested it.
I subtracted the .75 inch thickness of the wall and came up with 174 sq/in. And the cabinet is 40 inches tall. After subtracting for the material supporting the structure, and the top and bottom, I reached 6764.75 cu/in. And divided by 1728, I reached a grand total of 3.9144965 cu/ft. WOW! That's a lot of volume in there, especially for up to a 10 inch driver. Perhaps I really ought to try fitting in a 12 inch driver. Having almost 4 cu/ft to play with(actually less because the driver will also take up some space) its still a lot to consider. If I make a next one, and probably will, I'll make the sides around 10 inches and shorten the height of the enclosure.
It really gives me a lot of air to work with don't you think? I can see all sorts of possibilities opening up here.
John,
I went and found it again.... Here's a little linkage:ƒXƒs�[ƒJ�[�b’m–¼Œä‘½�o‰¡(‚¿‚ȃI�[ƒfƒBƒI)
I suggest you start with the:kanaderu, and the:Kirameku
I think you'll find them interesting. I may have missremembered about the square deflectors though, all I saw in the few minutes I looked around this time were round.
enjoy,
John
BTW: I was about to forget  to compliment with you for your amazing effort. I'm quietly following this thread since quite some time, and wish you best luck with your project!
to compliment with you for your amazing effort. I'm quietly following this thread since quite some time, and wish you best luck with your project! images and other attachments are only accessible to forum members. Maybe that's the problem? (you can freely register to access them).For some reason my Opera browser is having trouble going to all the links.
here is a picture of one of the original speakers. They are tiny sealed box with a small mid-woofer mounted horizontally and "backwards" (upside-down) on the top, "back-to-back" with a tweeter (also horizontal, that is firing toward the ceiling). Some care have been taken in the choice of the drivers (and the xover) to obtain a suitable (vertical) dispersion and proper tonal balance. In spite of its extreme simplicity and low cost, results are awesome. The original design is unfortunately not replicable as-is 'cause the drivers used are no longer available, but the author is working on a new version using currently available components.Can you show me an image of the Omnidirectional speaker that was chosen? I was able to see some, but believe I am missing out on the most important ones.
Attachments
- Status
- This old topic is closed. If you want to reopen this topic, contact a moderator using the "Report Post" button.
- Home
- Loudspeakers
- Full Range
- Hexagon Pioneer B20FU20 Enclosure