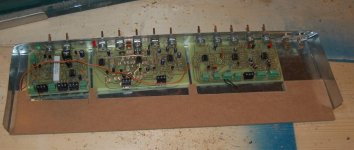
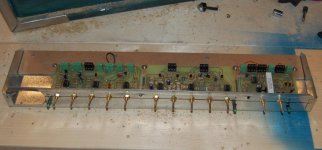
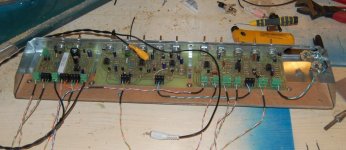
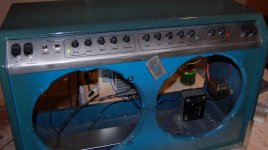
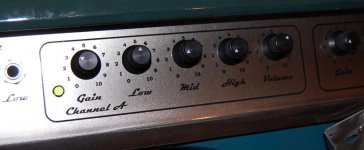
wow, looking good! Nice to see another picture of that beautiful blue cabinet.
So it is stereo, right? (two speakers, I figure, the chorus would justify making the amp stereo)
Thanks
I thought about stereo but decided to keep it mono, at least for now. Laying everything out in the case (preamp tray, power supply board, transformers, reverb tank and power amp) I can see it will be tight so I would need to make the other power amp smaller then this one or redo both into one unit.
I'd just like to say "nice PCB's"
Thanks
I have come a long way from when I started. My boards were nothing to write home about, for sure.
I've been trying to improve my layouts too and I think I'm making some progress there too.
Aye, it's looking good.
Any speakers ordered yet?
Thanks
No speakers yet. I want to get everything else finished before I order them. Lots to do yet.
John, just a passing thought about power amps... How about a switching amplifier? If you only need clean power, (ie, the pre-amp's taking care of distortion etc, and the power amp won't be pushed to clipping), then I can't think of anything better to save space.
A 2x50w (or 2x100w) amp will certainly be smaller than anything class AB (even if it does come down to the size of the heatsink required).
A 2x50w (or 2x100w) amp will certainly be smaller than anything class AB (even if it does come down to the size of the heatsink required).
Hi Chris,
I'll stay with the single amp for now. I did put a lot of work into it to get it ready for this project and I'd like to see that not go to waste. I do have a LOT of fully functional amps sitting around, but none are class D. I don't think I'll ever go there either - I've got nothing against them, just don't feel the 'pull' to explore this new realm.
I briefly powered everything up last night, after I finished the preamp tray wiring. It's all good except I have a hum coming from the reverb board. Further investigation is warranted.
I'll say this: building a combo amp like this is tough! I've built some detailed and involved projects but this outstrips them by a wide margin. All of the parts, controls, switches, wires, wires and more wires. Circuit boards, metal work, wood work, 1/4' jacks with switches, transformers, reverb tank...all crammed in. It's a marathon project, for sure.
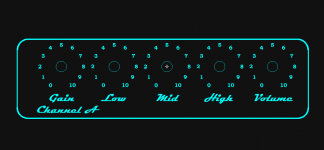
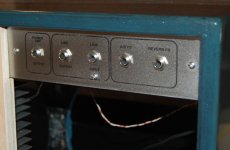
Did a little layout for the front panel:
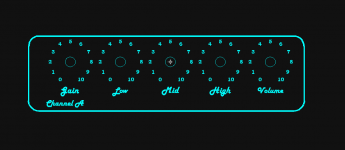
This gets printed in reverse and ironed onto the stainless steel faceplate. I'm on the fence about the font, I might change it.
I'll stay with the single amp for now. I did put a lot of work into it to get it ready for this project and I'd like to see that not go to waste. I do have a LOT of fully functional amps sitting around, but none are class D. I don't think I'll ever go there either - I've got nothing against them, just don't feel the 'pull' to explore this new realm.
I briefly powered everything up last night, after I finished the preamp tray wiring. It's all good except I have a hum coming from the reverb board. Further investigation is warranted.
I'll say this: building a combo amp like this is tough! I've built some detailed and involved projects but this outstrips them by a wide margin. All of the parts, controls, switches, wires, wires and more wires. Circuit boards, metal work, wood work, 1/4' jacks with switches, transformers, reverb tank...all crammed in. It's a marathon project, for sure.
Did a little layout for the front panel:

This gets printed in reverse and ironed onto the stainless steel faceplate. I'm on the fence about the font, I might change it.
Agreed about the fonts, and an old-school split panel design would look really good.
I really recommend trying class D, even if it's just a little kit, the (hifi) sound out of them is amazing (very transparent), combined with the almost complete lack of weight and heatsink requirements, I'd've thought that'd make them very good potential candidates for a musical instrument amplifier.
Ah well, each to his own.
Chris
I'd've thought that'd make them very good potential candidates for a musical instrument amplifier.
I'd certainly agree.
If I were to want to build another that is light weight, efficient and small I'd probably go in that direction. Right now though, I have many class AB modules collecting dust and putting one or two to good use in a project like this (not really going to be lugged around much) is a cost saving measure. I already have a substantial investment, in both money and (vast quantities of) time - I'll take a penny saved where I can.
The module I have now ( see HERE) is capable of 130 watts into 4 ohms before clipping. That is at the +/-36 supply voltage. Considering that the Ampeg VH140c has 2 power amps but they are each only rated 70 watts into 8 ohms each, I'm not doing bad at all. If I were to increase the supply to +/-50VDC, I'd have more than 200 watts available.
All the same, testing on my lab speaker (an old Pioneer car speaker in an MDF box) and I've nearly burned that out - smell the voice coil cooking.
So, with 2 100db drivers connected in parallel to make that 4 ohm load, I should have plenty of volume.
Home early today and I got a fair bit accomplished.
I mounted the power supply board on the top of the cab:
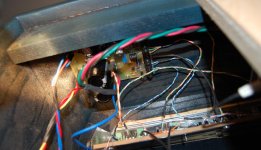
Close to the preamp tray for short wire runs.
Mounted the power amp on a board that will partially cover the back:
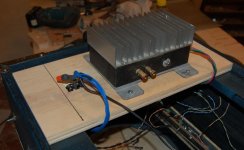
It will be in the middle of the open back and provide some support for the cab as well. I figured this is the best place to put the amp (mainly because there wasn't anywhere else to put it).
Wired up and mounted the power transformers and the reverb:
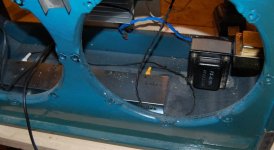
Reverb pan is too close to the big transformer and that is the source of the hum I mentioned earlier. I'll need to either move the tank or try to shield it somehow. PITA.
Put the switches in the front panel:
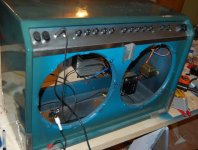
and turned it on and tried it out. A couple of snags (as usual) - the reverb pots are reversed. Actually they aren't but the preamps are. I put B first then A - B is clean, A is distorted. I want to redo the reverb board anyway, so I'll switch the pots then.
The switches have red LEDs in them. These were nice and cheap from Digikey so I bought 10 of the same to get the better price. I figured I would use them without powering the LEDs - no problem but 2 need to be upside down, with the LED on the bottom. "Bright" is defeated with the switch on, "reverb" is off with the switch on. Not a big deal - nice to have the LEDs all on the top but I can live with 2 on one side of the amp down.
Works really well. I have a line on a loner guitar that I can plug in and make a racket with soon.
I mounted the power supply board on the top of the cab:

Close to the preamp tray for short wire runs.
Mounted the power amp on a board that will partially cover the back:

It will be in the middle of the open back and provide some support for the cab as well. I figured this is the best place to put the amp (mainly because there wasn't anywhere else to put it).
Wired up and mounted the power transformers and the reverb:

Reverb pan is too close to the big transformer and that is the source of the hum I mentioned earlier. I'll need to either move the tank or try to shield it somehow. PITA.
Put the switches in the front panel:

and turned it on and tried it out. A couple of snags (as usual) - the reverb pots are reversed. Actually they aren't but the preamps are. I put B first then A - B is clean, A is distorted. I want to redo the reverb board anyway, so I'll switch the pots then.
The switches have red LEDs in them. These were nice and cheap from Digikey so I bought 10 of the same to get the better price. I figured I would use them without powering the LEDs - no problem but 2 need to be upside down, with the LED on the bottom. "Bright" is defeated with the switch on, "reverb" is off with the switch on. Not a big deal - nice to have the LEDs all on the top but I can live with 2 on one side of the amp down.
Works really well. I have a line on a loner guitar that I can plug in and make a racket with soon.
And the beat goes on...
Getting some more details cleaned up today. In my pursuit of the cause of the reverb hum, I tried a couple of things - process of elimination. One was to regulate the 36V supply for the reverb drive circuit. That made zero difference to the hum. Next I redid the ground connection, adding a 'disconnect' to the safety earth. This, again, made no difference. Of course, I have since found the reason for the hum (proximity to the main transformer) and rectified the problem.
Having fixed the hum, I tried the regulated supply again and found that it made absolutely no detectable difference. Based on this, I removed it from the circuit (air-wired in place, roughly).
The disconnect was another story though. This did make a notable difference to the amount of audible hum with the gain at max and volume at max. I kept this improvement and wired it in permanently. For those who don't know what a 'disconnect' is, it is a low value resistor (<100 ohms) bypassed by opposing diodes. I used a 36 ohm 10 watt resistor bypassed by two 1n4004 diodes.
Nuts and bolts.
I shaped the back mounting panel and reattached the power amp. Seen in this pic is the ground disconnect (in yellow heatshrink):
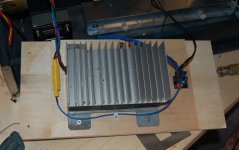
also seen is the fused power entry module, mounted in the panel. Notice the use of heatshrink on all of the faston connectors and even the marette that splices the neutrals. I like to reduce the chance of accidentally touching mains voltage if I can avoid it. Before I'm done, I'll cover the back of the power entry with a grounded metal box to completely enclose all exposed connections.
Here's the back panel mounted:
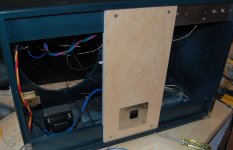
it's 3/4" birch veneer plywood and I rabbeted the top and bottom to fit around the horizontal rails of the cabinet. This sets the panel in a bit and looks better.
The power entry is held in place with a jam plate I made from stainless:
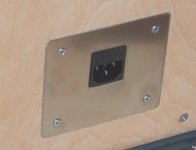
1001 details in a build like this and each takes it fair share of time to do. Experience is the best teacher and, though I'm doing well with this build, there are definitely things I'd do differently the next time...if there is a next time
Getting some more details cleaned up today. In my pursuit of the cause of the reverb hum, I tried a couple of things - process of elimination. One was to regulate the 36V supply for the reverb drive circuit. That made zero difference to the hum. Next I redid the ground connection, adding a 'disconnect' to the safety earth. This, again, made no difference. Of course, I have since found the reason for the hum (proximity to the main transformer) and rectified the problem.
Having fixed the hum, I tried the regulated supply again and found that it made absolutely no detectable difference. Based on this, I removed it from the circuit (air-wired in place, roughly).
The disconnect was another story though. This did make a notable difference to the amount of audible hum with the gain at max and volume at max. I kept this improvement and wired it in permanently. For those who don't know what a 'disconnect' is, it is a low value resistor (<100 ohms) bypassed by opposing diodes. I used a 36 ohm 10 watt resistor bypassed by two 1n4004 diodes.
Nuts and bolts.
I shaped the back mounting panel and reattached the power amp. Seen in this pic is the ground disconnect (in yellow heatshrink):

also seen is the fused power entry module, mounted in the panel. Notice the use of heatshrink on all of the faston connectors and even the marette that splices the neutrals. I like to reduce the chance of accidentally touching mains voltage if I can avoid it. Before I'm done, I'll cover the back of the power entry with a grounded metal box to completely enclose all exposed connections.
Here's the back panel mounted:

it's 3/4" birch veneer plywood and I rabbeted the top and bottom to fit around the horizontal rails of the cabinet. This sets the panel in a bit and looks better.
The power entry is held in place with a jam plate I made from stainless:

1001 details in a build like this and each takes it fair share of time to do. Experience is the best teacher and, though I'm doing well with this build, there are definitely things I'd do differently the next time...if there is a next time
20 or so of the 1001 details reside here:
The back plate. Stainless steel again with the lettering toner transfered on and coated with 2 layers of clear spray lacquer.
Originally, I was going to have the effects loop on the front panel but there isn't enough space. Adding the power amp out was a last minute decision. Nice to have the ability to make use of the amp on its own. Plugging in defeats the cabinet speakers.
Thanks! 
One of the more tedious aspects of a project like this is the build up - tear down cycle. In order to see if something works, it must be installed. Better to leave the cosmetic finishing on such parts until you know if you will keep them.
The back panel is a keeper and it will be removed and painted black, with the front baffle and parts of the inside of the cabinet. This will not happen until I have everything finished - a complete, fully functioning amp. I'll then complete disassemble the amp and do the final finishing.
Taking a break from the project today. I've done nearly all I can do until I have the speakers. I will probably order them this week.
Man this amp kicks ***! I love all the "details" you're putting into it! I mean, for a homebrew project, you'd be entirely worthy of competing with the big lines... That's what I think. Now, I can't wait to hear the thing!
Bravo!
Thanks! Very high praise.
I have on loan a guitar but all I can do is pluck strings. Oh but if only I could hammer out Crazy Train!
The sound is there - with the gain turned all the way up on the distorted channel, there is no mistaking it. The clean channel (channel A on this amp) is...clean!
If you want to play around a little...
Power chord - Wikipedia, the free encyclopedia
Lesson on Power Chords on a Guitar
You can use these on the lowest frequency string (low E), and the next one up in pitch (A). Move them up or down the neck as you please, you can make some very cool sounds with just 2 strings (a lot of songs have power chords in them, and you can substitute them for "normal" chords, when you learn which frets equate to which chord).
Chris
you can make some very cool sounds with just 2 strings
I'm trying...
I looked through and listened to the speaker choices again and I think I would like to get 2 different speakers. Any reason to not do this?
I have narrowed it down to the Man O War and the Legend 1258.
Why I want to use one of each, is that what one is lacking, the other has - or this is the way they sound to me. I'm going to go ahead and order them anyway. I can listen endlessly to those sound clips and come to a different conclusion every time.
I may (probably) make these switchable, to play through one or the other or both at once. Interesting permutations.
Last edited:
Scratch that, I now like the Red, White and Blue with the Man O War. See? Endlessly...
No, I think that is it. These are the wons (pun intended)
No, I think that is it. These are the wons (pun intended)
I think you could get some interesting sounds by using a high-power pot as a balance control. Minimum ohms possible would be best (in terms of power loss, but in terms of adjustment available, more ohms would be better), connect amp +ve to the wiper, then the + on each speaker to each end of the track.
You might find a certain balance you like between them. If not, run both at full volume, it can't do any harm (except to your hearing)...
Chris
PS - I'd be very interested to hear your opinions of the Man O War...
You might find a certain balance you like between them. If not, run both at full volume, it can't do any harm (except to your hearing)...
Chris
PS - I'd be very interested to hear your opinions of the Man O War...
- Status
- This old topic is closed. If you want to reopen this topic, contact a moderator using the "Report Post" button.
- Home
- Live Sound
- Instruments and Amps
- Groovy Guitar Amp
