I have been building a guitar - a Stratocaster clone (see my blog for details) and to accompany it, a guitar amp. Being a solid state type dude, all of the amp circuitry will be solid state and to that end, I have created a thread HERE covering that part of the project.
In this thread, I'll cover speaker choice, box construction and finish.
The design: It is fairly conventional - open back with two 12" drivers. The controls will be on a sloping panel above the baffle, similar to many other guitar amps. All of the components for the amp will be accessible from the back, the top of the cabinet is fixed and non-removable.
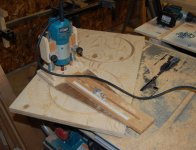
I make up for my lack of knowledge with enthusiasm for the task and without specific plans, cut the parts for the box. First, knowing that it will be 12" drivers and knowing that it will be Eminence drivers, I layout the baffle for the holes and start routing:
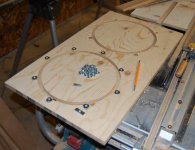
With the holes cut, I drill 1/16" deep countersinks with a 3/4" forstner bit for the t-nuts to sit in (they are now flush with the face...details ):
):
I then cut the other parts of the box - sides, top and bottom:
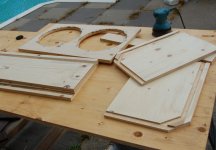
With all of these beautiful joints, assembly should be a breeze.

In this thread, I'll cover speaker choice, box construction and finish.
The design: It is fairly conventional - open back with two 12" drivers. The controls will be on a sloping panel above the baffle, similar to many other guitar amps. All of the components for the amp will be accessible from the back, the top of the cabinet is fixed and non-removable.
I make up for my lack of knowledge with enthusiasm for the task and without specific plans, cut the parts for the box. First, knowing that it will be 12" drivers and knowing that it will be Eminence drivers, I layout the baffle for the holes and start routing:

With the holes cut, I drill 1/16" deep countersinks with a 3/4" forstner bit for the t-nuts to sit in (they are now flush with the face...details

I then cut the other parts of the box - sides, top and bottom:

With all of these beautiful joints, assembly should be a breeze.
I didn't waste money on materials, just used up some of the leftover pieces of 3/4" spruce sheathing I have to build this box. Ran it through my thickness planer to make it reasonable, then sanded it. It ends up very smooth to the touch.
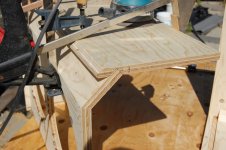
With all of the parts cut, assembly begins. The joints between the baffle and control panel and top are glued and reinforced with biscuits:
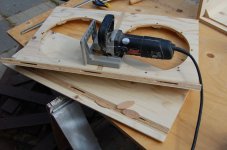
A side view shows how they fit together:
Clamps, a few brads and some glue secure the sides:
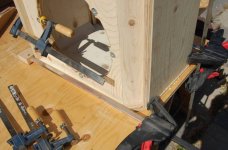
A few hours later, after the glue sets:
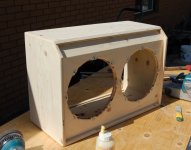
Ready for final sanding and some kind of finish.
With all of the parts cut, assembly begins. The joints between the baffle and control panel and top are glued and reinforced with biscuits:

A side view shows how they fit together:

Clamps, a few brads and some glue secure the sides:

A few hours later, after the glue sets:

Ready for final sanding and some kind of finish.
Looks great! But why did you mount the sloping wooden panel? Most combos have a amp section which hangs from the top and can slide out. You could cut a big hole in the panel (although it would be very hard now) and cover it with a metal panel. Because you now need pots with long screwthreads which aren't all that common, not available in all resistance values and not always the best quality.
Thinking while I'm typing, you could mount the pots on a metal panel from behind and have the shafts protrude the wooden panel. You would need pots with long shafts. The metal Piher pots with 6mm shafts are nice (although I did have a relatively new stereo one fail in one of my basses).
Thinking while I'm typing, you could mount the pots on a metal panel from behind and have the shafts protrude the wooden panel. You would need pots with long shafts. The metal Piher pots with 6mm shafts are nice (although I did have a relatively new stereo one fail in one of my basses).
Looks great! But why did you mount the sloping wooden panel? Most combos have a amp section which hangs from the top and can slide out. You could cut a big hole in the panel (although it would be very hard now) and cover it with a metal panel. Because you now need pots with long screwthreads which aren't all that common, not available in all resistance values and not always the best quality.
Thinking while I'm typing, you could mount the pots on a metal panel from behind and have the shafts protrude the wooden panel. You would need pots with long shafts. The metal Piher pots with 6mm shafts are nice (although I did have a relatively new stereo one fail in one of my basses).
Hi Jarno,
I thought about how I wanted it to be and came up with a "box strength first" idea, where the structure of the cabinet came first. I then thought of different way of mounting the various components and decided that all of the parts will accessible from the rear.
The preamp section and the "effects" section will be mounted on a bracket that will be attached from the back of the sloping panel. I will carefully cut the appropriate size hole to house these.
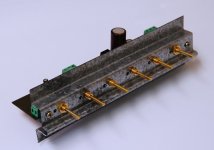
The preamp. It requires a hole `1" x 8" through the panel. Yes, it is tougher to cut these now but I'm up for it.
Once all of the parts are in place on the panel (including jacks), I'll make a faceplate from thin stainless to cover everything.
The case was constructed to accommodate two 12" Eminence drivers. My choice was the Legend 1258 based on the sound clips of the different drivers on Eminence's site. I listened to several possibilities through my speakers (loud!) and through headphones. After a while, everything sounds the same...
I'm not married to this choice, if someone has a recommendation, I'll entertain it. One thing is that they have to be Eminence, to fit the bolt pattern.
Moving on with construction, I had some decisions to make after the box was put together about how to finish it. I considered Tolex but I'm not big on glued on vinyl and it's kinda plain, boring. I want the things that I make to be eye-catching, unique and artistic (if possible). I thought I could do a funky paint job - take advantage of the hard to cover grain of the cheap plywood I used to add to the effect.
I started with black enamel, sprayed on heavy, to build up a thick coat rapidly - the idea was to create some sags in the paint and get to the "wrinkle" stage, where the top layer is drying but the layers underneath are still wet. This causes the paint to wrinkle - a good effect.
Letting this dry overnight, I switch to a bright baby blue and spray on several coats of this. This causes the black to wrinkle even further.
I let this cure for a week and then start sanding with the random orbit sander and 100 grit paper - the idea is to make it flat and also to expose some of the wrinkled black underneath. Once I'm satisfied with how much is showing, I switch to 400 grit paper and make it as smooth as possible.
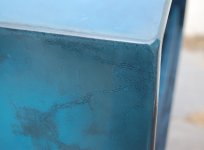
Next step, mix a little black with clear urethane and "flame" the edges. A few coats later and the desired effect is achieved.
The next day, sand smooth again with 400 grit and this time I mix a smidgen of the baby blue with the clear and overcoat the entire box, giving extra on the edges. At this point the colour is nearly where I want it.
To mellow out the colour even more and to give the smoothest possible surface, I sand smooth and shoot on several coats of clear (no tint) the following day.
This sounds like a lot of work but really it wasn't. I just takes time, the actual painting goes very quickly and is fun - probably a lot more fun than cutting and gluing on Tolex (cheaper too, I had all of the paint and clear already).
Here's the overall look:
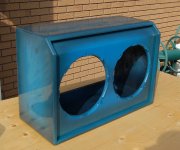
The baffle will be repainted black later. Another view:
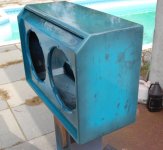
And a closeup of the finish:
I'm very pleased with the results.

I'm not married to this choice, if someone has a recommendation, I'll entertain it. One thing is that they have to be Eminence, to fit the bolt pattern.
Moving on with construction, I had some decisions to make after the box was put together about how to finish it. I considered Tolex but I'm not big on glued on vinyl and it's kinda plain, boring. I want the things that I make to be eye-catching, unique and artistic (if possible). I thought I could do a funky paint job - take advantage of the hard to cover grain of the cheap plywood I used to add to the effect.
I started with black enamel, sprayed on heavy, to build up a thick coat rapidly - the idea was to create some sags in the paint and get to the "wrinkle" stage, where the top layer is drying but the layers underneath are still wet. This causes the paint to wrinkle - a good effect.
Letting this dry overnight, I switch to a bright baby blue and spray on several coats of this. This causes the black to wrinkle even further.
I let this cure for a week and then start sanding with the random orbit sander and 100 grit paper - the idea is to make it flat and also to expose some of the wrinkled black underneath. Once I'm satisfied with how much is showing, I switch to 400 grit paper and make it as smooth as possible.
Next step, mix a little black with clear urethane and "flame" the edges. A few coats later and the desired effect is achieved.
The next day, sand smooth again with 400 grit and this time I mix a smidgen of the baby blue with the clear and overcoat the entire box, giving extra on the edges. At this point the colour is nearly where I want it.
To mellow out the colour even more and to give the smoothest possible surface, I sand smooth and shoot on several coats of clear (no tint) the following day.
This sounds like a lot of work but really it wasn't. I just takes time, the actual painting goes very quickly and is fun - probably a lot more fun than cutting and gluing on Tolex (cheaper too, I had all of the paint and clear already).
Here's the overall look:

The baffle will be repainted black later. Another view:

And a closeup of the finish:

I'm very pleased with the results.
OOHHH MY GOD!
That is sick-wicked amazing d'eh'ahh!

I am a pretty serious vintage freak and shun upon modern, unconventional designs, but let me tell you that this is just beautiful! I want you to make me a small version of that! like, a 10inch version!
I am amazed by your cabinet, it's going to be great!
That is sick-wicked amazing d'eh'ahh!
I am a pretty serious vintage freak and shun upon modern, unconventional designs, but let me tell you that this is just beautiful! I want you to make me a small version of that! like, a 10inch version!
I am amazed by your cabinet, it's going to be great!
Thanks!
Unfortunately, it's gathering dust right now - I'm still working on the electronics, specifically the preamp section where I've hit a few snags. I'm officially broke (too, tooooo many expenses this month!) so I need to let some time pass before I can get the drivers.
Unfortunately, it's gathering dust right now - I'm still working on the electronics, specifically the preamp section where I've hit a few snags. I'm officially broke (too, tooooo many expenses this month!) so I need to let some time pass before I can get the drivers.
Some metal work.
The corner protectors I've seen are plain and boring - being an industrious sucker for punishment, I figured I'd make my own. I planned the control panel faceplate to be stainless steel (I have lots of this) and so to match that, I'd make the corners from the same.
I am using 16 gauge stainless that is surplus kickplates for doors. It's hard to cut and drill but not as bad as better grades of stainless.
Some layout:
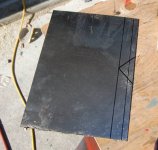
And the first cuts. Notice the scores with the cutting blade along the lines that need to be bent. This makes bending this thick metal manageable:
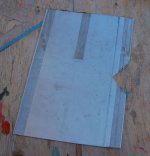
Bending:
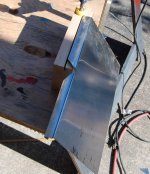
I used a block of hardwood with a slot cut into it for the metal edge to slip in and help with the bending. Some pounding with the hammer finishes it off.
More bending and you can see a rough pattern drawn on the side:
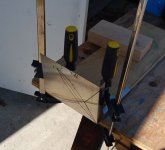
And that shape cut out:
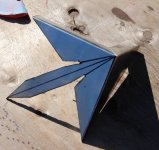
Continued...
The corner protectors I've seen are plain and boring - being an industrious sucker for punishment, I figured I'd make my own. I planned the control panel faceplate to be stainless steel (I have lots of this) and so to match that, I'd make the corners from the same.
I am using 16 gauge stainless that is surplus kickplates for doors. It's hard to cut and drill but not as bad as better grades of stainless.
Some layout:

And the first cuts. Notice the scores with the cutting blade along the lines that need to be bent. This makes bending this thick metal manageable:

Bending:

I used a block of hardwood with a slot cut into it for the metal edge to slip in and help with the bending. Some pounding with the hammer finishes it off.
More bending and you can see a rough pattern drawn on the side:

And that shape cut out:

Continued...
And the results:
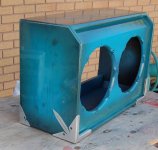
I made the pair for the bottom/back different. I still need to do another pair for the top/back which will be different again.
The cut and bent front panel:
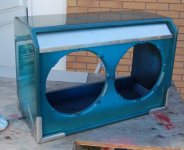
REALLY hard to bend this to that 45 degree angle and keep it from deforming. It will be held in place with a couple screws with the top edge wedged into the corner. The bent part is meant to clamp the grill cloth.

I made the pair for the bottom/back different. I still need to do another pair for the top/back which will be different again.
The cut and bent front panel:

REALLY hard to bend this to that 45 degree angle and keep it from deforming. It will be held in place with a couple screws with the top edge wedged into the corner. The bent part is meant to clamp the grill cloth.
Very nice corners! It almost looks like a modern "fleur-de-lys" don't it? I am starting to see a theme here: Blue amplifier, Fluer-de-Lys inspired corners...
Are you a Quebecer?
Si oui, c'est ben correct!
If not, then it's still a great looking amplifier!
Sorry, not from Quebec but been there a time or two. Je ne parle pas francais...just a leetle beet.
The corner was meant to look like a stiletto - a dagger
 Oh well, I still like it.
Thanks for the fine compliments. I have not done anything with the case since, I'm still working on the preamp section and I've taken an ambitious turn: I am reproducing the preamp and chorus from the Ampeg VH140C. See the schematics HERE.
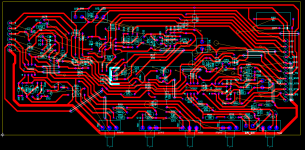
So far I have the preamp section boards laid out. I had to split them in two to get a size small enough to print and etch here:
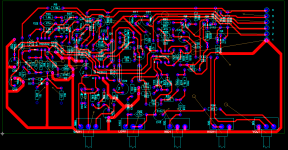
The other half:
Last edited:
aha, I see...
That's really an impressive project you got going there... Quite the project, m'yes. But there's one thing: You did not include the chorus section on your pcb, or did you not finish that layout yet?
huh... two reverb channels, pretty neat. Or two return level controls, rather, which are bridged together in some kind of way. I don't understand...

...
So far I have the preamp section boards laid out.
I forgot to read carefully. So, does DigiKey still carry the bucket brigade MN3001 chip? That's the only place I know that has it(had it?).
You must like the POLICE or Pink Floyd to want to incorporate a chorus unit in your amplifier!
I forgot to read carefully. So, does DigiKey still carry the bucket brigade MN3001 chip? That's the only place I know that has it(had it?).
You must like the POLICE or Pink Floyd to want to incorporate a chorus unit in your amplifier!
Not at Digikey, I found them on ebay (of course) HERE. That gives me a few extra to play with (or break).
I have the parts coming for the preamp tomorrow from Digikey and I want to get that up and running before I start in on the chorus board. This is meant to be a looooong term project.
I chose the Ampeg as a challenge and it is highly regarded. I wanted a project to sink my teeth into, completely opposite to how this started (with the ESP preamp). I'm not a player yet so I only have advice and instinct to work on.
I assumed Eminence drivers were acceptable - they are available locally and reasonably cheap.
The first project in any hobby will have compromises. If there is a second, I will further explore the options.
In the meantime, which EV 12" would you recommend?
BTW, still stalled (or, more appropriately, stalling) on the preamp. I have the parts, I have the boards etched (no camera for any pics - my ex have borrowed it) but I can't bring myself to stuff them, for fear that I made a mistake in the layout. I'm such a coward...
what?! Come on man, you'Re so close! If you made a mistake you'll be able to track it down, and if you're not able to we'll help you out!
and bishopdante,
although Electro-voice is highly regarded since the late fifties, Eminence did not garner its fine reputation by manufacturing mediocre products... Plus if he's not happy with them, he can sell them (they'll sell in no time in the local classified ads) and buy whatever. I'd go with some Celestions though...
I have a vintage 65 in my Traynor DG-30D and it sounds really good.
cheers all!
Close?? 
Ok, I started stuffing board 1, I have the jumpers and most of the resistors in and it only took 2 hours! Just to refresh your memory, here's board one (half of the preamp section only):
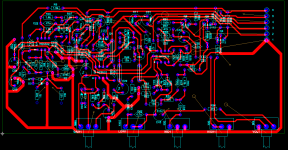
I feel helpless without my camera unable to take any pics of the actual boards (pics are motivational). I'm extremely paranoid about the component values that are printed on the board. I have checked and re-checked them but I still feel like something is wrong...I need therapy.
After this board is assembled I need to figure how to test it for mistakes. Besides the input jacks, I have 6 traces that go to board 2, three of these are GND, +15 and -15. The other three I'll have to trace on the schematic to see their impact on the circuit.
For luck, I'm crossing my fingers and my eyes on this one!
Ok, I started stuffing board 1, I have the jumpers and most of the resistors in and it only took 2 hours! Just to refresh your memory, here's board one (half of the preamp section only):

I feel helpless without my camera
After this board is assembled I need to figure how to test it for mistakes. Besides the input jacks, I have 6 traces that go to board 2, three of these are GND, +15 and -15. The other three I'll have to trace on the schematic to see their impact on the circuit.
For luck, I'm crossing my fingers and my eyes on this one!
Board one is assembled. I can't really check for circuit operation without board #2 (too much of #1 relies on #2), so I'm stuffing that now. Both of these connect to the chorus board which I haven't even started the layout on yet. I'll need to make sure that the preamp section is working properly before I start the chorus, just to give me some encouragement to press on.
I missed a few parts when I made my order, significant is the 330 ohm, 10 watt resistor in the reverb section and a few miscellaneous caps and resistors, both of which I have, but not in the size or quality I want.
I missed a few parts when I made my order, significant is the 330 ohm, 10 watt resistor in the reverb section and a few miscellaneous caps and resistors, both of which I have, but not in the size or quality I want.
- Status
- This old topic is closed. If you want to reopen this topic, contact a moderator using the "Report Post" button.
- Home
- Live Sound
- Instruments and Amps
- Groovy Guitar Amp