Yes, one school of thought is locate such braces slightly off-centre - as in the one edge at or just outside the vertical central axis.
MDF would be less efficient for that than either the plywood, or in the case of "stick" / dowel braces, solid hardwoods.
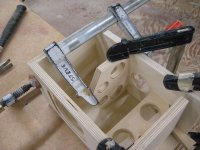
For clamping, when cut square, I find simple F or bar clamps for longer pieces, to work quite well. It's impossible to have too many clamps in the shop, but on smaller boxes there are limits to how many you have room for a time.
In the photo shown ( "milli" sized slot vented box for a Mark Audio 70mm series) , there was room to clamp up 7 of the total of 9 pieces that make up the enclosure at one go. This happens to show 2 braces - the upper one contacts the driver and connects the to side panels to back, and the lower one connects front to back and upper "shelf" of slot port. The driver brace is carefully sized for a snug friction fit to the rear magnet pole plate, and relies on the compression of driver mounting screws for pressure. It's important to not over torque those.
One could get fancy with dadoes, biscuits, dowels, Festool dominoes, etc , but I've built dozens of pairs of this size enclosure with no nails or screws, and all butt joints. The only mechanical fasteners will be the mounting screws for driver and input terminal cups.
MDF would be less efficient for that than either the plywood, or in the case of "stick" / dowel braces, solid hardwoods.
For clamping, when cut square, I find simple F or bar clamps for longer pieces, to work quite well. It's impossible to have too many clamps in the shop, but on smaller boxes there are limits to how many you have room for a time.
In the photo shown ( "milli" sized slot vented box for a Mark Audio 70mm series) , there was room to clamp up 7 of the total of 9 pieces that make up the enclosure at one go. This happens to show 2 braces - the upper one contacts the driver and connects the to side panels to back, and the lower one connects front to back and upper "shelf" of slot port. The driver brace is carefully sized for a snug friction fit to the rear magnet pole plate, and relies on the compression of driver mounting screws for pressure. It's important to not over torque those.
One could get fancy with dadoes, biscuits, dowels, Festool dominoes, etc , but I've built dozens of pairs of this size enclosure with no nails or screws, and all butt joints. The only mechanical fasteners will be the mounting screws for driver and input terminal cups.
Attachments
Last edited:
Looks good, what kind of glue are you using?
Is the front baffle thicker than the rest of the cabinet?
Do you glue the panels one at a time or clamp it all in place and let it set?
Is there any need for a seal between the driver and front baffle when using such a brace? Is the brace adjustable?
Is the front baffle thicker than the rest of the cabinet?
Do you glue the panels one at a time or clamp it all in place and let it set?
Is there any need for a seal between the driver and front baffle when using such a brace? Is the brace adjustable?
So let's say I use a vertical brace to support the back of the driver, would it be best to mount it off-centre? Could I use cheaper 18mm MDF for the brace?
Yes it should be off-centre. MDF, not being very stiff, does not make that good a brace, but it is better than nothing.
dave
Looks good, what kind of glue are you using?
Is the front baffle thicker than the rest of the cabinet?
Do you glue the panels one at a time or clamp it all in place and let it set?
Is there any need for a seal between the driver and front baffle when using such a brace? Is the brace adjustable?
Any yellow PVA cabinetmakers' glue - we alternate between Titebond I /II , or Dural ,
Yes, the front baffle is thicker than the others ( i.e. 18 & 15mm here) - this is to accommodate the thick mounting flange of the particular drivers (Mark Audio, CH x 70 series in this particular case. Wide dispersion drivers with flanges this thick should really be rebated to be flush with the baffle. With thinner and tapered profile flanges such as those on most Fostex, Mark's new CHN & CHS series among others, such rebating isn't essential for acoustics.
As many panels as you can get clamped up at one time while maintaining any critical clearances (such as vent slots), squareness of joints, etc, and that you have room for clamps to fit is fine. It does take some thinking to determine the exact sequence. As all of the enclosures I build require at least some fiber fill, if not lining of panels with padding of some sort, and many smaller FR drivers use mounting hole too small to access once all panels are together, I always leave at least one off until that part is completed. Sometimes it's the back, sometimes top or one of sides.
Air tight seal is required between the driver and baffle - almost all drivers will come with appropriate gaskets, which vary in resilience / degree of compressibility. We design our braces to be a "snug" fit when the driver is fully set, with no further adjustment such as could be achieved with the threaded rod arrangement in Scott's earlier post. With much larger and heavier drivers such as 18" home theater woofers, or Tannoy Dual Concentric monitors, I'll use a vertical brace and notch a support for the magnet
Do you sand before gluing? Should I wait till it's all put together before doing any sanding as I'd like to get a seamless finish between the panels... The cabinets may get knocked around a little, is it worth adding a few screws? Would Evo Stik be any good?
The rebate for the 12P is 12mm? Looks like a job for a router and a compass. The part of the brace that makes contact with the back of the driver should be flat or pointy? Does it matter if it's off centre from the back of the driver?
I've got a fairly big (~170mm) hole with the 12Ps, if I wanted to put a nice stain on the cabinet and add a grille I'd have to have the whole thing put together before adding the driver/connectors. What sort of stuffing should I use?
I do all my sanding after completion of assembly - and as a very high percentage of my builds get veneered, that sanding is prep work, and done with 80G on air driven random orbit sander. That'd be far too coarse if your plan was for "natural" clear top coat of whatever finishing product.
Not familiar with Evo Stik, but it appears to be an instant bond contact type adhesive. Unless others can attest to its bond strength & durability vis a vis a yellow cabinetmakers glue ( modified cross linking PVA ) such as those I mentioned above, I 'd "stick" with the latter, particularly if you suspect these will get knocked about a bit.
To the next question - yes, screws will provide some extra measure of ruggedness if that's going to be the case. If the chosen box ( it's not absolutely clear yet which that is) had sufficient room inside, that could be done with cleats on the inside of all joints. Installing the screws from the outside is certainly easier, but even when very carefully piloted /countersunk, can't be guaranteed not to split/ chip near edges of cross grain. That's not a huge problem if filled and sanded in prep for veneering, car trunk liner fabric similar to what nigelwright would suggest, or rugged paint that others would suggest-but would certainly speak to the project's utilization build if finished with natural top coats.
The few times I've painted speaker boxes, it's taken more time and total cost of filling, primers, color, clear top coats than veneering with all but the most exotic species.
Plus, I just prefer the look of "real" wood
Yes, a circle cutting jig of some type for router machining of the recessed mounting holes for drivers is the next best thing to CNC, to which some of us here have access.
I cut my driver braces to have a flat decent of contact to the driver magnet - that edge needn't be full length of magnet's diameter.
Type and amount of material for lining cabinet walls and/ or stuffing with fibrous fill will vary by design, and in most cases there will be some basic recommendations for staring levels.
Note that Full Range drivers such as either the 10 or 12P on which you seem to have narrowed your focus will have varying amount of break-in time required, ( easily in the hundreds of hours of playing time) and if not done before installing in assembled enclosure, can sound very thin on initial listening. Among other things, that means you may need to adjust fill levels after that period.
If the chosen box ( it's not absolutely clear yet which that is) had sufficient room inside, that could be done with cleats on the inside of all joints.
The few times I've painted speaker boxes, it's taken more time and total cost of filling, primers, color, clear top coats than veneering with all but the most exotic species.
Right, screws actually weaken a joint, so cleats screwed from inside is best overall: http://www.lansingheritage.org/images/altec/plans/1974-enc-design/page18.jpg
Yeah, and why I or the owner often used thick wall paper; quick, easy and seemingly endless choices to keep the S.O. busy. Various marbles were popular along with bamboo and because of the times, butcher block.
GM
Of course, consider the circumference of the WLs this small 'piston' pumps out [~344 m-sec/Hz] and it becomes obvious that its location on a typical vented alignment is of no importance beyond how close the vent's terminus is to a parallel boundary reflective/absorptive enough to audibly change its tuning.
GM
GM
No problem Chris. I don't post on the full-range forum much these days, so its entirely possible you've forgotten about me
Monty, B&Q stock 2 kinds of plywood. The hardwood stuff is probably the one you want, but its not cheap:
18mm: Untreated Hardwood Plywood (W)607mm (L)1220mm (T)18mm | Departments | DIY at B&Q
12mm: Untreated Hardwood Plywood (W)607mm (L)1220mm (T)12mm | Departments | DIY at B&Q
The alternative is the softwood ply, which I've used previously. Its not bad, but not as nice as the hardwood one.
B&Q Untreated Plywood (W)2.44m (L)1.22m (T)12mm | Departments | DIY at B&Q
Last time I wanted something doing, I think they were cutting 18mm stuff doubled up.
Anyway, I know its expensive, but it takes out quite a bit of the work. Just make sure you plan your cutsheet before walking in.
Chris
")
Try this place: http://stores.ebay.co.uk/farmwoodpr...63&clk_rvr_id=765415699937&afsrc=1&rmvSB=true
You can send them your cabinet cut list and what sort of ply you would like, they give you quote - the cut BB quotes I have are Very competitive AND I dont have to deal with lead swinging local tradesmen.
I could of course have the brace just supporting the top half of the enclosure so that it doesn't have to be anywhere near the vent. What side of the baffle would it be best to fit the port on for left/right speakers?
Thanks for the link, will definitely check it out. But also want to get some experience woodworking!
Thanks for the link, will definitely check it out. But also want to get some experience woodworking!
stopping a vertical brace short of the port sounds fine - you could ways orient it horizontally so it doesn't conflict with the port at all, and still connect three panels and the driver
I almost always do slot ports myself, but it probably doesn't matter whether a round port is centered or offset in mirror image
I almost always do slot ports myself, but it probably doesn't matter whether a round port is centered or offset in mirror image
The number and sizes of holes can vary ,but we like to shoot for at least 35-40% of total area of brace panel - and as the one photo above shows, with a horizontal brace, you can also bevel the front edge beyond magnet contact area. If the box is deep enough, the brace will still contact at least half of the depth of side panels.
I have at least a dozen sizes of hole saws and forstner bits, along with a heavy duty 1/2" electric drill for doing these - I find it faster than with a drill press.
I have at least a dozen sizes of hole saws and forstner bits, along with a heavy duty 1/2" electric drill for doing these - I find it faster than with a drill press.
Last edited:
- Status
- This old topic is closed. If you want to reopen this topic, contact a moderator using the "Report Post" button.
- Home
- Loudspeakers
- Full Range
- Good compact enclosure for FE166en to survive student life?