As fast as you remove aluminum oxide it is already starting to build up again. I think that a sanding to smooth the top surface of the screen and then blow the dust off leave them over night then paint with your color coat and then clear top coats there will be more than enough oxide to provide a fine grip for your color coat.
You can test your theory number two (was that a line from a Monty Python skit?) by coating a plastic sheet with the zink primer (let dry) and put your bad boy supply on one end of it and then check with your high voltage probe at the other end. If you can read a charge then there is no harm and only potential good in applying the zinc primer but if you cannot read any charge there is not much point as it will not be as good an insulation as your high gloss top coat will be so it would only amount to an unnecessary cost in time and materials and take up the space a clear coat could occupy. I think that your seven year R&D project has proven that the screen is plenty conductive enough and a little resistance is a good thing rather than a bad thing in this application. If you were going to have any problems they would have been evident long before now.Your stator does not seem to be broken so there does not seem to be a need for a fix.
The problem with glues and Styrene louvre is that the Styrene used in these louvres is a real witches brew of all manner if junk mixed with what ever amount of plasticizer they feel they need for any given batch. It is all over the place. I have glued and painted some louvre with good results and other pieces will not hold glue or paint for very long. So the problem is because of the hap hazard way in which they make the stuff it is not very reliable. The newer or fresher the louvre panel is the more likely it will be to be sweating out plasticizer older ones that have sat for a long time in use under the lamps generally have less issues with sweating it seems to slow down over time.You just cannot trust the glue or paint will stay put then again it might so you can see why Jim Strickland opted for solvent welding and encapsulation. He did not want to take any chances with product in the field. For your own stuff you can always repair or rebuild if necessary and you only have your own labor and inconvenience to deal with if an issue should arise and you have had a good run so it's not a bad gamble. With a company behind the product if and maybe can put you out of business.
I never did find many glues that realy stuck well to the Styrene. Roo Glue (Roo Products, Inc) which is a modified acrylic is not bad but not even close to a solvent weld. Which glue are you referring to? Some of the water based contacts stick very well and are not much bothered by plasticizer migration are good as was one of the 3M solvent based contacts Sorry I can't recall the number. Some of the auto vinyl top adhesives are very good and are specifically designed not to be bothered much by plasticizer. I sampled a number of polyurethane adhesives a few years ago and none stood out as potential choices. I even tried out three UV cure products but they were not great either and I was not much impressed with using a mercury vapor arc bulb taken from its outer bottle as a UV source. I got very careful after my first unintended very fast sun tan.
I think that your panels look really solid. You might want to consider stopping short of the diaphragm spacers (with your grid) by a row of cubes all the way around just to insure that even with contamination the charge from the grids cannot get to the diaphragm, the added material to stretch from (diaphragm) is not a bad thing to have either as Jim chose the same path.
From my own past experience I did not find that this form of construction was much different in terms of effort and time than building with wire. With grids you have to either pre powder coat them or paint them after assembly. With wire you have to get the wire bonded to the louvre and the insulation is taken care of, mil spec and tested if you buy the right wire.
I am glad to see your work shown so clearly as this provides people with options to try out ideas and methods that are proven to work and last. Building ESL's is like giving blood either way you know there is going to be a shock one from a needle and one from a supply. I hate that part. Regards.
I forgot to mention that the coating was so thin that didn't chance ripping the mylar to measure the thickness. jer
Hi Jer,
It sounds like you’ve played around with the new Licron Crystal coating more than most of us so I want to pick your brain some and offer some observations of my own.
I’m curious to find out if it can be wiped on rather than sprayed. Mavic’s panels have one sprayed coat (just wet) of the Licron Crystal; which looked rather thick when wet (2 mils or so) but the stuff is mostly solvent so it dried very thin and the panels sound wonderful. I sprayed some sample pieces of Mylar and made some observations. When applied a very light mist coat the droplets did not fully connect to form a continuous smooth surface (which I deem necessary). When sprayed just wet enough to form a continuous smooth coating (a factor determined by viscosity), the resulting dried thickness is somewhere between 1-2 microns thick, as coarsely measured using a micrometer graduated in [greater] 1/1000” increments.
I would think that a wiped-on coating of the Licron Crystal would be much thinner—perhaps a super light mist spray application followed by immediate wiping with a Licron dampened sponge to connect the dots and form continuous coating—or just wet a sponge or rag with the Licron and apply it in a circular motion. I haven’t tested if that would work. Have you tested a wiped-on coating?
moray james.Thank you very much for your compliments and thoughts on my design.
My theory #2 is mainly the only reason to waste a layer of precious coating thickness.
The very very first stator I made was from some preforated aluminium soffit material I found at home depot .
Along its short side it had a slight curve to it,so I had used the styrene grate for support and keep it flat.
After finding that I had poor performance do to a low open area I switched to aluminium screen.
This is how I had come up with the original size, was to compare the difference of the open area on a same size panel,needless to say the difference was huge.
Anyway,I was digging around in the garage one day (a couple of years later) and ran acrossed one of the old panels and had found that the styrene had come lose from the epoxy bond and not the aluminium, this was very puzzling and I knew that this was going to be an issue that needs to be solved in the future.
It was around that time that gorrilla glue came on the market and I have yet to try it.
I had thought about doing the syrup trick but had found that this softens the grate and could cause deformity's and an uneven (less than a flat panel) surface due to the forces that was being used to hold the screen flat.
Not to mention it can turn into a stringy mess if the consistancy is not just right, but I will investigate this further.
At the time I was after less than +or- 3mil (.003") tolerences but in time I had found that to be over kill.
I haven't tried any contact glues yet, but I plan to investigate them,im just a little worried about things getting very messy with them,though they may prove worth to initially glue the screen flat before a final glueing to the grate.
The powder coated grids were coated pre assembly of course.
The painted ones were painted after assembly and which is why it is essential that you use a glue that is not effected by the solvent used in the paint.
I had also thought about making the stator one row shorter, IMO was not keen on the idea of any part of the diagphram not being in control of the stator regardless of how little movement there may be along the edges.
Not to mention the extra cost of material it would take to fill the gap to seal the edges of the screen,however it is another option to be investigated.
Yes ,I agree,they can be a stickler but "every rose has it's thorn."-brett michaels.
And they are very much worth every bit of pain it takes to build them.
Even if it takes as much skill and time it takes to build a model rc airplane,at least it can't crash and burn to nothing just because the radio went out. jer
Charlie, yes those are the same techniques I have tried ,and had the same results and experience that you had just described,which is what i had tried to explain to you when we spoke on the phone.
Unfortunatly I didn't get a chance to play with it some more last weekend like I had planned, as I needed to get my bias supply finished and to make room on my bench to lay down the plate glass that is required for working on and building the frames for the panels.
"I would think that a wiped-on coating of the Licron Crystal would be much thinner—perhaps a super light mist spray application followed by immediate wiping with a Licron dampened sponge to connect the dots and form continuous coating—or just wet a sponge or rag with the Licron and apply it in a circular motion."
I used this technique the very first time,and yes it worked.
But just to be sure I hit it with another full coat and it wetted much much better.
So I just let it dry and went with it. jer
QUOTE: "I ran across one of the old panels and had found that the styrene had come lose from the epoxy bond and not the aluminum, this was very puzzling and I knew that this was going to be an issue that needs to be solved"
If I am reading you correctly you found that the epoxy was still bonded to the aluminum material but not to the styrene, is that correct?
If I am reading you correctly you found that the epoxy was still bonded to the aluminum material but not to the styrene, is that correct?
Yes, that was the way I remember it.
The reason it sticks to mind is because, I had found this to be strange and the opposite of what I had expected.
Sadly, I don't think I have them any more and I had considered them junk because they didn't work very good and I probably tossed them.
Bummer,as they stil do have some sentimental value as my very very first working pair.
Not mention all the elbow grease it and time it took to get them flatter than a peice of glass.
But ,if I do happen to find one I will post a picture. jer
I think it safe to say that what happened there was a direct result of plasticizer migration. Epoxy does bond to styrene well but if the styrene sweats out plasticizer the glue literally floats up off of the styrene. That's exactly what I was talking about. In this case the epoxy held tight to the aluminum screen. The Aluminum oxide offers plenty of purchase for the epoxy to grab hold and stay put. That is the reason why I said that I did not think that you would require a zinc primer on your screen. You can check your base color coat paint on a scrap piece of aluminum for adhesion and bonding strength easily. Spray a wet coat of the base color coat paint and let dry. The with a razor knife score a series of parallel cuts a 1/16 of an inch apart over an inch width then rotate 90% and repeat. Then take a piece of masking tape and place it over the pattern and rub it down well. Give the tape a hard pull and tear it up off of the painted surface. Take a look and see how much paint has stayed put on the aluminum surface. This is called a crosshatch test and is a standard in the finishing industry. If most of the 1/16 inch squares of paint are still stuck to the aluminum (and not to the tape) then you have a very good bond between the paint and the substrate. Provided the base coat bonds then any concern for bonding subsequent top coats only depends upon compatibility between the two paints. Coating within the minimum dry time provided by the coating manufacturer insures that each coat has the best adhesion to the coat below.
I use exactly the same test method to establish how well an adhesive will bond to a substrate.
Gorilla Glue was one of the urethane adhesives that I tested and it did not bond well to styrene.
Regarding the idea I mentioned about stopping short of the frame edge I was inferring that both the grid and the diaphragm coating stop short of the frame. This has proven to be a good arrangement in Acoustats and the extra undriven diaphragm permits the diaphragm to operate in a more pistonic fashion because there is extra material available to stretch from compared to driving right up to the stator clamps. I used to think that this was just a waste of driven diaphragm area but I now believe that it is a good thing.
If you overlap your screen on the grid then you can use a razor knife to trim it off along the outside edge line of a cube row thus providing full support to the screen at its outer edge. This has the added benefit of pushing the outer screen wire edges down into the cube safely away from the diaphragm then paint. If you are powder coating the screen first then loose screen edges will not be a problem, though I don't know how you are going to keep sections of screen square when they are being powder coated unless you hold them on a frame hooked at the corners. Hope that this helps to make things more understandable.
I have found that when trying to paint something which is held together with an adhesive that is also subject to the solvent in the paint you can cheat and get away with it if you lightly over spray 2 -3 coats (not wet) first and let dry between each coat. This will give you enough build up of paint to seal off the adhesive from the wet coats of paint to follow and which will contain the bulk of the solvent. It's cheating and the price that you pay is that the painting process takes a little longer.
Last edited:
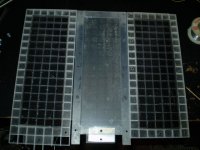
On my first panel the stator was a perforated aluminium plate material not screen as you might have thought.
I'm still not exactly sure what you mean, yet.
But the way I have it now is that the stator and the diagphram are exactly the same size.
Except that the diagphram is smaller by an 1/8" by length and width,so the diagphram frame is overlapping the stator edge towards the middle by a 1/16" all the way around.
This give an extra 1/4" of gap space for an arc to travel should one try to occur do to the sharp edges of the screen.
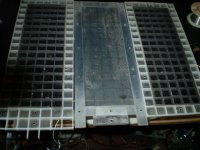
My powder coater did a sample for me for free just to see if it would work.
The sample that I gave him came directly off of the roll with part of the edge binding intact and was enough to keep it plenty square.
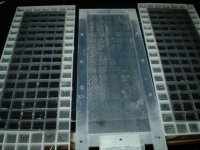
This is where I had left off and only built the ones I have shown you of that type.
He said that his minimum order was $35 and I asked him how much screen can I get done for that and he just said ,alot.
So I never got around to building suitable frames as I found out recently that wood could have possibly worked fine.
So,then I decided if I have to build metal frames to get them coated why not build the complete stator out of some 1/4" x 1/2" alu. c stock and then have it coated ,as gluing the screen to the grate is a PITA and would yeild me a much stronger more acurate quality product.
So,I went and got me a small argon TIG welder and right after that i got into some personal trouble issues and thats where I left off,until now.
So aside from the desire to perfect this particular construction technique I am also trying to iron out all the other extra little details aswell.
To come up with a recipe that says it works and try to eaz the stress for the diy new comer just starting out in the wonderful world of esl building.
Just a little background there.
As far as the primer is cocerned I agree with you there ,but my main question is "is it posible to reduce distortion even more by reducing the charge migration on the stators aswell.
I personaly won't be able to test this until I get a one with and a one wthout panels built along with the proper driving electronics finished
I'm still not exactly sure what you mean, yet.
But the way I have it now is that the stator and the diagphram are exactly the same size.
Except that the diagphram is smaller by an 1/8" by length and width,so the diagphram frame is overlapping the stator edge towards the middle by a 1/16" all the way around.
This give an extra 1/4" of gap space for an arc to travel should one try to occur do to the sharp edges of the screen.
My powder coater did a sample for me for free just to see if it would work.
The sample that I gave him came directly off of the roll with part of the edge binding intact and was enough to keep it plenty square.
This is where I had left off and only built the ones I have shown you of that type.
He said that his minimum order was $35 and I asked him how much screen can I get done for that and he just said ,alot.
So I never got around to building suitable frames as I found out recently that wood could have possibly worked fine.
So,then I decided if I have to build metal frames to get them coated why not build the complete stator out of some 1/4" x 1/2" alu. c stock and then have it coated ,as gluing the screen to the grate is a PITA and would yeild me a much stronger more acurate quality product.
So,I went and got me a small argon TIG welder and right after that i got into some personal trouble issues and thats where I left off,until now.
So aside from the desire to perfect this particular construction technique I am also trying to iron out all the other extra little details aswell.
To come up with a recipe that says it works and try to eaz the stress for the diy new comer just starting out in the wonderful world of esl building.
Just a little background there.
As far as the primer is cocerned I agree with you there ,but my main question is "is it posible to reduce distortion even more by reducing the charge migration on the stators aswell.
I personaly won't be able to test this until I get a one with and a one wthout panels built along with the proper driving electronics finished
It does not matter if you are gluing solid stock perforated sheet or bug screen what ever no matter, the issue is with the substrate material in this case cube louvre made from Styrene. If the Styrene has excessive quantities of plasticizer in it then glue bonds will possibly be subject to the same type of failure. The fault is not the glue or the application method (though a roughened substrate surface will always help any glue to grip) the problem is the plasticizer. There are adhesives which are less susceptible to the effects of migrating plasticizer but it is as always a matter of degree.
With respect to what I was getting at about the grid. Lets say you have a 9 inch square piece of cube luovre that's 16 cubes by 16 cubes. So you use one row all the way around for your stator spacers that leaves you with a diaphragm area of 14 cubes by 14 cubes. I am suggesting that your grid (whether it is screen or perf metal) be 12 cubes square and the coating on the diaphragm would match that at 12 cubes square. This way there is a 1/2 inch of non coated non driven Mylar all the way around the outside edge of the actively driven diaphragm. The "dead area provides you with two things. Firstly it is a safety gap that insures that even if a panel should become contaminated you have a long distance between the coating on the diaphragm and the active stator section. Secondly it provides an area of diaphragm from which extra material is available to insure that the diaphragm can move as a flat piston during motion forwards and backwards. If you run the stator grids right out to the stator clamps and do likewise to the diaphragm resistive coating then when the diaphragm tries to move as flat piston it has to stretch more than if there is a reserve of material to draw from. With the stator grid extending all the way to the edge of the stator spacers the diaphragm cannot stay flat for as far a distance in its range of excursion and must at some point bend or arc into a curve shape. If I have still not made this explanation understandable please let me know what part is not making sense.
Getting back to the idea of an overall stator design a flat perf metal plate (bonded to a cube louvre ) rather than a section of screen would be a lot stronger and much less flexible. You are then faced with proper pre treatment of the perf metal to insure that you have removed all the sharp edges prior to painting or powder coating. Then bond the perf metal plate to the substrate.
As far as I am concerned and this is just my opinion if you are working with cube louvre made from Styrene then glues are pretty much a waste of time and solvent welding is really the only way to go. That is why I ended up deciding to go with insulated wire because it was the only way that I could see that permitted the stator to be encapsulated onto the cube louvre grid. I suppose that you could experiment with liquid Styrene (solids and solvent) and attempt to pour that into the perf holes where they cross the solid structure of the cube louvres beneath the perf metal but that is a can of worms I would rather not open.
With respect to your last question of reducing distortion I don't think that you want to do anything to reduce the motion of charge on the stators that helps nothing you want then to be conductive. To reduce distortion you do however want to reduce the migration of charge on the diaphragm. You do this by making the resistive coating on the diaphragm VERY high much higher that what Acoustat ever used. High meg ohm to low gig ohm is where you want it to be to reduce distortion.
Jumping back to the stators for a moment though. In very high voltage cables they use a resistive layer usually a conductive carbon impregnated plastic layer immediately next to the copper conductor then they extrude the outer layer of high dielectric strength insulation over top. The thin resistive layer acts as a sort of buffer to dissipate large voltage peaks somewhat and protect the primary insulation from having a voltage spike literally punch a hole through the insulation. This might be a very good idea for home brew insulated stators to add a little safety factor into the mix.
I always was and still am concerned with people diy building such panels especially ones along the lines of a Martin Logan style with fully exposed stator panels. The voltages and currents involved with ESL's can be lethal. People who think they can take a can of latex paint to coat their stators and then top coat with layers of urethane to provide insulation and think it is safe are fooling only themselves. This is not to say the speaker will not work or that they may find they can touch it and not get a shock or even touch both sides and not get a shock. That may be the case in that instance but they have no way to be sure or to test. I can tell you that if you took a product to market built like this and someone was injured or killed your sorry *** would be grass in a court of law. Martin Logan spent a long time and went through a lot of coating companies before they could find one to coat their panels and guarantee the safety of the coating and do so for a realistic cost. It is not a simple or easy task and it is not even one that most professional powder coating companies are capable of or competent to undertake. So think about that when you are considering this in the basement or garage (with little or no prior experience) please be careful out there in diy land.
With grids such as you (Ger) are building they are positioned behind a cube louvre structure and will probably have a dust cover over top of that so any risk of physical contact is little to none. My rant was directed toward those who attempt the ML look and have no idea what they are doing or are even aware that it is or could be very dangerous. There are options for diy construction and ML style stators are available to build with. In the end they will cost less look better work better and most importantly be safe to use.
Ger I commend you for your effort to bring a high performance ESL design to the diy public you know well the steep learning curve involved to get where you are right now. Most diy builders are not at that level and are looking for the completed solution easy and ready to go. This is diy and you (the diy builder) are going to have to learn some basics and develop a level of competence before you undertake a project like this. In the same way that a diy tube builder should not undertake a 1000 volt plus amplifier project for his first (and perhaps last) project. Please be careful and get help stay safe.
Note: I am not attempting to direct this at individuals who have built such panels as they are probably aware of the risks and have done their best to deal with them so this is not a personal attack. This is directed toward the diy individual who really has no practical experience and who decides to build such a project. Imagine your child placing their ear to a panel to listen to the music and their hand to the back side to hold on. Is this really the moment you want to test the quality of you paint job?
Last edited:
Thanks again,Moray James,many many very good points there.
The main reason I like this material so much besides being inexpensive is the safety margin it does provide.
When I first started this I was under the impression that the more bais the higher efficiency.
So I started the design with 10kv to 20kv in mind,and possibly with 25kv to 40kv on a larger panel.
Although I found this to be very different in the real world I was able to run them very close to that range and can do so now, but not without havoc, especialy in the traneformers I was using then and now.
The static field was so strong that it rendered my spl meter useless at even 1m away, eventually it popped the opamp and I had to go buy another spl meter.
But, I could pick them up with the confidence of not getting zapped and hold them to my ear.
Except of course the occasional zap I'd get because I didn't mask off the frames to keep the diagphram coating from going completely to the edge.
It is only the quality of the material that disapointes me but I can work around that ,as the panels I have now still work very nicely after seven years.
I have tried to stress a few times the reason I had built the variable supply I have now. Is to test the stator coating and so far they seem to hold up to everything it's got at the moment with a 0v to 600 peak to peak sine into a 10 stage multiplier (half wave) at 200khz.
Anything above 300v p-p I start getting break down from some where but not from the stators them selves, as I tested those for any leakage at the highest voltage my supply can produce and there weren't any.
The jolt you get of off the transformer while the amp is supplying a signal is no joke.
And can be very deadly,this cannot be stressed enough!
So proper stator coating is the utmost task of the whole project.
If it is not done right the first time you may aswell just throw it in the trash start over.
Becuase your going to spend too much time trying to fix it .
Just to find out that it is still not up to par,as I have found out with my first painted stators.
Now the grid thing ,yes,I now understand what you are saying and I figured that was what you were getting at.
Back in 03 to 05 I had read a couple of discussions on this but no solid evidence was shown to make a difference.
I like the idea as this would help cut down on the extra capacitance load on the amplifier.
It is posible to even go as far as 3 to 6 squares in,But some test models would have to be made.
It is also posible that a proper active/inactive ratio be determined like the common d/s vs diagphram width ratio of 1:100 .
As far as gluing is concerned ,it works but not in the longterm.
When I ran into the problem of mounting the screen I had thought of using some some styrene strips that you can get in various widths from .010" on up (from the hobby store) to use as caps to seal the screen permanently to the grate as one method,but I didnt have the patiance to try it at the time, and it would have been an extra cost factor.
Nor did I know that there were going to be issues with gluing either. jer
Quote: "So proper stator coating is the utmost task of the whole project.
If it is not done right the first time you may as well just throw it in the trash start over.
Because your going to spend too much time trying to fix it .
Just to find out that it is still not up to par,as I have found out with my first painted stators."
That is exactly what I found and was the turning point for me to leave perf metal to the pro's and to build with insulated wire. The cost for large perf grids that have been flattened de-burred solvent washed and prepped for coating is not small and to find out they are worthless after they have been powder coated is a tough one to take. Start again and cross your fingers. I am not dissing the method just saying go into it with your eyes open and have an idea of what to look for.
A good question to ask your local powder coat guy is if he has ever applied a coating that was specifically intended as an electrical insulation. There is only one correct answer to that question for you so if you get the wrong answer move on unless you are prepared to pay to let your powder coater learn how at your expense. Most powder coating shops have zero experience in this type of application. If they tell you they know what they are doing then ask them if they will guarantee their work? They will normally tell you no so there is your answer. Know what powder coat material you want to use accept no substitutes and know how many mils that you require to be perfectly applied. That should get you going in the right direction.
yes I agree. I had a material picked out and it wasn't the brand he used.
So after some more research I started contemplating on doing the coating myself by using a kit from eastwood or using a dip method.
As a 30lb to 50 lb bag of coating was only about $20 or so.
I got done messing with powder coated refurbished panel sprayed with clear acyrlic.
I have to tell ya,it took every bit of voltage my bias supply could output without any arc over and probaly picked up an extra 2db to 3db of efficiantcy.
After I revamp a few things and tidy things up a bit I will get some true measurements to compare too . jer
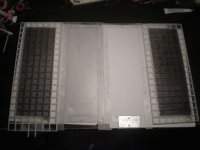
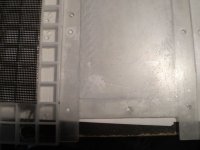
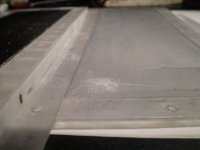
Been working on the second panel today.
It was in much worse shape than the first one.
I had to reglue the screens in a few spots as they were quite uneven and did not handle the bias voltage too good.
So,I cleaned them up,reglued and gave them several coats coats of clear acrylic (just like the last ones) until I had no arcing with my current bias voltage of about 7.5kv.
The diagphram was kept original (including a few pinhole tears) execpt for an extra coat of licron crystal on top of the original licron formula coating.
This was becuase of the spots of missing coating in some of the areas due to the cleaning process.
Mind you, it took some serious rubbing to make those spots to begin with as it was some sort of sticky brown dried on substance who knows what it was, along with salt, dirt and mud.
The coating held up suprizingly well after seven years as the pics show the abuse.
I will eventualy replace the diagphram after some testing to see if the original coating makes any noticeable difference in the sound due to its extra mass and thickness compared to the other identical one.
Improving on the bias voltage (approximately double) tremendously increased the efficiency.
Possibly matching that (or better)of sony speakers that I have been using, as they certainly can't keep up with two panels as it is.
More on that later when I get an spl measurement system in order. jer
Attachments
First impression?
As usual extreme high seemed to be dropped off a bit, and when they are there ,they are there ,when they are up in the mix.
Subtle detailes like closed high hat taps , ride cymbals and vocal airyness when buried in the mix is exactly that, buried.
Kind of like it was over expanded and strugling with the details.
Once it was turned up a bit you could hear everything just fine,but a little upper midrangey.
Probably due to the lack of extreme highs.
They kind of sound like the way sony's do now.
So at first it seemed natural but with my experience and perference I felt it wasn't right
Probably due to the lack of extreme highs.
This was done with no eq's on (flat).
Tommorrow I will due an A&B test with each speaker having its own seperate channel and eq using the same mono signal to see how much of a difference there is.
Then I wil replace the diagpram so that they are the same and repeat the listening test once more.
Fresh uncoated mylar is confrimed to be .25mil by my micrometer.
And about .6mil to .7mil after it has been coated with orginal formula licron and heat treated.
I will measure the thickness of the next new diagphram (when I make it) to compare it too. jer
Are you going to use the new Licron Crystal? It would be nice if you could take a quick camer shot of the coating right after you apply it (before it dries)... just curious whether you're gonna spray it on or opt for an even thinner coating by wetting a sponge or rag and wiping it on....
yes I will do that charlie.
I will be using the new formula from now on.
On this go around I wil probably do two as I want to duplicate the other panel exactly.
I have some thinner .035" stock to make some more frames to try on the smaller panels and also I need to make new frames for my larger panels ,plus the new build,on these I will experiment with coating techniques. jer
Thought these might be of interest.
Process of applying antistatic coating compositions to polyester films - Patent 4089997
Sprayon Anti-Static Spray - Krylon Products Group
Process of applying antistatic coating compositions to polyester films - Patent 4089997
Sprayon Anti-Static Spray - Krylon Products Group
I found the Sprayon in a web search last week and I got excited about it at first but I didn't see any polymer components on the MSDS and it was described as a anti-static "spray" as opposed to a "coating". I then called a service info number on the Krylon website and talked to one of their tech guys who told me it's not a permanent coating and needs to be reapplied after 7-10 days to maintain conductivity. I said OK and hung up when I heard that but now I'm wishing I had asked more questions-- like whether it might last longer (or even indefinitely) on a surface not subject to physical contact and wear... like an ESL diaphragm. Anyone else want to give them a call?
Thanks,moray james,The msds sheet on this product is dated april 3,2010 a very new product.
I will try to locate some of this or may be I could get krylon will send me a free sample.
The msds sheet gives about as much information as licrons did except that it smell like vanilla.
It will be very interesting! jer
I will try to locate some of this or may be I could get krylon will send me a free sample.
The msds sheet gives about as much information as licrons did except that it smell like vanilla.
It will be very interesting! jer
- Home
- Loudspeakers
- Planars & Exotics
- ESL Diaphragm coating