The 4.5 kHz resonance appears to be coming from the surround and I just use a notch filter for it.
That one is also coming from the cone, to about 6 to 8 mm in from the surround. I used the acrylic ever sticky glue, on the back side of the cone and surround, to quench that one. It comes from a Raleigh wave excitation mode. Most 8 inch drivers have this problem, but Fostex, on the F200A, are the only commercial mfg I have seen use this method to damp this problem properly, on the back side. It was their solution that taught me the correct way.
Good information on the treatment for the whizzer cone. The only one I have found that didn't need serious work was the AN 15 inch driver. The whizzer is just an extension of the voice coil and curves out just like a well matched horn throat. Just a few pattern sets and a modest amount of damping glue on the back side, were all it needed. The entire driver sounds like a full range flat panel ribbon driver.
Bud
How important, in your opinion, would conformal coating be for a 10-inch fullrange driver to achieve sonic benefits?
Quite important.
dave
I have finally got around to doing proper treatment of the Audio Nirvana 10" cast frame drivers. Gradually, I have applied the following:
CONE FRONT SIDE:
1) Three rings of EnABL patterns after doing the tap analysis
2) Two coatings with Microgloss included in Ed Lafontaine's Kit (cut 1:3 with water)
CONE BACK SIDE:
1) One ring of EnABL blocks just opposite the one of the middle ring of the front side (around 4 cm from surround)
2) One coating with Kuretake Zig-Zag 2-way glue from the EnABL ring pattern to the outer edge of the cone including surround
3) One coating with Kuretake Zig-Zag 2-way glue of the entire surface of the cone, excluding surround
WHIZZER FRONT SIDE:
1) Two rings of EnABL patterns
2) Two coatings with Microgloss included in Ed Lafontaine's Kit
WHIZZER BACK SIDE:
1) One coating with Kuretake Zig-Zag 2-way glue
RESULTS SO FAR:
1) Subjectively, the level of microdetail improved (with lower noise floor).
2) "Dissapearance" of the speakers improved quite a bit - the sound sticks to the drivers much less than before.
3) The sound is much less directional (less beaming)
QUESTIONS for the more EnABLE savvy members:
1) Even though the speakers now disappear much better than before, there remains a bit of stickiness of the sound to the drivers. Would you risk applying Microglass (cut 1:3 with water) on the back side of the cone over the single/double 2-way glue coating? Might this kill some of the previously gained benefits?
2) Would you recommend applying Microgloss over the 2-way glue on the back side of the whizzer?
Thank you for your thoughts and all the wonderful tips in the several EnABL treatments threads.
Peter
Last edited:
1) Even though the speakers now disappear much better than before, there remains a bit of stickiness of the sound to the drivers. Would you risk applying Microgloss (cut 1:3 with water) on the back side of the cone over the single/double 2-way glue coating? Might this kill some of the previously gained benefits?
You can apply the Gloss to the back side of a driver. What you risk is getting a very edgy sound. Applying gloss over the outer glue coat section, but not on the surround is probably a good idea, though I think I would drop the mix to about 1 part in 10 of water. You want the surface to be just barely tacky back there. If you apply another ring set up near the voice coil on the back you can gloss the whole thing. You will gain more transparency but the cabinetry and basket reflections are going to come right back through the cone.
2) Would you recommend applying Microgloss over the 2-way glue on the back side of the whizzer?
Only under the brim portion of the whizzer. It is ok to have it slip down the cone portion a tiny bit, but not much. Best to take a fine detail camel hair brush and bend the ferrule holding the brush hair to about a 30 degree angle. This will allow you to paint the underside of the whizzer "hat brim" without making a mess of the job.
Did you apply a pattern out on the metal bezel of the basket? This will help a bit with the directionality. The way to think about it is that each of the trailing edges of radiating and mounting surfaces, resonance nodes and subduction zones causes a loop back to the center of the driver. The dispersal of each of them allows the sound coming from the central piston of the voice coil to radiate through a wider arc. Some of the loop back mechanisms on the cone do not make it back to the voice coil, instead looping back to the next resonance node. The more of these you disperse the more coherent will be the final sound and you will hear deeper into the signal.
They are not actually dropping the "noise floor". Instead they are allowing the driver to do what it theoretically should be doing, if all of the resonance nodes were properly eliminated. The perfect signal that the device should be emitting is being disturbed in a number of ways by the loop back resonance nodes, subduction edges and attendant Raleigh waves and the reemergence zone just before the surround, in those cones that have a subduction.
The whizzer likely needs a third ring about 1/3 of the way down from the top. A subtle change should be observable with light tap test. Also check the cone area between the ring set under the whizzer , at about the whizzer diameter and the beginning of the subduction zone to see if another ring is needed between them.
Bud
Peter, you are certainly welcome.
If, after working with the drivers a bit more, you are still getting some shrieks and localization from high frequencies, investigate the front portion of the whizzer, both at the bottom, near the voice coil and at the top end. If there are responses to tapping that are harsher and louder than from the mid portion of the inside of the whizzer cone you need more Zig Zag glue. And, you need to place it on the inside, front side portion of the whizzer, in those two places. Alternate glue with Gloss, just on the offending portions, until the whizzer tap sounds identical from top to bottom. I realize this sounds like a bad idea, but it will control the problem, without harming high frequency response.
Bud
Finally some time to do some work on these speakers.
A couple of questions first.
The only PVA formulation i found locally that was vaguely similar to the products mentioned earlier is the following Lefranc & Bourgeois - Additifs acryliques : Gels, médiums et vernis
So it would be very helpful if Dave (Planet 10) could help me decide if this one's a go, and if the coating should be applied to both the cone and the whizzer cone or not.
Second question would most probably have to be answered by Bud as it's a bout the tacky glue, once again, the resources at hand limited my choice to the following Economy Rubber Cement, Art Material, Rubber Cement, Best-Test Rubber Cement Products: Best-Test Paper Cement, Bestine Solvent & Thinner, Super Spray Adhesive, KLEAN Artist's Linseed Oil, Adhesive Remover: Best-Test Products - Union Rubber, Inc. and i don;t know if it will work.
I did some tests using the rubber cement on some loose papers, and a week later, the glue is still tacky and no glue has seeped to the other side of the (very thin) paper...
So, what do you gentlemen think?
Thanks
Nick
Two busy weeks later, I have a follow-up to my Audio Nirvana EnABL adventure story for those still interested (summary of previous EnABL steps performed on my AN 10" cast frame are given above in post #24). So here goes the list of further modifications performed:
CONE BACK SIDE:
- application of Microgloss (roughly 1 part Microgloss and 10 parts of water) between the middle ring and the surround
WHIZZER BACK SIDE:
- Microgloss applied only under the brim portion of the whizzer (as advised by Bud)
WHIZEER FRONT SIDE:
- Third (middle) ring of EnABL patterns applied where tap analysis showed changes in the direction of the tap sound decay
- Microgloss applied from the subduction zone to the first ring of EnABL patterns
BEZEL OF THE DRIVER:
- Dynamat type of material applied along the circumference of the driver magnet bezel.
- Additional ring of EnABL patterns of the same material applied on the basket of the driver
The whole driver was then braced with a piece of bamboo wood firmly pressing on the back of the driver.
IMPRESSIONS OF SOUND:
- Finally I was getting the feeling of "scary presence" of musicians from these drivers/speakers, but only at times and only with certain recordings (I guess that is to be expected).
- Finally I was able to escape from the "audiophile" attention to lows/mids/highs and other technical qualities and start feeling/seeing the music itself.
- Because the speakers (back-loaded horns EZ10 design) are still with the side panels unscrewed, their disappearing quality cannot be judged fully yet but they already approach the disappearing act of my other EnABL-ed speakers (Fostex FE127eN enabled by Dave, put in Metronome cabinets).
FURTHER EXPERIMENTS:
- At this point, true to the diy principles, I could not pass the opportunity to do apply some enabling patterns to speaker front panels. So I cut up 1cm x 2cm blocks of Dynamat-type material and applied them along the outer edge of the inside of the front speaker panel. Then I applied one ring of EnABL patterns of the same material around the cut-out for the driver. After doing this, I had a feeling the speakers lost a bit of their liveliness and became a bit too dry (still open on the sides though). I decided I wanted to do more hours of listening before going back and removing the EnABL patterns from the panels. Still I wonder if having some cabinet resonances (cabinets are made of birch plywood) in the compression chamber of the back-loaded horn might actually serve a good purpose...
So I cut up 1cm x 2cm blocks of Dynamat-type material and applied them along the outer edge of the inside of the front speaker panel. Then I applied one ring of EnABL patterns of the same material around the cut-out for the driver. After doing this, I had a feeling the speakers lost a bit of their liveliness and became a bit too dry (still open on the sides though).
For EnABLing cabinets, sound absorbing materials are not ideal.
PVC duct tape, contact paper or similar materials will give you the desired effect without sucking the liveliness from the sound.
EnABL around the outer edge on the front of the baffle is a great place to start.
Did you calculate the block size based on baffle width?
Cheers,
Alex
Hi Alex, I calculated the size of the blocks so that I have 24 pairs of blocks (in the usual arrangement) along the outer edge. I am all for experiments (as one could tell from descriptions above) so I am going to try PVC duct tape also.
Experiments on the front of the baffle are fine but it is unlikely I would keep pieces of duct tape there for aesthetic reasons (detracting visually too much from the musical experience")
Experiments on the front of the baffle are fine but it is unlikely I would keep pieces of duct tape there for aesthetic reasons (detracting visually too much from the musical experience
hebrer,
You will not need to keep duct tape there. If you go looking in women's craft shops I suspect you will find a clear, flexible 0.003 inch thick acrylic plastic sheet that is normally used to line the bottoms of pantry shelves. This material has a stick and peal adhesive and once it is applied to a surface is invisible from a meter away, but it is easily removed, won't curl and lift on it's own and does not leave a stain of any kind.
I do think you may want to rethink the number of blocks you intend to use. Fewer than 36 block sets has a tendency to affect high frequency propagation across surfaces. Substantially more than 36 block sets also affects the same frequencies. It does appear to be a phase angle that is altered, drooping with fewer and advancing with more. I thought you should be aware of this.
Bud
Finally some time to do some work on these speakers.
A couple of questions first.
The only PVA formulation i found locally that was vaguely similar to the products mentioned earlier is the following Lefranc & Bourgeois - Additifs acryliques : Gels, médiums et vernis
So it would be very helpful if Dave (Planet 10) could help me decide if this one's a go, and if the coating should be applied to both the cone and the whizzer cone or not.
Second question would most probably have to be answered by Bud as it's a bout the tacky glue, once again, the resources at hand limited my choice to the following Economy Rubber Cement, Art Material, Rubber Cement, Best-Test Rubber Cement Products: Best-Test Paper Cement, Bestine Solvent & Thinner, Super Spray Adhesive, KLEAN Artist's Linseed Oil, Adhesive Remover: Best-Test Products - Union Rubber, Inc. and i don;t know if it will work.
I did some tests using the rubber cement on some loose papers, and a week later, the glue is still tacky and no glue has seeped to the other side of the (very thin) paper...
So, what do you gentlemen think?
Thanks
Nick
Someone? Anyone?
P.S: Happy easter
Nick,
I cannot address the PVA portion, I don't know what modge podge has as additives to modify the PVA and I do not read French. The rubber cement is not going to do what is needed, unless you can thin it out to water consistency and get it to penetrate the paper a bit. The typical material has too much mass and too high a surface tension to work properly.The acrylic glue I use will penetrate the paper a bit and uses the fibers of the paper as part of the damping mechanism. This is needed to reduce the overall addition of mass.
There is a kit available with pen tips of the most useful type, the correct paint and gloss coat a pen wand or two and if you ask a bottle of the acrylic glue I found so useful. EnABL kit - diyAudio
Ed ships these kits worldwide and the $35 price is hard to match.
Bud
Hi Bud,
Thanks for weighing in.
Concerning the EnABL' kit, I already have it, but the version without the glue, just the acrylic paint and the microgloss with the pen wand and assorted nibs. Had I known about the glue option I would most definitely have ordered it...
I guess i'm gonna start with the PVA and enabl' pattern, and later on apply the glue.
Regards
Nick
Hi All,
Not to far off topic but, Is there a EnABL' kit or info for the Audio Nirvana Super 8? I have these drivers and cannot find a definitive answer in the other threads on how or exactly what these drivers require.
Or will the same treatment for the super 12 work?
Thanks
Ian
Not to far off topic but, Is there a EnABL' kit or info for the Audio Nirvana Super 8? I have these drivers and cannot find a definitive answer in the other threads on how or exactly what these drivers require.
Or will the same treatment for the super 12 work?
Thanks
Ian
Hi Ian,
Rather than clutter up this thread and also to provide yet another treatment to a wider audience, I have placed the Audio Nirvana super 8 patterns and treatment text here, on the general EnABL thread.
http://www.diyaudio.com/forums/mult...ng-impressions-techniques-65.html#post2562961
Bud
Rather than clutter up this thread and also to provide yet another treatment to a wider audience, I have placed the Audio Nirvana super 8 patterns and treatment text here, on the general EnABL thread.
http://www.diyaudio.com/forums/mult...ng-impressions-techniques-65.html#post2562961
Bud
After numerous failed attempts to reach Dave (Planet10) in order to get his input as to the options I proposed above, I went on and coated the cones with a mixture of the Lefranc & Bourgeois Binder PVA compound and some plain PVA wood glue (3:1 ratio approx).
Turned out pretty good I must say
Even without the EnABL pattern, the sound is marginally better right now, so it seems I have gotten the right amount of PVA on the cones, no real loss of higher frequencies...
Next will be the outer twin ring pattern... and then onto the tap test...
Will keep you posted
Regards
Nick
hajj,
In a general sense there is a wide zone of good enough to make a difference that is pleasing. Admittedly there are optimum amounts of PVA and an optimum amount of patterns on the front 2 way ZIG glue on the back, out at the edge of the cone, on the front and back of a whizzer at opposite ends and an optimum amount of Gloss in a few places. It takes quite a bit of experience to get the perfect amount of correction applied. Fortunately, if you take your time and listen between treatments you can get to that level of experience pretty quickly. Mostly it takes the courage to just do it the first time. You have to really mess up to not obtain some satisfaction and so, as in horse shoes and perhaps sex, close is good enough. Persevere, the results will get fairly spectacular, not very far down this path you have taken.
Bud
Wow! 8 months since my last update!
I guess that's how long it takes when you move countries and jobs...
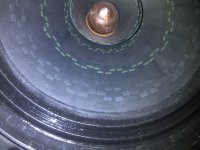
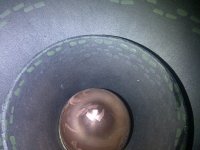
So, here's how my drivers look now, I have done all the main cones rings based on my interpretation of the tap analysis, which i think is less than perfect.
Judging by the number of extra rings I have put, I wondered what would happen if too many rings were drawn.... hmmm... Bud?
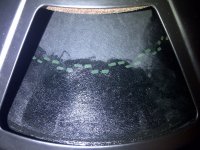
I've also applied the pattern on the back side, as well as the zig two way glue.
Next on the list:
- Final pattern on the whizzer cone (should be around halfway down on the front side.
- microgloss on both the main cone and whizzer, but i need to know where to put them, or at least what the rationale behind it is so i can judge where best to apply.
- Zig two way glue on the whizzer, same need to figure out where to apply it.
You'll notice that i've used two different paint types for the patterns as i found i had a small pot of tamiya flat green paint that seemed to have a higher solids content than the paint supplied with the kit, so i went with it. fingers crossed
I guess that's how long it takes when you move countries and jobs...
So, here's how my drivers look now, I have done all the main cones rings based on my interpretation of the tap analysis, which i think is less than perfect.
Judging by the number of extra rings I have put, I wondered what would happen if too many rings were drawn.... hmmm... Bud?
I've also applied the pattern on the back side, as well as the zig two way glue.
Next on the list:
- Final pattern on the whizzer cone (should be around halfway down on the front side.
- microgloss on both the main cone and whizzer, but i need to know where to put them, or at least what the rationale behind it is so i can judge where best to apply.
- Zig two way glue on the whizzer, same need to figure out where to apply it.
You'll notice that i've used two different paint types for the patterns as i found i had a small pot of tamiya flat green paint that seemed to have a higher solids content than the paint supplied with the kit, so i went with it. fingers crossed
Attachments
- Status
- This old topic is closed. If you want to reopen this topic, contact a moderator using the "Report Post" button.
- Home
- Loudspeakers
- Full Range
- EnABL project, Audio Nirvana Super 12