Yes, that is correct. I am having Albert move slowly as I want to end up with just the right amount of damping material. It is entire,y probable that another ring set will also be needed, out on the outer portion of the main cone.
Other sizes of Audio Nirvana have taken more damping material, or less than what has already been applied. The AN 8 needing the most and the AN 15 the least. However, I had both of those in my hands and this AN 12 is spooky action at a distance. The AN 8 never completely calmed down, while the AN 15 was very easy to control.
Bud
BMWTurbo,
Are your dimensions from the center point of the driver or from the various circumferences?
Bud
Hi Bud,
Sorry about the slow response, the dimensions are all diameters. The drivers are a 3inch WB.
19m, diametere, 22mm diameter, etc.
Bud,
Glad to tell you that the high sounds good and sparkle without too much glares after I applied another half a ring at the outer edge close to the surround. I also put one coat of glue at back of surround and second coat at edge of whizzer, back and front. There is still may be 30% glare has to be killed. The 2.5k region is still playing rough/ shout, but seems starting to behave. Anything I could do for that area??
Albert
Attachments
Last edited:
Alberti,
In a general sense the closer to the voice coil you apply a ring the lower the frequency it is going to clear up the resonance from. I would continue to look for another one or two spots, that you initially thought not important. Adding rings that are unnecessary just drops over all sensitivity a bit.
On a pair of Fostex 127 drivers I have had for a few years now, I continue to find places to add ring sets, slowly. I am down to chasing the last few piano notes that have a phase blur to them still. Pretty sure that another coating of Zig glue over the surround to cone joining, back side area, will kill that final two notes, but I am waiting to see if the other recent changes will settle out just enough to do that for me.
Trying to get rid of the resonances without killing the lively dynamics from drivers is the issue. You will likely be chasing ever smaller problems for some time, now that you are hearing them and have become confident that you can actually eliminate them, with the tools at hand.
Bud
bmwturbo,
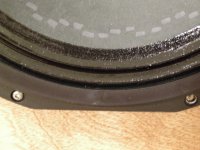
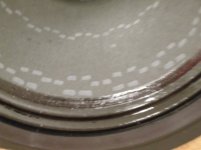
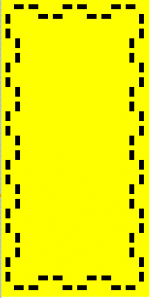
Here is your pattern guide and a pic of how the cone should look when done. No pattern for the center of the dome, but by the time you get to this you should be able to wing it.I would advise only one coat of 10% gloss on the center dome and two or perhaps three coats on the cone. Listen in between the first , second and third coats, with a 24 hour cure period for each. If you like what you hear without Gloss coating then a single coat will likely suffice.
Don't hesitate to ask questions as you progress.
Bud
Attachments
bmwturbo,
Here is your pattern guide and a pic of how the cone should look when done. No pattern for the center of the dome, but by the time you get to this you should be able to wing it.I would advise only one coat of 10% gloss on the center dome and two or perhaps three coats on the cone. Listen in between the first , second and third coats, with a 24 hour cure period for each. If you like what you hear without Gloss coating then a single coat will likely suffice.
Don't hesitate to ask questions as you progress.
Bud
Ripper, thanks Bud, muchly appreciated. I will need to go back and re-read I think to get my head around all that again.
I'd like to keep the cones black if possible from a cosmetic stand point.
The 10% I mention for Gloss is the Gloss to water ratio. As pure a water as you can get is best. I use a chap plastic syringe body to perform my mix raatio's.
I agree about the color. All of mine are done with a clear flat acrylic paint That the Gloss turns shiny and occasionally noticeable from across the room. Definitely let thew cones with pattern on cure for two to three days to get the minimum amount of noticeable spotting.
I am pretty sure that the officially endorsed kit from Ed LaFontaine provides the clear flat paint as a matter of course, along with the pen tips, nib holder and Gloss material, for a criminally low price, delivered around the world. Highly recommended!!!
Bud
Dust,
Yes, it will work on OB, just fine. You need a tape about 0.003 inch thick, 0.1mm thick should do nicely. I use clear acrylic shelf paper with a peel and re-stick adhesive. It is shiny and pretty much disappears from about a foot from the baffle.
As for where to place the pattern, dig up Alex from OZ posts and check out his baffle and port calculator. There are more things you can do with patterns between the drivers and edges, but they require you to learn the "tap test" method to locate the anomalous null rings. Treating these will free your high frequencies even more, from dispersion limiters. All of this is subtle. The most benefit will be gotten when the driver is EnABL's and then the baffle. A normal driver, well, you may or may not notice any difference. Many are so congested and bound up that their problems swamp what the baffle is doing wrong.
Mark Audio drivers, at least the small ones and the Fostex FF85 small drivers can get by without EnABL, but are just glorious when freed up by EnABL 2.0.
Bud
Thanks Bud. I did have a go on Alex's calculator but I don't understand why he takes the perimeter of the baffle as 4 times the width. My baffs are 610mm x 1220mm. To get perimeter wouldn't I just add up the 4 sides? (3660mm) as apposed to 4x 610. (2440)
Also, How does the program calculate the quantity of block pairs needed? If I plug in any old number it will effect the size. If this goes well I will go the whole hog and EnABLE the main drivers; Fostex 207s. I have taken it half way with planet 10's mod podge mod and phase plugs, but would need to practice before attempting it. Dust
Also, How does the program calculate the quantity of block pairs needed? If I plug in any old number it will effect the size. If this goes well I will go the whole hog and EnABLE the main drivers; Fostex 207s. I have taken it half way with planet 10's mod podge mod and phase plugs, but would need to practice before attempting it. Dust
Dust,
In general you should add up the four sides. This will provide you with a perimeter match, but may not provide an even pattern matching at the four corners. As for the number of block sets, which is two blocks and a space 1/2 the width of a block, there should be two rows of them with 18 sets per row, thirty six sets in total. This amount to be distributed around the entire periphery you choose to make your pattern size conform to.
So, if you were to use the 3660 mm perimeter, then the block sets would 100mm in total length, made up of two 40 mm long blocks and a 20 mm space between them. These blocks would then be 20mm wide and the two rows of 18 block sets would be spaced apart by 20 mm. This would make the outside of the outer row slightly smaller than the periphery, which you actually want.
Bud
Thanks Bud. I did have a go on Alex's calculator but I don't understand why he takes the perimeter of the baffle as 4 times the width. My baffs are 610mm x 1220mm. To get perimeter wouldn't I just add up the 4 sides? (3660mm) as apposed to 4x 610. (2440)
Also, How does the program calculate the quantity of block pairs needed? If I plug in any old number it will effect the size. If this goes well I will go the whole hog and EnABLE the main drivers; Fostex 207s. I have taken it half way with planet 10's mod podge mod and phase plugs, but would need to practice before attempting it. Dust
G'day Dust,
My EnABL calculator says to use the perimeter for calculating block size.
You should always use 18 block pairs when calculating baffle EnABL.
If the perimeter used is the addition of all four sides you will always need 72 blocks.
Note that if you use the '4 x baffle width' method, you will need more than the usual 72 blocks.
The '4 x baffle width' was Bud's advice to me when I was first exploring treatment for baffles. I was using Voigt pipes which IIRC had a baffle width around 9-10 inches and a height around 6 ft. It is a compromise for situations where you have an extremely narrow baffle vs height or where the distance from baffle edge to the edge of the driver is too small to fit the pattern using the perimeter method.
Both methods will achieve the desired result of rendering the cabinet sonically invisible.
Cheers,
Alex
")
- Home
- Loudspeakers
- Multi-Way
- EnABL - Listening impressions & techniques