Hi thunk303, thanks. Yes clamps are handy for all sorts of things especially clamping. I should be a little embarrassed by this revelation but I picked Jim's cabinet design based on size, having never heard either this or the pencil. This is a very good sounding cabinet though. I expect the pencil is just as good.
These 10.2 seem to open up a little more each day. It is hard to believe the quality of sound and the amount of volume these little guys can produce. Really marvelous.
These 10.2 seem to open up a little more each day. It is hard to believe the quality of sound and the amount of volume these little guys can produce. Really marvelous.
Hiya; i am new here, and enjoying this site more every minute ")
Been reading this topic because of my interest in the used driver.
Love the way u build this pair of speakers, it sure inspired me of building a pair of my own
Biut first thins first:
I need to finish my tube amp, a 300B SE, will be ready in a cpl of weeks, then ill buy the alpairs, and get bussy dealing with wood, saw and WAF factor....lol
Ill keep u all posted.
BTW; dont wanna steal this topic, soooo...admins: feel free to relocate it
Best regards: Wupsie.
Well, i just screwed in me alpair 10.2 drivers in the cabinets, and i must say: No bass at all...what is wrong??
I am a bit dissapointed and hope things will work out fine in the end.
Help is needed
Thank u all in advance
Hi Wupsie,
Alp 10 Gen 2's are bass rich drivers so you've got something amiss with your box build, or your system or room environment.
You've posted help requests in 2 threads relating to different builds (Jim's MLTL and Pencil 10). Did you built both these boxes? I've deleted your other help request post (duplication) as you've given no detail on your setup.
Depending on which box type you've built, please post in the same or close related thread. Diyaudio members in these threads may be best placed to help you. If you've built another type of box, feel free to start a new thread to seek further support.
You'll need to give much more detail about the whole of your build and set-up (include pics) in order for help to be effective.
Cheers
Mark.
Last edited:
I am sorry for the cross posting, what can i say: i panicked
Lots of hours in the build, high expectations and so on.
Well the alpairs have been playing for lets say 10 hours orso, so maybe things will work out after the break in period
My enclosures are made of 19mm mdf, the coloured kind: black.
Baffle and top are feneered, i used maple, oiled it, and it looks very nice, makes me and me gf smile
These are my first diy speakers, never used mdf, a router or glue before, and i learned a lot.
These are the plans i used:
[/FONT][/FONT][FONT=Skia-Regular_Regular][FONT=Skia-Regular_Regular][FONT=Skia-Regular_Regular]
[/FONT][/FONT][/FONT][FONT=Skia-Regular_Regular][FONT=Skia-Regular_Regular][FONT=Skia-Regular_Regular]
non[/FONT][/FONT][/FONT][FONT=Skia-Regular_Regular][FONT=Skia-Regular_Regular][FONT=Skia-Regular_Regular]-[/FONT][/FONT][/FONT][FONT=Skia-Regular_Regular][FONT=Skia-Regular_Regular][FONT=Skia-Regular_Regular]commercial use only[/FONT][/FONT][/FONT]
[FONT=Skia-Regular_Regular][FONT=Skia-Regular_Regular][FONT=Skia-Regular_Regular]Ill make some picts when i get back from work and post them here.[/FONT][/FONT][/FONT]
[FONT=Skia-Regular_Regular][FONT=Skia-Regular_Regular][FONT=Skia-Regular_Regular]I have another set of panels ready for another enclosure for the alpairs: pencil 10.[/FONT][/FONT][/FONT]
[FONT=Skia-Regular_Regular][FONT=Skia-Regular_Regular][FONT=Skia-Regular_Regular]Anyway: i am more then thankfull for the very fast reply's i get here, the alpairs look awesome and get good reviews, so i am sure i am doing something wrong,things will work out fine i hope.[/FONT][/FONT][/FONT]
Btw, my initial thought was: phase fault.
So i switched cables on one speaker....no result.
Gotta get to work now....ill be back, thanks guys
[FONT=Skia-Regular_Regular][FONT=Skia-Regular_Regular][FONT=Skia-Regular_Regular]
[/FONT][/FONT][/FONT]
Lots of hours in the build, high expectations and so on.
Well the alpairs have been playing for lets say 10 hours orso, so maybe things will work out after the break in period
My enclosures are made of 19mm mdf, the coloured kind: black.
Baffle and top are feneered, i used maple, oiled it, and it looks very nice, makes me and me gf smile
These are my first diy speakers, never used mdf, a router or glue before, and i learned a lot.
These are the plans i used:
ML-TL
[FONT=Skia-Regular_Regular][FONT=Skia-Regular_Regular]for Mark Audio Alpair
[/FONT]
[/FONT][FONT=Skia-Regular_Regular][FONT=Skia-Regular_Regular]10/10.2
[/FONT][/FONT][FONT=Skia-Regular_Regular][FONT=Skia-Regular_Regular][FONT=Skia-Regular_Regular]
designed by Jim Griffin
drawn by dld
[/FONT][/FONT][/FONT][FONT=Skia-Regular_Regular][FONT=Skia-Regular_Regular][FONT=Skia-Regular_Regular]drawn by dld
30-
[/FONT]
[/FONT]
[/FONT][FONT=Skia-Regular_Regular][FONT=Skia-Regular_Regular][FONT=Skia-Regular_Regular]mar[/FONT][/FONT][/FONT][FONT=Skia-Regular_Regular][FONT=Skia-Regular_Regular][FONT=Skia-Regular_Regular]-11 / [/FONT][/FONT][/FONT][FONT=Skia-Regular_Regular][FONT=Skia-Regular_Regular][FONT=Skia-Regular_Regular]update [/FONT][/FONT][/FONT][FONT=Skia-Regular_Regular][FONT=Skia-Regular_Regular][FONT=Skia-Regular_Regular]03-[/FONT][/FONT][/FONT][FONT=Skia-Regular_Regular][FONT=Skia-Regular_Regular][FONT=Skia-Regular_Regular]jun[/FONT][/FONT][/FONT][FONT=Skia-Regular_Regular][FONT=Skia-Regular_Regular][FONT=Skia-Regular_Regular]-11
[/FONT][/FONT][/FONT][FONT=Skia-Regular_Regular][FONT=Skia-Regular_Regular][FONT=Skia-Regular_Regular]
©
[/FONT]
[/FONT]
[/FONT][FONT=Skia-Regular_Regular][FONT=Skia-Regular_Regular][FONT=Skia-Regular_Regular]2011 [/FONT][/FONT][/FONT][FONT=Skia-Regular_Regular][FONT=Skia-Regular_Regular][FONT=Skia-Regular_Regular]Jim Griffin
non[/FONT][/FONT][/FONT][FONT=Skia-Regular_Regular][FONT=Skia-Regular_Regular][FONT=Skia-Regular_Regular]-[/FONT][/FONT][/FONT][FONT=Skia-Regular_Regular][FONT=Skia-Regular_Regular][FONT=Skia-Regular_Regular]commercial use only[/FONT][/FONT][/FONT]
[FONT=Skia-Regular_Regular][FONT=Skia-Regular_Regular][FONT=Skia-Regular_Regular]Ill make some picts when i get back from work and post them here.[/FONT][/FONT][/FONT]
[FONT=Skia-Regular_Regular][FONT=Skia-Regular_Regular][FONT=Skia-Regular_Regular]I have another set of panels ready for another enclosure for the alpairs: pencil 10.[/FONT][/FONT][/FONT]
[FONT=Skia-Regular_Regular][FONT=Skia-Regular_Regular][FONT=Skia-Regular_Regular]Anyway: i am more then thankfull for the very fast reply's i get here, the alpairs look awesome and get good reviews, so i am sure i am doing something wrong,things will work out fine i hope.[/FONT][/FONT][/FONT]
Btw, my initial thought was: phase fault.
So i switched cables on one speaker....no result.
Gotta get to work now....ill be back, thanks guys
[FONT=Skia-Regular_Regular][FONT=Skia-Regular_Regular][FONT=Skia-Regular_Regular]
[/FONT][/FONT][/FONT]
Hi wupsie,
No worries. Now we know which box design you've built, you're on the likely most helpful thread. Jim's designs are well proven so there's something in you set up that's amiss. But, assuming your running the drivers gently still at this early stage, bass output will be limited.
Take a look at these areas:
1 - Dimensions, vent size and damping inside the box (Jim and others to best advise you on this)
2 - Your amp? Home built? Sure you've got it wired up and working correctly?
3 - Source? Output/input matched with amp?
4 - Room placement - pics and more information will help.
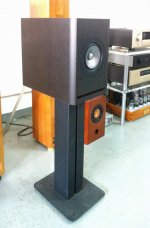
Right now I'm playing a pair of new 10 Gen.2's in a vented box (see pic). Already lots of bass after 1 hour so turning vols. down for the next 99 hours.
Using 8 watt 300B SET for the run-in period. Will move to Accuphase solid state once I'm happy I've got the box damping sorted.
Cheers
Mark.
No worries. Now we know which box design you've built, you're on the likely most helpful thread. Jim's designs are well proven so there's something in you set up that's amiss. But, assuming your running the drivers gently still at this early stage, bass output will be limited.
Take a look at these areas:
1 - Dimensions, vent size and damping inside the box (Jim and others to best advise you on this)
2 - Your amp? Home built? Sure you've got it wired up and working correctly?
3 - Source? Output/input matched with amp?
4 - Room placement - pics and more information will help.
Right now I'm playing a pair of new 10 Gen.2's in a vented box (see pic). Already lots of bass after 1 hour so turning vols. down for the next 99 hours.
Using 8 watt 300B SET for the run-in period. Will move to Accuphase solid state once I'm happy I've got the box damping sorted.
Cheers
Mark.
Attachments
Last edited:
Thanks for the reply
Well lets start with the gear:
Sphinxs pre amp project2 mark2, power amp sphinx project 12, cd speler sphinx project 9 mark 2.
Streaming: squeezebox classic.
Ill post some picts of my room later
Now your questions Mark:
Vent size is like in the plans.
Gear: see above, but i already have the parts for a 300B mono block set
Roomplacement, a few feet away from corners.
Now, i was looking at one enclosure, and saw the cleates went looses, so the entire back was not airtight as expected, soooo...i now will get me clamps out, and gleu them back on.
Btw, i already routered a hole for the bassport, but the actual tube needs to be placed.
I have a question about that: can i gleu a cpl of pieces of mdf together and drill a whole of the apropriate size in it, and gleu it in the box, in line with the bassport??
Many thanks for all u guys helping out a newbie
More tomorrow, i do need a few hours sleep
BTW those speakers look awesome, maybe ill saw up the panels i have here, and build a set like that
GF said: me like a lot
Thanks for the reply
Well lets start with the gear:
Sphinxs pre amp project2 mark2, power amp sphinx project 12, cd speler sphinx project 9 mark 2.
Streaming: squeezebox classic.
Ill post some picts of my room later
Now your questions Mark:
Vent size is like in the plans.
Gear: see above, but i already have the parts for a 300B mono block set
Roomplacement, a few feet away from corners.
Now, i was looking at one enclosure, and saw the cleates went looses, so the entire back was not airtight as expected, soooo...i now will get me clamps out, and gleu them back on.
Btw, i already routered a hole for the bassport, but the actual tube needs to be placed.
I have a question about that: can i gleu a cpl of pieces of mdf together and drill a whole of the apropriate size in it, and gleu it in the box, in line with the bassport??
Many thanks for all u guys helping out a newbie
More tomorrow, i do need a few hours sleep
BTW those speakers look awesome, maybe ill saw up the panels i have here, and build a set like that
GF said: me like a lot
so one of the cabinets was not fully sealed, and both have port opening machined, but no vent tube?
it's probably premature to form impressions of total system performance until those issues are remedied.\
yes, you could stack layers of wood to create the vent, but there would be a marginal reduction in volume and possibly more significantly in the effective internal length - both factors that could affect the an MLTL enclosure's tuning.
Well, i agree on that chisb, cant help it, a litle voice in me head keeps shouting : make haste.....lol
Anyway, i have a few questions:
According to the plans, the reflex tube should be 52mm, is this innner or outer diameter?
The only straight tube i can find has 50mm outer diameter...and ready to buy ports are not straight, please advice?
Had a collegue over a few minutes back, he wants to build a pair alpairs ....wonder wy
Next question is about damping, i have sonofill ready to use, and wonder where to put it, i believe the vent should be free at all times??
And because i have mdf cabinets i was wondering if it would be wise to
stick bitumen on the area around and behind the speaker, would that be wise??
Greetings from a DIY newbie...and yess u will all see the promised photo's soon
The improtant parameters are inner diameter & length. Here is a document that allows you to adjust a port to suit material you have on hand. (52mm id is standard North American 2" plumbing pipe)
http://p10hifi.net/tlinespeakers/FAL/downloads/ChangingPortSize.pdf
dave
http://p10hifi.net/tlinespeakers/FAL/downloads/ChangingPortSize.pdf
dave
some info on the build:
I used black mdf for the enclosure, for the lining i used solid oak, aprox 12mm.
The baffel and top are feneered with maple...woohoo looks sooo sweet
I used cleats on the back for a removable backpanel.
In the cleats are threaded busses, dont wanna go in to details about that.....lol
I use M4/50 screws to screw the backpanel to the cleats.
For the damping i have sonofil.
So...the score so far:
Boxes are ready, almost, had a bit of work with the backpanels, glueed the cleats initially, but at the end, they all loosened...problem was i used old glue....another then i used for the rest..well **** happens
To mount the speaker and solid oak trims i used a router, bought one and yes...it IS important to use it in the one direction the manufacturer tells u 2 , otherwise chips will get out of the object.
So in the mdf there are a few small router marks, chipped out, tryed to repair it, but thats oglyer then the originall situattion, so i took the loss like a real man.
What i learned about mdf: its very easy to work with, but, there is tension in it, and after sawing not one of the bigg panels was flat, had quiet a job trying to glue and clamp it up right in the 5 minutes the glue gives you.
Next time ill use 100% 90 degree aluminium profiles as clamp helpers, to make sure all panels line up flat, flush and 90degree
Well, i used black mdf, wy?
I dont have the space to spraypaint, and well, ill be honest, the investment in clamps, saw, router and routerbits made me bankacount puf like a old geezer, so i thougt it would be ok to choose for a danish oil finish.
The oil fifish does look cool, as on the mdf, as on the maple feneer, but, it has coloured the maple a bit to much yellow.
Next time ill use a 2 comp pu lacker, lets see if this keeps the maple more "natural".
About the feneer:
Like most newbies on feneer and woodworking, i asumed, that for a cool finish, sanding was requierd, so i started with 150, up to 300, and finished with 400.
After that the danish oil was aplied, 3 times.
Well, that is NOT the way to go if u want a almost 3D relief look on maple.
So next time ill aply a thick layer of PU lacker, no sanding before lacking, and after it dried, a light pass with 400 paper, guess that will bring the 3D maple effect without making it look yellow.
I have a question about the glue u peeps use to feneer , i used a bison white wood glue, aplyed it on the panel and the feneer, let it dry, and then ironed it on.
Now i had a bit of a hard time of making the layer of glue not to thick, i used a paintroller, any tips on that regarding type of glue and /or aplying?
When the feneering was on, i ròutered all sides with a 3mm round bit, even the bassreflexport, and that sure gives a certain air to the project
At this moment i need to experiment with the damping, i found a jimgriffin topic about that, stating damping should be aplied above the alpair, can u peeps tell me how you all damped these fine boxes?
Well, learned a lot and hat a lot of fun, i think it was very relaxing, workin with wood and stuff
Next thing i wanna do as a newbie is read info about how to interpertate specs of drivers, so i can understand what i am doing....lol
wupsie:
If I can offer an observation /opinion on your comments re finishing products for maple veneer - some of the most unnatural looking (and expletive-ly expensive) commercial cabinets I've ever seen ( AudioNote AN-E) were birds-eye maple finished in what appeared to be at least 1/16" thick clear polyurethane.
I'm sure it's bulletproof, but had for me had none of the texture and warmth of a "natural" finish - in fact it looked like the cabinet had been dipped in plastic.
I'd much prefer a nice post catalyzed nitrocellulose lacquer or conversion varnish to bring out the vibrancy and 3D grain texture of a highly figured veneer or solid hardwood. Part of the key is to not over-sand to too fine a grit - sure go to 600G and beyond for a glass smooth "piano" finish of whatever color, but it's been my experience that with aggressive random orbit sanding or beyond 220 that most veneers start taking on the grain porosity and lack of dimension of a cheap plastic laminate.
but then one man's opinion, and WTFDIK
Chrisb, thanks for your reply
Well, i think if i dont sand down the feneer, and put a pu lacker on it, one layer, and then sand it down with 300 or 400 the colour should stay natural, and the 3D should be cool.
But, i now feel the urge to try your option 2, man, help is needed, i need more time and money....lol.
What i dont want is a finish u described: as if is was dipped in plastic...tsss dont want plastic enclosures
I had a brief talk with a carpenter this morning, and asked him how to get a as natural as possible finish, in looks AND feel.
He suggested to only sanddown feneer lightly to get rid of dark spots, then put on a finish pu based or acrylic, as thick as possible, prefered with a furry lack roller, and then, sand it down with 400 lightly.
He invited me to take a look at some furniture in oak, maple and american spine he finished this way, so ill get a shower and get over there.
I must say that all this wood work is giving me so much pleasure, the sky is the limit, and, a good result doesnt take more then some elbow grease and a few tools.
And the best part is: I LOVE THE WAY MY ALPAIRS SOUND NOW!!!
I always was sceptical regarding burn in of speakers, but....now i see first hand, that its not a lie, it looks like the 10.2 units open up after every 10 hours of playing on low volumes, stereo image is realy amazing, sound is so sweet, clear, waaaaaawww
Ill keep i updated about the finish the carpenter used.....BRB!!!!
PS i have some rough plans on stand, keep u all updated
Last edited:
wupsie:
If I can offer an observation /opinion on your comments re finishing products for maple veneer - some of the most unnatural looking (and expletive-ly expensive) commercial cabinets I've ever seen ( AudioNote AN-E) were birds-eye maple finished in what appeared to be at least 1/16" thick clear polyurethane.
I'm sure it's bulletproof, but had for me had none of the texture and warmth of a "natural" finish - in fact it looked like the cabinet had been dipped in plastic.
I'd much prefer a nice post catalyzed nitrocellulose lacquer or conversion varnish to bring out the vibrancy and 3D grain texture of a highly figured veneer or solid hardwood. Part of the key is to not over-sand to too fine a grit - sure go to 600G and beyond for a glass smooth "piano" finish of whatever color, but it's been my experience that with aggressive random orbit sanding or beyond 220 that most veneers start taking on the grain porosity and lack of dimension of a cheap plastic laminate.
but then one man's opinion, and WTFDIK
Excellent point, Chrisb.
In the process of finishing my Super Pensils I discovered (stumbled upon) this over-sanding practice. The painter wanted to sand the veneer smooth while I was insisting that I wanted to feel the texture. Well, he listened and now I have finish I had in mind. And he's happy cos it was less work. Pity, most of my other stuff is sanded smooth and trapped in glaze.
-Zia
1. Most veneer I get has very light but still visible chatter marks for the knife/planer. These have to be removed or they will show through the finish, particularly with dark woods -- walnut, mahohany, even cherry. I remove these with a machine sanding at 100g.
2. If you are going to stain, sanding too fine will keep the stain from working properly. Even oil stains lie primarily on the surface of the wood. If you are using aniline dyes, you have to have surface roughness. I never sand beyond 220g if I am going to stain. Well, actually, I never sand beyond 220g except to remove surface imperfections on the final coat prior to buffing.
3. Use a light coat of shellac as the sealer after staining if you are using any kind of varnish -- including things called "tung oil finish" and the like. They are actually thin varnishes using tung oil as the vehicle.
Of course, the about is my way of doing things and every craftsman has his own techniques. YMMV.
Bob
Well, i am back of my visit to the earlier mentioned carpenter...omg..i am such a newbie
Well,all the stuff he showed me with the finish discussed befhas a very natural look, no discolouration ad all, and, it feels like real wood.
I still was kinda sceptical about the finish, so he took a bit of coffee and spilled it in the table...ooops
Al it took to remove it was a soft damp cloth...no stains left behind wooohooo
He also showed me some shellac finishes...also very apealing...options options options...lol
Well anyway, mine are oiled with danish oil and wached, so i guess my new to be audio furniture will get the same treatment.
And now a new question:
Got myself 2 inch pipe, cutted 2 pieces of 10cm , and shoved them in the routered ports.
To my suprise some of the low end bass dissapeared....what did i do wrong this time?
Ok, they were not gleued in, maybe that is the problem?
Come to think of it, the location of the bassport is kinda high, compared to similar builds, i hope i didnt make a mistake here
Bob and Zman; thanks for the info guys, realy apreciate it, u guys make me wanna read more about all the subjects discussed here, thats positive
EDIT: wow my bassport is almost 30mm to high, is that gonna be a problem?
Already thinking of how to close it neatly and router a new hole...next build ill take my time, thats for sure
Well,all the stuff he showed me with the finish discussed befhas a very natural look, no discolouration ad all, and, it feels like real wood.
I still was kinda sceptical about the finish, so he took a bit of coffee and spilled it in the table...ooops
Al it took to remove it was a soft damp cloth...no stains left behind
wooohoooHe also showed me some shellac finishes...also very apealing...options options options...lol
Well anyway, mine are oiled with danish oil and wached, so i guess my new to be audio furniture will get the same treatment.
And now a new question:
Got myself 2 inch pipe, cutted 2 pieces of 10cm , and shoved them in the routered ports.
To my suprise some of the low end bass dissapeared....what did i do wrong this time?
Ok, they were not gleued in, maybe that is the problem?
Come to think of it, the location of the bassport is kinda high, compared to similar builds, i hope i didnt make a mistake here
Bob and Zman; thanks for the info guys, realy apreciate it, u guys make me wanna read more about all the subjects discussed here, thats positive
EDIT: wow my bassport is almost 30mm to high, is that gonna be a problem?
Already thinking of how to close it neatly and router a new hole...next build ill take my time, thats for sure
Last edited:
- Status
- This old topic is closed. If you want to reopen this topic, contact a moderator using the "Report Post" button.
- Home
- Loudspeakers
- Full Range
- Come join me in my shop for a Griffin build