This community has been very helpful and welcoming in many ways so I thought I would give a little back by documenting a build of Jim Griffin's MLTL. We (you and I) will start with a single 5' x 5' sheet of true baltic birch plywood. I have been building furniture since I was a wee lad so I don't tend to do much by way of detailed drawing before turning on the saw. I did slow down enough to a a drawing to add to Jim's fine work that should be helpful to builders of this cabinet. I'll post as work progresses. Sadly I can't work on this everyday but will be able at least every other day so it should progress pretty quickly. Questions and comments are welcomed and encouraged. So are suggestions, but they may or may not be followed.")
Picture 1: (the attached pdf file) are the plans Jim Griffin put together.
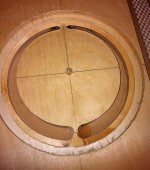
Picture 2: is the detail of the joinery I am using, that is a top view.
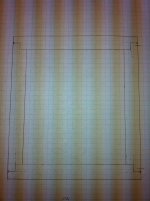
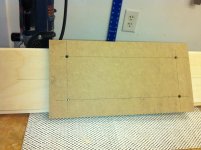
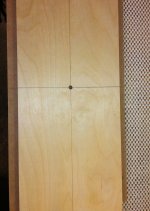
NOTE: I don't know if this was Jim's intention or not but I discovered that by using slightly modified (more on that later) 3/8" rabbets all four of the vertical pieces of each cabinet can be cut to 6 3/4". The photo (sorry for the quality) is a scale drawing done full size on graph paper.
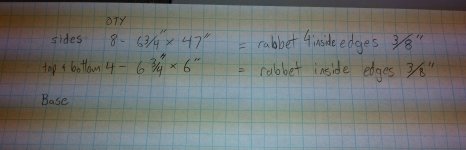
Picture 3: is the balance of my "planning" work. I find it helps to write important numbers down else I might get confused while working.
Next: Rough Cuts...
Picture 1: (the attached pdf file) are the plans Jim Griffin put together.
Picture 2: is the detail of the joinery I am using, that is a top view.
NOTE: I don't know if this was Jim's intention or not but I discovered that by using slightly modified (more on that later) 3/8" rabbets all four of the vertical pieces of each cabinet can be cut to 6 3/4". The photo (sorry for the quality) is a scale drawing done full size on graph paper.
Picture 3: is the balance of my "planning" work. I find it helps to write important numbers down else I might get confused while working.
Next: Rough Cuts...
Attachments
Now for the rough cuts. As I don't have enough room in my shop to actually put a 5x5 sheet of anything up on my table saw I cut sheet goods down to a more manageable size outside. I didn't take pictures of this. Basically you put you 5x5 sheet of ply on a pair of saw horses, measure to the center, 30", draw a line straight down the center, check to be sure you did that right, then get out the trusty circular saw. I find that a new thin kerf blade really makes a difference when cutting baltic birch with a circular saw. I don't use a guide/fence but can follow a line with great accuracy. Since this is a rough cut it isn't critical that it be perfectly straight just stay within a 1/16" +/- of your line and you will be fine. After starting the cut about 12" in stop and clamp your kerf with a couple of wood cauls so that when the cut is finished the boards don't fall all over the place and get dinged up. There are a lot of different ways to deal with this problem but to each his own.
Once I had two more manageable halves I headed into the shop for the table saw. Before each project I pull out the Incra rules and calipers and double check the accuracy of the table saw fence to blade measurements and the blade runout. Most of the time there is no need for adjustment, but sometimes there is. There was today. Good thing I checked.
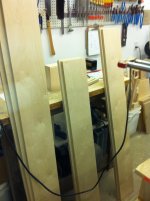
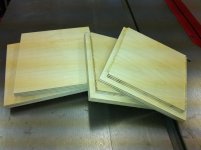
Picture 4: First I cut 8 pieces 60" long by 6 7/8" wide. That is what I call a rough cut. The cut itself is actually smooth.
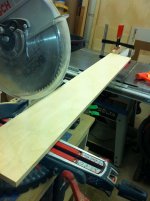
Picture 5 & 6: Next it was time to cut to length. I like to use a miter saw for this kind of cut, it is safer, leaves a nice finish cut, and is very repeatable and accurate. As can be seen in the picture there is a stop set up to ensure the lengths are accurate and the same.
Picture 7: Then I set the fence to 6 3/4", put a magnetic hold down in place and did the final width cuts. This step gives you the opportunity to make minor adjustments if needed and the final shave also makes for a very clean cut. With a tuned saw and sharp blade no jointing and little to no sanding is needed.
Once I had two more manageable halves I headed into the shop for the table saw. Before each project I pull out the Incra rules and calipers and double check the accuracy of the table saw fence to blade measurements and the blade runout. Most of the time there is no need for adjustment, but sometimes there is. There was today. Good thing I checked.
Picture 4: First I cut 8 pieces 60" long by 6 7/8" wide. That is what I call a rough cut. The cut itself is actually smooth.
Picture 5 & 6: Next it was time to cut to length. I like to use a miter saw for this kind of cut, it is safer, leaves a nice finish cut, and is very repeatable and accurate. As can be seen in the picture there is a stop set up to ensure the lengths are accurate and the same.
Picture 7: Then I set the fence to 6 3/4", put a magnetic hold down in place and did the final width cuts. This step gives you the opportunity to make minor adjustments if needed and the final shave also makes for a very clean cut. With a tuned saw and sharp blade no jointing and little to no sanding is needed.
Attachments
Joint Forming.
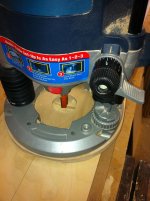
The rabbets on the edges can be formed using a table saw or a router. I find it easier and much messier to use a router, so that was my choice this time. As 3/4 baltic birch plywood is not actually a nominal 3/4" you have to make a minor adjustment to the bit depth. To get a really tight fitting joint set the 3/8" rabbet bit depth to 1/32" short/less (we say "shy" where I live) of 3/8". In other words don't set the bit depth a full 3/8" set it to 11/32". Wood work can be accurate down to about a 1/64", not much more though.
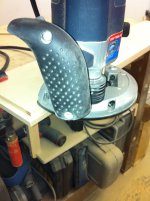
Picture 8: The old Bosch router loaded with a CMT rabbet bit. There are lots of ways to keep your wood from moving around on you, I like clamps.
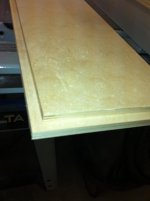
Picture 9: Notice the rabbet goes around all four edges and the rabbet is on what will be the inside of the speaker cabinet, not the finish side.
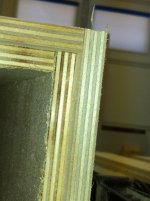
Picture 10: Checking to be sure the fit is good. Though hard to tell it is indeed perfect.
The rabbets on the edges can be formed using a table saw or a router. I find it easier and much messier to use a router, so that was my choice this time. As 3/4 baltic birch plywood is not actually a nominal 3/4" you have to make a minor adjustment to the bit depth. To get a really tight fitting joint set the 3/8" rabbet bit depth to 1/32" short/less (we say "shy" where I live) of 3/8". In other words don't set the bit depth a full 3/8" set it to 11/32". Wood work can be accurate down to about a 1/64", not much more though.
Picture 8: The old Bosch router loaded with a CMT rabbet bit. There are lots of ways to keep your wood from moving around on you, I like clamps.
Picture 9: Notice the rabbet goes around all four edges and the rabbet is on what will be the inside of the speaker cabinet, not the finish side.
Picture 10: Checking to be sure the fit is good. Though hard to tell it is indeed perfect.
Attachments
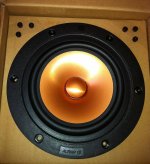
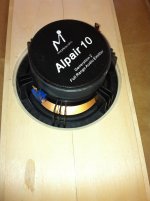
I don't know how I managed to not include this but the whole center of this build in the MarkAudio Alpair 10.2 which just came to my door yesterday. I got to tell you guys that is one beautiful looking driver. Obviously excellent craftsmanship and design went into these drovers. I cannot wait to hear them!
That's all for today, will be back on Friday with more build...
Bedankt Bas Horneman, Blij dat u hier bent!
That's all for today, will be back on Friday with more build...
Bedankt Bas Horneman, Blij dat u hier bent!
Attachments
Last edited:
Blij hier te zijn!Bedankt Bas Horneman, Blij dat u hier bent!
Are you a dutchman living in the US of A?Geen Bas Horneman. Mijn dochter woonde in Amsterdam en leerde mij een beetje Nederlands. I have some Portuguese too as my spouse is Brazilian.
Hi Jim! I hope so, thanks to your efforts. I have a couple of surprises later on in the construction.
Well no build posts today, I have other things to do while the sun is shining. More tomorrow.
Mijn dochter woonde in Amsterdam en leerde mij een beetje Nederlands. I have some Portuguese too as my spouse is Brazilian.Hi Jim! I hope so, thanks to your efforts. I have a couple of surprises later on in the construction.
Well no build posts today, I have other things to do while the sun is shining. More tomorrow.
She did an excellent job. I can only say Obrigado in Portuguese.Mijn dochter woonde in Amsterdam en leerde mij een beetje Nederlands
Did a little work today. It seemed to me that the next logical step would be to rout the speaker holes. It is easier, in my mind, to do this while still working with individual panels rather than an assembled box, especially routing the 45 degree chamfer on the backside of the speaker hole.
Picture 11: The tops and bottoms of the cabinets. The dimensions are 6" x 6 3/4". Test for fit was very tight so I trimmed about 1/32 of an inch as needed for a tight but not forced fit. Mmmmmm I love a great fit.
Picture 12: One of the front panels marked and ready to have a 1/4" hole drilled in the right spot. I like to use a 1/4" oak dowel as a pivot point. I have used nails in the past but just prefer the dowel.
Picture 13: This is the back side of the panel. I feel MDF does have it's place in cabinet building and this is it. By the time the hole is routed out for the speaker there won't be much wood left to hold the panel together. By adding this MDF brace I avoid what could be a tragic accident while routing and handling the front panels.
Attachments
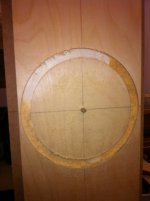
Picture 14: This is the front panel ready for the router and circle jig. The jig is built of Baltic Birch so it is hard to tell in the picture what is jig and what is speaker cabinet panel.
Picture 15: The router in place. You can see the hole with the bit in the center.
Picture 16: The first cut was a complete circle about 3/8" deep. That recesses the speaker a bit but does leave it proud (above the surface of the front panel) about 1/8". I did this mostly because I like the look.
Picture 15: The router in place. You can see the hole with the bit in the center.
Picture 16: The first cut was a complete circle about 3/8" deep. That recesses the speaker a bit but does leave it proud (above the surface of the front panel) about 1/8". I did this mostly because I like the look.
Attachments
Picture 17: The second cut is shown here. It is all the way through and 137mm in diameter. Since the router is guided by a center pin I stopped the cut at both the top and bottom at the center line. If I had cut a full circle I could well have made a mess of things. After all the routing I used a jig saw to complete the cuts.
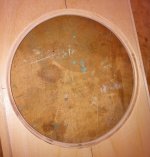
Picture 18: This is the back side of the front panel. The MDF brace was removed and the 45 degree chamfer was routed on the back side. Of course the MDF brace was reinstalled for handling.
Picture 18: This is the back side of the front panel. The MDF brace was removed and the 45 degree chamfer was routed on the back side. Of course the MDF brace was reinstalled for handling.
Attachments
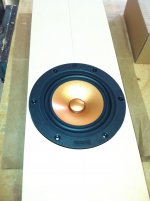
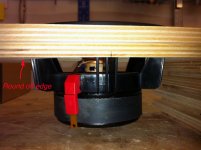
Picture 19: The panel from the backside with that beautiful Alpair 10.2 in place. I like to test fit for that feeling of satisfaction.
Picture 20: The front view. The picture (from my phone) doesn't really show how good the fit is, but it is good.
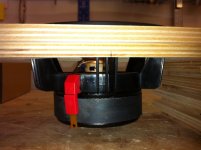
Picture 21: This is a side view. You can see the chamfered back and how the speaker sits a little proud on the front. Perfect. I was not aware of this when I ordered the Alpairs that there is a rubber gasket built in the backside of the frame. A nice touch.
The next step will be to cut a hole for the PVC pipe that will make up the vent...
Picture 20: The front view. The picture (from my phone) doesn't really show how good the fit is, but it is good.
Picture 21: This is a side view. You can see the chamfered back and how the speaker sits a little proud on the front. Perfect. I was not aware of this when I ordered the Alpairs that there is a rubber gasket built in the backside of the frame. A nice touch.
The next step will be to cut a hole for the PVC pipe that will make up the vent...
Attachments
hi naturall,
what kind of guide are u using under? i usually used straight plank, with r distance and do circle cut from the center. but i see from the photo u used circular jig with abit more than the base.
although i used router trimmer to do the job, which with plunge router the base will be too big to do circular cut.
notes:
i have never seen more beautiful plywood than urs.
cheers
henry
Hi Mark, The back edge is chamfered, a little hard to tell in the picture. Rather than rounded it is a 45 degree edge.
kristleifur thanks for the kind words.
_henry_ To do the chamfer on the back side of the panel I used a bearing guided chamfer bit. On the front side I used a homemade circle jig.
Hopefully I can get into the shop today..
kristleifur thanks for the kind words.
_henry_ To do the chamfer on the back side of the panel I used a bearing guided chamfer bit. On the front side I used a homemade circle jig.
Hopefully I can get into the shop today..
I haven't gotten much done since the last post, but haven't stopped altogether either.
Picture 22: Using a 2 3/8 OD hole saw to make holes for the vents. The plan provided by Jim Griffin shows what appeared to me to be a 1 1/32" diameter hole for the vent. In an email from Jim this is what he had to share: "The port tube internal diameter is 2.0625" (radius is 1.03125") and the part is Parts Express #260-322 which comes in a 5" length. You can use the port tube uncut (5" long) or trim it to 4" length. The longer length will yield an F3 point of 32-33 Hz vs. about 35 Hz for the 4" tube. You can do what I do which is to not permanently insert the tube until I have a chance to hear the speaker to decide. The only downside to the 5" tube is that it has a little less clearance inside the box to the opposite wall." Thanks again Jim, I am following your advice and cutting a couple of tubes for both cabinets of differing lengths so I can listen to the choices.
Picture 23: The front panels
Picture 24: The back panel with holes drilled for binding posts. I placed these 17" from the top. No real reason for the 17" just made the decision at the time.
Well for some reason I cannot attach pictures anymore. The option to manage attachments is gone for me. I'll check again tomorrow and add the pictures them if possible.
Hi henry I may not understand your question. I used a circle guide to cut the circular rabbet for the speaker to rest in and the same circle jig to cut the hole all the way through. That is all done from the top of the panel. The guides center point is the center of the speaker hole. Because I chose to make all the panels (front, back, and sides) all the same width it leaves little wood left on the front panel after routing so I screwed a piece of wood to the back to hold the front panel together until assembly. For the backside chamfer the router bit bearing just rides agains the hole edge itself while routing the backside relief. If this doesn't help clarify say so and when this place allows me to post pictures again I will post a picture of the circle cutting jig I used. Just let me know.
- Status
- This old topic is closed. If you want to reopen this topic, contact a moderator using the "Report Post" button.
- Home
- Loudspeakers
- Full Range
- Come join me in my shop for a Griffin build