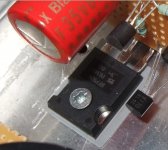
What's the white goop I see around the IRFs that use the enclosure as heatsink. Some kind of adhesive?
Thermal grease. Smooths out the metal parts contact area and increases heat transfer.
Thermal grease. Smooths out the metal parts contact area and increases heat transfer.
that's what I hoped. I have some Arctic Silver I can put to use then...
Don't forget the insulation pads also, else they will zap.
Yep, got those on the way!
")
Also, you will need some plastic shoulder washers so that your bolt doesnt short the tab to the sink even though you have the mica in between.
ok, now I'm lost. The plastic washer goes where?
Its a special washer, shoulder washer. So it goes DOWN into the hole in the tab of the mosfet and it also spreads out over the top of the tab. The bolt then goes through this plastic washer and does NOT touch the tab at all. It touches the heatsink only so it cant short anything out this way.
This IS a necessity. Unless you use a plastic bolt.
This IS a necessity. Unless you use a plastic bolt.
Its a special washer, shoulder washer. So it goes DOWN into the hole in the tab of the mosfet and it also spreads out over the top of the tab. The bolt then goes through this plastic washer and does NOT touch the tab at all. It touches the heatsink only so it cant short anything out this way.
This IS a necessity. Unless you use a plastic bolt.
That's a bummer. Now I have to wait another week to wrap this up. Oh well, thanks for the info.
That's a bummer. Now I have to wait another week to wrap this up. Oh well, thanks for the info.
TO-247 don't need a washer, have a plastic eye. The pad is enough. TO-220 need washer or nylon screw & nut. IRFP series are TO-247 casing standard.
Attachments
TO-247 don't need a washer, have a plastic eye. The pad is enough. TO-220 need washer or nylon screw & nut. IRFP series are TO-247 casing standard.
Thank the Lord Jesus. I was wondering why no had mentioned using them this whole time. Thanks as always Salas, particularly for your prompt replies. My goal has been to finish this project during the holiday...
Yeah, it is themal grease. You are right, THIS ONE is some kind of adhesive. You have thermal grease in two variants, one that is similar to artic silver (very nice brand) and one that act as glue too.What's the white goop I see around the IRFs that use the enclosure as heatsink. Some kind of adhesive?
I made a mistake and took the wrong tube, so my mosfets are hard glued
About the insulation matter, I took the approach of having each mosfet with each own heatsink. That way they have no insulation pads, but you need to care about not having any heatsink touching anything else in the case. That's extreme DIY


Yeah, it is themal grease. You are right, THIS ONE is some kind of adhesive. You have thermal grease in two variants, one that is similar to artic silver (very nice brand) and one that act as glue too.
I made a mistake and took the wrong tube, so my mosfets are hard glued
About the insulation matter, I took the approach of having each mosfet with each own heatsink. That way they have no insulation pads, but you need to care about not having any heatsink touching anything else in the case. That's extreme DIY
Ha. Ok, cool, thanks for clarifying.
DOH! Sorry about that Wushuliu. Guess I have surrounded myself with to many metal tabs lately and forgot about the mosfet casing here.
No worries!
You are right, THIS ONE is some kind of adhesive. You have thermal grease in two variants, one that is similar to artic silver (very nice brand) and one that act as glue too.
Which one is the glue like type you used ? I often need thermal conductive glue but always in small quantities. This glue I use till now is also best used directly as it deteriorates quickly. About 5 grams of it cost 13 Euro. It is quite good mechanically and thermally but it is bad stuff for the health. It is very strong though as the heatsinks never have come off. On the contrary, when I want to remove a heatsink I pull the chip out of the PCB
I am looking for a variant just as good but less environmentally hostile and also less aggressive for human health. Preferably less expensive too....Which one do you use and what does it cost ? I need it for glueing aluminium heatsinks to plastic/metal chips.
BTW washers under screw heads are always useful as the screw comes loose less easy. Don't use the spring type though as it will loose its spring capability because of the heat and the screw will come loose. Just use standard "ring type" washers under the screws head and under the nut. They have the benefit that pressure is divided so the plastic case won't crack.
Last edited:
Update on Dcb1 with Optical volume control
Well i have been living with my dcb1 with optical volume control for a couple of weeks now...and thought it was time for a quick update.
First of all my previous pre was a p2p b1 buffer, with the dcb1 installed i noticed an imediate improvment...music had much more detail and on quite a few tracks i had noticed sounds that previously i had not heard, but that didnt mean that the dcb1 sounded aggresive, infact music flowed more easily and sounded much calmer then my b1 buffer, piano's sounded wonderfull, with notes just hanging in the air before slowly fadeing out...noticed this while listening to norah jones...also i noticed that i was feeling the emotion of the music rather then just hearing the music, so over all i have been very pleased with the dcb1...
...Yesterday i swaped out a cheap diode bridge which was used for the optical volume control and replaced it with a bridge i made up from 4 mur120's...while i was in there, i also balanced the currents in the dcb1...previously i was getting 50ma on the one channel and 60ma on the other...so i added a two 200ohm resistor in parralel with the 68r//68r resistors giving me 29ohm and 1.69v being droped...so 58ma...pretty much balanced for now...
When i played music...i couldn't believe it...it sounded so much better then before...the music now was not coming from the speakers...it was floating in the room...the bass was amazing and the only way i can discribe it, is the say the bass had been freed...the bass was no longer held back and for the first time in my system i was actualy feeling the bass as well as hearing it...and still it sounds well controled with every bass note heard. Detail also seemed to go up another notch with instruments now sounding much more real...and drums snapped...you could really hear/feel the hit of the drum.
Problem now is, i dont know wether to attribute this to the diode bridge change or the balancing of currents...Lucklily i took Andrews advice and just tacked on the 200ohm resistor, so it will be easy to remove and hear a difference.
I will listen to the dcb1 for a while as it is..and then i will remove the 200ohm resistor and report if i hear a change.
Sorry for rambling on...i find it hard to put things into writing and somtimes it comes accross way too long winded...
Alon.
I use a very cheap (but effective) one. It works really well, and the tube seems to never end. 50ml tube. Free shipping.Which one is the glue like type you used ?
Which one do you use and what does it cost ? I need it for glueing aluminium heatsinks to plastic/metal chips.
BTW washers under screw heads are always useful as the screw comes loose less easy. Don't use the spring type though as it will loose its spring capability because of the heat and the screw will come loose. Just use standard "ring type" washers under the screws head and under the nut. They have the benefit that pressure is divided so the plastic case won't crack.
DealExtreme: $7.23 FUJIK Silicone Thermal Glue (50ml Grease-Like)
Hope this is not considered spam. If so, a moderator should PM me and I will PM the website address to him.
Regards,
Regi
Well i have been living with my dcb1 with optical volume control for a couple of weeks now...and thought it was time for a quick update.
First of all my previous pre was a p2p b1 buffer, with the dcb1 installed i noticed an imediate improvment...music had much more detail and on quite a few tracks i had noticed sounds that previously i had not heard, but that didnt mean that the dcb1 sounded aggresive, infact music flowed more easily and sounded much calmer then my b1 buffer, piano's sounded wonderfull, with notes just hanging in the air before slowly fadeing out...noticed this while listening to norah jones...also i noticed that i was feeling the emotion of the music rather then just hearing the music, so over all i have been very pleased with the dcb1...
...Yesterday i swaped out a cheap diode bridge which was used for the optical volume control and replaced it with a bridge i made up from 4 mur120's...while i was in there, i also balanced the currents in the dcb1...previously i was getting 50ma on the one channel and 60ma on the other...so i added a two 200ohm resistor in parralel with the 68r//68r resistors giving me 29ohm and 1.69v being droped...so 58ma...pretty much balanced for now...
When i played music...i couldn't believe it...it sounded so much better then before...the music now was not coming from the speakers...it was floating in the room...the bass was amazing and the only way i can discribe it, is the say the bass had been freed...the bass was no longer held back and for the first time in my system i was actualy feeling the bass as well as hearing it...and still it sounds well controled with every bass note heard. Detail also seemed to go up another notch with instruments now sounding much more real...and drums snapped...you could really hear/feel the hit of the drum.
Problem now is, i dont know wether to attribute this to the diode bridge change or the balancing of currents...Lucklily i took Andrews advice and just tacked on the 200ohm resistor, so it will be easy to remove and hear a difference.
I will listen to the dcb1 for a while as it is..and then i will remove the 200ohm resistor and report if i hear a change.
Sorry for rambling on...i find it hard to put things into writing and somtimes it comes accross way too long winded...
Alon.
Don't know about equalizing such a little current difference in the two main CCS, since the Mosfets transconductance will not appreciably change so to say it equalizes serious reg Zo differences. Its aesthetically nice to have them matched non the less. If you look at their curves, it takes a lot to get them going. That is why we jump to 200mA and over in hot rod mod.
Thanks for the nice review by the way, and you will know what made your subjective differences when you will remove the equalizing resistor and listen back to how it was set before. Let us know.
- Home
- Amplifiers
- Pass Labs
- Building a symmetrical PSU B1 buffer