hey, so ive oredered most of the parts now, and i have a question for you guys regarding prototyping...do you guys use breadboards/perfboards at all? and if so how do you rig up the tubes so they arent moving around and whatnot?
also, the 6v6 has separate values for plate dissipation and screen dissipation, so that 14 W is for the plate only. thanks for helping me understand this stuff better...now just the long wait for the transformers...and hopefully by then everything should be in
I build a kind of Lego block. I connect a tube socket to a terminal stripAnd then I have a second strip in parallel to the first. I can place resistors or caps between the two stips. The socket is mounted to a short length of aluminum 2" wide the aluminum and both terminal strips are mounted to a 6" square of plywood. So each tube and the passive components that attach to it is a little block that connects with screw terminals to other little blocks. Now I can built an entire amp in 10 minutes with no solder. I can leave common blocks like a triode gain stage or a phase splitter wired up for months. I have a variable voltage B+ power supply that uses a conventional PT, SS diodes and a CRC filter but is controlled by a variac transformer. It is good to have a 1 ohm resistor in series with the B+ supply so you can measure current.
I have some resistance substitution boxes too so I can swap out resisters and check a waveform on a scope just be rotating a switch to (say) select a cathode bias value by experiment. I have some test equipment, the distortion meter and HP signal generator help. I'm able to select a bias point based on watching the distortion meter.
None of this was expensive. $20 for the variac on eBay, $100 for the scope. Older 50's and 60's vintage test equipment is dirt cheap and well suited to building tube amps.
But the best "prototype" system of all is hands down "Spice". You can try 20 different ideas in one evening and get detailed measurements. I use this one MacSpice 3f5 - Circuit Simulator for Mac OS X If you are not using a Mac there are links to make other versions of Spice. But I'd absolutely recommend simulating before you touch any real hardware even if you have a Lego block setup like mine. After a while you will develop little blocks of Spice netlist and use these just like the Lego blocks and can built an amp simulation very quickly by cut and pasting in the amp stages you want.
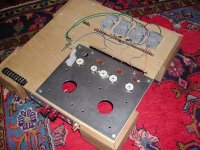
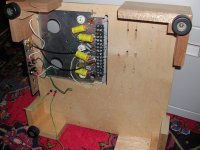
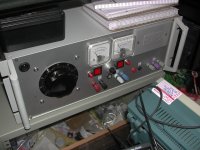
Here are a few pics of my breadboard and bench PS. 9 pin and 7 pin sockets in the AL plate, and octals in the grey relay blocks. Ugly, but roomy, and gets the job done.
My Home-brew bench PS sounds much like Chrish's; A variac controls mains to the front panel receptacle (this feature gets used the most), push a button then the variac also controls B+ via a CLC supply, good for about 150ma (used a $5 swap meet toob TV transformer), variable bias supply with a 10 turn pot, good for about -60V or so IIRC, and a 12.6VCT 3A filament transformer with all three taps on the front panel to allow 6.3V or 12.6V heater wiring.
My Home-brew bench PS sounds much like Chrish's; A variac controls mains to the front panel receptacle (this feature gets used the most), push a button then the variac also controls B+ via a CLC supply, good for about 150ma (used a $5 swap meet toob TV transformer), variable bias supply with a 10 turn pot, good for about -60V or so IIRC, and a 12.6VCT 3A filament transformer with all three taps on the front panel to allow 6.3V or 12.6V heater wiring.
Attachments
awesome thanks guys! i have a decent oscilloscope (old, but its never let me down), a bunch of breadboards and a decent DMM. I will definitely look into making something like that for holding the tubes in place...looks very useful for tube based projects. the lego blocks idea is pretty cool too. do you make new ones for every amp you build or do you just replace with different values? and dont worry...i wouldnt dream of building something for real without testing it in spice first ")
the lego blocks idea is pretty cool too. do you make new ones for every amp you build or do you just replace with different values?
I have about 7 blocks. Some hold one tube, some two tubes (for push/pull power stages) So I mostly keep them assembled but might have to take one apart if I've run out of empty blocks. I don't have enough to build a full stereo amp, just one channel.
tagstrip is pretty useful, its basically a strip with solder tags, can be cut down to size pretty easily, and wires can easily be mounted directly on the strip to keep it neat. or you could use turret board, alot of amos do this and you could probably find a good layout online. as for PCBs, any amp ive got with PCB routed heaters, i usually sever the heater tracks and handwire them. and also i have seem wire rated around 1000v 5A thats pretty thin solid core stuff. not sure where it came from, i found it laying around at school with those ratings all over the insulation.
Also instead of PCB i have used a prototype board covered in 3mmx3mm solder pads which worked quite well.
Also instead of PCB i have used a prototype board covered in 3mmx3mm solder pads which worked quite well.
as for PCBs, any amp ive got with PCB routed heaters, i usually sever the heater tracks and handwire them. QUOTE]
yea I wouldnt put a trace expected to carry almost 3 A of current on a PCB...the trac would have to be enourmous...i was just thinking for the actual circuitry...i would definitely use real wires for the power stuff. high current and PCBs dont really mix in my experience.
hey, so it might be a little early to be thinking about the end product, but does anyone build combos, and if so, what kind of wood do you use? are there any other concerns with the cab i should be worrying about? i know the basics of how cabs affect the frequency response. also, how do you guys make your chassis? would it be worth it to make one or should i just have someone else (like front panel express etc) make one for me?
You can get virtually everything for a champ project online.......tolex, handles, knobs, pots, lamps, corners, feet, etc etc. Here are a few vendors that sell what you need:
VINYL & TWEED COVERING from Parts Express ship same day and come with 45 day money back guarantee. Free Shipping Available. Order free 10,000 product catalog.
Angela Instruments Online Catalog - Guitar Amp Parts - Fender Amp Parts
Guitar Amp Parts
AA764 Blackface Champ DIY Tube Amp Kit
Antique Electronic Supply
Lynchy: Check out this recent thread about using a rotary switch to change cathode bias R's:
(Starting around post #54)
http://www.diyaudio.com/forums/tubelab/164027-howdy-fellas-ive-some-simple-se-questions.html
(Starting around post #54)
http://www.diyaudio.com/forums/tubelab/164027-howdy-fellas-ive-some-simple-se-questions.html
That was extremely helpful! Thanks!... Im still waiting on a few parts, but should be able to begine work on this project within the next week or 2...and I was wondering...does the type of wood the amp is built out of affect the tone significantly? I assume it works the same way as guitar body, but Im not sure what kind of tone shaping I would want from the cab. so I was wondering, what kind of wood do you guys usually use? and how do you feel about open-back vs closed back amps (I realize that the open back have a bassier response)
awesome! thanks for that...so this is something ive wondered for a while: do different amp coverings affect tone at all? or is it strictly aesthetic?
if your building a head, then it doesnt afect sound at all, the only thing for the box you need to consider is the weight it needs to carry if picked up, and propper ventilation for power tubes.
if your building a combo, then a covering might affect it slightly, but its more affeced by the strength of the cabinet, the wood of the cabinet and open/closed backed. Ive got a 160watt cab made of plywood with celestion seventy80's, pretty cheap but doesnt sound bad for building random heads and testing them, makes tweaking alot easier.
How far are you with this build now?
still waiting on parts, so there is no rush to build the cab yet, I was just wondering so i can start planning things out cost-wise...I still have a little bit of tinkering once i get the parts...so it might be a little bit before i need to worry about this, but i figured the sooner i ask about it the better i can plan
Acoustically speaking, the wood in a guitar speaker cabinet isn't all that important with the possible exception of the baffle (on which the speakers are mounted). Fender famously used 1/2 fir plywood in their Bassman cabinet (which was quite large) and the baffle added it's own low-frequency resonance because it wasn't very stiff.
For the most part, you want a compromise between sturdiness and light weight. This almost always means plywood. Good quality fir (3/4") is fine for cabinet sides. Unfortunately, most fir plywood sold in the big box stores is junk. It's warped, it has voids (which compromise strength and can lead to nasty resonances), and the face veneers are rough as hell. If you really want the good stuff, find a supplier of Baltic Birch (also known as Finnish Birch) or ApplePly (google it). This is really nice stuff, strong, no voids, lots of plies. Solid wood will also work, but I'd stay away from pine as it's too soft. Poplar would be a good choice, it's light, relatively strong and is available in the big box stores (but use plywood for the baffle).
Now let's talk about open backs. But first, an explanation. A cabinet's sole acoustic purpose is to isolate the front of the speaker from the back. Period. The better it does this, the more volume you will get for a given signal. Open-back cabinets allow a certain amount of mixing of the front and back sounds. This can enhance tone. But it can also degrade tone. You can make use of this. Place an open-back cabinet flat against a wall and it will behave like a closed-back cabinet. Move it away and the distance from the wall (and the angle to the wall) will determine which frequencies are enhanced or degraded. This is a form of comb-filtering. Again, this is a weapon in your tonal arsenal, but it means that it pays to experiment.
The same advice given about the difference between hi-fi and guitar amplifier circuits applies to speakers. That's why experimenting is really a lot of fun. Who knows, you might stumble on something new that really works for you. With guitar gear, it's all a matter of taste.


DiY guitar amplifier musings
I have been a pro musician, primarily guitar/ keys/ bass for forty-five years, spent thirty or so, owning and operating a pro-audio service shop, own many amps, built a few, modified hundreds, but have been an electronics product design engineer for the last 18 years or so ( although in disparate fields) and as a result have collected a few observations, some may call opinions.
For most stuff, I use an older Line 6 AX 212 modelling amp because it will do A to Z, sound wise, right now!!!, with no extra pedals, etc. Good enough for Rundgren, good enough for me, most times. Need instant Jeff Beck ring modulator-type skronk?...no problem. DSP does all the heavy lifting. For live gigs, it's perfect,...... almost.
But in the studio...nothing beats a Marshall pumping a vintage 4-12 with testicle-vibrating bottom woof on occasion...or a fine textured grainy-sounding AC-30 for a nice muscular chording sound for those pop/rock tunes. Or even better the same Marshall driving a vintage Leslie with the requisite
12VDC car brake lights in series to protect the phenolic tweeter diaphragm. Really, you should have one of each...haha. Fender amps never turned my crank- sounding either too shrill and biting and floppy on the low end- just my taste.
Building guitar amps is very cool, if you know what you want to end up with and have the technical chops to get there.
For tube amps, most of the sound seems to develop those obvious, gross characteristic tonalities from the output transformer and speakers, in my opinion. I temporarily replaced an equivalent Hiwatt output transformer into an often-recorded fine, but broken, vintage Marshall, belonging to one J Page, just because...guess what the Marshall sounded like, after? Complete with that clangy PeteTownshend/ Hiwatt top end and upper midrange emphasis. ooops- that won't do...and they are very close, preamp-design-wise...All that stuff is derived from the old Fender Bassman, if you look at the schematics.
Impedance matching or intentional mismatching with technically "crappy" low powered speakers (Celestion GB's for one, or Jensens) are another whole world of pain and discussion. Bruce Zinky- former designer @ Fender Custom shop- Blues Deville, etc., did this- intentional mismatch, that is.. Don't forget, most of the component choices are based on the type or style of distortion that part might add to the mix. Having said that though, super clean efficient speakers sound great for bass but really suck goat-*** for guitar, IMHO.
Comments? Remember...this is the source material you guys and gals spend all that time and money on, just to hear so accurately.......
- Status
- This old topic is closed. If you want to reopen this topic, contact a moderator using the "Report Post" button.
- Home
- Live Sound
- Instruments and Amps
- Building a Guitar amp