Finishing ideas/suggestions.
Anodizing ? Painting ? Simple sanding ?
Anodizing isn't the type of thing you DIY normally, but I will talk about some ideas I had on the subject latter.
You can get a very nice finish by sanding with very fine grit sandpaper and a sanding block. I used to wash my Al parts in the dishwasher after sanding. I used TSP, back when it WAS TSP. Make sure you don't have any of those products that prevent spots on dishes. After the dry cycle, inspect the parts. If you have scratches or gouges in the surface, you can try to place them where they won't show. If that isn't possible, then I suggest painting.
First, fill the defects with automotive body filler (Bondo) or JB weld. Since they are scratches, they should already be rough enough to give good adhesion. For dents you may need to rough the surface with course sandpaper. After the filler dries, sand smooth and wash again.
They are making paints now that stick pretty well to Al, and they may work for you. If you have trouble finding a good Al paint, try to find an etching primer made for Al. You can also buy a chromatic acid solution at many large hardware stores. This works quite well on Al as a surface prep. Always read and follow label directions. Rinse with distilled water and dry quickly. As soon as your part is complete dry, paint the part so new oxide does not form.
I have produced very nice finishes using glass beads in a blast cabinet, but that might not be an option for most of you.
If the surfaces of the parts are defect free, you can get a good finish with sanding alone. Each grit of the sandpaper will give a slightly different finish. Pick one you like.
Another finish I like is wire brushed Al. This can be difficult to get a smooth even finish, but if you don't like the finish, you can brush again or sand. A brushed finish can be painted also, but that covers the brushed finish. Different brush wheels give different finishes. You can test on a scrap piece to see if you like the look.
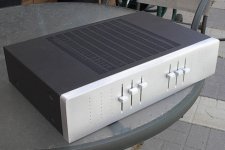
Another finishing option on raw aluminum is the frosted look:

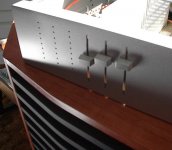
and closer:

I did this with a random orbit sander loaded with a 100 grit disk. Holding the sander firmly to the surface prevents it from spinning (and creating swirls).
Once it is as even as you would like, clean with acetone or lacquer thinner and spray on 2-3 coats of lacquer.

and closer:

I did this with a random orbit sander loaded with a 100 grit disk. Holding the sander firmly to the surface prevents it from spinning (and creating swirls).
Once it is as even as you would like, clean with acetone or lacquer thinner and spray on 2-3 coats of lacquer.
Trisodium phosphate - Wikipedia, the free encyclopedia
Try Trisodium Phosphate For a Thorough Clean Before Painting
TSP Trisodium Phosphate heavy duty cleaner
That should get you off to a good understanding of TSP.
Try Trisodium Phosphate For a Thorough Clean Before Painting
TSP Trisodium Phosphate heavy duty cleaner
That should get you off to a good understanding of TSP.
You can get a very nice finish by sanding with very fine grit sandpaper and a sanding block.
Does it result in a long term attractive finish or is some form of sealing required?
These days, for prototyping or one off projects I use Alodine:
Alodine - Wikipedia, the free encyclopedia
Alodine - Wikipedia, the free encyclopedia
Does it result in a long term attractive finish or is some form of sealing required?
Here's a link to front panel that was hand brushed without any protective finish. After 25 years it still looks perfectly fine: http://www.diyaudio.com/forums/solid-state/4572-how-all-started-2.html#post144399
Another finishing option on raw aluminum is the frosted look:
View attachment 150634
and closer:
View attachment 150635
I did this with a random orbit sander loaded with a 100 grit disk. Holding the sander firmly to the surface prevents it from spinning (and creating swirls).
Once it is as even as you would like, clean with acetone or lacquer thinner and spray on 2-3 coats of lacquer.
How did you make those slider slots? was it a circular saw from both sides?
For sanded surfaces, you might want to apply a sealer. The brushed finish holds up pretty well. The main problem with the sanded finishes is that they can show finger prints. The brushed finish is usually rough enough to prevent prints showing. In both cases it depends on how fine you finish the Al. With both methods, the surface is still just Al, and will scratch like Al.
Alodine is a brand name for chromate dip solution. The chromic acid from the hardware store is much cheaper. Unless the chromate dip states clearly that it gives a clear finish, there is a good chance it will tint the Al surface. The actual color is determined by additives. If you use any chromate dip, check it on a scrap piece first.
There is also a phosphate dip for Al. It is phosphoric acid. This can be bought in several forms. Most of the products sold to remove rust from iron are phosphoric acid based. With either surface prep, you may need to experiment with the proper dilution for optimum results.
Alodine is a brand name for chromate dip solution. The chromic acid from the hardware store is much cheaper. Unless the chromate dip states clearly that it gives a clear finish, there is a good chance it will tint the Al surface. The actual color is determined by additives. If you use any chromate dip, check it on a scrap piece first.
The color will depend on the length of dipping process. If I want it clear, I submerge it only for few seconds, doing it longer produces nice golden tint.
Any surface discolorations can be further smoothed out with Scotch-Brite pads. I use those pads for final finishing after sand paper brushing as well.
Scotch-Brite™ Hand Pad
How did you make those slider slots? was it a circular saw from both sides?
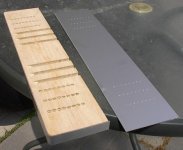
It was cut from the front - clamped in place to the top of the tablesaw (careful layout!) and the blade slowly raised to make the cut.
A confession is in order though: that is not solid 3/4" aluminum...

Faked to look that way.
Slider knobs are solid aluminum though, I made those from what was left after the heatsinks were cut. Waste not
It was cut from the front - clamped in place to the top of the tablesaw (careful layout!) and the blade slowly raised to make the cut.
A confession is in order though: that is not solid 3/4" aluminum...
View attachment 150776
Faked to look that way.
Slider knobs are solid aluminum though, I made those from what was left after the heatsinks were cut. Waste not
Faked is fair. It looks good, therefore it is good.
I'm glad to see more contributions here by past and present builders. Thanks guys.
Faked is fair. It looks good, therefore it is good.
Not only is it good, it's environmentally (
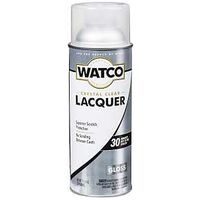
What type of lacquer do you use ?
Is it Al specific ?
No, normal lacquer:

You could use clear polyurethane also, though the solvent based version will slightly amber (yellow) over time. The spray bomb water borne one would be better than lacquer actually:
An externally hosted image should be here but it was not working when we last tested it.
Clean the aluminum thoroughly to improve the adhesion.
Last edited:
- Status
- This old topic is closed. If you want to reopen this topic, contact a moderator using the "Report Post" button.
- Home
- Design & Build
- Construction Tips
- Build your own case