Another method:
Interpose a 1M resistor between inv and non-inv inputs. Call it Rt.
Input 1Vp into the circuit from the signal source.
Measure output, let us say it is 25Vp, and a current probe (LTSpice) across Rt indicates 25nAp is flowing. This means there is 1M x 25nA = 25mVp across the test resistor.
Open Loop gain is 20log(Vout/V(Rt)), in this case 20log(25/0.025), viz 60dB.
If Closed Loop Gain (Av) is 28dB, then Loop gain must be 32dB.
1M is generally high enough to ensure very little measurement error.
Hugh
Last edited:
Wahab/AKSA - yes, both valid approaches also - thanks for sharing.
5th Element - apologies for my late reply.
I used 27 Ohm in series with the NPN driver base and then 1nF from the NPN driver base up to the +ve rail. Same on the PNP side, with C going to the -ve rail. Drivers run class A full time.
I could not get rid of the parasitic output stage oscillation without this network (I was using MJ21193/94 and 15032/33 drivers). I asked Bob Cordell to comment and he recommended the base stoppers - which I had not fitted in my design.
My recomendation based on personal experience and advice from others:-
Design your PCB to be able to fit base stoppers in the output devices (1 stopper resistor per output device) and the RC network I mentioned above in the driver bases.
When you run your tests, you can then ommit the C's and/or trim up the stoppers. If you can, its a good idea to use SMD 1206 or 1210 resistors for the base stoppers - you can locate these very close to the output device bases on your PCB.
3.3 to 4.7 Ohms are a good first guess value for the output device base stoppers
22 to 56 for the driver stoppers (you may find you can leave out the C if you increase the driver stopper resistor value - so more towards 56 Ohms). Try to keep the drive r stoppers as low as possible consistent with reliable operation (i.e. no parastics)
On my pre-drivers I used BF471 and BF472 - but these are no longer available but AKSA has indicated in another thread that there are some good Fairchild and Sanyo devices for this function. I made place on my board for pre-driver base stoppers, but found I did not need them - I just fitted a link.
Ideally, try to avoid the use of the C I mentioned above in the driver base networks because it creates a pole in the loop respnose which has to be tamed - this was my motivation for asking Bob to comment by the way.
In my next power amp I'll b e moving to 1302/3281 - a better proposition all round.
Good luck.
I would like to see pictures, seems to me this is a simulator product
I could read, somewhere, "by ear"...maybe this is a reference of a built amplifier.
I read it fast... dinamic reading, as i could not see the amplifier product...maybe i have missed a link to the picture.
Is it in the other thread?...i found there are two threads about...one is Slone's Blameless other is beefing up.
I have not visited the one, the other threaqd, as usually people makes simulations only..... and in my beliefs, this is not the best idea.... seems waste of time to me.... because when we listen results goes against our spectations...some beautifull designs, on the paper, sounds terrible (not all them.... only some of them).
Have images...do this amplifier exists... say.. assembled, playing...do you have videos in youtube or other place showing audio? (sample).
The Slone one really needs some care.... Doctor Self original one (seems he was the first) is better.
I have assembled both.... several years ago....i found them awfull.... then, last year, i have tried once again..oscilated..... because of that i have made modifications (listening)... result the Blame.
regards,
Carlos
No, it it exists - its not vaporware. See below post #6 onwards
http://www.diyaudio.com/forums/solid-state/96192-post-your-solid-state-pics-here.html
Its fully balanced, not blameless though. If you search under 'Bonsai' in the Solid State forum you can find the original circuit - I've made some mods since then on the compensation.
http://www.diyaudio.com/forums/solid-state/96192-post-your-solid-state-pics-here.html
Its fully balanced, not blameless though. If you search under 'Bonsai' in the Solid State forum you can find the original circuit - I've made some mods since then on the compensation.
so, will read all post with care..also will see your site/page/llink.
Thank you very much and sorry to interrupt your sequence.
regards,
Carlos
Here is the said thread in DIYaudio Carlos.
Thank you for your reply Bonsai too. The above thread helped to completely clarify what you were getting at. Fortunately it will be very easy to install 1206 resistors right next to the output transistors.
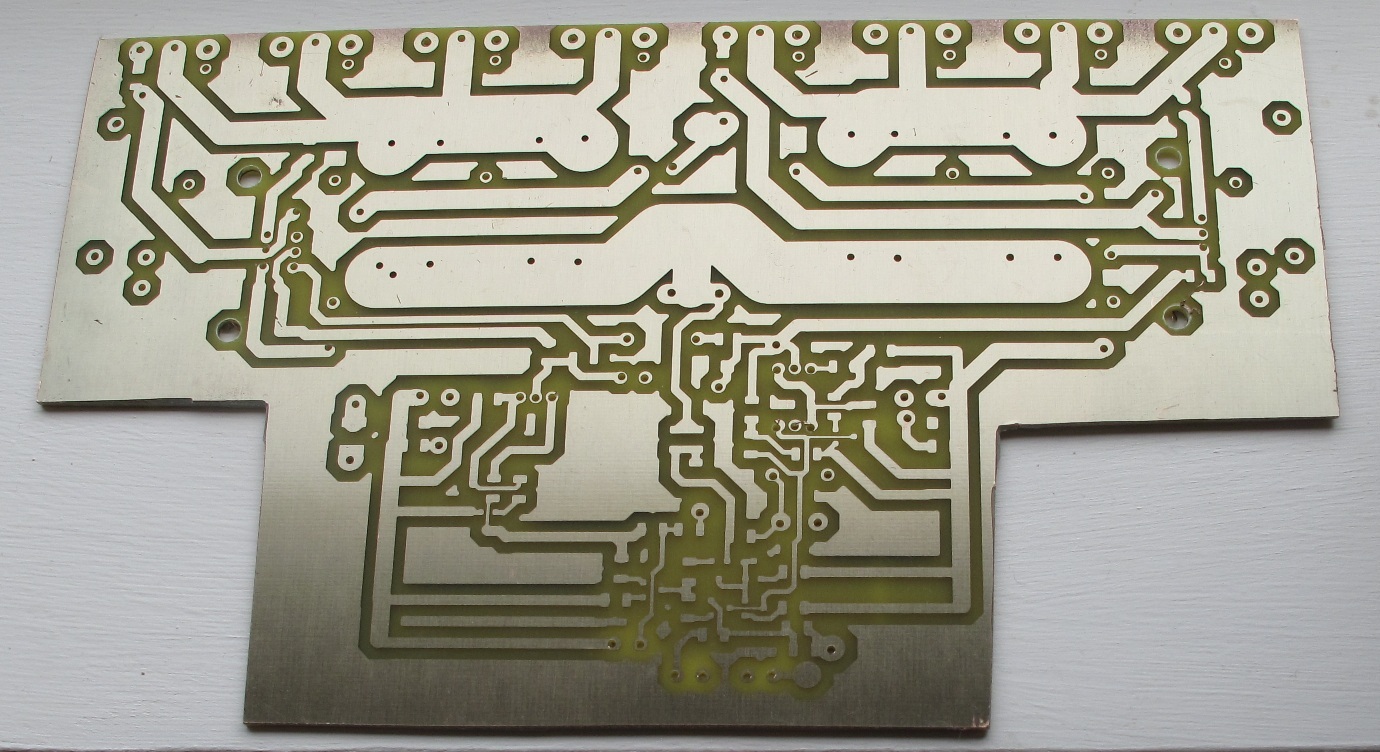
I've stuffed and soldered the thing now.

Had it up and running with 1 pair of output transistors on the low voltage bench PSU. It's a shame really that it can only give +-10volts. But it's enough to make sure everything works.
I could set the bias and it sounded decent enough when played through a lowfi pair of speakers fed with a crappy mp3 player ^^ I also loosely tested the protection circuit and that worked too.
Now to try the thing on a 42 volt supply, check it's stable then solder in the three remaining pairs of output transistors.
After that it's time for the 64 volt PSU
I was inspired by this thread to make a similar blameless amp, but with only one output pair as I only intend to use ~35V rails with a transformer I already have. I came up with this.
As I posted here some time ago, the problem with the split pole compensation was massive overshooting on square wave input. I cured that problem (at least in simulation!) by using the RC network seen here as R133/C119. C106/107 also help.
This is designed, simulated, PCB laid out but not yet built simply due to time constraints. Using those MJEs for drivers is probably not warranted, and I might look at KSC2690/KSA1220 instead.
Just noticed that since I did that schematic, I have tweaked the compensation somewhat. C119 = 22p, R133 = 15K, C103 = 100p, C104 = 220p, C106 open and C107 = 47p.
Actually I'm still tweaking it, miller caps on the predrivers might indeed be a bad idea, 100nF capacitors across R122/123 seem to do the job just as well!
Actually I'm still tweaking it, miller caps on the predrivers might indeed be a bad idea, 100nF capacitors across R122/123 seem to do the job just as well!
Just noticed that since I did that schematic, I have tweaked the compensation somewhat. C119 = 22p, R133 = 15K, C103 = 100p, C104 = 220p, C106 open and C107 = 47p.
Actually I'm still tweaking it, miller caps on the predrivers might indeed be a bad idea, 100nF capacitors across R122/123 seem to do the job just as well!
I'm having a look at the schematic and one thing I'm wondering here is the value of R133.
As far as I understood it, having the cap + resistor combo in parallel with the main feedback resistor, R126, was to provide a low impedance path for high frequencies to pass through.
In the original schematic that Slone provided, the feedback resistor = 10k and the resistor to ground = 330R.
These two obviously set the gain of the whole amplifier, but the capacitor and resistor in parallel with the main feedback resistor, mean that if oscillation should occur, the high frequency present on the output, see the 330R resistance and not the 10k and hence aren't amplified by the rest of the amplifier.
Also, the value of the feedback resistor is directly related to the noise performance of the amplifier. The bigger it is, the noisier it is. Self deliberately uses something like a 2.2k resistor in this place for that reason. Lowering the value of the feedback resistor means you lower the input impedance. Self does some funky bootstrap around the input circuit to keep a high input impedance without unbalancing the rest of the amplifier. I didn't see any real point in going to this length in the ones I'm building as they are quite, quiet enough. I'm only mentioning this incase you want to lower this a little, of course this depends on what you want to use to drive the amplifier.
I'm still working through a couple of teething problems with the one I've built here, part of that created by Farnell sending me the wrong value of resistor. You don't tend to notice the print on a 604 surface mount resistor so I missed that when putting it together. Using the 47k they sent in place of the 6.5k that should have been there meant the protection circuitry wasn't triggering as it was supposed to >.<
I havent had any problems with stability. But then I suppose I haven't put the amplifier through it's paces with a worst case scenario here, but I also don't have a square wave generator so can't test for overshoot. I do have 4.7R base stoppers on each output device and the 100R before each driver, but so far I haven't needed any caps.
Quick update.
I've been busy working through some trouble with this, but then I didn't expect everything to work first time round perfectly.
The amplifier gives roughly
185 watts into 9.4 ohms.
320 watts into 4.7 ohms.
580 watts into 2.35 ohms.
It's not built for a 1 ohm load, but those figures are quite decent enough.
The input stage requires optimisation, but is functioning decently as it is, I need to increase the tail current and faff with the degeneration.
What with the board being much larger then my other Blameless build, well at least longer, it is far more susceptible to what Self describes as induction based distortion. I have gone against what he recommends here as it's fairly impractical. He recommends having both the +ve and -ve power rails input at the same location on the board, you then presumably run them parallel for as long as is possible. This way you keep the wires entering the board highly twisted and kept close together. I don't do this, I've got the power rails entering from opposite sides of the board, what one could consider the worst place for them to be. As bad as this is it's a very practical way to layout the board.
In my case I have wires carrying the power to the boards and the position you place these in has a significant effect on the distortion profile.

This shows the bad location of the input wires. It is also an excellent example of induction based distortion as all of the other sources have been suitably dealt with. The only thing that could be better is the distortion generated by the input stage as this isn't perfect, however here the induction distortion is so bad it swamps it. This also mirrors Self's findings pretty accurately too.
One other thing to mention is that this was done late at night, the output power here has risen to 210 watts as the mains voltage is just that bit higher.
Next up is the distortion profile when the wires are located in a pretty decent place.

What an improvement And now the induced half wave sine pulses have been removed you can clearly see the sharp rise in the distortion profile. 0.005% THD @10khz @185 watts doesn't at first appear to be that bad, however this sampling frequency here was only 48khz. This cuts off the higher harmonics from the picture, as you can see the 4th harmonic is on its way up too and by the looks of things would probably intersect 10khz at around 0.01%, this isn't so nice, although no one can hear the 4th harmonic of a 10khz fundamental anyway
A 20khz 4th harmonic has a fundamental of 5khz and here that's comfortably at around 0.0007%, so even though the performance isn't as good as it could be, you couldn't hear it anyway.
Interestingly the 9.4 ohm full power test here had lower distortion then the unloaded amplifier did. Quite clearly there's some cancellation going on somewhere.
The protection circuit still needs tweaking, I'm having a small amount of trouble with it, but it's somewhat operational as it is. The circuit is a triple slope affair using an opamp as a comparator to tightly define the activation point. I had based this off of Jan Didden's excellent spread sheet and during conversations with him we decided to try using an opamp, rather then the flaky Vbe parameter of a transistor to define the activation point.
I've been busy working through some trouble with this, but then I didn't expect everything to work first time round perfectly.
The amplifier gives roughly
185 watts into 9.4 ohms.
320 watts into 4.7 ohms.
580 watts into 2.35 ohms.
It's not built for a 1 ohm load, but those figures are quite decent enough.
The input stage requires optimisation, but is functioning decently as it is, I need to increase the tail current and faff with the degeneration.
What with the board being much larger then my other Blameless build, well at least longer, it is far more susceptible to what Self describes as induction based distortion. I have gone against what he recommends here as it's fairly impractical. He recommends having both the +ve and -ve power rails input at the same location on the board, you then presumably run them parallel for as long as is possible. This way you keep the wires entering the board highly twisted and kept close together. I don't do this, I've got the power rails entering from opposite sides of the board, what one could consider the worst place for them to be. As bad as this is it's a very practical way to layout the board.
In my case I have wires carrying the power to the boards and the position you place these in has a significant effect on the distortion profile.
This shows the bad location of the input wires. It is also an excellent example of induction based distortion as all of the other sources have been suitably dealt with. The only thing that could be better is the distortion generated by the input stage as this isn't perfect, however here the induction distortion is so bad it swamps it. This also mirrors Self's findings pretty accurately too.
One other thing to mention is that this was done late at night, the output power here has risen to 210 watts as the mains voltage is just that bit higher.
Next up is the distortion profile when the wires are located in a pretty decent place.
What an improvement
And now the induced half wave sine pulses have been removed you can clearly see the sharp rise in the distortion profile. 0.005% THD @10khz @185 watts doesn't at first appear to be that bad, however this sampling frequency here was only 48khz. This cuts off the higher harmonics from the picture, as you can see the 4th harmonic is on its way up too and by the looks of things would probably intersect 10khz at around 0.01%, this isn't so nice, although no one can hear the 4th harmonic of a 10khz fundamental anywayA 20khz 4th harmonic has a fundamental of 5khz and here that's comfortably at around 0.0007%, so even though the performance isn't as good as it could be, you couldn't hear it anyway.
Interestingly the 9.4 ohm full power test here had lower distortion then the unloaded amplifier did.
Quite clearly there's some cancellation going on somewhere.The protection circuit still needs tweaking, I'm having a small amount of trouble with it, but it's somewhat operational as it is. The circuit is a triple slope affair using an opamp as a comparator to tightly define the activation point. I had based this off of Jan Didden's excellent spread sheet and during conversations with him we decided to try using an opamp, rather then the flaky Vbe parameter of a transistor to define the activation point.
Nice work. I, too, have power coming in at opposite sides of the board, though my power leads are so short, I can't imagine it causing trouble.
Pray tell, how can I get a copy of this? Have been wanting such a tool ever since reading Michael Kiwanuka's paper.
I had based this off of Jan Didden's excellent spread sheet
Pray tell, how can I get a copy of this? Have been wanting such a tool ever since reading Michael Kiwanuka's paper.
Nice work. I, too, have power coming in at opposite sides of the board, though my power leads are so short, I can't imagine it causing trouble.
Pray tell, how can I get a copy of this? Have been wanting such a tool ever since reading Michael Kiwanuka's paper.
It takes a massive leap of the imagination to find it!
One googles Jan Didden the first hit is his website and the spreadsheet is hidden away in the SOAR article
But to save you the trouble here's a direct link.
http://www.linearaudio.nl/paXdocs/paX prot calc master reworked.xls
One thing I'll mention about the power ratings I took before; these were taken 0.1dB before any clipping occurred. I know 1% is the usual benchmark that the hifimags measure too. I didn't see any point in this though, as I don't ever intend on driving the amp into clipping.
Thanks so much!
I agree: for this exercise you'd want to show how good the amp is, instead of how loud it goes. I like the graphs of THD vs power output instead (I'm not suggesting them as a replacement for your graphs); gives one an idea of when the amp starts to reach its limits.
I know 1% is the usual benchmark
I agree: for this exercise you'd want to show how good the amp is, instead of how loud it goes. I like the graphs of THD vs power output instead (I'm not suggesting them as a replacement for your graphs); gives one an idea of when the amp starts to reach its limits.
Nice set of results 5th Element!
What are you using to get your distortion plots?
I am afraid WRT layout, my rails don't run together on the PCB either and that's to do with the layout. I use a sandwich construction so the rails are on the opposite sides of the PCB. Having said that, there are no high current 0V traces on the PCB - only decoupling+signal ground and in the case of the decoupling gound, I think it should be kept well away from the supply rails so supply rail harmomics are not inductively coupled into the decouple+signal ground and then on up to the front end.
Nice set of results 5th Element!
Thanks
What are you using to get your distortion plots?
STEPS as a part of the ARTA package. I'm using an Asus Xonar Essence ST in combination with it.
I am afraid WRT layout, my rails don't run together on the PCB either and that's to do with the layout. I use a sandwich construction so the rails are on the opposite sides of the PCB. Having said that, there are no high current 0V traces on the PCB - only decoupling+signal ground and in the case of the decoupling gound, I think it should be kept well away from the supply rails so supply rail harmomics are not inductively coupled into the decouple+signal ground and then on up to the front end.[/QUOTE]
Indeed. I don't have any high current return grounds on the PCB either and my power rails are well away from the signal ground. It seems to work reasonable well doing it like this, even though I have to careful where the wires carrying the power enter the PCB. If it's too much of a problem there's always the option of using shielded power cables
- Status
- This old topic is closed. If you want to reopen this topic, contact a moderator using the "Report Post" button.
- Home
- Amplifiers
- Solid State
- Beefing up the Blameless.