Mihan said:BFNY
I'm interested to know how you printed the top side of your B1 board please?
I use the products from Pulsar. To transfer the image from laser printer to board I use their "toner transfer paper", then to seal it I use the TRF film. I use green for both sides, to seal the toner before etching, then to seal the top side after printing. here's the film description
http://www.pulsarprofx.com/pcb/a_Pages/4_Products/4b_TRF_Foils/TRF_Foils.html
You can buy this stuff at many places, including Digi-key.
The board making process I use is this
1) laser print bottom image to transfer paper
2) Use heat pressure to transfer image to copper side of board
3) use heat to seal bottom image with green TRF film
4) Touch up areas with etch resist pen
5) etch board
6) clean off toner with laquer thinner
7) Print top legend to toner transfer (check "mirror image" in print options)
8) drill 2 guide holes in board on diagonal ends (resistor pads)
9) use 2 pins in holes to align top mask print with bottom, tape in place
10) use heat to transfer top mask to board
11) use heat to seal top mask image with Green TRF film
12 ) drill board
I use a laminator bought used on Ebay to do the heat transfers, 5 passes for the toner transfer, 2-3 passes for the green TRF film.
The toner transfer paper lasts a long time if you cut it up and just use enough to make the board. This may look like a lot of work, but it goes fast once you do it a few times. I use green scotchbrite then a wash to clean/abrade both sides of the board immediately before the toner transfer. You have to do a good job there or it won't stick well.
Bob
BFNY's B1 Board
Thanks Bob for your detailed description of the process.
I was aware of a product called 'Press n' Peel' for for transferring the circuit for etching, but it hadn't occurred to me to use the technique for printing the top side.
I will try the Pulsar product next time I make a board.
Mike
Thanks Bob for your detailed description of the process.
I was aware of a product called 'Press n' Peel' for for transferring the circuit for etching, but it hadn't occurred to me to use the technique for printing the top side.
I will try the Pulsar product next time I make a board.
Mike
Re: BFNY's B1 Board
A similar, but not exactly the same approach can be used to make a board with copper on both sides. Yes, it really helps to have the mask there when stuffing, and is worth the work for me. Friends you may send boards to appreciate it too!
Mihan said:Thanks Bob for your detailed description of the process.
I was aware of a product called 'Press n' Peel' for for transferring the circuit for etching, but it hadn't occurred to me to use the technique for printing the top side.
I will try the Pulsar product next time I make a board.
Mike
A similar, but not exactly the same approach can be used to make a board with copper on both sides. Yes, it really helps to have the mask there when stuffing, and is worth the work for me. Friends you may send boards to appreciate it too!
troystg said:
As per the site...
"Already sold out. More on order. Check this space."
http://www.passdiy.com/order.htm
Just hung up with Colin @ PassDIY.
They were just getting back from CES.
He says that reason the phone has been busy last 2 weeks were phone mechanical issues.
He was super nice and polite. He took my request for a PCB and jfets and was courteous the entire time. He said the requests have been VERY strong for these boards.
Side note we discussed the SR-1's and system used @ CES.
Thanks again Mr. Pass for sharing your designs and making this possible.
")
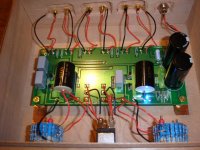
My Cigar Box B1 is completed and is powered by a 18V wallwort I bought at the local Goodwill computer store. The blue LED lights up. I have not tested it in a stereo system yet. I will report back about it when I do. This is my first completed DIY effort.
Attachments
vonfilm said:Cigar B1
Congratulations, before you know it you'll be scratching the back of your head why the thing you're assembling has a timing device.


- Home
- Amplifiers
- Pass Labs
- B1 Buffer Preamp