
Hi GuysA friend of mine ask for audiophile RPi network streamer transport solutions. I have some recommendations for him.
Just to share the options here in case somebody want to know the selections clearly.
"I recommend three fully integrated audiophile RPi network streamer transport solutions for you:
A. Low cost but still great sound quality streamer transport solution
1. TransportPi Digi (#20B)
2. UcPi (#47A)
3. Optional MonitorPi (#49A)
4. Optional acrylic cover (#51A)
B. Fully function audiophile grade RPi I2S/DSD network streamer transport
1. TransportPi MKII (#20A)
2. FifoPi MA (#1C)
3. PurePi (#48A) with optional UcConditioner 3.3V (#26A)
4. Optional MonitorPi (#49A)
5. Optional acrylic cover (#51A)
C. Flagship RPi I2S/DSD network streamer transport
1. HdmiPi Pro (#17B) or TransportPi AES
2. FifoPi Q7 (#1D)
3. StationPi SMT (#35C)
4. LinearPi 5V(#32A)
5. UcConditioner 5V (#25A)
6. LifePO4 Mini 3.3V (#42A)
7. UcConditioner 3.3V (#26A)
8. MonitorPi (#49A)
"
D. Simplified flagship RPi I2S/DSD network streamer transport
1. HdmiPi Pro (#17B) or TransportPi AES
2. FifoPi Q7 (#1D)
3. PurePi (#48A)
4. UcConditioner 3.3V (#26A)
5. MonitorPi (#49A)
I need some beginner help here. I am trying to understand what the various boards do, in simple terms. I will then have a better understanding of what I need to build a “streamer”. I have read this thread, Ian’s site and the user manuals, but just seem to go round in circles. Can anyone point me in a direction that tells me what the basics are?
I understand a Raspberry Pi (with SW) can be used (as a source) to stream music (flac) from a NAS (or internet) to a DAC board.
Is a “TransportPi” and “RecieverPi” an input board to receive a digital signal to send this to the DAC?
I think I understand what a DAC does, but where do the I/V boards fit in to the food chain?
Does the DAC send to the I/V board for output to a power amp? So one needs a DAC and I/V board?
ReClocker = FifoPi board? Nice to have, but not needed in a basic setup? Are these a timing signal for the whole system?
StationPi? A platform for mounting all these boards? Helps to reduce EMI.
PSU I understand need to power the system. All sorts of options there, and many questions there too, as what is needed and what is better
Your guys help would be much appreciated.
TransportPI (various versions of it) are the Digital outputs that will feed your Dac using Coax (RCA/AES or BNC). ReceiverPi (DDC or Pro) take digital signal in from USB or HDMI or RCA coax or Optical. Typically the ReceiverPi will be connected to FifoPi to reclock the input signal to get a cleaner signal out to TransportPi or HDMIPi Pro.Is a “TransportPi” and “RecieverPi” an input board to receive a digital signal to send this to the DAC?
The I/V board is the final output stage of the DAC. It produces the output that can then be connected to either a preamp or Amp. If you use Ian's DAC boards then you would need an I/V board. Ian has a few options on different I/V boards you can use.I think I understand what a DAC does, but where do the I/V boards fit in to the food chain?
Does the DAC send to the I/V board for output to a power amp? So one needs a DAC and I/V board?
If you use TransportPi AES or HDMI Pro then you need a FifoPi board since they work in Sync mode.ReClocker = FifoPi board? Nice to have, but not needed in a basic setup? Are these a timing signal for the whole system?
Correct and this is optional.StationPi? A platform for mounting all these boards? Helps to reduce EMI.
Currently best claimed PSU in Ian's offering is UCPure followed by LifePO4 mini if i'm not mistaken.PSU I understand need to power the system. All sorts of options there, and many questions there too, as what is needed and what is better
You can probably simplify things by buying a bundle of everything from the project page .
Looks nice, what voltage output configurations are possible in the UCPure Quad?Just finish the UcPure Quad project. It could be the best low noise high dynamic power supply on this planet so far.
Everything was integrated. Would be super easy to build.
Well done, @iancanada ! Congratulations!!Just finish the UcPure Quad project. It could be the best ultra low noise high dynamic power supply on this planet so far.
Everything was integrated. Would be super easy to build.

Ian
In order to avoid a potentially unnecessary usage of the UCPure Quad, which would -in your opinion- be the most appropriate applications? Where would the UCPure Quad make sense and where would a LinearPi + UcConditioner make more sense?
The original 3.3V and 5V used to take 9V AC, is it still the case? Or we need to provide higher AC voltage to the quad?UcPureQuad outputs 5V/3.3V, can be configurated by jumpers.
@iancanada can You please advice if there is any issue/ incompatibility (or could be) between combo: FifoPi Ma 1.5 +newest Transport Pi AES with DACs based on TDA1541? So far tested 2 of them, without positive results.In the FifoPi Ma manual i saw this. Maybe, 16 to 32 bit is enabled and needs disabling?
View attachment 1296968
View attachment 1296969
Thanks in advance
@NeoTheOne Thanks so much. Learning all the time, makes things clearer. Is there such a post where all the concept is explained, or does on pick this understanding up as one goes along?
Good suggestion to take one of Ian's projects and start from there. It does help to understand the concept and what boards do. Much appreciated for the time.
Good suggestion to take one of Ian's projects and start from there. It does help to understand the concept and what boards do. Much appreciated for the time.
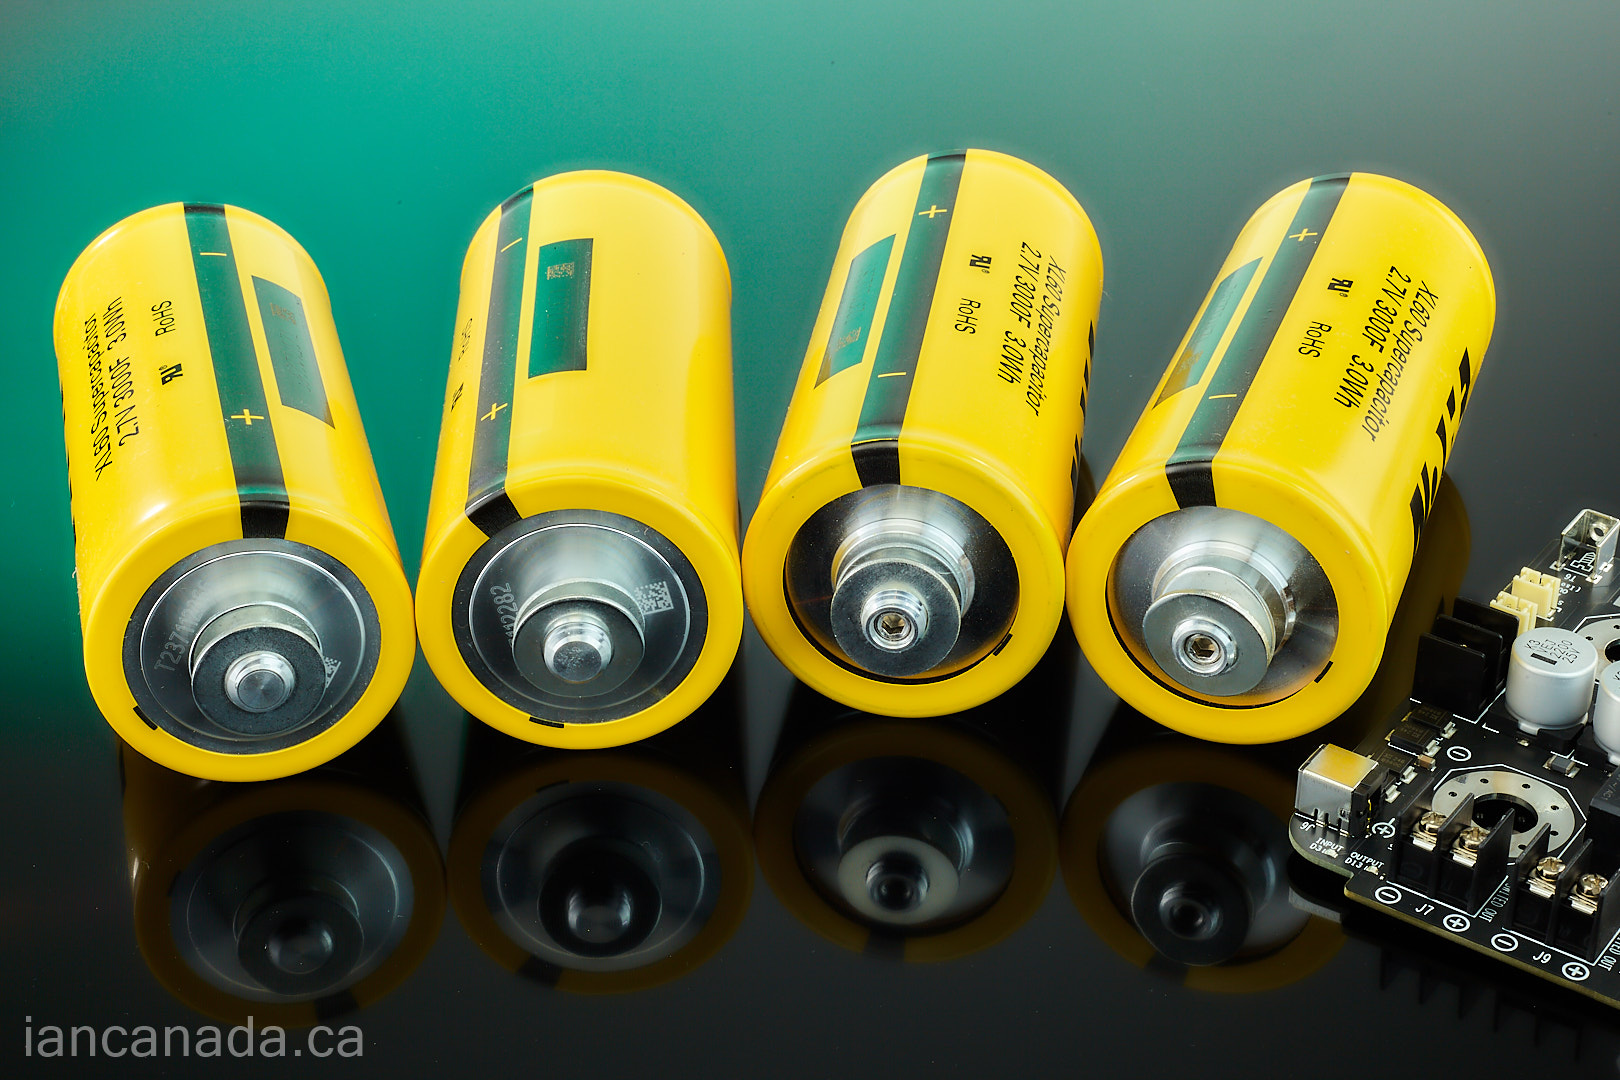
New design ideas of the UcPure Quad, compared with UcPure MkIII
1. Two 3000F ultracapacitor groups in parallel, reducing the output ESR to the next lower level which has never been reached before. Noise was also reduced by 1/sqrt(2) in principle.
2. New dual PCB architecture to completely eliminate the wires between UcPure and ultracapacitors, thus significantly improving the performance. Because the resistance of the wires can be even higher than the ultracapacitor ESR itself.
3. The pure time is double, the dynamic current is also double.
4. Balancing functions are integrated on PCB, so no longer need external balancer/protection boards.
5. Both horizontal and vertical mount brackets.
6. 5V or 3.3V, jumper configurable.
7. 5.3A or 8.1A fast charging current, jumper configurable
8. Optimized to 12V AC input
9. Double copper thickness, four layers PCB design to ensure the lowest ESR performance
10. Two groups of switched and continuous output to make it easier to share this great power supply with different circuits of the system
11. So far the best power supply for clocks and DACs to improve the sound quality.
11. Very easy to assemble, just screw and play.
12. Come with all accessories.
13. Many other improvements
Assembling steps
1. Make sure 4 UCs are fully discharged.
2. Mount each of the UCs to the UcPure Quad PCB using the two 1.5mm washers and the self-locking nut. Follow the signs of the positive and negative terminals, don't be reversed. Also need to make sure nothing touches the ultracapacitors at the back of the PCB. Don't forget the balancing cable.
3. Mount the other side of the four UCs to the back plate PCB using 1.5mm washers and the self-locking nuts. Tighten all the nuts. Connecting the balancing cable.
4. Install the 8 nut covers. That's very important for safety.
5. Make sure J14 and J15 are set for the desired voltage. Make sure S5 is set correctly for the charging current.
Using the UcPure Quad
1. Connect a AC 12V 6A/9A input to J3, 1182M12 or 1182P12 or higher power transformers are recommended
2. It takes up to an hour to charge the 4 UCs to full form fully empty at the first time
3. Turn on the power switch S1 when the full LED D8 lights up, the blue pure LED D9 and the output LED D13 will also light up. The UpPer Quad is ready for use.
[Step1]
[Step2]

[Step3]

[Step4]


Ian
1. Two 3000F ultracapacitor groups in parallel, reducing the output ESR to the next lower level which has never been reached before. Noise was also reduced by 1/sqrt(2) in principle.
2. New dual PCB architecture to completely eliminate the wires between UcPure and ultracapacitors, thus significantly improving the performance. Because the resistance of the wires can be even higher than the ultracapacitor ESR itself.
3. The pure time is double, the dynamic current is also double.
4. Balancing functions are integrated on PCB, so no longer need external balancer/protection boards.
5. Both horizontal and vertical mount brackets.
6. 5V or 3.3V, jumper configurable.
7. 5.3A or 8.1A fast charging current, jumper configurable
8. Optimized to 12V AC input
9. Double copper thickness, four layers PCB design to ensure the lowest ESR performance
10. Two groups of switched and continuous output to make it easier to share this great power supply with different circuits of the system
11. So far the best power supply for clocks and DACs to improve the sound quality.
11. Very easy to assemble, just screw and play.
12. Come with all accessories.
13. Many other improvements
Assembling steps
1. Make sure 4 UCs are fully discharged.
2. Mount each of the UCs to the UcPure Quad PCB using the two 1.5mm washers and the self-locking nut. Follow the signs of the positive and negative terminals, don't be reversed. Also need to make sure nothing touches the ultracapacitors at the back of the PCB. Don't forget the balancing cable.
3. Mount the other side of the four UCs to the back plate PCB using 1.5mm washers and the self-locking nuts. Tighten all the nuts. Connecting the balancing cable.
4. Install the 8 nut covers. That's very important for safety.
5. Make sure J14 and J15 are set for the desired voltage. Make sure S5 is set correctly for the charging current.
Using the UcPure Quad
1. Connect a AC 12V 6A/9A input to J3, 1182M12 or 1182P12 or higher power transformers are recommended
2. It takes up to an hour to charge the 4 UCs to full form fully empty at the first time
3. Turn on the power switch S1 when the full LED D8 lights up, the blue pure LED D9 and the output LED D13 will also light up. The UpPer Quad is ready for use.
[Step1]
[Step2]
[Step3]
[Step4]
Ian
- Home
- Source & Line
- Digital Line Level
- Asynchronous I2S FIFO project, an ultimate weapon to fight the jitter