@Drive Shaft
Thanks again for your info! The audio gear I am using consists of the following components I have presently in my listening system: I own a pair of mono block tube amps that put out pure class A power. I did some mods to these tube amps by changing out the coupling caps to see what I prefer. Also using Tung-Sol KT120 tubes for power, and an older Tung-Sol driver tube in combination that I like! I built another Class D amp using the IcePower 1200as2 module. I use an NAD C542 cd plyer to play my discs. I had purchased the Peachtree Audio Grand Pre DAC years ago, so that is what most of my gear is using for preamp/DAC. Speakers are a custom made floor standing 2-1/2 way design that uses the older BG Neo3-PDR tweeter with (2) M-165 mid-bass woofers.
When I want to listen to my music files on my desktop PC (windows 10 OS) I open up JRiver program that bypasses the windows kernels I believe, and that digital signal is fed into the GrandPre via the wire-world USB cable. I can chose to use ether my tube amps to my speakers, or use the Icepower amp instead.
If I use my NAD cd player to listen to cd's, I use the RCA interconnects that run to the GrandPre's line level input. I have tried listening with using a coaxial digital cable from the back of the NAD to the GrandPre coaxial input, but prefer the sound from the NAD, using RCA's over the GrandPre DAC using coaxial cable.
I haven't been around the audio world in some time now, so I was just wondering if I could bump up the sound quality a few notches? That's why I have been looking around for a DIY build that I could do to allow me to further improve my current system. I am debating also about building one of either Iancanada's components, or this NOS DAC build thread a lot of others are chiming in on. Looks like this AD1862 chip may be a good starting point, but I am really not sure.
Appears that there are quite a few builds on another thread that could be much cheaper as a starting point for me. Then perhaps when the components I'm looking for with Ian's stuff, I may jump in then when they become available. To be perfectly honest, I'd really prefer to build something that would allow me to upgrade to better stuff in the future. I'm sure that better components will come out as with most things these days. Jus a matter of time..lol
Just a note, I bought a 4.3 DSI screen that goes into the 15 pin screen connector instead of the GPIO. It works out of the box with Volumio with no special boot config.txt. I will now try with the Ian Canada streamer stack in my earlier post. I don't think there will be a conflict with the config as it doesn't use any GPIO pins. We'll see. Hopefully it doesn't cause noise - the enemy of a good stream. If / When I case it up, I can shield the screen with some copper tape or something.Note, it works with volumIO and a bare RPi3B with ian GPIO extender kit no other hats for sure. See picture. I just don't want to blow anything up but adding the audio boards. This is a 5V2.5A iFi power supply. The screen seems to say you need a 3A PS, but so far it works with just RPi3B and VolumIO and USB SSD.
excerpt from above site on pinouts below. It looks like the pinout for RGB uses some of the same pins as i2S, so i don't think they will work together.
If this is too off topic from the audio board stuff, let me know. I have built the streamer and now just want a kiosk display running and have chosen this little DPI LCD screen which goes on the 40 PIN GPIO.
Interface
- The pin of "NC" means that the touch screen does not occupy this pin, and the user can use it for other applications.
PIN NO. SYMBOL DESCRIPTION 1 NC Not connected 2 5V 5V power 3 VSYNC Vertical synchronization 4 5V 5V power 5 HSYNC Horizontal synchronization 6 GND Ground 7 B2 RGB signal lines 8 G4 RGB signal lines 9 GND Ground 10 G5 RGB signal lines 11 G7 RGB signal lines 12 PWM Backlight control (Pi4 can only turn on/off the backlight. Only the earlier versions support brightness adjustment with PWM) 13 TP_INT Interrupt pin of touch panel 14 GND Ground 15 R4 RGB signal lines 16 R5 RGB signal lines 17 NC Not connected 18 R6 RGB signal lines 19 TP_SDA The I2C SDA of touch panel 20 GND Ground 21 B7 RGB signal lines 22 R7 RGB signal lines 23 TP_SCL The I2C SCL of touch panel 24 B6 RGB signal lines 25 GND Ground 26 B5 RGB signal lines 27 LCD_CLK Clock pin of LCD panel 28 DE Data enable of LCD panel 29 B3 RGB signal lines 30 GND Ground 31 B4 RGB signal lines 32 G2 RGB signal lines 33 G3 RGB signal lines 34 GND Ground 35 NC Not connected 36 G6 RGB signal lines 37 NC Not connected 38 R2 RGB signal lines 39 GND Ground 40 R3 RGB signal lines
Curious about adding a reclocker to my system and found the fifopiMA. it says "master mode" which is not something I am familiar with. The DAC I am using is the ProtoDAC which I believe operates in I2S slave mode. Does this mean it is not compatible?
What about the ReClockPi? This jitter reducing re-clocking is all new to me.
What about the ReClockPi? This jitter reducing re-clocking is all new to me.
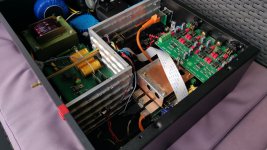
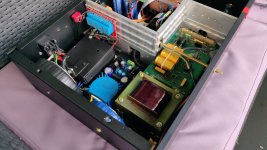
Now that I was busy with shielding, I immediately decided to separate aluminum plates as much as possible digitally from analog.
whether it helps I have no idea, tonight I'll listen in detail if it adds anything, if not then all the work is for nothing.
ian canada products certainly give a nicer sound ...... you will hear that immediately

whether it helps I have no idea, tonight I'll listen in detail if it adds anything, if not then all the work is for nothing.
ian canada products certainly give a nicer sound ...... you will hear that immediately
Attachments

@Drive Shaft
Thanks again for your info! The audio gear I am using consists of the following components I have presently in my listening system: I own a pair of mono block tube amps that put out pure class A power. I did some mods to these tube amps by changing out the coupling caps to see what I prefer. Also using Tung-Sol KT120 tubes for power, and an older Tung-Sol driver tube in combination that I like! I built another Class D amp using the IcePower 1200as2 module. I use an NAD C542 cd plyer to play my discs. I had purchased the Peachtree Audio Grand Pre DAC years ago, so that is what most of my gear is using for preamp/DAC. Speakers are a custom made floor standing 2-1/2 way design that uses the older BG Neo3-PDR tweeter with (2) M-165 mid-bass woofers.
When I want to listen to my music files on my desktop PC (windows 10 OS) I open up JRiver program that bypasses the windows kernels I believe, and that digital signal is fed into the GrandPre via the wire-world USB cable. I can chose to use ether my tube amps to my speakers, or use the Icepower amp instead.
If I use my NAD cd player to listen to cd's, I use the RCA interconnects that run to the GrandPre's line level input. I have tried listening with using a coaxial digital cable from the back of the NAD to the GrandPre coaxial input, but prefer the sound from the NAD, using RCA's over the GrandPre DAC using coaxial cable.
I haven't been around the audio world in some time now, so I was just wondering if I could bump up the sound quality a few notches? That's why I have been looking around for a DIY build that I could do to allow me to further improve my current system. I am debating also about building one of either Iancanada's components, or this NOS DAC build thread a lot of others are chiming in on. Looks like this AD1862 chip may be a good starting point, but I am really not sure.
Appears that there are quite a few builds on another thread that could be much cheaper as a starting point for me. Then perhaps when the components I'm looking for with Ian's stuff, I may jump in then when they become available. To be perfectly honest, I'd really prefer to build something that would allow me to upgrade to better stuff in the future. I'm sure that better components will come out as with most things these days. Jus a matter of time..lol
No problem. Thanks for expanding on your system. It gives me a bigger picture now of your current setup.
I'm really the worse person to comment as I'm cutting edge modern (No Mains, No Traditonal Ampfliers, High Efficiency, Optical Isolation, Isolation, <1 Ohm or milliohms range, WAV-only w/ embedded album art, realtime kernels, RAMPLAY, Max Transparency, Max Resolution, Max Transient Response, Clocks at the low frequency possible, etc.), so legacy OEM DAC chains I really shouldn't comment on at all.
With that said, I'll try to point you in a possible direction.
If you think about the NAD C542, it runs on Mains power so I recommend just a cheap Toslink cable since it provides some isolation and should be more compatible with Ian's stack (ReceiverPi DDC). Ian mentioned feeding any Toslink into a ReceiverPi is irrelevant because the Q7 will handle it's business and convert your signal with a modern Clock. So you can't go wrong feeding a ReceiverPi Toslink. If you think about the legacy clocks inside the C542, it should be a modern improvement in the signal. Ian's Stack will act like a conduit feeding it a legacy optical signal and then it converts to a modern clocked optical signal into your Peachtree.
So C542 -> Toslink -> Ian's Stack -> Peachtree PreDAC should render an modern improvement with some isolation over C542 -> Coax -> Peachtree PreDAC
This should also give you flexibility if one day your C542 goes kaput by just replacing it with another TOSLINK IN Source.
As for your PC source, I recommend opening your PC and look if you have an free PCI-E slot.
If you have a free PCI-E slot, I recommend checking out Startech's site for which PCI-E USB fits your needs best? Maybe you want USB-C + USB-A for future expandability. Just make sure it's using the ASM3142 chipset otherwise pass.
https://www.startech.com/en-us/search?search_term=pcie usb 3.0
If you find one that works for you, you can check out prices on Provantage:
https://www.provantage.com/service/searchsvcs?QUERY=startech+pcie&SUBMIT.x=0&SUBMIT.y=0
Provantage usually has the best prices on Startech cards.
From there, JRiver -> USB PCI-E -> Wire World -> Peachtree Pre DAC
For future consideration, keep a USB optical cable to pair with your Wire World down the line. But this also introduces complications on how to power the USB optical cable. For example, I can justify powering my USB optical cable with UcPure/UcBalancer because I have 3 5V outputs to share with my gear. One of these 3 outputs will power one side of the StationPi. So I can only recommend a USB optical cable one day, not now, if you eventually run UcPure/UcBalancer @5V powering the StationPi Audio side. Otherwise, it's really difficult to justify an USB optical cable without proper Off Mains Power.
A possibility is Jriver -> USB PCI-E -> Wire World -> ReceiverPi Pro, but this is an unknown for now. If you really need USB into Ian's Stack, there's a BridgePi but better to wait to see what the ReceiverPi DDC offers. Focus on your C542 then the PC side should naturally integrate.
Besides the RCA, OPT and the I2S over HDMI inputs, ReceiverPi DDC has an additional USB input which can adapt with an Amanero Combo384 or compatible USB interface.
Ian
https://www.diyaudio.com/community/...eapon-to-fight-the-jitter.192465/post-7429394
I'm asumming the Peachtree Pre DAC has a built-in DAC, so you can just use that for now and slowly expand to Ian's HAT DAC or another third-party DAC later on.
Similar to this post:
https://www.diyaudio.com/community/...eapon-to-fight-the-jitter.192465/post-7189464
Again, zero knowledge in OEM DACs but Ian's DAC is a more modern DAC than the Peachtree Pre DAC and I've always read positive feedback on Ian's HAT DAC.
So I think you can implement Ian's Stack for improvement with the C542 by giving your gear a better modern clocked signal. Then on the PC side, if possible, add a USB PCI-E card -> Peachtree Pre DAC. From there, I don't think you need to update the DAC at the same time. You can implement Ian's stack, give it proper power then later down the road add the HAT DAC or another third-party DAC once everything is stable.
If you do decide on Ian's stack, I think it's more important to invest in powering it properly from the start then getting things stable with your legacy gear then consider a HAT DAC or another third-party DAC at a later point.
Like you mentioned, Ian's stack can be the foundation for future expandability but you can try to improve on your legacy system for now.
Last edited:
Im using FiFoPiQ7 and transportAES into a Cambridge dacmagic 200m coax digital input and it works perfectly. Really sounds awesome. See my other posts.Curious about adding a reclocker to my system and found the fifopiMA. it says "master mode" which is not something I am familiar with. The DAC I am using is the ProtoDAC which I believe operates in I2S slave mode. Does this mean it is not compatible?
What about the ReClockPi? This jitter reducing re-clocking is all new to me.
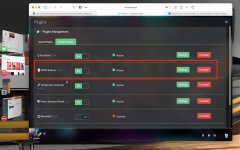
How to enable safe shutdown via Volumio. I have found a way to easily enable this in the volumIO settings. See my other posts for the streamer stack i built and the boards I am using, as my scenario is using ShieldPi pro in my stack.
Steps.
1. Add the GPIO plugins from the plugins manager.
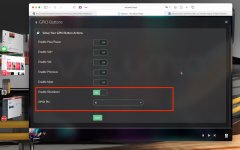
2. Select Enable Shutdown and ensure you have GPIO pin set to "4" via the dropdown. This corresponds to Ian's instructions for the ShieldPi Pro and the addition of a line to config.txt. With the plugin you don't have to edit the config.txt boot file.
3. Ignore the other options as you can use the IR remote for most of them if you have MonitorPi.
4. Now when you press the tiny button (yes it's there) on the front of ShieldPi Pro, it will safely shutdown the RPi world.
I am still working on how to make it come back on with the button. I haven't figured that part out yet.
Steps.
1. Add the GPIO plugins from the plugins manager.
2. Select Enable Shutdown and ensure you have GPIO pin set to "4" via the dropdown. This corresponds to Ian's instructions for the ShieldPi Pro and the addition of a line to config.txt. With the plugin you don't have to edit the config.txt boot file.
3. Ignore the other options as you can use the IR remote for most of them if you have MonitorPi.
4. Now when you press the tiny button (yes it's there) on the front of ShieldPi Pro, it will safely shutdown the RPi world.
I am still working on how to make it come back on with the button. I haven't figured that part out yet.
Attachments
Have a look hereHow to enable safe shutdown via Volumio. I have found a way to easily enable this in the volumIO settings. See my other posts for the streamer stack i built and the boards I am using, as my scenario is using ShieldPi pro in my stack.
Steps.
1. Add the GPIO plugins from the plugins manager.
2. Select Enable Shutdown and ensure you have GPIO pin set to "4" via the dropdown. This corresponds to Ian's instructions for the ShieldPi Pro and the addition of a line to config.txt. With the plugin you don't have to edit the config.txt boot file.
3. Ignore the other options as you can use the IR remote for most of them if you have MonitorPi.
4. Now when you press the tiny button (yes it's there) on the front of ShieldPi Pro, it will safely shutdown the RPi world.
I am still working on how to make it come back on with the button. I haven't figured that part out yet.
https://www.diyaudio.com/community/...fight-the-jitter.192465/page-460#post-7426316
Cool. I'm on RPi3B. Does that matter?Issues are solved:
1: updated my RPI 4 with latest EEPROM version. I followed steps explained here: https://dreamonward.com/2019/11/20/on-off-button/
2: The J4 and J5 are not correct labeled, both on PCB as manual. I figured this out when measuring through the shieldpi pro PCB.
I can't believe that nobody had seen or mentioned the issues numer 2 from above ???
It does. What I am trying to do is get it to turn back on when I press the button. The way I read the manuals a cable is required between shieldPi Pro and the PurePi....but I am confused as to the exact socket on each board to use for this....and also whether I need to use the switch on the PurePi (latching) vs the switch on the ShieldPi Pro (momentary)....or whether it's even possible to have one switch manage both startup and shutdown of the entire stack....and whether or not the PurePi has to alway be "on" or it actually goes completely off (no lights)
J4 on shieldpi is for pushbutton startup and safe shutdown. J5 is connection to contol other devices.
Have a look in the manual of the new Shieldpi Pro mkII, there you can find a bit more info about your question.
I was wrong in my post 9297. The RPI was not starting up again after shutdown. This was solved after the eeprom update.
Have a look in the manual of the new Shieldpi Pro mkII, there you can find a bit more info about your question.
I was wrong in my post 9297. The RPI was not starting up again after shutdown. This was solved after the eeprom update.
My advice for what it is worth - stick to what Ian has to offerYa $2 is in small quantities. Under $1 each if you buy a full reel. It’s a 2520 package.
http://www.accusilicon.com/cn/
View attachment 1206797
")
Did you know you can use MonitorPi on just a standard RPi install to see what’s going on? Yep.
Here is a MPiPro on ShieldPro on RPi3b. Running Volumio.
Here I’m playing via I2S with no i2S HAT. But you can see what MPiPro picks up. I’ve also got a DSI 4.3 screen running at same time.

Here is a MPiPro on ShieldPro on RPi3b. Running Volumio.
Here I’m playing via I2S with no i2S HAT. But you can see what MPiPro picks up. I’ve also got a DSI 4.3 screen running at same time.
Please keep us updated on your findings. I’m interested in upgrading my ucconditioner3.3 ucConditioner 2 is installed. I honestly didn't expect any sonic changes, but to my surprise, a significant amount of body and meat is added. Not that those things are lacking befire the uc Conditioner. Impressive. The UCs have very little run time, hopefully as things settle in the next couple days the improvement will be even more prounced.
I've learned alot and will continue to explore this DIY "thingie".
Thanks Ian for providing the parts to do so.
View attachment 1205789
@fusion360guyDid you know you can use MonitorPi on just a standard RPi install to see what’s going on? Yep.
Here is a MPiPro on ShieldPro on RPi3b. Running Volumio.
Here I’m playing via I2S with no i2S HAT. But you can see what MPiPro picks up. I’ve also got a DSI 4.3 screen running at same time.
Referring to your line "Here I’m playing via I2S with no i2S HAT", Could you please share more about how you are doing this and input and output connection details....
- Home
- Source & Line
- Digital Line Level
- Asynchronous I2S FIFO project, an ultimate weapon to fight the jitter