If you can’t read the emotion in it, it isn’t good enough!
Roger, I am shortly to have something published so I wanted to say that I submitted it before reading that statement (as it is a rather similar sentiment!).
")
Emotion!
Nuuk,
I am happy to see I am not alone in this! My feelings are if it doesn’t move you what is the point?
As to the other problem of system tuning, if you can think of a good answer I would certainly appreciate hearing it.
Where will you be published? I would like to read it when it is done. In fact I will even proof it for you if you like, had some experience there.
Roger
Having built a number of Amp3 kits, I'd like to offer some comments:
- the fiddly nature and small size of SMT devices is a fact of life, and I expect more kits will have them in future
- my first amp worked, even though my soldering skills are low, and I'm not great at following instructions. If I had read 41hz instructions more carefully, I'd have done a better job. The pcb was eventually damaged by my stupidity, but the build quality of the pcb was such that I was able to salvage it with minor repair
- after the 1st kit, the subequent kits are almost easy to build. They require concentration, but in some ways doing SMT forces you to be clean and careful
What's most important for me is that Jan has quietly demonstrated that he has put in careful engineering thought into the kits. The rationale behind his decisions on parts and layout seems based on experience, feedback from users and most importantly, in consultation with Tripath's technical staff. That's important for me. It's one thing that I don't have the gear to measure distortion, etc, etc, but it's critical for me that the kit designer understands class-D and has the benefit of working with the vendor's technical resources.
I'm in no position to comment on the other offerings, but my $0.02 worth is that designing a class-D kit requires a lot more understanding and care than, say, a chipamp kit.
Where will you be published? I would like to read it when it is done. In fact I will even proof it for you if you like, had some experience there.
Hi Roger, the article will be for TNT (there, now I have 'come out'
). And thanks for the proof-reading offer that I will be pleased to take-up! - the fiddly nature and small size of SMT devices is a fact of life, and I expect more kits will have them in future
I agree, and it's all the more frustrating that I cocked up the AMP-3! If I can find the time, I will have to try and find a way to practise my SMD soldering!
What's most important for me is that Jan has quietly demonstrated that he has put in careful engineering thought into the kits.
Yes, reading the site, he seems to be more than qualified/informed to make a good class-T amp! And the boards are of good quality. Haiving messed around with my Philips CD723, the 41Hz boards are almost indestructible in comparison!
I'm in no position to comment on the other offerings, but my $0.02 worth is that designing a class-D kit requires a lot more understanding and care than, say, a chipamp kit.
Are you talking other commercial class-T amps here, or 'home-brew'? I know of at least one other very good (commercial) class-T amp! And time moves on and in a few years we may well find a lot of 'home-brew' class-T amp designs on the forums (from people a lot cleverer than me, I may add).
t. said:I'm currently using one of NUUKs SMPS to power my Amp3.
I've also used 12v 7ah/20k caps and a LM338 regulated supply.
For me NUUKs SMPS was the best, its also very compact...
Nuuk and t.
Thanks for the information on the SMPS. I've been using a 12v 12AH SLA to power my Nixon DacKit and it sounds really good to my ears. I find it interesting that you find the SMPS superior to the SLA.
I've put in an order for the Monica II DAC and the Charlize T-amp from Yeo. I'll try them with the SLAs I have, first, and then try them out with the SMPS you guys mentioned.
I got the Charlize amp from Yeo because I thought it would be an easier way to get into one of the quality class-T amp kits. I also seriously considered the AMP3, but was slightly put off by soldering the SMDs. Not that I mind working with small parts, but knowing me it would be a while before I get enough of an itch to sit down and tackle it. I figure it would take me a not insignificant chunk of time to do it right.
That said, I will probably get one or two AMP3s at some point. Given that you can get 3 kits for less than the price of one Charlize I was torn, especially since no one knows, yet, how each sounds compared to the other. The price difference was kind of big for me - $55 difference between an assembled Charlize board and an unassembled AMP3, but I went for the assembled one.
Just out of curiousity, how long did it take you guys to finish the AMP3?
I have lots of conventional soldering experience, but next to no SMD soldering experience, so I'd be most interested in hearing from those with a similar background (as well as from everyone else
).BTW- even with the time and difficulty issues with soldering, I'd be more inclined to get the AMP3 with all the SMDs rather than a similar kit from 41Hz that used through hole parts. With all the talk of inductance, etc., to me it just seems more "right" for this type thing, though who knows how it affects sonics?
OK, thanks!
KT
KT said:
BTW- even with the time and difficulty issues with soldering, I'd be more inclined to get the AMP3 with all the SMDs rather than a similar kit from 41Hz that used through hole parts. With all the talk of inductance, etc., to me it just seems more "right" for this type thing, though who knows how it affects sonics?
OK, thanks!
KT
KT,
this is exaclty the question I have in mind "how it affects sonics?".
The Autoconstruire kit dont use SMD parts and it get very good review. When reading comments like this :
http://www.diyaudio.com/forums/showthread.php?postid=682978#post682978
http://www.diyaudio.com/forums/showthread.php?postid=683417#post683417
I ask myself if SMD worth the extra pain. I have no problem thinking that a well built amp3 with autoconstruire inductors would sound better then the Autoconstruire kit, but how much better
We'll have to wait Nuuk review to have an answer to our question.
Regards,
Just out of curiousity, how long did it take you guys to finish the AMP3?
Ehm, it took me one [short] evening to assemble the AMP1. It took another [loong] evening to simultaneously assemble two AMP3 kits. And I have cursed even the grand grand father of the founder of tripath.. and Jan, as well.. after having wound 8 [EIGHT] small size toroids... and I had our workshop tools, Metcal solder station with smd tweezers, all sort of soldersuckers, and magnifying glass with light.
So, my feeling is, that the AMP3 kit is not for the lighthearted. But it's a beautiful little kit, technically speaking. And works well.
On the contrary, I don't see why the AMP1 should pose any serious problems in assembling. It's easy and fast, less toroids, no stinking dead beetle to solder. And it's a more serious looking amp. How it compares, it's too soon for me to speak up.
Ciao, George
But George, did you have access to the wonderful Decibel Dungeon SMD construction jig? (Note the high-tech pre-heating)
I did but I still failed to complete the AMP-3 kit
I am now consoling myself by winding the inductors!
An externally hosted image should be here but it was not working when we last tested it.
I did but I still failed to complete the AMP-3 kit
I am now consoling myself by winding the inductors!
Nuuk, it's genial! Me, being less able, turned to the Metcal station instead...
But I think, You .. YOU Deviated from the assembly instructions!!!
You started with the chip...
He he.. imagine that, positioning that chip with all the other caps sticking around..
Wait, maybe I understood one thing: it's Really Hard to manage these tiny bits while wearing glowes made of asbestos...
Ciao, George
You started with the chip...
No George, I did all the small SMD parts first and then the chip. I had no problem getting the chip secured in place and got one side soldered nicely. But the other side.......


Wait, maybe I understood one thing: it's Really Hard to manage these tiny bits while wearing glowes made of asbestos...
You mean that you don't wear them?
No wonder that you make these kits so quickly! KT said:Just out of curiousity, how long did it take you guys to finish the AMP3?
I have lots of conventional soldering experience, but next to no SMD soldering experience, so I'd be most interested in hearing from those with a similar background (as well as from everyone else
I had the exact same experience as you before I worked on my first AMP3. In all honesty, the first try at it was fairly long and painful (took me approximately 5 hours with a large tip iron and no magnifying glass to get all parts soldered) and resulted in the death of a TA2024 chip
 but it also helped me to figure out a much better technique to solder the little parts and the chip - that and i got a finer chisel tip and conical tip for my iron . My second kit was assembled much more quickly in about 3 hours and the only things I didn't get to were winding and soldering the toroids to the board. It also had much better looking solder joints all around. I find the best way to solder SMD is to position the part on the pads, hold the part using a tweezer with your left hand, get a small dab of solder on the tip of your iron, and "tack" one side of the part to one pad. Then you can just apply enough heat to the joint on the other side, get a little solder in there to make a nice clean joint, and go back and do the other side. For the chip I went down and heated each pad and pin and applied a little solder not worrying if it flowed onto other pins. When both sides were finished like that go back and cut a section of solder braid the length of one side of the chip, hold it on the pins with tweezers, apply heat with your iron and suck all the excess solder onto the braid. You can also go back and heat each pad/pin with the iron to make sure it made a good joint. Check with a magnifying glass to make sure there aren't any solder bridges between pins... that's what caused the chip in my first amp to let out the magic smoke.
My overall advice would be to give it a try. You'd have to try pretty hard to mess up the AMP3 pcb and Jan is gracious enough to let you order replacement parts if they somehow become inoperable for whatever reason
Brian
hi guys
this is yeo from diyparadise.com posting under the moniker "donjuan". you can guess where i was heading, until i was turned on by tube curves.
letting the cat out of the bag, we just tested charlize with aircore inductors and result is promising. however, how you wind them is critical! since we don't know much, we decide to leave winding inductors to a much more qualified vendor.
once he figures out how much to skin the hide off our back, we'll do the accounting and add to the sales price of charlize. most probably we'll just offer an upgrade.
as for my unsightly speaker stand, do understand that i was in the process of moving house and had to clear one room (my store room) for another housemate. please don't tell my wife about this as she's been constantly nagging me about my place and you guys are going to make it worse for me!
once i move into my new home (estimate this weekend), i'll settle down everything and put up a much much better setup, with much prettier speaker stands. dont' worry about the testing part as i don't test anything at home right now. it's all tested at my business partners' place.
(btw, i like stuffs that sound great on those cheapo speaker stands. if it requires stands that cost 2 arms, 2 legs and a torso, that's murder!)
the drivers are corals. imho a much much better driver than it has been given credit for. i just attended a hifi show over the weekend and i feel that the humble flat 6 (among other coral drivers) can **** the pants off so many of those commercial
offerings. and these were built more than 20 years ago! so much for progress...
ta da!
donjuan
this is yeo from diyparadise.com posting under the moniker "donjuan". you can guess where i was heading, until i was turned on by tube curves.
letting the cat out of the bag, we just tested charlize with aircore inductors and result is promising. however, how you wind them is critical! since we don't know much, we decide to leave winding inductors to a much more qualified vendor.
once he figures out how much to skin the hide off our back
, we'll do the accounting and add to the sales price of charlize. most probably we'll just offer an upgrade.as for my unsightly speaker stand, do understand that i was in the process of moving house and had to clear one room (my store room) for another housemate. please don't tell my wife about this as she's been constantly nagging me about my place and you guys are going to make it worse for me!
once i move into my new home (estimate this weekend), i'll settle down everything and put up a much much better setup, with much prettier speaker stands. dont' worry about the testing part as i don't test anything at home right now. it's all tested at my business partners' place.
(btw, i like stuffs that sound great on those cheapo speaker stands. if it requires stands that cost 2 arms, 2 legs and a torso, that's murder!)
the drivers are corals. imho a much much better driver than it has been given credit for. i just attended a hifi show over the weekend and i feel that the humble flat 6 (among other coral drivers) can **** the pants off so many of those commercial
offerings. and these were built more than 20 years ago! so much for progress...
ta da!
donjuan
I have nearly completed my fourth Amp3 kit. It gets easier each time. I used a thirty watt iron, and the special holding down tool shown above, but no below board heater. Jan has good instructions for soldering on his website, and I can confirm its not difficult with care;-
1) use very fine tipped iron, (I had to sharpen mine from the original pencil point to make it small enough), and use the absolute minimum amount of solder each time. Clean iron after every joint. Use magnifier glasses and bright light, or magnifing lamp, at least 3x power. (I used the latter). Don't drink coffee or coke beforehand as these tend to make your hands shake.
2) Install all small components first, then chip, then tubular Caps and inductors
3) For SMDs. preflux both pads, if necessary heating each pad with dry iron to spread flux. (I used conventional grease type flux in a can, because I had it. Use only a very little. Flux pens may be better). Put very small drop of solder on one pad (use the thinest fluxed solder wire available. Remove excess with solder wick if necessary). Position SMD, but just not touching this pad. Heat pad to melt solder, slide smd into position, using slightly downward pressure, far enough so a good portion of second pad is showing. I use a wooden toothpick on top of component to push smd around. Molten solder will tend to pull smd to position by surface tension, and also tend to tilt it if not held down. I found using tweezers good for initial positioning, but too shaky for this final stage.
Heat second pad, (not SMD) and apply small amount of solder.
4) Chip is best done with solder paste and hot air, but conventional soldering OK, using minimum solder. Again preflux pads, and prepare two diagonally oposite corners with very small solder mounds. Preflux these mounds again. Position chip, and use a dry iron to solder each of these corners with the solder you placed on the pad, pressing down on chip. Check position of chip very carefully as after this it is not removable. (I mucked up my first kit at this point, tried to reposition it after soldering more than two legs, and pulled a pad off with solderwick because of too cool an iron). Solder each leg with minimum solder. Check carefully with strong magnifying glass to ensure no bridging.
5) the inductors are best done by threading the wire through to mid way, and winding half at a time.
It sounds difficult, but in fact it is not, and the results are well worth it. SMDs are now very common, so its useful to learn how to handle these, and the kit is cheap enough after all.
I am a complete newbie in DIY and AMP3 was the first attempt at assembling a kit.
Respect!
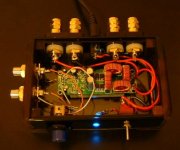
Here is a pic of my assembled amp3 in an acrylic/Ebony casing.
Forgive the mess with the wires and of course the pot is dirty cheap.
I wanted to use a good pot/stepped attenuator but there's none here and unfortunately I can't use paypal, so I haven't been able to get someone sell me one with alternative payment method.
Ikobo, credit card...
If someone wants to sell me a good pot like Noble, Alps Blue or even better Stepped Att. kit like the one on ebay by kuo kyc, that would be nice.
Attachments
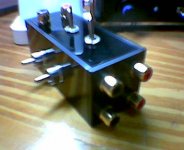
Here's also a pic of my expander that allows me to connect three source to the amp3.
Again made with acrylic, easy to work with and Ebony.
Please forgive the verrrry low resolution, pic taken by phone camera.
I originally wanted to put a pot in it, that would have made it a passive pre-amp, but again no good pot...
Again made with acrylic, easy to work with and Ebony.
Please forgive the verrrry low resolution, pic taken by phone camera.
I originally wanted to put a pot in it, that would have made it a passive pre-amp, but again no good pot...
Attachments
Nuuk said:
Respect!
I can't but agree.
I always smiled when reading people's complaints about those SMD parts being so tiny... until I got my 41Hz Amp3 kits.
Now I'm a bit scared
Will let you know how things go.
Cheers
Andrea
- Status
- This old topic is closed. If you want to reopen this topic, contact a moderator using the "Report Post" button.
- Home
- Amplifiers
- Class D
- Another T-Amp Kit