I am thinking about getting a pair of these during the pre order period for balanced/bridged configuration. My question is on some balanced outputs(the input to these amps) the low side of signal is ground and not an invert of the high side signal. So will these amps work like that?
Any answers? Is the question not understandable? I don't want to spend $634(and labor to build) if it is not going to work.
It sounds like you're looking for a bridged amp driven from basically an
RCA input signal. You might want to look at Step 46 here:
Amp Camp Amp Build Guide - diyAudio Guides
Yay ACA
I'm listening to my ACA right now. I built the monoblocks a little over 1-1/2 years ago. I missed the last release because I hesitated... Oh well. I pre-ordered a silver face with a switch this time. I can't wait to build this kit. Better PS, higher voltage on the rails, what's not to like. I looked at the build instructions (very nice!!) and the idea of a balanced set appeals to me. I'm curious to see if my 64 year old ears can hear the difference self-cancelling distortion might make. I can usually tell one DAC or amp from another, so who knows.
Thank you diyAudio (and Nelson!!) for continuing to support the community. The kits are good for people to dip their toes in the water, and really good for us guys who haven't designed or built anything for a few decades. It put a huge smile on my face when my ACA started up and ran perfectly the first time I powered them up.
Thank you diyAudio (and Nelson!!) for continuing to support the community. The kits are good for people to dip their toes in the water, and really good for us guys who haven't designed or built anything for a few decades. It put a huge smile on my face when my ACA started up and ran perfectly the first time I powered them up.
I havent built them yet. Fingers crossed, ordering parts and waiting.
Ive been a member of this site for years. ( had a previous account I no longer remember the pass and account name for... oops!) and have been a member of several forums over the years and this one stands out as something else.
There are so many good things to say about this community and this is one of them.
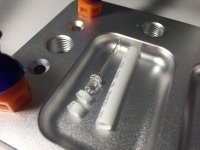
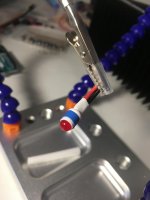
My preference, the LEDs should have standard holders. A great kit, "professional" except for lack penny worth LED holders
That's great feedback. We agree. Actually it's been a challenge to find "the right part" for this, and we've been looking at lots of different pre-fabricated options.
That said, I just tried your trick (using some heatshrink) and it worked great. I used one layer, shrunk it, then put another later over that, and shrunk that, and now the 5mm body of the LED nicely snug-press-fits into the 6mm hole and won't come out even without considerable force. I attach two examples, both need just the right about of force to go in, and to be pulled out again. You'd need heatshrink though... :/
We'll see what we can come up with something for the next batch, but sometimes it does take months to find the right part, secure it from a reliable supplier, get samples, make needed chassis or fixture changes, test a prototype to see what knock-on problems it causes, re-do photography / build guide, order it in quantity and then advertise it as part of the kit. Likely we'll include heatshrink in the next kit.
Attachments

Last edited:
Sorry, a little off topic �� Would the Pesante 2U be the complementary chassis to match the new ACA for a B1? Was thinking it would be nice to be able to stack the ACA on top and have them match.
The Pesante would be a good choice, other than the fact is only comes with steel panels which are hard to work and it's a different width (450mm). The Slimline range has aluminum options, as does the galaxy range.
The ACA V1.6 uses a Mini Dissipante 2Ux200x230 which has a 240mm x 90mm faceplate. The only other chassis which have that size faceplate is the Galaxy 2U 230x(170 / 230 / 280). That would probably be the best to stack. You'd want to get the "no bolt holes in front" option, which we don't currently offer in the diyAudio store, but this is a great reminder for me to add that as an option (added to my todo list)
") I'd say you'll be able to select that option within the week, but if you need to order it now, just email contact@diyaudiostore.com and Elena will knock up a custom order for you manually.
I'd say you'll be able to select that option within the week, but if you need to order it now, just email contact@diyaudiostore.com and Elena will knock up a custom order for you manually.Jason,
So with the new ACA chassis there is a 2U heat sink with UMS. You can also get 4U and 5U heat sinks with UMS. What about 3U heat sinks? I was thinking of building an M2 in a 3U dissipante chasis.
We actually have designed a "hybrid" 3U UMS pattern which is a franken-UMS merge of the new 2U UMS and existing 4U/5U UMS that will allow you to mount all the existing "big amp" PCBs in the store in a downsized chassis, as well as the new "small amp" 2U UMS PCBs, in an "upsized" chassis. It has a lot of holes, but it works. It's a very obvious gap we need to fill now we have 2U, 4U and 5U, but we just haven't had time to implement this yet as a product.
I know there has always been a lot of demand for a Deluxe 3U for smaller projects like the F5, and if you want to turn up the heat on a smaller project, this will let you go to town. So we're excited about getting that ready... but after getting the ACA pre-sale wrapped up, I am really going to be trying hard to get to work on upgrading diyAudio to XenForo which is years overdue.
Last edited:
Hellllllllllllllowwwww
 Hi all, I’d like to introduce myself, my name is Anthony, I’m a very long time lurker here and I finaly signed up, this is my first post. I’m a recording studio owner/builder in the midst of a multi year diy “ground up” build, everything from mics, pre’s, compressors, eq’s, amps, mixing console, monitors, and on and on and on, it’s a never ending fun fest in my diy pro audio world!
That said, I’m soon to build a pair of ProAc 100 studio monitor knock offs by Troles called Studio 101’s, I’m very interested in these Class A balanced mono block style “Amp Camp” builds designed by Nelson Pass. I’m thinking of building and using a pair as my main nearfield mix monitor amps.
I read the whole thread and I hope I didn’t miss anything?
I do have some questions for ya’ll if ya don’t mind....
1.any mention anywhere of using a linear power supply in lieu of the dc brick?
any reason (other than cost) the DC brick would be a better option than a linear supply in this application?
2. Has anyone mentioned/used audiophile grade resistors in these?
3. Is there any reason(other than size and cost)not to use poly film caps in lieu of the electrolytics in this build? There seems a ton of space in the chassis to accommodate.
4. Anyone know of any other possible component upgrades to squeeze every bit of sound potential outta these bad boys?
I know I should probably just leave well enough alone......, but yeah right!
Thanx so much for any info, happy to join ya’ll!
EDIT; I just realized there are over 400 pages here, I’ve got more reading to do
Hi all, I’d like to introduce myself, my name is Anthony, I’m a very long time lurker here and I finaly signed up, this is my first post. I’m a recording studio owner/builder in the midst of a multi year diy “ground up” build, everything from mics, pre’s, compressors, eq’s, amps, mixing console, monitors, and on and on and on, it’s a never ending fun fest in my diy pro audio world!That said, I’m soon to build a pair of ProAc 100 studio monitor knock offs by Troles called Studio 101’s, I’m very interested in these Class A balanced mono block style “Amp Camp” builds designed by Nelson Pass. I’m thinking of building and using a pair as my main nearfield mix monitor amps.
I read the whole thread and I hope I didn’t miss anything?
I do have some questions for ya’ll if ya don’t mind....
1.any mention anywhere of using a linear power supply in lieu of the dc brick?
any reason (other than cost) the DC brick would be a better option than a linear supply in this application?
2. Has anyone mentioned/used audiophile grade resistors in these?
3. Is there any reason(other than size and cost)not to use poly film caps in lieu of the electrolytics in this build? There seems a ton of space in the chassis to accommodate.
4. Anyone know of any other possible component upgrades to squeeze every bit of sound potential outta these bad boys?
I know I should probably just leave well enough alone......, but yeah right!
Thanx so much for any info, happy to join ya’ll!
EDIT; I just realized there are over 400 pages here, I’ve got more reading to do
Last edited:
1) Sure! Go ahead if you want. (The bricks are really good though...)
2) Yes, everybody that has built the kit. If you want to spend $11 a resistor on bulk film or something like that, go ahead. Don't think it's going to make a huge difference in sound quality however. Mainly it just makes your wallet lighter.
3) Again, if you are interested in that, go ahead! There is quite a bit of excess room and there are a ton of caps to try.
4) Yes. Build it as designed first and make changes one at a time so you understand what things actually do to the sound. That way you'll appreciate just how good a deal it is in it's stock form.
DeyeYguy: I'd suggest you take Jim's advice to heart. Just take a look at the list of build guides in his signature line -if there was a list of forum members who could/should speak to the efficacy of aerospace grade / boutique "audiophile approved" parts in a DIY build, I think his name would be near the top.
But if inclined to get spendy, I'd highly recommend building bone stock to start with, and changing only one part at at time to assess the merits. Not mentioned yet is cyrogenically treated heat sinks. I think I'm kidding - but maybe not?
ps; Jason, take a breather, dude - those of us who can't wait maybe don't deserve the fruit of all your efforts?
Last edited:
Derekva
Thanks, already had a look at these kits but to be honest, I'm a bit afraid of the high voltage with tubes. So, something as lean and simple as the ACA would be great. Or going passive otherwise someone says I need Gain!
Erich
That's what's great about the Aikido LV. 24VDC.
-D
1.any mention anywhere of using a linear power supply in lieu of the dc brick?
any reason (other than cost) the DC brick would be a better option than a linear supply in this application?
2. Has anyone mentioned/used audiophile grade resistors in these?
3. Is there any reason(other than size and cost)not to use poly film caps in lieu of the electrolytics in this build? There seems a ton of space in the chassis to accommodate.
4. Anyone know of any other possible component upgrades to squeeze every bit of sound potential
Hello,
Of course things can be improved but that would double or triple the cost of the part list.
I surely would try Mills wirewounds for the 4 power resistors mounted on the circuit.
Some of the other resistors could be changed too. Just find out which ones are the most important and when you feel bored just replace a few. They dont have to be like high tech resistors that cost 10$ a piece. Maybe even some old Allen bradley resistors could do. As long as you dont heat them up to much noise will not be an isue.
I think the big improvements can be made in the power supply.
Wait for Meper from Copenhagen.
greetings, Eduard
I read the whole thread and I hope I didn’t miss anything?
I do have some questions for ya’ll if ya don’t mind....
1.any mention anywhere of using a linear power supply in lieu of the dc brick?
any reason (other than cost) the DC brick would be a better option than a linear supply in this application?
2. Has anyone mentioned/used audiophile grade resistors in these?
3. Is there any reason(other than size and cost)not to use poly film caps in lieu of the electrolytics in this build? There seems a ton of space in the chassis to accommodate.
4. Anyone know of any other possible component upgrades to squeeze every bit of sound potential outta these bad boys?
Just a tip - next time you read through a (400 page) thread, keep a text document open, then you can copy and paste relevant posts and info into it for reference later. I read my documents while on the loo.
Hey, this is diy, please experiment and report back:
1) Amp Camp Amp - ACA
Take your pick: Resistors | Hifi Collective
2) Amp Camp Amp - ACA
3) Amp Camp Amp - ACA
4) Amp Camp Amp - ACA
Hi. I have an eye towards building two of the new ACA kits together in one chassis, in a dual mono configuration rather than as monoblocks, as two separate chassis won't really work in how I have my system set up, but I'd like to have the additional power afforded by using two kits to acheive 15w of output. This would be my first build, so I have a couple of questions.
1) I'd like to build it in the 3U Dissipante chassis. Is there enough room in the 300mm case or do I need the 400mm?
2) I plan on using two separate power supplies, but is it possible to make the whole operation run off one switch?
3) this one is purely aesthetic. The amp I'm replacing in my system is Yamaha CA-2010, which I sold some months back. I'm missing the glow and movement of the VU meters. I'd like to add some to this build. There is a kit available from JLM audio (JLM Audio Shop). Anyone want to weigh in on whether this is possible or whether wiring in that VU buffer pcb and meters would negatively affect the sound? I realize this would have little to no practical effect. It's totally for looks.
Thanks!
BM2352 - I'd posited the same myself, and aside from the fact that the custom Dissipante 2U chassis designed for the kit have heatsinks that are pre-machined for the output devices and PCB mounting support, there might not be sufficient dissipation for a pair of boards per side on the 300mm deep model? I'd be inclined to go for the 400mm, and in aluminum to simplify your fabrication of rear panel.
I'd imagine that'd also leave plenty of room for a single higher wattage 24V SMPS - without digging much deeper than the offerings on the PartsExpress site, something like the NES350-24 might suffice?
Others may opine that linear supplies are inherently superior, but today's switchers are pretty decent, and in many cases cost less than the mains transformer alone.
I bought a pair of PCB in Burning amp and Papa was gracious enough to give me a pair of ACA 1.1 PCBS. Can I build the balanced version with old PCB? What is the significant difference between version 1.1 and 1.6? I just need to get the clarified before I order the chassis or kit depending on the answer.
I bought a pair of PCB in Burning amp and Papa was gracious enough to give me a pair of ACA 1.1 PCBS. Can I build the balanced version with old PCB? What is the significant difference between version 1.1 and 1.6? I just need to get the clarified before I order the chassis or kit depending on the answer.
Yes. Circuits are the same. Boards are different layouts to allow mosfet mounting to the standard 2U enclosures. The bracket gets in the way when trying to mount the board to the heat sink with the 1.1 boards.
- Home
- Amplifiers
- Pass Labs
- Amp Camp Amp - ACA