it is an inrush protection, and an NF-switch. An incomming signal switch the amp on, in the first step over an 25W resistor which will bridged after about two seconds. After an definitive time without incomming signal the electronic switch the amp off.
Any information of schematics or if kit is available???
I would like to use them in my Aleph 4 (monoblocks).
Thank you very much in advance.
Trigon
")
Re: Nice Job, Did you cut the Aluminimum Plates
The easiest way to cut aluminum is with a circular saw or on a table saw. I also use band saw and after that use belt sander (2" x 36") grade 80. It really dosn't wear a lot and I'm using same belts for years. Final finish can be done with a 100 grade.
Nicely done amp,BTW
jewilson said:I've been using a bandsaw, however a lot of clean up is need after cutting. I was thinking about cleaning the up edges with a big belt sander, however aluminum will wear it out fast. Any suggestion
The easiest way to cut aluminum is with a circular saw or on a table saw. I also use band saw and after that use belt sander (2" x 36") grade 80. It really dosn't wear a lot and I'm using same belts for years. Final finish can be done with a 100 grade.
Nicely done amp,BTW

trigon said:
Any information of schematics or if kit is available???
I would like to use them in my Aleph 4 (monoblocks).
Thank you very much in advance.
Trigon
hello Trigon
I made a little sketch, which corresponds to my construction unit sizes, (trafo, Elkos...). I do not believe that you can use it.
The none, which you could use are the data of the drillings in the heatsinks and the front, back, cover and floor plates. The front plate stands somewhat over the cover.
If interest exists, I will try to sent you this sketch.
Martin
trigon said:Hi naim35
I was thinking of your schematics and posibly kits of "Inrush Protection with NF-switch" PCB, not for entire amplifier or box, only PCB of your "Inrush protection and NF-switch unit". Thank you for your answer anyway.
Trigon
Hello Trigon,
sorry I did´nt understand you.
I bought a finished equipped electronic by Thel.
http://www.thel-audioworld.de/module/nm25/nm25.htm
Martin
Peter, Cutting Aluminum
I was a little frightened to cut the aluminum on my table saw. I tried on piece, however a friend purchase cheap 200 bit tooth blade, no carbide. The sound this made while cutting was just a little unnerving. So I switched to the bandsaw which cut's the aluminum like butter but leaves a ruff edge. I have a large 96 inch belt sander for cleaning up the edges. What type of blade our you using on the table saw and are you
using a special hold down jig.
I called some machine shops around and found I could get this stuff cut with a laser, but their max thickness was 3/8". Anything thicker requires a end mill. In addition, do you use any special bit for counter sinks.
Thanks
JW
To tell the truth I never cut aluminum on a regular table saw, but I remember that Cyclotronguy was saying it is possible. I use mitre saw for short cuts and special setup for longer cuts. It consists of a table with a sliding jig above where I mount my 7 1/2 circular saw. The piece I cut is clamped to the table and a saw slides above. This is very safe setup and it works well. For my 10" mitre saw I'm using 72 teeth Freud Non ferrous Metal Blade, similar blade for my smaller saw.
I think that even a laser cut needs finishing and I wouldn't bother with shops unless they are pretty cheap. Use a band saw and then 80 grade belt. It will finish the cut edge in no time. The cuts done on circular saw need also finishing on a belt. It all depends how straifgt you can feed material on your band saw and on the amount of teeth per inch. As far as I remember 14 teeth per inch is a good number.
I think that even a laser cut needs finishing and I wouldn't bother with shops unless they are pretty cheap. Use a band saw and then 80 grade belt. It will finish the cut edge in no time. The cuts done on circular saw need also finishing on a belt. It all depends how straifgt you can feed material on your band saw and on the amount of teeth per inch. As far as I remember 14 teeth per inch is a good number.
Re: Peter, Cutting Aluminum
As a matter of fact, yes. The best are pilot countersink bits and the best place to shop for them is here: http://www.ares-server.com/Ares/Ares.asp?MerchantID=STK00006&Action=Catalog&Type=Department&ID=15
They have all sorts of usefull tools for metal as well as aluminum as well.
jewilson said:In addition, do you use any special bit for counter sinks.
Thanks
JW
As a matter of fact, yes. The best are pilot countersink bits and the best place to shop for them is here: http://www.ares-server.com/Ares/Ares.asp?MerchantID=STK00006&Action=Catalog&Type=Department&ID=15
They have all sorts of usefull tools for metal as well as aluminum as well.
Truely beautiful amp. I love the satin anodized aluminum.
I've used a bearing guided carbide chamfer bit in my 1.75HP router and made very nice chamfers. The edge must be very smooth and multiple passes are needed, but it gives a very clean and shiny finished edge.
Has anyone anodized parts diy style? I was wondering what type of pre anodizing work must be done. My salvage aluminum plate has some small surface scratches that I know will look like hell if I just anodized as is. My plan was to sand them out with a random orbial sander (about 150 grit), then sandblast and anodize. I would love to end up with a luster like Martin's masterpeices, but I fear this wouldn't be forgiving of flaws.
I may need to try a few samples with the bottom and back plate. Any comments would be welcomed.
Cyclotron guy is employed by PassLabs solely because he thinks anything is possible, and has occasionally proven his point. Don't any of you try anything he says can be done unless your insurance is paid up.Peter Daniel said:To tell the truth I never cut aluminum on a regular table saw, but I remember that Cyclotronguy was saying it is possible
Originally posted by Peter DanielI]
To tell the truth I never cut aluminum on a regular table saw, but I remember that Cyclotronguy was saying it is possible. I use mitre saw for short cuts and special setup for longer cuts. It consists of a table with a sliding jig above where I mount my 7 1/2 circular saw. The piece I cut is clamped to the table and a saw slides above. This is very safe setup and it works well. For my 10" mitre saw I'm using 72 teeth Freud Non ferrous Metal Blade, similar blade for my smaller saw.
I cut aluminum for the first time on my table saw last weekend, and I got some great results. It really helps to use some paste wax, and get the table top nice and slick first.
I used a 10" non-ferrous freud, which Peter recommended in a previous thread.
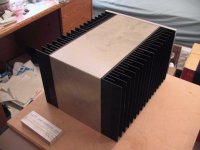
Here is my newest Aleph-X chassis (inspiration from Wayne Sankey's Aleph 2)
--
Brian
Attachments
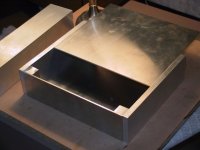
Here is my preamp chassis I also made last weekend. As for the table saw cuts with the 72 teeth non-ferrous freud blade, they are pretty good, and a quick run on a belt sander with a 60grit belt gives the edges a nice brushed finish.
I highly recommend cutting aluminum on a table saw. With the proper blade, it is just as easy as cutting wood.
However, a miter saw with the same 10" blade works better for small cuts, such as the 3/4" bar stock, as the my miter gauge on the table saw isn't quite as good.
I also made a gainclone chassis with my table saw, but haven't taken any pictures yet. It is just a small 6"x6"x6" cube...
--
Brian
Attachments
Hello Brian,
Nice job you done with your chasis, I like it.
Especially with the preamp one, It seems it will gonna be
really heavy
Do you plan to anodize them ?
Best regards,
Kristijan Kljucaric
http://web.vip.hr/pcb-design.vip
Nice job you done with your chasis, I like it.
Especially with the preamp one, It seems it will gonna be
really heavy
Do you plan to anodize them ?
Best regards,
Kristijan Kljucaric
http://web.vip.hr/pcb-design.vip
Brian Donaldson said:Truely beautiful amp. I love the satin anodized aluminum.
I've used a bearing guided carbide chamfer bit in my 1.75HP router and made very nice chamfers. The edge must be very smooth and multiple passes are needed, but it gives a very clean and shiny finished edge.
Has anyone anodized parts diy style? I was wondering what type of pre anodizing work must be done. My salvage aluminum plate has some small surface scratches that I know will look like hell if I just anodized as is. My plan was to sand them out with a random orbial sander (about 150 grit), then sandblast and anodize. I would love to end up with a luster like Martin's masterpeices, but I fear this wouldn't be forgiving of flaws.
I may need to try a few samples with the bottom and back plate. Any comments would be welcomed.
Hello Brian
the front and cover plates are glassblast , before sanding with fine sandpaper 250ér.
More interesting results, if you pre-grind with fine sandpaper. Always wet and wash out aluminum particles of the sandpaper, work in one direction .
Afterwards with sharpening felt of the company 3M, likewise wet work. This results in a fine structure and a noble appearance. Aluminum becomes effective fully. I will send a photo, because I don´t know if “sharpening felt” is the right english word for it.
Martin
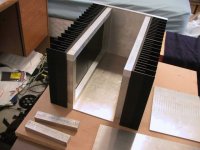
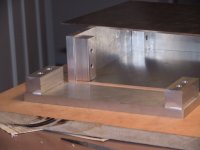
The internal construction is different the Wayne's though... I like 3/4" square stock better. I also have been able to do blind taps for the front panel, so that no screws are shown on the front panel. I am finishing up the assembly now.
How did you do that ?? I don't understand your description.
Cause i want to do sth similar but don't know how.
greetings,
garnex
kristijan-k said:Hello Brian,
Nice job you done with your chasis, I like it.
Especially with the preamp one, It seems it will gonna be
really heavy
Do you plan to anodize them ?
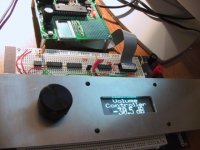
Thanks, the preamp chassis isn't too heavy. It will be my remote controlled volume control. I am just finishing up the control logic now, and I will use either a relay board, or a pga2310 digital solution for it. Here is a picture of my front panel (pcb will be made for the chips). The text is subject to be changed, I am just trying to get it looking like I like. I am working on the menu system now.
As for finishing them, I am planning on anodizing them, and I really like the finish that Martin (naim35) has on his.
--
Brian
Attachments
garnex said:How did you do that ?? I don't understand your description.
Cause i want to do sth similar but don't know how.
greetings,
How do I do what? Blind Taps? This is just implying that I drilled holes 7/16" through the 1/2" front panel/sides (for preamp case), then I threaded them with my tap, which I modified by cutting off the pointy tip, so that I could get deeper threads. Here is a picture of my preamp chassis, with the sides connected to 1" square stock. I used 1" screws and countersunk them with my drill press. I used 3/4" stock for everything else, so that I wouldn't have to countersink the screws in the square stock.
As for connecting the top, bottom and other sides, I will just make threaded holes in the square stock and screw them to it.
On the outside of the case, there are no visible screws in the 1/2" sides.
To see how Wayne Sankey put his aleph-x chassis together, see:
http://www.passdiy.com/gallery/aleph2-p1.htm
--
Brian
Attachments
- Status
- This old topic is closed. If you want to reopen this topic, contact a moderator using the "Report Post" button.
- Home
- Amplifiers
- Pass Labs
- Aleph 2